

Users Manual - English
Page 2
...WARNING - Do not use ." Special care is not working properly, if it to be used as contained in this embroidery machine only for its intended use bent needles. 13. Keep ventilation openings of burns, fire, electric shock, or injury to break. 12. Do not operate where aerosol ...are being used by or near children. 2. The wrong plate can cause the needle to persons. 1. "SAVE THESE INSTRUCTIONS" "This embroidery machine is being administered. 8. To reduce the risk of the embroidery machine and foot control free from the electrical outlet when removing covers, lubricating, or ...
...WARNING - Do not use ." Special care is not working properly, if it to be used as contained in this embroidery machine only for its intended use bent needles. 13. Keep ventilation openings of burns, fire, electric shock, or injury to break. 12. Do not operate where aerosol ...are being used by or near children. 2. The wrong plate can cause the needle to persons. 1. "SAVE THESE INSTRUCTIONS" "This embroidery machine is being administered. 8. To reduce the risk of the embroidery machine and foot control free from the electrical outlet when removing covers, lubricating, or ...
Users Manual - English
Page 4
...first follow the troubleshooting table in the card slot while your machine turns on the needle while sewing. Plug the machine directly into the wall. Benzene, thinner, and scouring powders can damage the case and machine, and should never be sure to turn off the power ... and unplug the cord when: ● Operation is an advanced computerized home embroidery machine. If the problem persists, please consult your eye on . Be sure to change for improvement without notice. 1 needle, or other moving parts. 2. Always consult the operation manual or use extension cords...
...first follow the troubleshooting table in the card slot while your machine turns on the needle while sewing. Plug the machine directly into the wall. Benzene, thinner, and scouring powders can damage the case and machine, and should never be sure to turn off the power ... and unplug the cord when: ● Operation is an advanced computerized home embroidery machine. If the problem persists, please consult your eye on . Be sure to change for improvement without notice. 1 needle, or other moving parts. 2. Always consult the operation manual or use extension cords...

Users Manual - English
Page 5
... the bobbin 15 UPPER THREADING 16 Auto needle threading device 17 PREPARATION BEFORE EMBROIDERING 18 Attaching stabilizer material 18 Embroidering different types of fabric 18 Setting the fabric in the embroidery frame 20 Fitting the embroidery frame to the machine 22 Removing the embroidery frame ...... 22... THREAD TENSION ADJUSTMENT....... 23 ADJUSTING THE LCD SCREEN CONTRAST 24 If the LCD is hard to see when the power is turned on 24 CHANGING THE NEEDLE 25 CHAPTER 2 EMBROIDERING 26 EMBROIDERY ...
... the bobbin 15 UPPER THREADING 16 Auto needle threading device 17 PREPARATION BEFORE EMBROIDERING 18 Attaching stabilizer material 18 Embroidering different types of fabric 18 Setting the fabric in the embroidery frame 20 Fitting the embroidery frame to the machine 22 Removing the embroidery frame ...... 22... THREAD TENSION ADJUSTMENT....... 23 ADJUSTING THE LCD SCREEN CONTRAST 24 If the LCD is hard to see when the power is turned on 24 CHANGING THE NEEDLE 25 CHAPTER 2 EMBROIDERING 26 EMBROIDERY ...
Users Manual - English
Page 6
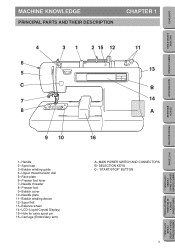
... winding device 12- LCD (Liquid Crystal Display) 15- CONTENTS MACHINE KNOWLEDGE EMBROIDERING MAINTENANCE MACHINE KNOWLEDGE PRINCIPAL PARTS AND THEIR DESCRIPTION CHAPTER 1 4 6 5 C 7 8 31 2 15 12 11 13 B 14 A ERROR MESSAGE TROUBLESHOOTING PATTERNS EMBROIDERING USING A SMALL FRAME (OPTIONAL) 9 10 1- Presser foot lever 7- Bobbin cover 10- Needle plate 11- Spool felt 13- Hole for extra spool...
... winding device 12- LCD (Liquid Crystal Display) 15- CONTENTS MACHINE KNOWLEDGE EMBROIDERING MAINTENANCE MACHINE KNOWLEDGE PRINCIPAL PARTS AND THEIR DESCRIPTION CHAPTER 1 4 6 5 C 7 8 31 2 15 12 11 13 B 14 A ERROR MESSAGE TROUBLESHOOTING PATTERNS EMBROIDERING USING A SMALL FRAME (OPTIONAL) 9 10 1- Presser foot lever 7- Bobbin cover 10- Needle plate 11- Spool felt 13- Hole for extra spool...
Users Manual - English
Page 8
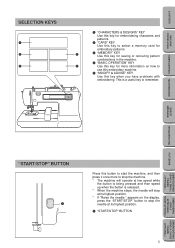
... patterns. 3 3 "MEMORY" KEY Use this key for saving or retrieving pattern combinations in the machine. 4 "BASIC OPERATION" KEY 5 Use this key for more to stop the machine. * The machine will stop the needle at its highest position. 1 "START/STOP" BUTTON 5 EMBROIDERING USING A LARGE FRAME (OPTIONAL) ...This is released. * When the machine stops, the needle will operate at low speed while the button is...
... patterns. 3 3 "MEMORY" KEY Use this key for saving or retrieving pattern combinations in the machine. 4 "BASIC OPERATION" KEY 5 Use this key for more to stop the machine. * The machine will stop the needle at its highest position. 1 "START/STOP" BUTTON 5 EMBROIDERING USING A LARGE FRAME (OPTIONAL) ...This is released. * When the machine stops, the needle will operate at low speed while the button is...

Users Manual - English
Page 9
Parts Name 1 Cleaning brush 2 Needle set itself and then turn it 's storage position. An alternate method to return the embroidery arm to turn the machine off and then turn off the machine. A cover might not be provieded in some countries, the No. 14 machine cover is still attached, touch "CHARACTERS ...-001 ***** 130013-003 130012-003 XA3728-001 X58739-003 X59351-001 130920-051 127610-000 XA0181-051 * When placing the machine cover on the machine while the embroidery frame is supplied as metallic thread. *** If using special threads which wind quickly off the thread spool, ...
Parts Name 1 Cleaning brush 2 Needle set itself and then turn it 's storage position. An alternate method to return the embroidery arm to turn the machine off and then turn off the machine. A cover might not be provieded in some countries, the No. 14 machine cover is still attached, touch "CHARACTERS ...-001 ***** 130013-003 130012-003 XA3728-001 X58739-003 X59351-001 130920-051 127610-000 XA0181-051 * When placing the machine cover on the machine while the embroidery frame is supplied as metallic thread. *** If using special threads which wind quickly off the thread spool, ...

Users Manual - English
Page 13
Press "BASIC OPERATION". 2. Touch "WINDING BOBBIN". Press "MODIFY & ADVISE". 2. CONTENTS MACHINE KNOWLEDGE EMBROIDERING MAINTENANCE ERROR MESSAGE TROUBLESHOOTING Example: To find out the combination of fabric, needle and thread 1. The operation procedure for winding a bobbin will be displayed. 1 "BASIC OPERATION" key Example: To find out how to wind a bobbin 1. Touch "FABRIC AND THREAD AND NEEDLE". 2 "MODIFY & ADVISE" key 10 PATTERNS EMBROIDERING USING A SMALL FRAME (OPTIONAL) EMBROIDERING USING A EXTRA-SMALL FRAME (OPTIONAL) EMBROIDERING USING A LARGE FRAME (OPTIONAL)
Press "BASIC OPERATION". 2. Touch "WINDING BOBBIN". Press "MODIFY & ADVISE". 2. CONTENTS MACHINE KNOWLEDGE EMBROIDERING MAINTENANCE ERROR MESSAGE TROUBLESHOOTING Example: To find out the combination of fabric, needle and thread 1. The operation procedure for winding a bobbin will be displayed. 1 "BASIC OPERATION" key Example: To find out how to wind a bobbin 1. Touch "FABRIC AND THREAD AND NEEDLE". 2 "MODIFY & ADVISE" key 10 PATTERNS EMBROIDERING USING A SMALL FRAME (OPTIONAL) EMBROIDERING USING A EXTRA-SMALL FRAME (OPTIONAL) EMBROIDERING USING A LARGE FRAME (OPTIONAL)
Users Manual - English
Page 18
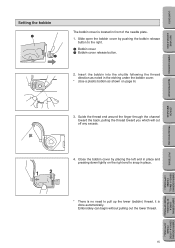
...2. Close the bobbin cover by pushing the bobbin release button to pull up the lower (bobbin) thread, it is located in front of the needle plate. 1. Guide the thread end around the finger through the channel toward the back, pulling the thread toward you which will cut off any... excess. CONTENTS MACHINE KNOWLEDGE Setting the bobbin 1 2 The bobbin cover is done automatically. Slide open the bobbin cover by placing the left end in place and pressing...
...2. Close the bobbin cover by pushing the bobbin release button to pull up the lower (bobbin) thread, it is located in front of the needle plate. 1. Guide the thread end around the finger through the channel toward the back, pulling the thread toward you which will cut off any... excess. CONTENTS MACHINE KNOWLEDGE Setting the bobbin 1 2 The bobbin cover is done automatically. Slide open the bobbin cover by placing the left end in place and pressing...
Users Manual - English
Page 19
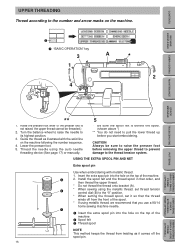
..., the upper thread cannot be sure to raise the presser foot before you use a 90/14 home sewing machine needle. 1 Insert the extra spool pin into the hole on the machine following the number sequence. 4. Lower the presser foot. 5. CAUTION Always be threaded.) 2. Insert the extra...thread tension control dial (B) to the thread tension system. Turn the balance wheel to raise the needle to the number and arrow marks on the top of the machine. 2. CONTENTS MACHINE KNOWLEDGE UPPER THREADING Thread according to its highest position. 3. Raise the presser foot lever (If the...
..., the upper thread cannot be sure to raise the presser foot before you use a 90/14 home sewing machine needle. 1 Insert the extra spool pin into the hole on the machine following the number sequence. 4. Lower the presser foot. 5. CAUTION Always be threaded.) 2. Insert the extra...thread tension control dial (B) to the thread tension system. Turn the balance wheel to raise the needle to the number and arrow marks on the top of the machine. 2. CONTENTS MACHINE KNOWLEDGE UPPER THREADING Thread according to its highest position. 3. Raise the presser foot lever (If the...

Users Manual - English
Page 20
... route the thread under the metal guides and the hook. 5. Release the thread from the needle threader lever. 7. CONTENTS MACHINE KNOWLEDGE EMBROIDERING MAINTENANCE 1 4 2 3 4 Auto needle threading device 6 Net If using special threads which wind quickly off the thread spool, attach a net to the spool before using. * Cut... the net to match the size of the machine. 17 Lower the presser foot. 3. Push the needle threader lever toward the rear of the spool. 1 Net 2 Thread spool 3 Spool pin 4 Spool cap 1.
... route the thread under the metal guides and the hook. 5. Release the thread from the needle threader lever. 7. CONTENTS MACHINE KNOWLEDGE EMBROIDERING MAINTENANCE 1 4 2 3 4 Auto needle threading device 6 Net If using special threads which wind quickly off the thread spool, attach a net to the spool before using. * Cut... the net to match the size of the machine. 17 Lower the presser foot. 3. Push the needle threader lever toward the rear of the spool. 1 Net 2 Thread spool 3 Spool pin 4 Spool cap 1.
Users Manual - English
Page 28
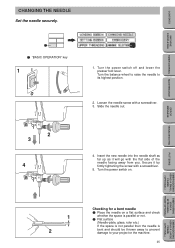
CONTENTS MACHINE KNOWLEDGE EMBROIDERING MAINTENANCE CHANGING THE NEEDLE Set the needle securely. 1 1 "BASIC OPERATION" key 1 1. Insert the new needle into the needle shaft as far up as it by firmly tightening the screw with a screwdriver. 5. ERROR MESSAGE TROUBLESHOOTING PATTERNS EMBROIDERING USING A...then the needle is bent and should be thrown away to prevent damage to its highest position. 2. Turn the balance wheel to raise the needle to your project or the machine. 25 Slide the needle out. 2 3 4 4. Loosen the needle screw with the flat side of the needle facing away...
CONTENTS MACHINE KNOWLEDGE EMBROIDERING MAINTENANCE CHANGING THE NEEDLE Set the needle securely. 1 1 "BASIC OPERATION" key 1 1. Insert the new needle into the needle shaft as far up as it by firmly tightening the screw with a screwdriver. 5. ERROR MESSAGE TROUBLESHOOTING PATTERNS EMBROIDERING USING A...then the needle is bent and should be thrown away to prevent damage to its highest position. 2. Turn the balance wheel to raise the needle to your project or the machine. 25 Slide the needle out. 2 3 4 4. Loosen the needle screw with the flat side of the needle facing away...
Users Manual - English
Page 31
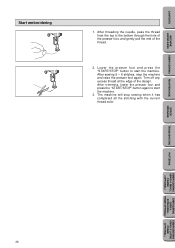
Trim off any excess thread at the edge of the thread. 2. The machine will stop the machine and raise the presser foot again. After threading the needle, pass the thread from the top to the bottom through the hole of the presser foot, and gently pull the end of the design. After ...trimming, lower the presser foot and press the "START/STOP" button again to start the machine. 3. Lower the presser foot and...
Trim off any excess thread at the edge of the thread. 2. The machine will stop the machine and raise the presser foot again. After threading the needle, pass the thread from the top to the bottom through the hole of the presser foot, and gently pull the end of the design. After ...trimming, lower the presser foot and press the "START/STOP" button again to start the machine. 3. Lower the presser foot and...
Users Manual - English
Page 32
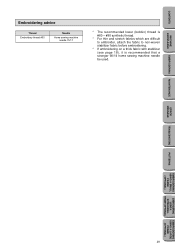
... Embroidering advice Thread Embroidery thread #50 Needle Home sewing machine needle 75/11 * The recommended lower (bobbin) thread is #60 - #90 synthetic thread. * For thin and stretch fabrics which are difficult to...woven stabilizer fabric before embroidering. * If embroidering on a thick fabric with stabilizer (see page 18), it is recommended that a stronger 90/14 home sewing machine needle be used. EMBROIDERING MAINTENANCE ERROR MESSAGE TROUBLESHOOTING PATTERNS EMBROIDERING USING A SMALL FRAME (OPTIONAL) EMBROIDERING USING A EXTRA-SMALL FRAME (OPTIONAL) EMBROIDERING USING A LARGE ...
... Embroidering advice Thread Embroidery thread #50 Needle Home sewing machine needle 75/11 * The recommended lower (bobbin) thread is #60 - #90 synthetic thread. * For thin and stretch fabrics which are difficult to...woven stabilizer fabric before embroidering. * If embroidering on a thick fabric with stabilizer (see page 18), it is recommended that a stronger 90/14 home sewing machine needle be used. EMBROIDERING MAINTENANCE ERROR MESSAGE TROUBLESHOOTING PATTERNS EMBROIDERING USING A SMALL FRAME (OPTIONAL) EMBROIDERING USING A EXTRA-SMALL FRAME (OPTIONAL) EMBROIDERING USING A LARGE ...
Users Manual - English
Page 46
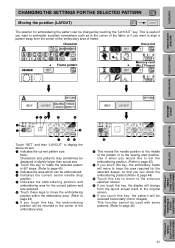
... 3 Indicates the area which can be returned to the center of frame. This function cannot be reversed horizontally (mirror imaged). CONTENTS MACHINE KNOWLEDGE CHANGING THE SETTINGS FOR THE SELECTED PATTERN Moving the position (LAYOUT) The position for the selected design, so that you can ...key, the embroidery frame will move to trace the area required for embroidering the pattern can be embroidered. 4 Indicates the current center needle drop position. 5 Indicates the embroidering position and embroidering area for the current pattern and size selected. 6 Touch these keys to ...
... 3 Indicates the area which can be returned to the center of frame. This function cannot be reversed horizontally (mirror imaged). CONTENTS MACHINE KNOWLEDGE CHANGING THE SETTINGS FOR THE SELECTED PATTERN Moving the position (LAYOUT) The position for the selected design, so that you can ...key, the embroidery frame will move to trace the area required for embroidering the pattern can be embroidered. 4 Indicates the current center needle drop position. 5 Indicates the embroidering position and embroidering area for the current pattern and size selected. 6 Touch these keys to ...
Users Manual - English
Page 47
...area display can be used for the currently selected pattern and size. * Do not lower the needle. Use the hole of the presser foot as a guide, and never lower the needle while it is touched, the embroidery frame will trace the embroidery area to the upper right corner... Touch the "????" CONTENTS MACHINE KNOWLEDGE EMBROIDERING MAINTENANCE ERROR MESSAGE TROUBLESHOOTING Changing the embroidery position Touch the arrow key...
...area display can be used for the currently selected pattern and size. * Do not lower the needle. Use the hole of the presser foot as a guide, and never lower the needle while it is touched, the embroidery frame will trace the embroidery area to the upper right corner... Touch the "????" CONTENTS MACHINE KNOWLEDGE EMBROIDERING MAINTENANCE ERROR MESSAGE TROUBLESHOOTING Changing the embroidery position Touch the arrow key...
Users Manual - English
Page 48
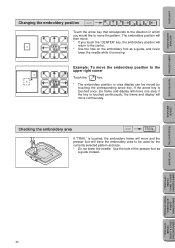
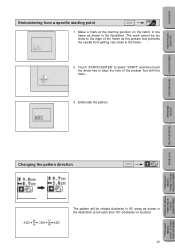
CONTENTS MACHINE KNOWLEDGE EMBROIDERING MAINTENANCE Embroidering from getting very close to the frame. 2. Touch "START/CENTER" to select "START" and then touch the arrow key to align the hole of the frame as the presser foot prevents the needle from a specific starting position on the fabric in the frame as shown in the...
CONTENTS MACHINE KNOWLEDGE EMBROIDERING MAINTENANCE Embroidering from getting very close to the frame. 2. Touch "START/CENTER" to select "START" and then touch the arrow key to align the hole of the frame as the presser foot prevents the needle from a specific starting position on the fabric in the frame as shown in the...
Users Manual - English
Page 53
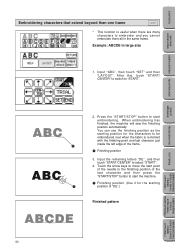
...OPTIONAL) EMBROIDERING USING A LARGE FRAME (OPTIONAL) When embroidering has finished, the machine will sew the finishing position automatically. After this, touch "START/ CENTER" to switch to select "START". 4. CONTENTS MACHINE KNOWLEDGE EMBROIDERING MAINTENANCE ERROR MESSAGE TROUBLESHOOTING Embroidering characters that extend beyond than one ...LAYOUT". Touch the arrow keys to move the start point of the needle to the finishing position of the last character and then press the "START/STOP" button to start the machine. 1 Finishing position (Use it for the characters to be embroidered ...
...OPTIONAL) EMBROIDERING USING A LARGE FRAME (OPTIONAL) When embroidering has finished, the machine will sew the finishing position automatically. After this, touch "START/ CENTER" to switch to select "START". 4. CONTENTS MACHINE KNOWLEDGE EMBROIDERING MAINTENANCE ERROR MESSAGE TROUBLESHOOTING Embroidering characters that extend beyond than one ...LAYOUT". Touch the arrow keys to move the start point of the needle to the finishing position of the last character and then press the "START/STOP" button to start the machine. 1 Finishing position (Use it for the characters to be embroidered ...
Users Manual - English
Page 54
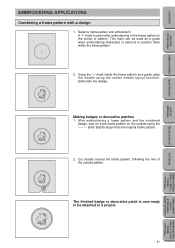
...finished badge or decorative patch is sewn after embroidering of the frame pattern in the center of the outside using the center needle layout function. A "+" mark is now ready to position them within the frame pattern. 2. Using the "+" mark inside... as a guide when embroidering characters or patterns to be used as a guide, align the needle using the "- - -" stitch slightly larger than the original frame pattern. 2. CONTENTS MACHINE KNOWLEDGE EMBROIDERING MAINTENANCE ERROR MESSAGE TROUBLESHOOTING EMBROIDERING APPLICATIONS Combining a frame pattern with a design 1. After...
...finished badge or decorative patch is sewn after embroidering of the frame pattern in the center of the outside using the center needle layout function. A "+" mark is now ready to position them within the frame pattern. 2. Using the "+" mark inside... as a guide when embroidering characters or patterns to be used as a guide, align the needle using the "- - -" stitch slightly larger than the original frame pattern. 2. CONTENTS MACHINE KNOWLEDGE EMBROIDERING MAINTENANCE ERROR MESSAGE TROUBLESHOOTING EMBROIDERING APPLICATIONS Combining a frame pattern with a design 1. After...
Users Manual - English
Page 61
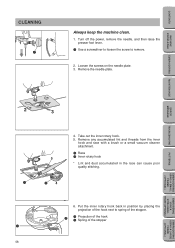
Take out the inner rotary hook. 5. CONTENTS MACHINE KNOWLEDGE CLEANING Always keep the machine clean. 1. Turn off the power, remove the needle, and then raise the presser foot lever. 1 Use a screwdriver to loosen the screw to spring of the stopper. 1 Projection of the hook 2 Spring of the ...
Take out the inner rotary hook. 5. CONTENTS MACHINE KNOWLEDGE CLEANING Always keep the machine clean. 1. Turn off the power, remove the needle, and then raise the presser foot lever. 1 Use a screwdriver to loosen the screw to spring of the stopper. 1 Projection of the hook 2 Spring of the ...
Users Manual - English
Page 62
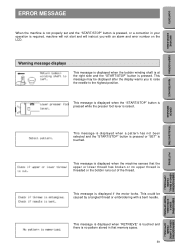
...stored in your operation is required, machine will not start and will instruct you to raise the needle to the highest position. This could be displayed after the display warns you with a bent needle. CONTENTS MACHINE KNOWLEDGE EMBROIDERING MAINTENANCE ERROR MESSAGE TROUBLESHOOTING... ERROR MESSAGE When the machine is not properly set and the "START/STOP" button is pressed, or a correction in that ...
...stored in your operation is required, machine will not start and will instruct you to raise the needle to the highest position. This could be displayed after the display warns you with a bent needle. CONTENTS MACHINE KNOWLEDGE EMBROIDERING MAINTENANCE ERROR MESSAGE TROUBLESHOOTING... ERROR MESSAGE When the machine is not properly set and the "START/STOP" button is pressed, or a correction in that ...


