
Users Manual - English
Page 4
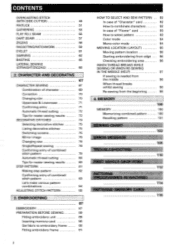
...WHEN THREAD BREAKS WHILE SEWING OR WHEN RE-SEWING IN THE MIDDLE (HELP) 97 If sewing is needed from the middle 98 When thread breaks whilst sewing 98 Re-sewing from the beginning 99 4. EMBROIDERING 87 EMBROIDERY 87 PREPARATION BEFORE SEWING 89 Fitting embroidery unit 89 Inserting memory...85 3. MEMORY MEMORY Memorizing combined pattern Recalling pattern 100 100 100 101 SEWING CHART 1 102 ERROR MESSAGE I 105 TROUBLESHOOTING 110 FIRST NEEDLE DROP POINT 112 PATTERNS (PROGRAMMED IN MACHINE) 114 PATTERNS (MEMORY CARD) 116 2 CONTENTS OVERCASTING STITCH (WITH SIDE-...
...WHEN THREAD BREAKS WHILE SEWING OR WHEN RE-SEWING IN THE MIDDLE (HELP) 97 If sewing is needed from the middle 98 When thread breaks whilst sewing 98 Re-sewing from the beginning 99 4. EMBROIDERING 87 EMBROIDERY 87 PREPARATION BEFORE SEWING 89 Fitting embroidery unit 89 Inserting memory...85 3. MEMORY MEMORY Memorizing combined pattern Recalling pattern 100 100 100 101 SEWING CHART 1 102 ERROR MESSAGE I 105 TROUBLESHOOTING 110 FIRST NEEDLE DROP POINT 112 PATTERNS (PROGRAMMED IN MACHINE) 114 PATTERNS (MEMORY CARD) 116 2 CONTENTS OVERCASTING STITCH (WITH SIDE-...
Users Manual - English
Page 26
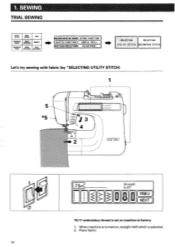
... SEWING STITCH STITCH APPLICATION ADJUSTMENT (PREPARATION BEFORE SEWING)( EXTRA FUNCTION ) ( SWITCH FUNCTION)( USEFUL SKILL ) TTERN SELECTION)( ADJUSTMENT SELECTING SELECTING UTILITY STITCH DECORATIUE STITCH Let's try sewing with fabric (by "SELECTING UTILITY STITCH) 1 kk 0 24 3 IC 2 J i I rima I (Straight (Le ft) PREU ) F( NEXT 75/11 embroidery thread is set on , straight (left) stitch is turned on machine...
... SEWING STITCH STITCH APPLICATION ADJUSTMENT (PREPARATION BEFORE SEWING)( EXTRA FUNCTION ) ( SWITCH FUNCTION)( USEFUL SKILL ) TTERN SELECTION)( ADJUSTMENT SELECTING SELECTING UTILITY STITCH DECORATIUE STITCH Let's try sewing with fabric (by "SELECTING UTILITY STITCH) 1 kk 0 24 3 IC 2 J i I rima I (Straight (Le ft) PREU ) F( NEXT 75/11 embroidery thread is set on , straight (left) stitch is turned on machine...

Users Manual - English
Page 89
... touch connector of presser foot "Q" on needle holder and attach the foot by designated case. (6) Do not carry machine whilst embroidery attachment is set - O 2. EMBROIDERING EMBROIDERY UTILITY STITCH BASIC SEWING CARO CHARACTER BASIC SEWING OPERATION MEMORY DECORATIVE SEWING STITCH STITCH APPLICATION ADJUSTMENT (PREPARATION BEFORE SUING) EXTRA FUNCTION ( SWITCH FUNCTION)( USEFUL SKILL PATTERN SELECTION ( ADJUSTMENT ( STEP LAYOUT...
... touch connector of presser foot "Q" on needle holder and attach the foot by designated case. (6) Do not carry machine whilst embroidery attachment is set - O 2. EMBROIDERING EMBROIDERY UTILITY STITCH BASIC SEWING CARO CHARACTER BASIC SEWING OPERATION MEMORY DECORATIVE SEWING STITCH STITCH APPLICATION ADJUSTMENT (PREPARATION BEFORE SUING) EXTRA FUNCTION ( SWITCH FUNCTION)( USEFUL SKILL PATTERN SELECTION ( ADJUSTMENT ( STEP LAYOUT...

Users Manual - English
Page 91
... the unit slowly. Hold thread end lightly. Insert connector of embroidery unit into the slot. * Do not carry the sewing machine with screw driver. Remove cover of the embroidery unit securely into slot and ensure connection. 9. Lower presser foot, sew 5 - 6 stitches, stop the machine once. Embroidery unit cannot be sure to turn offpower supply before the procedure...
... the unit slowly. Hold thread end lightly. Insert connector of embroidery unit into the slot. * Do not carry the sewing machine with screw driver. Remove cover of the embroidery unit securely into slot and ensure connection. 9. Lower presser foot, sew 5 - 6 stitches, stop the machine once. Embroidery unit cannot be sure to turn offpower supply before the procedure...
Users Manual - English
Page 101
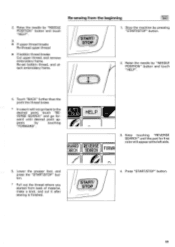
...ap- Stop the machine by "NEEDLE POSITION" button and touch "HELP". 4. ward until the part for - Lower the presser foot, and press the "START/STOP" button. * Pull out the thread where you started from the beginning (REVERSE) SEARCH 2. START/ STOP 4. Re-sewing from back of .../STOP" button. 2. Raise the needle by touching "FORWARD". Re-set bobbin thread, and attach embroidery frame. (START/ STOP 1. Touch "BACK" further than the point the thread broke. * In case it after sewing is finished. Press "START/STOP" button. 99 pears by "NEEDLE PnSMnN" button and much ...
...ap- Stop the machine by "NEEDLE POSITION" button and touch "HELP". 4. ward until the part for - Lower the presser foot, and press the "START/STOP" button. * Pull out the thread where you started from the beginning (REVERSE) SEARCH 2. START/ STOP 4. Re-sewing from back of .../STOP" button. 2. Raise the needle by touching "FORWARD". Re-set bobbin thread, and attach embroidery frame. (START/ STOP 1. Touch "BACK" further than the point the thread broke. * In case it after sewing is finished. Press "START/STOP" button. 99 pears by "NEEDLE PnSMnN" button and much ...
Users Manual - English
Page 103
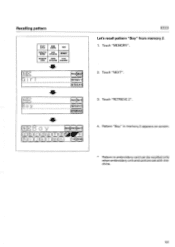
Touch "RETRIEVE 2". 4. N B Qy PREU NEXT MEMORY2) 0ETPIEUE2 4 N Boy CHECk PREU NEXT ra-.)l (c)(d:(_)(T)0?;il LAI ECCIEDE :n. Touch "MEMORY". 2. Touch "NEXT". El5111:1 3. Pattern "Boy" in memory 2 appears on screen. * Pattern in embroidery card can be recalled only when embroidery unit and card are set with machine. 101 Recalling pattern UTILITY STITCH BASIC SEWING CARD CHARACTER BASIC SEWING OPERATION MEMORY DECORATIVE SEWING STITCH STITCH APPLICATION ADJUSTMENT 4P N Gi r l PREU NEXT MEMORY1) RERIE0E1 RETRIEVE Let's recall pattern "Boy" from memory 2. 1.
Touch "RETRIEVE 2". 4. N B Qy PREU NEXT MEMORY2) 0ETPIEUE2 4 N Boy CHECk PREU NEXT ra-.)l (c)(d:(_)(T)0?;il LAI ECCIEDE :n. Touch "MEMORY". 2. Touch "NEXT". El5111:1 3. Pattern "Boy" in memory 2 appears on screen. * Pattern in embroidery card can be recalled only when embroidery unit and card are set with machine. 101 Recalling pattern UTILITY STITCH BASIC SEWING CARD CHARACTER BASIC SEWING OPERATION MEMORY DECORATIVE SEWING STITCH STITCH APPLICATION ADJUSTMENT 4P N Gi r l PREU NEXT MEMORY1) RERIE0E1 RETRIEVE Let's recall pattern "Boy" from memory 2. 1.
Users Manual - English
Page 108
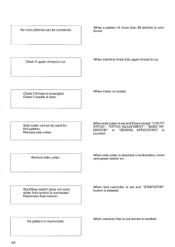
... is set and 5 keys except "UTILITY STITCH", "STITCH ADJUSTMENT", "BASIC OPERATION" or "SEWING APPLICATION" is touched. Start/Stop switch does not work when foot control is entangled. Check if needle is attached in embroidery, move and power switch on. When machine finds that is not stored is recalled. Side cutter cannot be combined...
... is set and 5 keys except "UTILITY STITCH", "STITCH ADJUSTMENT", "BASIC OPERATION" or "SEWING APPLICATION" is touched. Start/Stop switch does not work when foot control is entangled. Check if needle is attached in embroidery, move and power switch on. When machine finds that is not stored is recalled. Side cutter cannot be combined...

Users Manual - English
Page 109
...to store patterns that is touched in embroidery mode. When Multiple color key is exceeding sewing area. This button does not work when embroidery attachment is connected. This button does not work when needle is stored in embroidery mode with needle position down to ... in memory page. When recalling pattern that cannot be saved in embroidery mode. This pattern cannot be combined. When "UTILITY STITCH", "CHARACTER SEWING", "DECORATIVE STITCH" or "BASIC SEWING" is not stored in machine or in embroidery mode. When "ENFORCEMENT STITCH" button is pressed in card by ...
...to store patterns that is touched in embroidery mode. When Multiple color key is exceeding sewing area. This button does not work when embroidery attachment is connected. This button does not work when needle is stored in embroidery mode with needle position down to ... in memory page. When recalling pattern that cannot be saved in embroidery mode. This pattern cannot be combined. When "UTILITY STITCH", "CHARACTER SEWING", "DECORATIVE STITCH" or "BASIC SEWING" is not stored in machine or in embroidery mode. When "ENFORCEMENT STITCH" button is pressed in card by ...

Users Manual - English
Page 113
... is pulled too much. 4. Turn off position. 1. Accordingly, the machine does not start 5. Fabric is not inserted. 3. Lower the presser foot. 4. Memory card is not fed properly. 2. Mechanical trouble Symptom 1. Sew without threading upper thread. Main power switch is not correct. 3. Connect embroidery unit properly to proper needle. 4. The combination of fabric, thread...
... is pulled too much. 4. Turn off position. 1. Accordingly, the machine does not start 5. Fabric is not inserted. 3. Lower the presser foot. 4. Memory card is not fed properly. 2. Mechanical trouble Symptom 1. Sew without threading upper thread. Main power switch is not correct. 3. Connect embroidery unit properly to proper needle. 4. The combination of fabric, thread...


