

Users Manual - English
Page 2
...this sewing machine from the electrical outlet immediately after using ." Do not allow to be followed, including the following. Never operate this manual. Do not operate where aerosol (spray) products are being adminis- Keep fingers away from the electrical outlet when removing covers, lubricating,... use as described in the needle area, such as contained in the instruction manual. Do not use outdoors. 7. Switch the sewing machine to break. 14. Always unplug before cleaning. 2. Use this manual. 3. Never operate the sewing machine with same type rated 15 watts. To...
...this sewing machine from the electrical outlet immediately after using ." Do not allow to be followed, including the following. Never operate this manual. Do not operate where aerosol (spray) products are being adminis- Keep fingers away from the electrical outlet when removing covers, lubricating,... use as described in the needle area, such as contained in the instruction manual. Do not use outdoors. 7. Switch the sewing machine to break. 14. Always unplug before cleaning. 2. Use this manual. 3. Never operate the sewing machine with same type rated 15 watts. To...
Users Manual - English
Page 3
... In the event a malfunction occurs or adjustment is Sewing curve 30 required, first follow the troubleshooting table in the back of the operation manual to clean Stitch selection 26 the case. Remember to turn off the power switch and unplug the cord when: • Operation is the... most advanced computerized home use sewing machine. Always consult the operation manual when replacing or installing any THREAD TENSION 16 other parts to keep your eye on the foot controller. Sewing edge 31 just the machine...
... In the event a malfunction occurs or adjustment is Sewing curve 30 required, first follow the troubleshooting table in the back of the operation manual to clean Stitch selection 26 the case. Remember to turn off the power switch and unplug the cord when: • Operation is the... most advanced computerized home use sewing machine. Always consult the operation manual when replacing or installing any THREAD TENSION 16 other parts to keep your eye on the foot controller. Sewing edge 31 just the machine...

Users Manual - English
Page 17
Quick adjustment reference chart for stitch width and stitch length STITCH Straight (Left) Straight (Middle) Zigzag WV Overcasting AA. AAA Buttonhole =, CD Applique Faggoting Patchwork Elastic zigzag Stretch stitching Blind stitch Bar tacking M LEE %'toAt,% A ,i v V : E E2 a C AIV W \ / "V --. \ 'AveAAAAAAA Scallop ENE N Darning Basting Lateral sewing (Straight) Lateral sewing (Zigzag) - - - -
Quick adjustment reference chart for stitch width and stitch length STITCH Straight (Left) Straight (Middle) Zigzag WV Overcasting AA. AAA Buttonhole =, CD Applique Faggoting Patchwork Elastic zigzag Stretch stitching Blind stitch Bar tacking M LEE %'toAt,% A ,i v V : E E2 a C AIV W \ / "V --. \ 'AveAAAAAAA Scallop ENE N Darning Basting Lateral sewing (Straight) Lateral sewing (Zigzag) - - - -

Users Manual - English
Page 18
... TENSION UTILITY STITCH BASIC SEWING CARD CHARACTER BASIC SEWING OPERATION MEMORY DECORATIVE SEWING STITCH STITCH APPLICATION ADJUSTMENT Use this procedure when changing upper thread tension manually. "S" (Strong) O Every touch tightens upper thread tension. Touch "STITCH ADJUSTMENT". r J VVVVVV Zigzag Stitching STITCH WIDTH f7,71 4.." .' .1 STITCH LENGTH 1THREAD I. ) TENSION C 0.0 rnmEl 2.5 nimEI 000008110000LIL) 2. Change...
... TENSION UTILITY STITCH BASIC SEWING CARD CHARACTER BASIC SEWING OPERATION MEMORY DECORATIVE SEWING STITCH STITCH APPLICATION ADJUSTMENT Use this procedure when changing upper thread tension manually. "S" (Strong) O Every touch tightens upper thread tension. Touch "STITCH ADJUSTMENT". r J VVVVVV Zigzag Stitching STITCH WIDTH f7,71 4.." .' .1 STITCH LENGTH 1THREAD I. ) TENSION C 0.0 rnmEl 2.5 nimEI 000008110000LIL) 2. Change...
Users Manual - English
Page 37
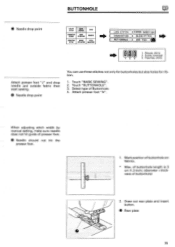
When adjusting stitch width by manual setting, make sure needle does not hit guide of Buttonhole. 4. Draw out rear plate and insert button. 0 Rear plate 35 Touch "BUTTONHOLE". 3. Touch "BASIC SEWING". 2. ...
When adjusting stitch width by manual setting, make sure needle does not hit guide of Buttonhole. 4. Draw out rear plate and insert button. 0 Rear plate 35 Touch "BUTTONHOLE". 3. Touch "BASIC SEWING". 2. ...

Users Manual - English
Page 82
... stitch pattern Touch "SCISSORS" before sewing. Tips for neater sewing results Refer to page 72 "Tips for these stitches. * Enforce stitch at end of sewing manually and then cut at the first stitching point of sewing and needle is auto-
... stitch pattern Touch "SCISSORS" before sewing. Tips for neater sewing results Refer to page 72 "Tips for these stitches. * Enforce stitch at end of sewing manually and then cut at the first stitching point of sewing and needle is auto-


