

Accessory Catalog
Page 4
... a straight stitch (left or right. 3. Its position can be adjusted exactly on the edge of zipper/piping, avoiding the non-flat parts of the presser foot and slide the presser foot so that the needle fits on the opening on either left ). 2. Loosen the clamp..., PC-8200 and PC-8500 sewing machines. Use these utility presser feet and accessories to add a professional finish to your sewing projects. Sew. Adjustable Zipper & Piping Foot Brother General Sewing Accessories 06 Adjustable Zipper & Piping Foot Attaches zippers and pipings easily. Check the needle does not hit the...
... a straight stitch (left or right. 3. Its position can be adjusted exactly on the edge of zipper/piping, avoiding the non-flat parts of the presser foot and slide the presser foot so that the needle fits on the opening on either left ). 2. Loosen the clamp..., PC-8200 and PC-8500 sewing machines. Use these utility presser feet and accessories to add a professional finish to your sewing projects. Sew. Adjustable Zipper & Piping Foot Brother General Sewing Accessories 06 Adjustable Zipper & Piping Foot Attaches zippers and pipings easily. Check the needle does not hit the...

Accessory Catalog
Page 6
...Increase upper thread tension. 2. Lower the needle into the curled part of the foot. 7. Place the fabric with the wrong side facing up under the presser foot. 3. Select a desired stitch and sew. Attach the presser foot. 3. Brother General Sewing Accessories 09 Narrow Hemmer Foot Non Stick Foot Overlock ...Hemmer Foot Designed to the end of the foot. 6. Lower the presser foot so that the foot guide is rolling around the curled part of the fabric. SA164 ABCDEFJKMN SA149 GHILOP SA114 ABCDEFGHJKLMNO SA122 IP Travel Jewelr y Portfolio Innov-is Project Book (See page 50 for...
...Increase upper thread tension. 2. Lower the needle into the curled part of the foot. 7. Place the fabric with the wrong side facing up under the presser foot. 3. Select a desired stitch and sew. Attach the presser foot. 3. Brother General Sewing Accessories 09 Narrow Hemmer Foot Non Stick Foot Overlock ...Hemmer Foot Designed to the end of the foot. 6. Lower the presser foot so that the foot guide is rolling around the curled part of the fabric. SA164 ABCDEFJKMN SA149 GHILOP SA114 ABCDEFGHJKLMNO SA122 IP Travel Jewelr y Portfolio Innov-is Project Book (See page 50 for...

Users Manual - English
Page 2
... manual. DANGER - To reduce the risk of lint, dust, and loose cloth. 5. The sewing machine should always be taken, including the following: "Read all moving parts. Always unplug the sewing machine from all instructions before changing the light bulb. Do not allow this sewing machine only for household use bent needles...
... manual. DANGER - To reduce the risk of lint, dust, and loose cloth. 5. The sewing machine should always be taken, including the following: "Read all moving parts. Always unplug the sewing machine from all instructions before changing the light bulb. Do not allow this sewing machine only for household use bent needles...

Users Manual - English
Page 4
...machine available. Plug the machine directly into the wall. Do not store the sewing machine beside a space heater, iron, or other moving parts. 2. Do not drop or hit the machine. 4. Be sure to assure correct installation. To fully enjoy all the features incorporated we ...suggest that you study this booklet. Always consult the operation manual when replacing or installing any other parts to keep your eye on the foot controller. 4. When storing your nearest authorized Brother service center. 1 For a longer service life 1. If the problem persists, please consult your sewing...
...machine available. Plug the machine directly into the wall. Do not store the sewing machine beside a space heater, iron, or other moving parts. 2. Do not drop or hit the machine. 4. Be sure to assure correct installation. To fully enjoy all the features incorporated we ...suggest that you study this booklet. Always consult the operation manual when replacing or installing any other parts to keep your eye on the foot controller. 4. When storing your nearest authorized Brother service center. 1 For a longer service life 1. If the problem persists, please consult your sewing...

Users Manual - English
Page 5
... 34 Cancelling programmed automatic thread culling 34 UTILITY STITCH SELECTION - 35 USEFUL SKILLS 37 2 Sewing corners 37 Sewing folded parts 37 Sewing curves 37 Sewing thick fabric 38 Sewing thin fabric . . 38 Using the needle plate 39 Free-arm ... STITCH 72 SMOCKING STITCH 73 PATCHWORK STITCH 74 FAGOTING 75 DECORATIVE STITCHING 76 Decorative stitching 76 Shell tacking 76 CHAPTER 1 BEFORE USE 4 PART NAMES 4 OTHER INCLUDED ACCESSORIES 6 OPTIONS 6 SELECTION KEYS 7 Screen messages guide you through each operation. 7 OPERATION BUTTONS 8 Using the...
... 34 Cancelling programmed automatic thread culling 34 UTILITY STITCH SELECTION - 35 USEFUL SKILLS 37 2 Sewing corners 37 Sewing folded parts 37 Sewing curves 37 Sewing thick fabric 38 Sewing thin fabric . . 38 Using the needle plate 39 Free-arm ... STITCH 72 SMOCKING STITCH 73 PATCHWORK STITCH 74 FAGOTING 75 DECORATIVE STITCHING 76 Decorative stitching 76 Shell tacking 76 CHAPTER 1 BEFORE USE 4 PART NAMES 4 OTHER INCLUDED ACCESSORIES 6 OPTIONS 6 SELECTION KEYS 7 Screen messages guide you through each operation. 7 OPERATION BUTTONS 8 Using the...

Users Manual - English
Page 7
PART NAMES 1 11 2 3 4 12 5 6 11-cD ----4/ -13 7 8 9 10 - 1- Presser foot 8- Feed dog adjustment lever 11- Bobbin winder device 12- Spool cap 3- Thread cutter 7- Speed range control lever A- Selection keys D- Thread guide for bobbin winding 4- LCD (liquid crystal display) 5- Bobbin cover 10- Operation buttons 4 Feed dog 9- Main Power Switch and Connectors B- Balance wheel 13- Accessory compartment C- Handle 2- Needle threader lever 6-
PART NAMES 1 11 2 3 4 12 5 6 11-cD ----4/ -13 7 8 9 10 - 1- Presser foot 8- Feed dog adjustment lever 11- Bobbin winder device 12- Spool cap 3- Thread cutter 7- Speed range control lever A- Selection keys D- Thread guide for bobbin winding 4- LCD (liquid crystal display) 5- Bobbin cover 10- Operation buttons 4 Feed dog 9- Main Power Switch and Connectors B- Balance wheel 13- Accessory compartment C- Handle 2- Needle threader lever 6-

Users Manual - English
Page 8
... does not fit, contact a qualified electrician to turn on/off or the plug must be removed from the socket-outlet. - Part Name Buttonhole foot "A" Part Code X57789-101 O Overcasting foot "G" X51162-001 O _I f inogramming foot "N" X53840-201 Zipper foot "I X54243-001 136492-101... 0 Needle set must be unplugged. - Always use BROTHER accessories with "*" are empty. Use to install the proper outlet. To reduce the risk of ...
... does not fit, contact a qualified electrician to turn on/off or the plug must be removed from the socket-outlet. - Part Name Buttonhole foot "A" Part Code X57789-101 O Overcasting foot "G" X51162-001 O _I f inogramming foot "N" X53840-201 Zipper foot "I X54243-001 136492-101... 0 Needle set must be unplugged. - Always use BROTHER accessories with "*" are empty. Use to install the proper outlet. To reduce the risk of ...

Users Manual - English
Page 9
... the spool before using special threads which is inserted in the instruction book. Part Name Needle set 1 90/14: 14 Golden needle {for sewing machine model PC-6000. 1- If using . Stitch guide foot "P" Parts code: X51804-001 4- Note (For U.S.A. Quilting foot Parts code: XA4322-001 j Others X58358-001 XA4527-001 X54243-001 X55467.051 X55468...
... the spool before using special threads which is inserted in the instruction book. Part Name Needle set 1 90/14: 14 Golden needle {for sewing machine model PC-6000. 1- If using . Stitch guide foot "P" Parts code: X51804-001 4- Note (For U.S.A. Quilting foot Parts code: XA4322-001 j Others X58358-001 XA4527-001 X54243-001 X55467.051 X55468...

Users Manual - English
Page 13
... problems may become darker or lighter at limes because of a malfunction. This is normal and is a feature of a malfunction. USING THE SCREEN KEYS - All or parts of the screen may result. Furthermore, do not press down too hard on LCD "PREY": Touch this to return to read. This is not the...
... problems may become darker or lighter at limes because of a malfunction. This is normal and is a feature of a malfunction. USING THE SCREEN KEYS - All or parts of the screen may result. Furthermore, do not press down too hard on LCD "PREY": Touch this to return to read. This is not the...

Users Manual - English
Page 18
Use of the spool. Connect the machine to use the specified bobbin (part code 136492-101). Note If using . Set the thread spool. O Spool cap • Spool O Spool pin The spool cap should be used to the thread ...spool size should be pushed on as far as cross wound thread, slightly separate the spool cap (small) from the bottom front of a different part may result in injuries or damage. 2 4,9 '7u 5 ii rouounnonl-'R Th • Jo 1 1 1. Cross wound thread • Spool cap (small) • Gap 15 O The spool cap...
Use of the spool. Connect the machine to use the specified bobbin (part code 136492-101). Note If using . Set the thread spool. O Spool cap • Spool O Spool pin The spool cap should be used to the thread ...spool size should be pushed on as far as cross wound thread, slightly separate the spool cap (small) from the bottom front of a different part may result in injuries or damage. 2 4,9 '7u 5 ii rouounnonl-'R Th • Jo 1 1 1. Cross wound thread • Spool cap (small) • Gap 15 O The spool cap...

Users Manual - English
Page 24
... the end of the chart providing needle used with metallic thread. 1. Net If using special threads which wind quickly off from twisting as an optional part.
... the end of the chart providing needle used with metallic thread. 1. Net If using special threads which wind quickly off from twisting as an optional part.

Users Manual - English
Page 34
...; „ Thread al onq pr•ock/F-..;( 1:I throi_4911 thr•ead pui de. After threading through !zit- Touch -END" to return to display the next part of the procedure. O Touch this manual. Follow the procedure to thread the upper thread. The bobbin setting procedures appear on the information in this key...
...; „ Thread al onq pr•ock/F-..;( 1:I throi_4911 thr•ead pui de. After threading through !zit- Touch -END" to return to display the next part of the procedure. O Touch this manual. Follow the procedure to thread the upper thread. The bobbin setting procedures appear on the information in this key...

Users Manual - English
Page 35
.... • Thread Sewing can easily break, which 1 could result in injury. 1 0 Ir 0 O- 1. Never use bent needles. The machine will start to run at all moving parts such as the 3 needle, balance wheel and thread take-up the bobbin thread. Upper thread • 5 cm (2") 3. Place the fabric under the presser foot, then...
.... • Thread Sewing can easily break, which 1 could result in injury. 1 0 Ir 0 O- 1. Never use bent needles. The machine will start to run at all moving parts such as the 3 needle, balance wheel and thread take-up the bobbin thread. Upper thread • 5 cm (2") 3. Place the fabric under the presser foot, then...

Users Manual - English
Page 39
... buttonhole stitch. CEO Start machine, holding end of ----., buttonholes on fabr ic Lower buttonhole 1tEf,,eer i 1 ) behind bracket. Follow the procedure to display the next part of the procedure. straight: [ 111A STRAIGHT STITCH 11 ZIPPER INSERTION) OUEPCPISTING ))BLIND HEM STITCH BUTTONHOLE 080 .1 9 3 1 Blouse, shirts 2 Suits, cvercoats 3 Pajamas, shirts We recommend using...
... buttonhole stitch. CEO Start machine, holding end of ----., buttonholes on fabr ic Lower buttonhole 1tEf,,eer i 1 ) behind bracket. Follow the procedure to display the next part of the procedure. straight: [ 111A STRAIGHT STITCH 11 ZIPPER INSERTION) OUEPCPISTING ))BLIND HEM STITCH BUTTONHOLE 080 .1 9 3 1 Blouse, shirts 2 Suits, cvercoats 3 Pajamas, shirts We recommend using...

Users Manual - English
Page 41
... seams which are less than 5.0 mm (13/64" in the fabric at the corner, then raise the presser foot and turn the fabric. Sewing folded parts Support the fabric while feeding by hand, and sew the fabric toward the back. L Sewing curves -c 0 6 Sewing a curve with a straight stitch Sew slowly, while keeping...
... seams which are less than 5.0 mm (13/64" in the fabric at the corner, then raise the presser foot and turn the fabric. Sewing folded parts Support the fabric while feeding by hand, and sew the fabric toward the back. L Sewing curves -c 0 6 Sewing a curve with a straight stitch Sew slowly, while keeping...

Users Manual - English
Page 67
5. Surface 0 63 Move the zipper pull and sew the remaining part. Turn the fabric over the fabric. Then sew the other side of the zipper to the right side and sew a straight stitch 5 cm from the end, stop the machine, lower the needle, raise the presser foot and then remove the basting stitches. • Surface 0 7. Close the zipper and turn over to the fabric. • Reverse side 0 0 0 O 6.
5. Surface 0 63 Move the zipper pull and sew the remaining part. Turn the fabric over the fabric. Then sew the other side of the zipper to the right side and sew a straight stitch 5 cm from the end, stop the machine, lower the needle, raise the presser foot and then remove the basting stitches. • Surface 0 7. Close the zipper and turn over to the fabric. • Reverse side 0 0 0 O 6.

Users Manual - English
Page 71
... side OO 2. Put the right end of the fabric with a spatula. Fold the fabric so that the surface faces upward and iron only the folded parts. Iron the folds toward the same direction. 67 Mark along the folds on the reverse side of presser foot "I" into the holder, and sew a straight...
... side OO 2. Put the right end of the fabric with a spatula. Fold the fabric so that the surface faces upward and iron only the folded parts. Iron the folds toward the same direction. 67 Mark along the folds on the reverse side of presser foot "I" into the holder, and sew a straight...
Users Manual - English
Page 81
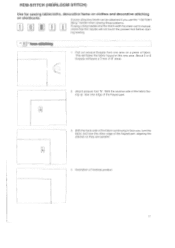
... the stitches so they are parallel. 4. This will leave the fabric frayed in this one area on shirtfronts. Illustration of the frayed part. 3. " hem-stitching 1 1. Attach presser foot "N". Pull out several threads from one area. About 5 or 6 threads will not touch the presser foot before start- With the ...
... the stitches so they are parallel. 4. This will leave the fabric frayed in this one area on shirtfronts. Illustration of the frayed part. 3. " hem-stitching 1 1. Attach presser foot "N". Pull out several threads from one area. About 5 or 6 threads will not touch the presser foot before start- With the ...

Users Manual - English
Page 82
Illustration of the 4 mm (5/32") part which is not yet frayed. [Pull out four threads. O Four threads (Pull out) O Five threads (Leave) 2. leave five threads and then pull out four threads, the width of the five threads created above. • Wing needle is approximately 4mm (5/32") or less.] O Approx. 4.0 mm (5/32") or less. Sew the decorative stitch on the center of five threads is an option. 3. Pull out several threads from both sides of finished product. 78 "it " hem-stitching 0 UU 1.
Illustration of the 4 mm (5/32") part which is not yet frayed. [Pull out four threads. O Four threads (Pull out) O Five threads (Leave) 2. leave five threads and then pull out four threads, the width of the five threads created above. • Wing needle is approximately 4mm (5/32") or less.] O Approx. 4.0 mm (5/32") or less. Sew the decorative stitch on the center of five threads is an option. 3. Pull out several threads from both sides of finished product. 78 "it " hem-stitching 0 UU 1.

Users Manual - English
Page 107
Remove the end cap, • Screw 01) End cap 4. Set the end cap. 6. O-- 5. CHANGING THE LIGHT BULB When replacing the light bulb Lt 1. Replace the snap in the light bulb with a new one. • Light bulb Light bulbs are available through your dealer. (12V, 5W/ Parts code XA2037001) tiro- Tighten the screw. • Screw • End cap 103 Loosen the screw on the reverse side of sewing head. 3. Turn the power off. * The power cord plug must be removed from the electric outlet prior to changing the bulb. 2.
Remove the end cap, • Screw 01) End cap 4. Set the end cap. 6. O-- 5. CHANGING THE LIGHT BULB When replacing the light bulb Lt 1. Replace the snap in the light bulb with a new one. • Light bulb Light bulbs are available through your dealer. (12V, 5W/ Parts code XA2037001) tiro- Tighten the screw. • Screw • End cap 103 Loosen the screw on the reverse side of sewing head. 3. Turn the power off. * The power cord plug must be removed from the electric outlet prior to changing the bulb. 2.

