

Users Manual - English
Page 3
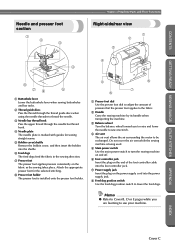
... Open the upper cover to place the spool of thread on the spool pin. 6 Bobbin winder Use the bobbin winder when winding the bobbin. 7 Operation panel Select a stitch from those that appear in the accessory compartment of the machine parts. Before using the sewing machine, carefully read these descriptions to start the sewing machine and automatically cut them.
... Open the upper cover to place the spool of thread on the spool pin. 6 Bobbin winder Use the bobbin winder when winding the bobbin. 7 Operation panel Select a stitch from those that appear in the accessory compartment of the machine parts. Before using the sewing machine, carefully read these descriptions to start the sewing machine and automatically cut them.
Users Manual - English
Page 4
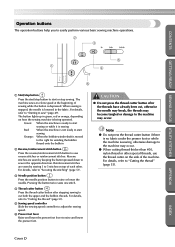
...foot for sewing straight seams. 5 Bobbin cover/shuttle Remove the bobbin cover, and then insert the bobbin into the power supply jack. 8 Feed dog position switch Use the feed dog position switch to lower the feed dogs. APPENDIX INDEX Cover C Do not cover the air vent while the sewing machine is ...the end of pressure that the presser foot applies to the fabric. 2 Handle Carry the sewing machine by its handle when transporting the machine. 3 Balance wheel Turn the balance wheel toward you are learning to use your machine. Memo ● Refer to Cover B, D or E pages while you to raise ...
...foot for sewing straight seams. 5 Bobbin cover/shuttle Remove the bobbin cover, and then insert the bobbin into the power supply jack. 8 Feed dog position switch Use the feed dog position switch to lower the feed dogs. APPENDIX INDEX Cover C Do not cover the air vent while the sewing machine is ...the end of pressure that the presser foot applies to the fabric. 2 Handle Carry the sewing machine by its handle when transporting the machine. 3 Balance wheel Turn the balance wheel toward you are learning to use your machine. Memo ● Refer to Cover B, D or E pages while you to raise ...
Users Manual - English
Page 5
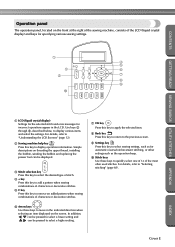
... Operation buttons The operation buttons help you to easily perform various basic sewing machine operations. 2 3 5 1 4 6 1 Start/stop button Press the start/stop button to start sewing Orange: When the bobbin winder shaft is moved to the right for winding the bobbin thread onto the bobbin 2 Reverse/reinforcement stitch button Press the reverse/reinforcement stitch button to...
... Operation buttons The operation buttons help you to easily perform various basic sewing machine operations. 2 3 5 1 4 6 1 Start/stop button Press the start/stop button to start sewing Orange: When the bobbin winder shaft is moved to the right for winding the bobbin thread onto the bobbin 2 Reverse/reinforcement stitch button Press the reverse/reinforcement stitch button to...
Users Manual - English
Page 6
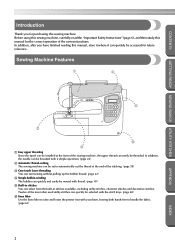
... 9 Settings key Press this key to select sewing settings, such as for incorrect operations appear in the indicated direction when selecting an item displayed on threading the upper thread, installing the bobbin, winding the bobbin and replacing the presser foot can be displayed....panel The operation panel, located on the front at the right of the sewing machine, consists of the LCD (liquid crystal display) and keys for specifying various sewing settings. 1 4 5 2 6 3 7 8 9 0 GETTING READY SEWING BASICS UTILITY STITCHES APPENDIX 1 LCD (liquid crystal display) Settings for the ...
... 9 Settings key Press this key to select sewing settings, such as for incorrect operations appear in the indicated direction when selecting an item displayed on threading the upper thread, installing the bobbin, winding the bobbin and replacing the presser foot can be displayed....panel The operation panel, located on the front at the right of the sewing machine, consists of the LCD (liquid crystal display) and keys for specifying various sewing settings. 1 4 5 2 6 3 7 8 9 0 GETTING READY SEWING BASICS UTILITY STITCHES APPENDIX 1 LCD (liquid crystal display) Settings for the ...
Users Manual - English
Page 8
... automatically cut the thread at the front of the sewing machine, the upper thread can easily be accessed for the correct operation of the stitching. (page 58) 3 One-touch lower threading You can start sewing without pulling up the bobbin thread. (page 22) 4 Simple bobbin-winding The bobbin can select from the built-in stitches available...
... automatically cut the thread at the front of the sewing machine, the upper thread can easily be accessed for the correct operation of the stitching. (page 58) 3 One-touch lower threading You can start sewing without pulling up the bobbin thread. (page 22) 4 Simple bobbin-winding The bobbin can select from the built-in stitches available...
Users Manual - English
Page 9
... ...1 Introduction ...2 Sewing Machine Features ...2 Contents ...3 Important Safety Instructions 6 GETTING READY 9 Turning the Machine On/Off 10 Power supply precautions ...10 Turning on the machine ...11 Turning off the machine ...11 Understanding the LCD Screens 12 Checking machine operating procedures ...13 Changing the Machine Settings 14 Changing ...Threading the needle ...27 Using the twin needle ...28 Using thread that winds off quickly ...31 Pulling up the bobbin thread ...31 Replacing the Needle ...33 Needle precautions ...33 Needle types and their uses ...33 Checking the needle ......
... ...1 Introduction ...2 Sewing Machine Features ...2 Contents ...3 Important Safety Instructions 6 GETTING READY 9 Turning the Machine On/Off 10 Power supply precautions ...10 Turning on the machine ...11 Turning off the machine ...11 Understanding the LCD Screens 12 Checking machine operating procedures ...13 Changing the Machine Settings 14 Changing ...Threading the needle ...27 Using the twin needle ...28 Using thread that winds off quickly ...31 Pulling up the bobbin thread ...31 Replacing the Needle ...33 Needle precautions ...33 Needle types and their uses ...33 Checking the needle ......

Users Manual - English
Page 12
... unplug, grasp the plug, not the cord. 10. Keep fingers away from the accumulation of electric shock: 1. Do not use outdoors. 7. This sewing machine is not working properly, if it is not intended for examination, repair, electrical or mechanical adjustment. 4. Always unplug the... electrical outlet when removing covers, lubricating, or when making any air openings blocked. DANGER - Always use as threading needle, changing needle, threading bobbin, or changing presser foot, and the like. 15. It may deflect the needle causing it must be left unattended while plugged in the needle...
... unplug, grasp the plug, not the cord. 10. Keep fingers away from the accumulation of electric shock: 1. Do not use outdoors. 7. This sewing machine is not working properly, if it is not intended for examination, repair, electrical or mechanical adjustment. 4. Always unplug the... electrical outlet when removing covers, lubricating, or when making any air openings blocked. DANGER - Always use as threading needle, changing needle, threading bobbin, or changing presser foot, and the like. 15. It may deflect the needle causing it must be left unattended while plugged in the needle...
Users Manual - English
Page 15
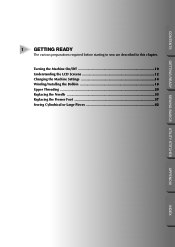
Turning the Machine On/Off 10 Understanding the LCD Screens 12 Changing the Machine Settings 14 Winding/Installing the Bobbin 18 Upper Threading ...24 Replacing the Needle 33 Replacing the Presser Foot 37 Sewing Cylindrical or Large Pieces 42 APPENDIX INDEX CONTENTS GETTING READY SEWING BASICS UTILITY STITCHES 1 GETTING READY The various preparations required before starting to sew are described in this chapter.
Turning the Machine On/Off 10 Understanding the LCD Screens 12 Changing the Machine Settings 14 Winding/Installing the Bobbin 18 Upper Threading ...24 Replacing the Needle 33 Replacing the Presser Foot 37 Sewing Cylindrical or Large Pieces 42 APPENDIX INDEX CONTENTS GETTING READY SEWING BASICS UTILITY STITCHES 1 GETTING READY The various preparations required before starting to sew are described in this chapter.
Users Manual - English
Page 19
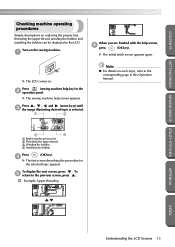
...help screen, 6 press (OK key). Press (sewing machine help screen appears. To 5 return to the corresponding page in this Operation Manual. 3 4 1 Replacing the presser foot 2 Threading the upper thread 3 Winding the bobbin 4 Installing the bobbin Press (OK key). 4 X The first ...upper thread, winding the bobbin and installing the bobbin can be displayed in the 2 operation panel. X The sewing machine help key) in the LCD. To display the next screen, press . CONTENTS GETTING READY SEWING BASICS UTILITY STITCHES Checking machine operating procedures Simple descriptions on...
...help screen, 6 press (OK key). Press (sewing machine help screen appears. To 5 return to the corresponding page in this Operation Manual. 3 4 1 Replacing the presser foot 2 Threading the upper thread 3 Winding the bobbin 4 Installing the bobbin Press (OK key). 4 X The first ...upper thread, winding the bobbin and installing the bobbin can be displayed in the 2 operation panel. X The sewing machine help key) in the LCD. To display the next screen, press . CONTENTS GETTING READY SEWING BASICS UTILITY STITCHES Checking machine operating procedures Simple descriptions on...

Users Manual - English
Page 24
...-151). Use only the enclosed bobbin or bobbins of any other bobbin may result in injuries or damage to the machine. ● The enclosed bobbin was designed specifically for this sewing machine. GETTING READY SEWING BASICS UTILITY STITCHES GETTING READY CONTENTS Winding/Installing the Bobbin This section describes how to prepare the bobbin thread. 1 APPENDIX 1 Bobbin winder Memo ● The order...
...-151). Use only the enclosed bobbin or bobbins of any other bobbin may result in injuries or damage to the machine. ● The enclosed bobbin was designed specifically for this sewing machine. GETTING READY SEWING BASICS UTILITY STITCHES GETTING READY CONTENTS Winding/Installing the Bobbin This section describes how to prepare the bobbin thread. 1 APPENDIX 1 Bobbin winder Memo ● The order...
Users Manual - English
Page 25
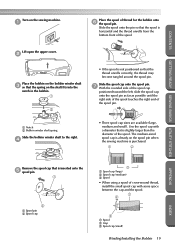
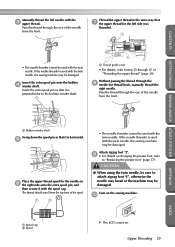
... as possible until the right side of the spool touches the right end of thread for the bobbin onto 6 the spool pin. The medium-sized spool cap is already on the spool pin when the sewing machine is purchased. 1 2 APPENDIX Remove the spool cap that is inserted onto the 5 spool pin... and the thread unrolls from the bottom front of the spool. CONTENTS GETTING READY SEWING BASICS UTILITY STITCHES Turn on the sewing machine. 1 Place the spool of the spool pin. 1 Notch 2 Bobbin winder shaft spring Slide the bobbin winder shaft to the right. 4 • Three spool cap sizes are available ...
... as possible until the right side of the spool touches the right end of thread for the bobbin onto 6 the spool pin. The medium-sized spool cap is already on the spool pin when the sewing machine is purchased. 1 2 APPENDIX Remove the spool cap that is inserted onto the 5 spool pin... and the thread unrolls from the bottom front of the spool. CONTENTS GETTING READY SEWING BASICS UTILITY STITCHES Turn on the sewing machine. 1 Place the spool of the spool pin. 1 Notch 2 Bobbin winder shaft spring Slide the bobbin winder shaft to the right. 4 • Three spool cap sizes are available ...
Users Manual - English
Page 27
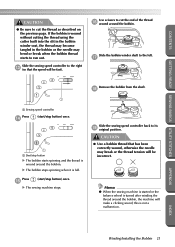
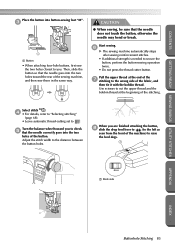
... button) once. X The sewing machine stops. CAUTION ● Use a bobbin thread that the speed will be incorrect. Use scissors to run out. Memo ● When the sewing machine is started or the balance wheel is full. If the bobbin is not a malfunction. X The bobbin stops spinning when it is turned... after winding the thread around the bobbin, the machine will be fast). Slide the sewing speed controller to cut the...
... button) once. X The sewing machine stops. CAUTION ● Use a bobbin thread that the speed will be incorrect. Use scissors to run out. Memo ● When the sewing machine is started or the balance wheel is full. If the bobbin is not a malfunction. X The bobbin stops spinning when it is turned... after winding the thread around the bobbin, the machine will be fast). Slide the sewing speed controller to cut the...
Users Manual - English
Page 28
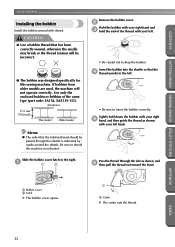
... around the shuttle. CAUTION ● Use a bobbin thread that the bobbin thread should be incorrect. ● The bobbin was designed specifically for this sewing machine. Actual size 11.5 mm (7/16 inch) This model Older model Remove the bobbin cover. 2 Hold the bobbin with your right hand and 3 hold down the bobbin with your right 5 hand, and then guide...
... around the shuttle. CAUTION ● Use a bobbin thread that the bobbin thread should be incorrect. ● The bobbin was designed specifically for this sewing machine. Actual size 11.5 mm (7/16 inch) This model Older model Remove the bobbin cover. 2 Hold the bobbin with your right hand and 3 hold down the bobbin with your right 5 hand, and then guide...
Users Manual - English
Page 35
Insert the extra spool pin onto the bobbin 4 winder shaft. GETTING READY SEWING BASICS UTILITY STITCHES APPENDIX 1 Bobbin winder shaft Swing down the spool pin so that it is used with the twin needle, the sewing machine may be damaged. CAUTION ● When using the twin needle, be sure to attach zigzag foot "J", otherwise the needle...
Insert the extra spool pin onto the bobbin 4 winder shaft. GETTING READY SEWING BASICS UTILITY STITCHES APPENDIX 1 Bobbin winder shaft Swing down the spool pin so that it is used with the twin needle, the sewing machine may be damaged. CAUTION ● When using the twin needle, be sure to attach zigzag foot "J", otherwise the needle...
Users Manual - English
Page 38
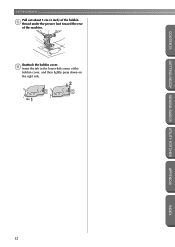
CONTENTS GETTING READY SEWING BASICS UTILITY STITCHES GETTING READY Pull out about 5 cm (2 inch) of the bobbin 5 thread under the presser foot toward the rear of the bobbin cover, and then lightly press down on the right side. 2 1 32 APPENDIX INDEX Reattach the bobbin cover. 6 Insert the tab in the lower-left corner of the machine.
CONTENTS GETTING READY SEWING BASICS UTILITY STITCHES GETTING READY Pull out about 5 cm (2 inch) of the bobbin 5 thread under the presser foot toward the rear of the bobbin cover, and then lightly press down on the right side. 2 1 32 APPENDIX INDEX Reattach the bobbin cover. 6 Insert the tab in the lower-left corner of the machine.
Users Manual - English
Page 89
... thread-cutting set to the distance between the button holes. Adjust the stitch width to . Start sewing. 6 X The sewing machine automatically stops after sewing reinforcement stitches. • If additional strength is needed to cut the upper thread and the bobbin thread at the end of the 7 stitching to raise the feed dogs. 1 1 Back side APPENDIX...
... thread-cutting set to the distance between the button holes. Adjust the stitch width to . Start sewing. 6 X The sewing machine automatically stops after sewing reinforcement stitches. • If additional strength is needed to cut the upper thread and the bobbin thread at the end of the 7 stitching to raise the feed dogs. 1 1 Back side APPENDIX...
Users Manual - English
Page 143
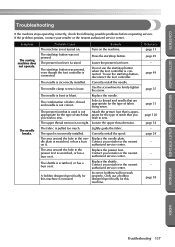
...Attach the presser foot that are appropriate for this machine. Incorrect bobbins will not work properly. page 18 APPENDIX INDEX Troubleshooting 137 To use a bobbin designed specifically for the type of stitch that you you wish to sew. The combination of fabric being sewn. The upper...your retailer or the nearest authorized service center. Only use the start /stop button. Reference page 11 page 49 - Symptom The sewing machine does not operate. The needle breaks. Do not use the start /stop button, disconnect the foot controller. Replace the needle. appropriate...
...Attach the presser foot that are appropriate for this machine. Incorrect bobbins will not work properly. page 18 APPENDIX INDEX Troubleshooting 137 To use a bobbin designed specifically for the type of stitch that you you wish to sew. The combination of fabric being sewn. The upper...your retailer or the nearest authorized service center. Only use the start /stop button. Reference page 11 page 49 - Symptom The sewing machine does not operate. The needle breaks. Do not use the start /stop button, disconnect the foot controller. Replace the needle. appropriate...
Users Manual - English
Page 144
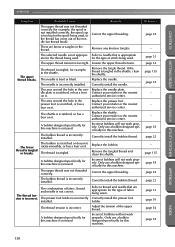
... bent or blunt. Contact your retailer or the nearest authorized service center. Incorrect bobbins will not work properly. Incorrect bobbins will not work properly. A bobbin designed specifically for this machine is not used . Reference page 24 - APPENDIX CONTENTS GETTING READY SEWING BASICS UTILITY STITCHES Symptom Probable Cause Remedy The upper thread was not threaded correctly...
... bent or blunt. Contact your retailer or the nearest authorized service center. Incorrect bobbins will not work properly. Incorrect bobbins will not work properly. A bobbin designed specifically for this machine is not used . Reference page 24 - APPENDIX CONTENTS GETTING READY SEWING BASICS UTILITY STITCHES Symptom Probable Cause Remedy The upper thread was not threaded correctly...
Users Manual - English
Page 147
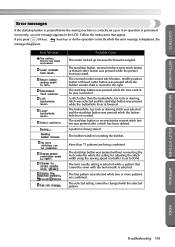
... the foot controller was connected. The first pattern was pressed while the bobbin winder shaft is moved to [ON]. Follow the instructions that cannot be changed with the twin needle is tangled. The start /stop button is pressed before the sewing machine is being combined. The start /stop button or reverse/reinforcement stitch...
... the foot controller was connected. The first pattern was pressed while the bobbin winder shaft is moved to [ON]. Follow the instructions that cannot be changed with the twin needle is tangled. The start /stop button is pressed before the sewing machine is being combined. The start /stop button or reverse/reinforcement stitch...
Users Manual - English
Page 151
...language 17 screwdriver Cover A, 35 seam ripper Cover A, 81 selecting stitching 68 settings 14 settings key Cover E, 14 sewing machine help key Cover E, 13 sewing machine needles 33 sewing speed 49 sewing speed controller Cover B, Cover D, 99 shell tuck stitch 108 shutter 26 shuttle 22, 135 shuttle hook 136 side ... 53 thread cutter button Cover D, 53 thread guide cover Cover B, 20, 26 thread guide discs Cover C, 27 thread guide for bobbin winding Cover B, 20 thread guide plate Cover B, 20, 26 thread tension 54 thread tension dial Cover B, 54 thread that quickly unwinds 31...
...language 17 screwdriver Cover A, 35 seam ripper Cover A, 81 selecting stitching 68 settings 14 settings key Cover E, 14 sewing machine help key Cover E, 13 sewing machine needles 33 sewing speed 49 sewing speed controller Cover B, Cover D, 99 shell tuck stitch 108 shutter 26 shuttle 22, 135 shuttle hook 136 side ... 53 thread cutter button Cover D, 53 thread guide cover Cover B, 20, 26 thread guide discs Cover C, 27 thread guide for bobbin winding Cover B, 20 thread guide plate Cover B, 20, 26 thread tension 54 thread tension dial Cover B, 54 thread that quickly unwinds 31...


