
Users Manual - English
Page 9
...Machine Parts and Their Functions Cover B Front view ...Cover B Needle and presser foot section ...Cover C Right-side/rear view ...Cover C Operation buttons ...Cover D Operation panel ...Cover E Optional Accessories ...1 Introduction ...2 Sewing Machine Features ...2 Contents ...3 Important Safety Instructions 6 GETTING READY 9 Turning the Machine...bobbin thread ...31 Replacing the Needle ...33 Needle precautions ...33 Needle types and their uses ...33 Checking the needle ...34 Replacing the needle ...35 Replacing the Presser Foot 37 Presser foot precautions ...37 Replacing the presser foot ...
...Machine Parts and Their Functions Cover B Front view ...Cover B Needle and presser foot section ...Cover C Right-side/rear view ...Cover C Operation buttons ...Cover D Operation panel ...Cover E Optional Accessories ...1 Introduction ...2 Sewing Machine Features ...2 Contents ...3 Important Safety Instructions 6 GETTING READY 9 Turning the Machine...bobbin thread ...31 Replacing the Needle ...33 Needle precautions ...33 Needle types and their uses ...33 Checking the needle ...34 Replacing the needle ...35 Replacing the Presser Foot 37 Presser foot precautions ...37 Replacing the presser foot ...

Users Manual - English
Page 12
...using this machine, basic safety precautions should never be taken, including the following: Read all moving parts. Use this machine only for examination, repair, electrical or mechanical adjustment. 4. Never operate the machine with this machine. 18. ... Do not allow this machine to the symbol "{" position when making any opening. 6. Always use outdoors. 7. Never drop or insert any object into water. Switch the machine to be replaced by young children or ... use as contained in this manual. 3. This sewing machine is not intended for household use bent needles. 13.
...using this machine, basic safety precautions should never be taken, including the following: Read all moving parts. Use this machine only for examination, repair, electrical or mechanical adjustment. 4. Never operate the machine with this machine. 18. ... Do not allow this machine to the symbol "{" position when making any opening. 6. Always use outdoors. 7. Never drop or insert any object into water. Switch the machine to be replaced by young children or ... use as contained in this manual. 3. This sewing machine is not intended for household use bent needles. 13.

Users Manual - English
Page 14
...or hit the machine. 4. up lever, needle, or other hot objects. 2. For a longer service life 1. Always consult the operation manual when replacing or installing any other parts to assure correct installation. Use only neutral soaps or detergents to keep your local authorized Brother dealer. If ... troubleshooting table in the back of the most advanced computerized household sewing machines. To fully enjoy all the features, we suggest that you study the manual before using the machine. When storing this machine, avoid direct sunlight and high humidity locations. Benzene, thinner, and...
...or hit the machine. 4. up lever, needle, or other hot objects. 2. For a longer service life 1. Always consult the operation manual when replacing or installing any other parts to assure correct installation. Use only neutral soaps or detergents to keep your local authorized Brother dealer. If ... troubleshooting table in the back of the most advanced computerized household sewing machines. To fully enjoy all the features, we suggest that you study the manual before using the machine. When storing this machine, avoid direct sunlight and high humidity locations. Benzene, thinner, and...
Users Manual - English
Page 34
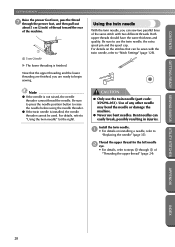
...position button to begin sewing. Using the twin needle With the twin needle, you are ready to raise the needle before using the needle threader. ● If the twin needle is installed, the needle threader cannot be sewn with two different threads. For details, refer to "Replacing the needle" (... any other needle may bend the needle or damage the machine. ● Never use bent needles. Install the twin needle. 1 • For details on the stitches that the upper threading and the lower threading are finished, you can sew two parallel lines of the same stitch with the twin ...
...position button to begin sewing. Using the twin needle With the twin needle, you are ready to raise the needle before using the needle threader. ● If the twin needle is installed, the needle threader cannot be sewn with two different threads. For details, refer to "Replacing the needle" (... any other needle may bend the needle or damage the machine. ● Never use bent needles. Install the twin needle. 1 • For details on the stitches that the upper threading and the lower threading are finished, you can sew two parallel lines of the same stitch with the twin ...
Users Manual - English
Page 41
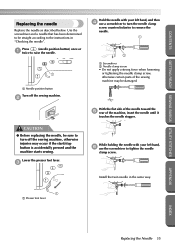
...to tighten the needle clamp screw. While holding the needle with your left hand, and then 4 use the screwdriver to turn off the sewing machine. 2 CAUTION ● Before replacing the needle, be straight according to remove the needle. 1 2 1 Screwdriver 2 Needle clamp screw • Do not apply a ...when loosening or tightening the needle clamp screw, otherwise certain parts of the machine, insert the needle until it touches the needle stopper. With the flat side of the needle toward the 5 rear of the sewing machine may occur if the start/stop button is accidentally pressed and...
...to tighten the needle clamp screw. While holding the needle with your left hand, and then 4 use the screwdriver to turn off the sewing machine. 2 CAUTION ● Before replacing the needle, be straight according to remove the needle. 1 2 1 Screwdriver 2 Needle clamp screw • Do not apply a ...when loosening or tightening the needle clamp screw, otherwise certain parts of the machine, insert the needle until it touches the needle stopper. With the flat side of the needle toward the 5 rear of the sewing machine may occur if the start/stop button is accidentally pressed and...
Users Manual - English
Page 88
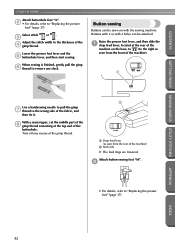
... pull the gimp 6 thread to the thickness of the machine on with 4 holes can be attached. With a seam ripper, cut the middle part of the 8 gimp thread remaining at the rear of the 4 gimp thread. Attach button-sewing foot "M". 2 • For details, refer to "Replacing the presser foot" (page 37). APPENDIX INDEX 82 Raise...
... pull the gimp 6 thread to the thickness of the machine on with 4 holes can be attached. With a seam ripper, cut the middle part of the 8 gimp thread remaining at the rear of the 4 gimp thread. Attach button-sewing foot "M". 2 • For details, refer to "Replacing the presser foot" (page 37). APPENDIX INDEX 82 Raise...


