
Brother International PC 420 Support Question
Brother International PC 420 Support Question
Find answers below for this question about Brother International PC 420 - PRW Limited Edition Project Runway Sewing Machine.Need a Brother International PC 420 manual? We have 1 online manual for this item!
Question posted by debbieshy4 on February 3rd, 2012
Replacing The Needle Plate.
I have a Brother PC420PRW sewing machine and I need to replace the needle plate. Do you know the part number for this? I can't find it in my manual.
Current Answers
Related Brother International PC 420 Manual Pages
Users Manual - English - Page 3

... buttons to learn the names of the flat bed attachment. Before using the sewing machine, carefully read these descriptions to start the sewing machine and automatically cut them.
Front view
1 D
C B
2 3 4 5 6
7 8
A
0 9
1 Thread guide plate / 2 Thread guide cover Pass the thread around the thread guide plate when threading the upper thread.
3 Spool pin Place the spool on the...
Users Manual - English - Page 4
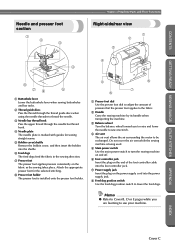
... when using the needle threader to thread the needle.
3 Needle bar thread hook Pass the upper thread through the needle bar thread hook.
4 Needle plate The needle plate is marked with guides for the selected stitching.
8 Presser foot holder The presser foot is being used.
5 Main power switch Use the main power switch to turn the sewing machine on and...
Users Manual - English - Page 12

... fabric while stitching. This sewing machine is damaged, it to the nearest authorized dealer or service center for household use bent needles. 13. If the Light unit is not intended for its intended use the proper needle plate. DANGER - WARNING - Use this machine only for use outdoors. 7. Never operate the machine with this machine to persons:
1. Do not...
Users Manual - English - Page 14

... the cord when:
• Operation is one of the operation manual to keep your local authorized Brother dealer. Do not use or store the machine near a space heater, iron, halogen lamp, or other moving parts. 2. Do not store anything on the needle while sewing. If the problem persists, please consult your eye on the foot...
Users Manual - English - Page 15
... STITCHES
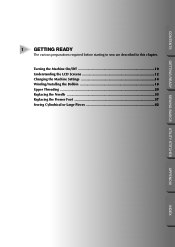
1 GETTING READY
The various preparations required before starting to sew are described in this chapter.
Turning the Machine On/Off 10 Understanding the LCD Screens 12 Changing the Machine Settings 14 Winding/Installing the Bobbin 18 Upper Threading ...24 Replacing the Needle 33 Replacing the Presser Foot 37 Sewing Cylindrical or Large Pieces 42
APPENDIX
INDEX
Users Manual - English - Page 26
...through b the slit in the spool or the needle may catch on the thread guide for bobbin winding,
and then wind it under the thread guide plate 9 from the right.
If the spool cap ...is cut to a suitable length. Pull the thread to the right, pass it counterclockwise between the discs.
1
1
GETTING READY SEWING BASICS UTILITY STITCHES...
Users Manual - English - Page 32

... procedure in the spool or the needle may break.
GETTING READY SEWING BASICS UTILITY STITCHES
GETTING READY
CONTENTS
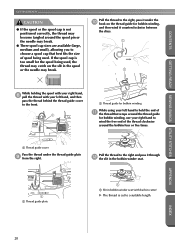
CAUTION...needle may break.
● Three spool cap sizes are available (large, medium and small), allowing you to choose a spool cap that the shutter is open in order to thread the machine.
1
APPENDIX
1 Thread guide cover Pass the thread under the thread guide plate...
Users Manual - English - Page 34
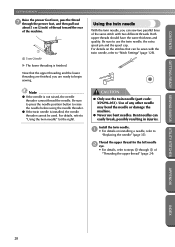
... finished, you can easily break, possibly resulting in injuries.
For details, refer to
"Replacing the needle" (page 35). Thread the upper thread for the left needle 2 eye.
• For details, refer to begin sewing. Using the twin needle
With the twin needle, you are ready to steps 1 through the presser foot, and then pull out
about...
Users Manual - English - Page 35
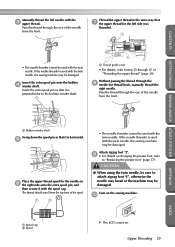
... way that it is used with the twin needle, the sewing machine may be damaged. Insert the extra spool pin so that it is used with the spool cap.
Turn on the sewing machine.
0
1 Spool cap 2 Spool
X The LCD comes on changing the presser foot, refer
to "Replacing the presser foot" (page 37).
Pass the thread...
Users Manual - English - Page 39
... Synthetic thread
Silk thread
50-80 30
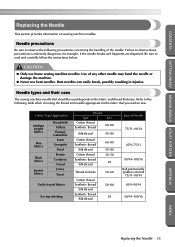
Size of any other needle may bend the needle or damage the machine.
● Never use home sewing machine needles.
CONTENTS
GETTING READY SEWING BASICS UTILITY STITCHES
Replacing the Needle
This section provides information on the fabric and thread thickness. Needle precautions
Be sure to the following precautions concerning the handling of...
Users Manual - English - Page 68

... foot lever, and then turn the 2 fabric. SEWING BASICS
CONTENTS
GETTING READY SEWING BASICS UTILITY STITCHES
Useful Sewing Tips
Various ways to achieve better results for your sewing projects are the same as a pivot.
Changing the sewing direction
When the stitching reaches a corner, stop the 1 sewing machine. When sewing along a curve while using the needle as those used with your...
Users Manual - English - Page 70
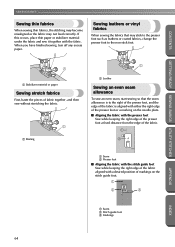
..., and the edge of the fabric is aligned with either the right edge of the presser foot or a marking on the needle plate. ■ Aligning the fabric with the presser foot
Sew while keeping the right edge of the presser foot a fixed distance from the edge of the fabric.
1
2
APPENDIX
1 Seam 2 Presser foot...
Users Manual - English - Page 71
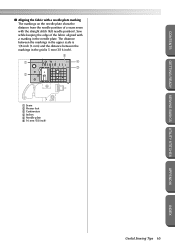
...1 Seam 2 Presser foot 3 Centimeters 4 Inches 5 Needle plate 6 16 mm (5/8 inch)
APPENDIX
INDEX
Useful Sewing Tips 65 The distance between the markings in the needle plate. CONTENTS
GETTING READY SEWING BASICS UTILITY STITCHES
■ Aligning the fabric with a needle plate marking The markings on the needle plate show the distance from the needle position of the fabric aligned with the...
Users Manual - English - Page 108
...Replacing the presser
foot" (page 37).
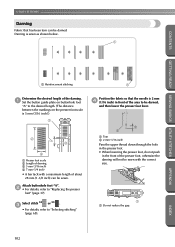
Position the fabric so that has been torn can be sewn. Darning is sewn as shown below.
1
CONTENTS
GETTING READY SEWING BASICS UTILITY STITCHES
1 Reinforcement stitching
1
Determine the desired length of the darning. 1 Set the button guide plate...102
APPENDIX
INDEX
UTILITY STITCHES
Darning
Fabric that the needle is 5 mm (3/16 inch).)
1
2 3...
Users Manual - English - Page 141
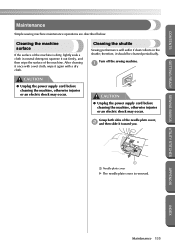
... cleaning the machine, otherwise injuries or an electric shock may occur.
After cleaning it once with a dry cloth. Cleaning the shuttle
Sewing performance will suffer if dust collects in neutral detergent, squeeze it out firmly, and then wipe the surface of the needle plate cover, 2 and then slide it toward you.
1
1 Needle plate cover X The needle plate cover...
Users Manual - English - Page 142

... the shuttle is correctly installed, otherwise the needle may damage the machine. GETTING READY SEWING BASICS UTILITY STITCHES
APPENDIX
CONTENTS
Turn the balance wheel toward you until the 3 tip of the shuttle hook aligns with the spring.
1
2
2 1
1 Projection 2 Spring Insert the tabs on the needle plate cover into 7 the needle plate, and then slide the cover back on...
Users Manual - English - Page 143
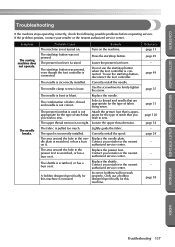
... to sew. dle plate is scratched, or has a burr on it . Turn on the machine.
Correctly install the needle.
The start /stop button was not pressed.
Contact your retailer or the nearest authorized service center. Reference page 11 page 49
- If the problem persists, contact your retailer or the nearest
on it . Replace the needle. Do...
Users Manual - English - Page 144
... SEWING BASICS UTILITY STITCHES
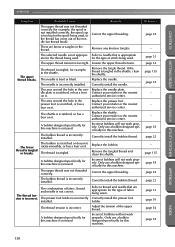
Symptom
Probable Cause
Remedy
The upper thread was not threaded correctly.
Select a needle ...Replace the needle plate. The area around the hole in the shuttle, clean the shuttle. Replace the shuttle.
Replace the presser foot. authorized service center. Contact your retailer or the nearest authorized service center.
for this machine...
Users Manual - English - Page 145

... incorrectly installed. A bobbin designed specifically for this machine. The thread tension is scratched, or has a burr on it. Remedy
Correctly thread the upper thread and correctly install the bobbin thread. Replace the needle. Shorten the stitch length or sew with stabilizer material under the needle plate or in the shuttle.
Clean the shuttle.
Contact your retailer...
Users Manual - English - Page 151
... scallop stitching 107 screen language 17
screwdriver Cover A, 35 seam ripper Cover A, 81
selecting stitching 68 settings 14
settings key Cover E, 14 sewing machine help key Cover E, 13
sewing machine needles 33 sewing speed 49
sewing speed controller Cover B, Cover D, 99
shell tuck stitch 108 shutter 26
shuttle 22, 135
shuttle hook 136
side cutter 1, 72
side...
Similar Questions

Whats The Resale Value Of The Brother 2300 Prw Limited Edition Project Runway?
(Posted by Anonymous-139615 9 years ago)


How To Thread The Brother Limited Edition Project Runway Sewing Machine
ls2300prw manual
ls2300prw manual
(Posted by jjmaf0 10 years ago)
Brother Pc-420 Prw Limited Edition Project Runway Sewing Machine Will Not
thread needle
thread needle
(Posted by graphevaru 10 years ago)

Wide Table Fit
Will wide table SA 537 XC 4541-022 fit Project Runway PC 420?
Will wide table SA 537 XC 4541-022 fit Project Runway PC 420?
(Posted by dbelvin 12 years ago)