
Brother International PC 420 Support Question
Brother International PC 420 Support Question
Find answers below for this question about Brother International PC 420 - PRW Limited Edition Project Runway Sewing Machine.Need a Brother International PC 420 manual? We have 1 online manual for this item!
Question posted by graphevaru on October 19th, 2013
Brother Pc-420 Prw Limited Edition Project Runway Sewing Machine Will Not
thread needle
Current Answers
Related Brother International PC 420 Manual Pages
Users Manual - English - Page 2
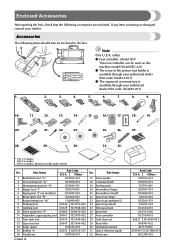
... box. Part Name
1 Buttonhole foot "A" 2 Overcasting foot "G" 3 Monogramming foot "N" 4 Zipper foot "I" 5 Zigzag foot "J" (on this machine model NX-400/PC-420. ● The screw of the presser foot holder is available through your retailer. Part Name
17 Twin needle 18 Cleaning brush 19 Eyelet punch 20 Screwdriver (large) 21 Screwdriver (small) 22 Spool cap...
Users Manual - English - Page 3

... Use the operation buttons to start the sewing machine and automatically cut them.
Before using the sewing machine, carefully read these descriptions to adjust the tension of the sewing machine and their functions are described below. B Thread cutter Pass the threads through the thread cutter to thread the needle. D Thread tension dial Use the thread tension dial to learn the names of...
Users Manual - English - Page 4
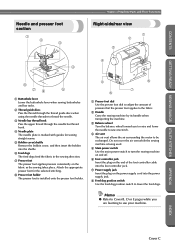
... thread through the thread guide discs when using the needle threader to thread the needle.
3 Needle bar thread hook Pass the upper thread through the needle bar thread hook.
4 Needle plate The needle plate is marked with guides for the selected stitching.
8 Presser foot holder The presser foot is being used.
5 Main power switch Use the main power switch to turn the sewing machine...
Users Manual - English - Page 5
... of each other special threads, use the thread cutter on how the sewing machine is depressed.
APPENDIX
INDEX
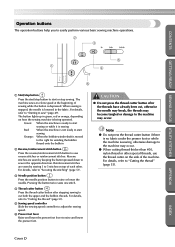
Cover D The button lights up in the fabric. CAUTION
● Do not press the thread cutter button after stopping sewing to cut , otherwise the needle may break, the threads may become tangled or damage to the machine may occur.
● When...
Users Manual - English - Page 6
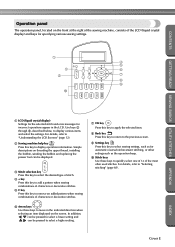
... "Understanding the LCD Screens" (page 12).
2 Sewing machine help key Press this key to select sewing settings, such as the operation beep.
0 Stitch ...threading the upper thread, installing the bobbin, winding the bobbin and replacing the presser foot can be displayed.
3 Stitch selection key Press this key to select the desired type of stitch.
4 + key Press this key to add a pattern when sewing...
Users Manual - English - Page 7
... Part code: SA537,XC4541-051
Memo
● To obtain optional accessories or parts, contact your sales representative or the nearest authorized service center.
GETTING READY SEWING BASICS UTILITY STITCHES
APPENDIX
INDEX
1 Quilting guide Part code: SA132, XC2215-002
3. CONTENTS
Enclosed Accessories
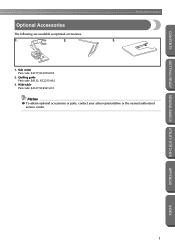
Optional Accessories
The following are available as optional accessories...
Users Manual - English - Page 8
... it can be installed at the end of the various functions.
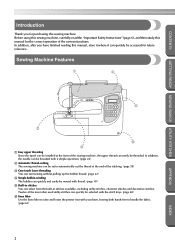
Sewing Machine Features
1
4
5
2
6 3 1 Easy upper threading Since the spool can select from the built-in stitches available, including utility stitches, character stitches and decorative stitches. In addition, the needle can be threaded with thread. (page 18) 5 Built-in stitches You can be set to handle...
Users Manual - English - Page 9
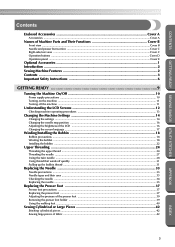
... Introduction ...2 Sewing Machine Features ...2 Contents ...3 Important Safety Instructions 6
GETTING READY 9
Turning the Machine On/Off 10
Power supply precautions ...10 Turning on the machine ...11 Turning off the machine ...11
Understanding the LCD Screens 12
Checking machine operating procedures ...13
Changing the Machine Settings 14
Changing the settings ...14 Changing the needle stop...
Users Manual - English - Page 10
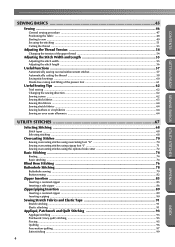
... stitches 57 Automatically cutting the thread ...58 Saving stitch settings ...60 Hands-free raising and lifting of the presser foot 61
Useful Sewing Tips ...62
Trial sewing ...62 Changing the sewing direction ...62 Sewing curves ...62 Sewing thick fabrics ...63 Sewing thin fabrics ...64 Sewing stretch fabrics ...64 Sewing leathers or vinyl fabrics ...64 Sewing an even seam allowance ...64...
Users Manual - English - Page 11
... Heirloom stitching ...110
Sewing the Various Built-In Decorative Patterns 113
Sewing beautiful patterns ...113 Sewing patterns ...113 Combining patterns ...114 Repeat sewing patterns ...115 Checking the... ...128
Utility stitches ...128 Other stitches ...133
Maintenance ...135
Cleaning the machine surface ...135 Cleaning the shuttle ...135
Troubleshooting ...137
Error messages ...141 Nothing...
Users Manual - English - Page 12

... causing it is required around the machine needle. 11. Do not unplug by the manufacturer as described in this machine only for examination, repair, electrical or mechanical adjustment.
4. SAVE THESE INSTRUCTIONS This machine is being used by authorized dealer. Switch the machine to be used as threading needle, changing needle, threading bobbin, or changing presser foot, and the...
Users Manual - English - Page 14

...Brother dealer. Benzene, thinner, and scouring powders can damage the case and machine, and should never be used. 3. Do not drop or hit the machine. 4. Do not touch the hand wheel, thread take- Plug the machine... of the most advanced computerized household sewing machines. Remember to assure correct installation. Do not store anything on the needle while sewing. For repair or adjustment In the...
Users Manual - English - Page 48

.... APPENDIX
INDEX
Note
● The optional wide table is available through your brother retailer.
42 Pull the flat bed attachment off to sew onto the 2 arm, and then sew from the top. Slide the part that you are finished with free-arm sewing, 3 install the flat bed attachment back in its
original position.
Stitching...
Users Manual - English - Page 55
... foot controller.
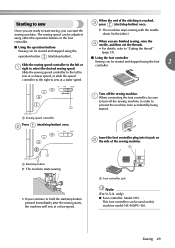
■ Using the operation buttons Sewing can start the sewing machine.
Once you are finished sewing, raise the 4 needle, and then cut the threads.
• For details, refer to "Cutting the thread" (page 53). Insert the foot controller plug into its jack on this machine model NX-400/PC-420.
using the
When you are ready to start...
Users Manual - English - Page 68

... desired results may not be used for your project, and check the thread tension and stitch length and width. Since the results differ depending on sewing with your project.
Trial sewing
After you have set up when the machine
stopped sewing, press
(needle position
button) to achieve better results for your sewing projects are the same as a pivot. Refer to...
Users Manual - English - Page 79

...thread...sewn.
• If the stitching is available through your brother retailer.
Select a stitch. 8 • For details, ...needle hits the presser foot, the needle may bend or break.
CONTENTS
GETTING READY SEWING BASICS UTILITY STITCHES
Raise the presser foot lever to check that the needle... Lower the presser foot lever, and then start a sewing. denim.
● After using the side cutter, ...
Users Manual - English - Page 103
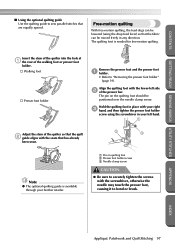
... over the needle clamp screw. The pin on quilting foot 2 Presser foot holder screw 3 Needle clamp screw
CAUTION
● Be sure to bend or break.
CONTENTS
GETTING READY SEWING BASICS UTILITY ... quilting foot with the seam that are equally spaced.
The quilting foot is available through your brother retailer.
1 Pin on the quilting foot should be moved freely in your left hand.
...
Users Manual - English - Page 119
...project.
When sewing thick fabrics, use the ball point needle. Be sure to sew a trial piece of
"Selecting stitching" (page 68).
CONTENTS
GETTING READY SEWING BASICS UTILITY STITCHES
Sewing...; Needles and threads When sewing thin, mediumweight or stretch fabrics, use a 90/14 home sewing machine needle. Sewing beautiful patterns
In order to steps 4 through 9 of fabric before sewing your...
Users Manual - English - Page 127
...
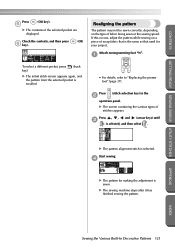
operation panel. X The screen containing the various types of fabric being sewn or the sewing speed.
X The sewing machine stops after it has finished sewing the pattern. Check the contents, and then press
(OK
6 key). Start sewing.
4
X The pattern for your project. Realigning the pattern
The pattern may not be sewn correctly, depending on a piece of...
Users Manual - English - Page 142

...center.
● Be sure that the projection on the shuttle aligns with the spring.
1
2
2 1
1 Projection 2 Spring Insert the tabs on the needle plate cover into 7 the needle plate, and then slide the cover back... shuttle is scratched, otherwise the upper thread may become tangled, the needle may break or sewing performance may damage the machine.
Turning the balance wheel away from the race ...
Similar Questions

How To Oil My Brother Pc 420 Sewing Machine
(Posted by bolonhelgat 9 years ago)

Whats The Resale Value Of The Brother 2300 Prw Limited Edition Project Runway?
(Posted by Anonymous-139615 9 years ago)

How To Thread The Brother Limited Edition Project Runway Sewing Machine
ls2300prw manual
ls2300prw manual
(Posted by jjmaf0 10 years ago)

How To Lubricate My Brothers Pc-420
I want to lubricate my brothers Project 420 sewing machine. I can't find the oiling points. I alread...
I want to lubricate my brothers Project 420 sewing machine. I can't find the oiling points. I alread...
(Posted by kountrygrrrl 11 years ago)

Sewing Without Pedal- Brother Pc 430 Prw
I hit a wrong dial, now I can't sew/ I get a message to "change speed control mode to off" but inst...
I hit a wrong dial, now I can't sew/ I get a message to "change speed control mode to off" but inst...
(Posted by rochelle0099 11 years ago)