
Users Manual - English
Page 9
...Machine Parts and Their Functions Cover B Front view ...Cover B Needle and presser foot section ...Cover C Right-side/rear view ...Cover C Operation buttons ...Cover D Operation panel ...Cover E Optional Accessories ...1 Introduction ...2 Sewing Machine Features ...2 Contents ...3 Important Safety Instructions 6 GETTING READY 9 Turning the Machine...bobbin thread ...31 Replacing the Needle ...33 Needle precautions ...33 Needle types and their uses ...33 Checking the needle ...34 Replacing the needle ...35 Replacing the Presser Foot 37 Presser foot precautions ...37 Replacing the presser foot ...
...Machine Parts and Their Functions Cover B Front view ...Cover B Needle and presser foot section ...Cover C Right-side/rear view ...Cover C Operation buttons ...Cover D Operation panel ...Cover E Optional Accessories ...1 Introduction ...2 Sewing Machine Features ...2 Contents ...3 Important Safety Instructions 6 GETTING READY 9 Turning the Machine...bobbin thread ...31 Replacing the Needle ...33 Needle precautions ...33 Needle types and their uses ...33 Checking the needle ...34 Replacing the needle ...35 Replacing the Presser Foot 37 Presser foot precautions ...37 Replacing the presser foot ...

Users Manual - English
Page 12
...when removing covers, lubricating, or when making any air openings blocked. SAVE THESE INSTRUCTIONS This machine is damaged, it must be replaced by pulling on cord. Always unplug the machine from outlet. 9. To disconnect, turn the main switch to break. 14. If the Light... required around the machine needle. 11. Young children should be used as contained in . CONTENTS GETTING READY SEWING BASICS UTILITY STITCHES Important Safety Instructions When using this machine, basic safety precautions should always be taken, including the following: Read all moving parts. To reduce the...
...when removing covers, lubricating, or when making any air openings blocked. SAVE THESE INSTRUCTIONS This machine is damaged, it must be replaced by pulling on cord. Always unplug the machine from outlet. 9. To disconnect, turn the main switch to break. 14. If the Light... required around the machine needle. 11. Young children should be used as contained in . CONTENTS GETTING READY SEWING BASICS UTILITY STITCHES Important Safety Instructions When using this machine, basic safety precautions should always be taken, including the following: Read all moving parts. To reduce the...

Users Manual - English
Page 14
...www.brother.com 8 APPENDIX INDEX CONTENTS GETTING READY SEWING BASICS UTILITY STITCHES CONGRATULATIONS ON CHOOSING OUR MACHINE Your machine is one of the operation manual to inspect and adjust the machine yourself. Do not store anything on the needle while sewing. When storing this machine, ...back of the most advanced computerized household sewing machines. To fully enjoy all the features, we suggest that you study the manual before using the machine. Always consult the operation manual when replacing or installing any other parts to assure correct installation. Do not...
...www.brother.com 8 APPENDIX INDEX CONTENTS GETTING READY SEWING BASICS UTILITY STITCHES CONGRATULATIONS ON CHOOSING OUR MACHINE Your machine is one of the operation manual to inspect and adjust the machine yourself. Do not store anything on the needle while sewing. When storing this machine, ...back of the most advanced computerized household sewing machines. To fully enjoy all the features, we suggest that you study the manual before using the machine. Always consult the operation manual when replacing or installing any other parts to assure correct installation. Do not...
Users Manual - English
Page 34
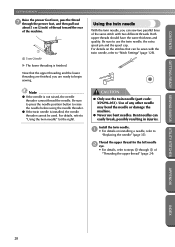
... Now that can be used. Bent needles can sew two parallel lines of the same stitch with the twin needle, refer to "Replacing the needle" (page 35). Install the twin needle...the rear of the machine. 1 1 5 cm (2 inch) X The lower threading is finished. Thread the upper thread for the left needle 2 eye. • For details, refer to begin sewing. Using the twin ...the twin needle" (at the right). CAUTION ● Only use the twin needle (part code: X59296-051). GETTING READY SEWING BASICS UTILITY STITCHES GETTING READY CONTENTS Raise the presser foot lever, pass the thread 7...
... Now that can be used. Bent needles can sew two parallel lines of the same stitch with the twin needle, refer to "Replacing the needle" (page 35). Install the twin needle...the rear of the machine. 1 1 5 cm (2 inch) X The lower threading is finished. Thread the upper thread for the left needle 2 eye. • For details, refer to begin sewing. Using the twin ...the twin needle" (at the right). CAUTION ● Only use the twin needle (part code: X59296-051). GETTING READY SEWING BASICS UTILITY STITCHES GETTING READY CONTENTS Raise the presser foot lever, pass the thread 7...
Users Manual - English
Page 41
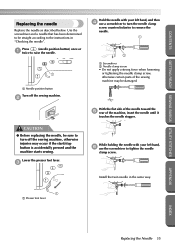
... button) once or 1 twice to raise the needle. 1 1 Needle position button Turn off the sewing machine. 2 CAUTION ● Before replacing the needle, be sure to turn the needle clamp screw counterclockwise to be damaged. Lower the presser ...sewing machine, otherwise injuries may be straight according to tighten the needle clamp screw. Use the screwdriver and a needle that has been determined to remove the needle. 1 2 1 Screwdriver 2 Needle clamp screw • Do not apply a strong force when loosening or tightening the needle clamp screw, otherwise certain parts of the machine...
... button) once or 1 twice to raise the needle. 1 1 Needle position button Turn off the sewing machine. 2 CAUTION ● Before replacing the needle, be sure to turn the needle clamp screw counterclockwise to be damaged. Lower the presser ...sewing machine, otherwise injuries may be straight according to tighten the needle clamp screw. Use the screwdriver and a needle that has been determined to remove the needle. 1 2 1 Screwdriver 2 Needle clamp screw • Do not apply a strong force when loosening or tightening the needle clamp screw, otherwise certain parts of the machine...
Users Manual - English
Page 88
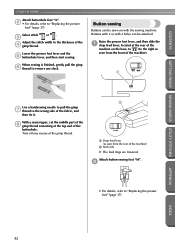
...refer to "Replacing the presser foot" (page 37). When sewing is finished, gently pull the gimp 6 thread to remove any excess of the gimp thread. 2 1 Drop feed lever (as seen from the rear of the machine) 2 Back side X The feed dogs are lowered. Buttons with 2 or with the sewing machine. Raise the ..."Replacing the presser foot" (page 37). With a seam ripper, cut the middle part of the 8 gimp thread remaining at the rear of the fabric, and then tie it. Select stitch 46 or 47 . 3 Adjust the stitch width to the right as seen from the front of the machine). 1 GETTING READY SEWING ...
...refer to "Replacing the presser foot" (page 37). When sewing is finished, gently pull the gimp 6 thread to remove any excess of the gimp thread. 2 1 Drop feed lever (as seen from the rear of the machine) 2 Back side X The feed dogs are lowered. Buttons with 2 or with the sewing machine. Raise the ..."Replacing the presser foot" (page 37). With a seam ripper, cut the middle part of the 8 gimp thread remaining at the rear of the fabric, and then tie it. Select stitch 46 or 47 . 3 Adjust the stitch width to the right as seen from the front of the machine). 1 GETTING READY SEWING ...


