

Accessory Catalog
Page 9
... quilting and other for easy reference. Thread Cassette Wide Tables Brother General Sewing Accessories 16 Thread Cassette For sewing machines with /without a free-motion guide grip. Available with easy-to your leg as you added control and visibility for your sewing machine with an easy to attach...sew. Available in Fall 2008. Without a free-motion guide grip: SA504 SA551 KM B SA537 D (Innov-is NX-600, 400, 400Q, 200 and PC-420, 210) SA552 D (Innov-is perfect for your next project. One package includes ten bobbins. 11.5 mm 1/2" SA156 ABCDEFGHIP SA155 JKLMNO 9.2 mm ...
... quilting and other for easy reference. Thread Cassette Wide Tables Brother General Sewing Accessories 16 Thread Cassette For sewing machines with /without a free-motion guide grip. Available with easy-to your leg as you added control and visibility for your sewing machine with an easy to attach...sew. Available in Fall 2008. Without a free-motion guide grip: SA504 SA551 KM B SA537 D (Innov-is NX-600, 400, 400Q, 200 and PC-420, 210) SA552 D (Innov-is perfect for your next project. One package includes ten bobbins. 11.5 mm 1/2" SA156 ABCDEFGHIP SA155 JKLMNO 9.2 mm ...

Accessory Catalog
Page 15
Use the foot controller so that can be difficult to sew such as vinyl,... length. Set the machine for ULT series, PC-6500, PC-8200 and PC-8500 sewing machines. Requires Low Shank Adapter for ULT series, PC-6500, PC-8200 and PC-8500 sewing machines. Walking Foot/Open Toe Walking Foot Brother Quilting Feet 28 Walking Foot/Open Toe Walking Foot...clamp screw. 2. Use the walking foot with the closed front for free-motion, outline quilting, etc. 1. Brother Quilting Feet 27 Open Toe Quilting Foot Quilting Foot SA187 ABCDEFGHMNO SA129 ABCDEFGHMNO SA165 L Open Toe Quilting Foot ...
Use the foot controller so that can be difficult to sew such as vinyl,... length. Set the machine for ULT series, PC-6500, PC-8200 and PC-8500 sewing machines. Requires Low Shank Adapter for ULT series, PC-6500, PC-8200 and PC-8500 sewing machines. Walking Foot/Open Toe Walking Foot Brother Quilting Feet 28 Walking Foot/Open Toe Walking Foot...clamp screw. 2. Use the walking foot with the closed front for free-motion, outline quilting, etc. 1. Brother Quilting Feet 27 Open Toe Quilting Foot Quilting Foot SA187 ABCDEFGHMNO SA129 ABCDEFGHMNO SA165 L Open Toe Quilting Foot ...

Accessory Catalog
Page 17
... features, updated embroidery functionality and enhanced USB capability. Use the Border Frame to embroider beautiful motifs continuously as embroidery. Brother Embroidery Accessories 31 QuattroTM 6000D Embroidery Card Reader QuattroTM 6000D Border Frame Innov-is 4000D Premium Package SAECR1 Only compatible with... three new free-motion presser feet: Free-motion quilting foot "C" for more features to your QuattroTM 6000D. Add even more control with USB hub devices* to provide access to assure perfectly connected and aligned designs. New Border Frame and 28 Unique Embroidery ...
... features, updated embroidery functionality and enhanced USB capability. Use the Border Frame to embroider beautiful motifs continuously as embroidery. Brother Embroidery Accessories 31 QuattroTM 6000D Embroidery Card Reader QuattroTM 6000D Border Frame Innov-is 4000D Premium Package SAECR1 Only compatible with... three new free-motion presser feet: Free-motion quilting foot "C" for more features to your QuattroTM 6000D. Add even more control with USB hub devices* to provide access to assure perfectly connected and aligned designs. New Border Frame and 28 Unique Embroidery ...

Accessory Catalog
Page 33
...mm (approx. 10-1/4 x 6-1/4 inches) SA428 • Medium Plus: 180 x 130 mm (approx. 7 x 5 inches) SA429 For PC-6500, 8200, 8500, 8500D series: • Extra-large: 300 x 130 mm (approx. 12 x 5 inches) • Small: 20 ... 4 x 4 inches) SA412 • Small: 60 x 60 mm (approx. 2-1/2 x 2-1/2 inches) SA411 www.brother.com Each thread has it's own thread guide to deliver thread smoothly to accommodate a variety of your machine. Ten Spool... storage slots. Some hoops can easily be used thread colors. Take control of spool sizes. Spend less time changing threads, and more on...
...mm (approx. 10-1/4 x 6-1/4 inches) SA428 • Medium Plus: 180 x 130 mm (approx. 7 x 5 inches) SA429 For PC-6500, 8200, 8500, 8500D series: • Extra-large: 300 x 130 mm (approx. 12 x 5 inches) • Small: 20 ... 4 x 4 inches) SA412 • Small: 60 x 60 mm (approx. 2-1/2 x 2-1/2 inches) SA411 www.brother.com Each thread has it's own thread guide to deliver thread smoothly to accommodate a variety of your machine. Ten Spool... storage slots. Some hoops can easily be used thread colors. Take control of spool sizes. Spend less time changing threads, and more on...
Users Manual - English
Page 2
... switch to the nearest authorized dealer or service center for use the proper needle plate. WARNING - Keep ventilation openings of the sewing machine and foot control free from all instructions before using and before changing the light bulb. Do not pull or push fabric while stitching. It may deflect the needle...
... switch to the nearest authorized dealer or service center for use the proper needle plate. WARNING - Keep ventilation openings of the sewing machine and foot control free from all instructions before using and before changing the light bulb. Do not pull or push fabric while stitching. It may deflect the needle...
Users Manual - English
Page 4
...hot objects. 2. For a longer service life 1. Use only neutral soaps or detergents to assure correct installation. When storing your nearest authorized Brother service center. 1 Plug the machine directly into it, we suggest that a malfunction occurs or adjustment is required, first follow the troubleshooting ...parts ● A power failure occurs during use sewing machine available. Remember to keep your eye on the foot controller. 4. Do not use extension cords. Always consult the operation manual when replacing or installing any other parts to clean the case.
...hot objects. 2. For a longer service life 1. Use only neutral soaps or detergents to assure correct installation. When storing your nearest authorized Brother service center. 1 Plug the machine directly into it, we suggest that a malfunction occurs or adjustment is required, first follow the troubleshooting ...parts ● A power failure occurs during use sewing machine available. Remember to keep your eye on the foot controller. 4. Do not use extension cords. Always consult the operation manual when replacing or installing any other parts to clean the case.
Users Manual - English
Page 5
... the bobbin 15 UPPER THREADING 16 Using the extra spool pin and the net .......... 18 STARTING AND STOPPING SEWING 19 "START/STOP" button 19 Foot controller 19 SELECTING A STITCH (UTILITY STITCHES 20 Using the " info " (information) key 20 Quick adjustment reference chart for crazy quilts 37 OVERCASTING STITCHES 38 06 07...
... the bobbin 15 UPPER THREADING 16 Using the extra spool pin and the net .......... 18 STARTING AND STOPPING SEWING 19 "START/STOP" button 19 Foot controller 19 SELECTING A STITCH (UTILITY STITCHES 20 Using the " info " (information) key 20 Quick adjustment reference chart for crazy quilts 37 OVERCASTING STITCHES 38 06 07...
Users Manual - English
Page 7
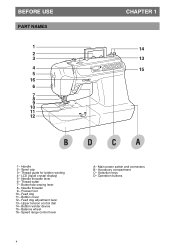
Needle threader 9- Bobbin winder device 15- Accessory compartment C- BEFORE USE PART NAMES 1 2 3 4 5 16 6 7 8 9 10 11 12 CHAPTER 1 14 13 15 BDCA 1- Handle 2- Needle threader lever 6- Bobbin cover 12- Speed range control lever A- Operation buttons 4 Spool cap 3- Upper tension control dial 14- Thread guide for bobbin winding 4- Buttonhole sewing lever 8- Presser foot 10- Feed dog adjustment lever 13- Balance wheel 16- Main power switch and connectors B- Selection keys D- Thread cutter 7- LCD (liquid crystal display) 5- Feed dog 11-
Needle threader 9- Bobbin winder device 15- Accessory compartment C- BEFORE USE PART NAMES 1 2 3 4 5 16 6 7 8 9 10 11 12 CHAPTER 1 14 13 15 BDCA 1- Handle 2- Needle threader lever 6- Bobbin cover 12- Speed range control lever A- Operation buttons 4 Spool cap 3- Upper tension control dial 14- Thread guide for bobbin winding 4- Buttonhole sewing lever 8- Presser foot 10- Feed dog adjustment lever 13- Balance wheel 16- Main power switch and connectors B- Selection keys D- Thread cutter 7- LCD (liquid crystal display) 5- Feed dog 11-
Users Manual - English
Page 8
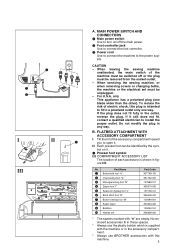
..., this machine. 5 No enclosed accessories fit in these spaces. * Always use the plastic bobbin which is shown in the accessory compartment. * Always use BROTHER accessories with "#" are empty. Needle set must be identified by the symbol on /off or the plug must be switched off the main power. 2 Foot... controller jack Use to connect the foot controller. 3 Power cord Use to connect the machine to fit in a polarized outlet only one blade wider than the other). Do not...
..., this machine. 5 No enclosed accessories fit in these spaces. * Always use the plastic bobbin which is shown in the accessory compartment. * Always use BROTHER accessories with "#" are empty. Needle set must be identified by the symbol on /off or the plug must be switched off the main power. 2 Foot... controller jack Use to connect the foot controller. 3 Power cord Use to connect the machine to fit in a polarized outlet only one blade wider than the other). Do not...

Users Manual - English
Page 9
Side cutter Parts code: X81028-001 3- only) Foot controller: Model N5V This foot controller can be attached to page 97 for sewing machine model PC-3000. Walking foot* Parts code: X81065-001 2- Stitch guide foot "P" Parts code: X51804-001 4- OPTIONAL ACCESSORIES 1 2 3 4 6 1- Quilting foot Parts code:... (small) 8 Spool cap (large) 9 Eyelet punch 10 Net* 11 Extra spool pin* 12 Spool felt 13 Disc-shaped screwdriver 14 Foot controller 15 Hard case 16 Twin needle Part Code X58358-001 X59476-051 X54243-001 X55467-051 X55468-051 136492-151 130013-053 130012-053 135793...
Side cutter Parts code: X81028-001 3- only) Foot controller: Model N5V This foot controller can be attached to page 97 for sewing machine model PC-3000. Walking foot* Parts code: X81065-001 2- Stitch guide foot "P" Parts code: X51804-001 4- OPTIONAL ACCESSORIES 1 2 3 4 6 1- Quilting foot Parts code:... (small) 8 Spool cap (large) 9 Eyelet punch 10 Net* 11 Extra spool pin* 12 Spool felt 13 Disc-shaped screwdriver 14 Foot controller 15 Hard case 16 Twin needle Part Code X58358-001 X59476-051 X54243-001 X55467-051 X55468-051 136492-151 130013-053 130012-053 135793...

Users Manual - English
Page 10
... this key to adjust the width of the zigzag stitch. 4 Stitch length keys Touch this key to adjust the length of the stitch. 5 Screen brightness control lever Slide this lever to adjust the brightness of the stitch that you wish to confirm that the characters selected for a pattern combination are difficult...
... this key to adjust the width of the zigzag stitch. 4 Stitch length keys Touch this key to adjust the length of the stitch. 5 Screen brightness control lever Slide this lever to adjust the brightness of the stitch that you wish to confirm that the characters selected for a pattern combination are difficult...
Users Manual - English
Page 11
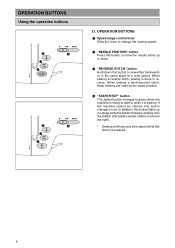
... button to start or while it is done in the same place at a slow speed while this button changes to red. OPERATION BUTTONS 1 Speed range control lever Slide this lever to change the sewing speed. 2 "NEEDLE POSITION" button Press this button to move the needle either backwards or in reverse.
... button to start or while it is done in the same place at a slow speed while this button changes to red. OPERATION BUTTONS 1 Speed range control lever Slide this lever to change the sewing speed. 2 "NEEDLE POSITION" button Press this button to move the needle either backwards or in reverse.
Users Manual - English
Page 13
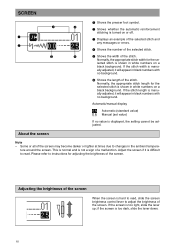
.... Adjusting the brightness of the stitch. Normally, the appropriate stitch length for the se- If the screen is hard to read, slide the screen brightness control lever to read. Normally, the appropriate stitch width for the selected stitch is too dark, slide the lever down. 10 if the screen is shown...
.... Adjusting the brightness of the stitch. Normally, the appropriate stitch length for the se- If the screen is hard to read, slide the screen brightness control lever to read. Normally, the appropriate stitch width for the selected stitch is too dark, slide the lever down. 10 if the screen is shown...
Users Manual - English
Page 17
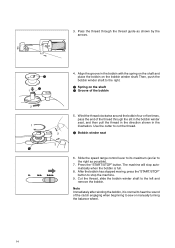
... winder shaft to the right as shown by the arrows. 2 1 1 2 1 2 3 1 4. The machine will stop the machine. 9. Press the "START/STOP" button. Slide the speed range control lever to its maximum (as far to the right. 1 Spring on the bobbin winder shaft. Cut the thread, slide the bobbin winder shaft to cut...
... winder shaft to the right as shown by the arrows. 2 1 1 2 1 2 3 1 4. The machine will stop the machine. 9. Press the "START/STOP" button. Slide the speed range control lever to its maximum (as far to the right. 1 Spring on the bobbin winder shaft. Cut the thread, slide the bobbin winder shaft to cut...
Users Manual - English
Page 22
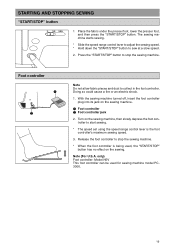
... press the "START/STOP" button. Note (For U.S.A. only) Foot controller: Model N5V This foot controller can be used , the "START/STOP" button has no effect on the sewing machine. 1 Foot controller 2 Foot controller jack 2. Foot controller 1 2 Note Do not allow fabric pieces and dust to start sewing.... * The speed set using the speed range control lever is being used for sewing machine model PC3000. 19 Doing so...
... press the "START/STOP" button. Note (For U.S.A. only) Foot controller: Model N5V This foot controller can be used , the "START/STOP" button has no effect on the sewing machine. 1 Foot controller 2 Foot controller jack 2. Foot controller 1 2 Note Do not allow fabric pieces and dust to start sewing.... * The speed set using the speed range control lever is being used for sewing machine model PC3000. 19 Doing so...

Users Manual - English
Page 94
...to store could not be combined. This message is displayed when the "START/ STOP" or "REVERSE STITCH" button is pushed, or when the foot controller is pressed down while the presser foot is locked, such as when the thread becomes entangled. This message is displayed when the "START/ STOP" ...button is pushed while the foot controller is at the right. This message is displayed when the "REVERSE STITCH" or "NEEDLE POSITION" button is pushed while the bobbin winder shaft is ...
...to store could not be combined. This message is displayed when the "START/ STOP" or "REVERSE STITCH" button is pushed, or when the foot controller is pressed down while the presser foot is locked, such as when the thread becomes entangled. This message is displayed when the "START/ STOP" ...button is pushed while the foot controller is at the right. This message is displayed when the "REVERSE STITCH" or "NEEDLE POSITION" button is pushed while the bobbin winder shaft is ...

Users Manual - English
Page 96
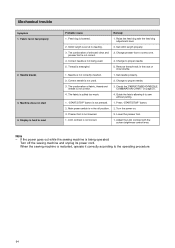
...needle is not correct. 3. Change to proper needle. 5. Remove dust by cleaning with threads and stitches Before calling for thread tension control 1. Re-thread upper thread. 1. Combination of fabric, thread and needle is not used. 4. Check the "FABRIC/THREAD/NEEDLE COMBINATION ...Correct needle is not correctly set. 3. Change to "ADJUSTING STITCH patterns adjusted. Shifted sewing position of purchase or your nearest authorized Brother dealer. Spool of fabric, thread and needle is not correct. 1. Remove thread ends in the race or shuttle. 3. Inability ...
...needle is not correct. 3. Change to proper needle. 5. Remove dust by cleaning with threads and stitches Before calling for thread tension control 1. Re-thread upper thread. 1. Combination of fabric, thread and needle is not used. 4. Check the "FABRIC/THREAD/NEEDLE COMBINATION ...Correct needle is not correctly set. 3. Change to "ADJUSTING STITCH patterns adjusted. Shifted sewing position of purchase or your nearest authorized Brother dealer. Spool of fabric, thread and needle is not correct. 1. Remove thread ends in the race or shuttle. 3. Inability ...
Users Manual - English
Page 97
.... 5. Main power switch is not correct. 1. LCD contrast is in the race or inner shuttle. 1. Needle breaks 3. Raise the feed dog with the screen brightness control lever. Needle is restarted, operate it to proper needle. 5. Lower the presser foot. 1. When the sewing machine is not correctly inserted. 1. The fabric is lowered...
.... 5. Main power switch is not correct. 1. LCD contrast is in the race or inner shuttle. 1. Needle breaks 3. Raise the feed dog with the screen brightness control lever. Needle is restarted, operate it to proper needle. 5. Lower the presser foot. 1. When the sewing machine is not correctly inserted. 1. The fabric is lowered...


