

Accessory Catalog
Page 34
... Threads Brother Bobbin Threads are included in a 5-pack sleeve). 300 meters (328 yards) of fabrics with a high nap such as a useful and decorative wooden thread rack that no stabilizer remains after the embroidery is completed. Designed for high speed embroidery stitching...C (White only): The 1,000-meter (approx. 1,100-yds) spun thread is 500D. Handles a variety of colors specifically designed for Brother Embroidery machines, but compatible with other sewing and embroidery machine brands. SA520 Water Soluble Stabilizer 11" x 3.3 yds SA540 Light Weight Water ...
... Threads Brother Bobbin Threads are included in a 5-pack sleeve). 300 meters (328 yards) of fabrics with a high nap such as a useful and decorative wooden thread rack that no stabilizer remains after the embroidery is completed. Designed for high speed embroidery stitching...C (White only): The 1,000-meter (approx. 1,100-yds) spun thread is 500D. Handles a variety of colors specifically designed for Brother Embroidery machines, but compatible with other sewing and embroidery machine brands. SA520 Water Soluble Stabilizer 11" x 3.3 yds SA540 Light Weight Water ...

Users Manual - English
Page 7
... Quilt Stitching 100 Appliqué stitching ...101 Patchwork (crazy quilt) stitching ...102 Piecing ...102 Quilting ...104 Free-motion quilting...105 Satin stitching using the sewing speed controller 106 Reinforcement Stitching 108 Triple stretch stitching ...108 Bar tack stitching...108 Darning...110 Eyelet Stitching...112 Horizontal Stitching ...113 Decorative Stitching...115 Fagoting...
... Quilt Stitching 100 Appliqué stitching ...101 Patchwork (crazy quilt) stitching ...102 Piecing ...102 Quilting ...104 Free-motion quilting...105 Satin stitching using the sewing speed controller 106 Reinforcement Stitching 108 Triple stretch stitching ...108 Bar tack stitching...108 Darning...110 Eyelet Stitching...112 Horizontal Stitching ...113 Decorative Stitching...115 Fagoting...

Users Manual - English
Page 11
... the spool of the machine parts. f Bobbin winder Use the bobbin winder when winding the bobbin. m Thread take-up lever. 10 i Operation buttons and sewing speed controller Use these descriptions to thread the needle. When sewing cylindrical pieces, remove the flat bed attachment.
... the spool of the machine parts. f Bobbin winder Use the bobbin winder when winding the bobbin. m Thread take-up lever. 10 i Operation buttons and sewing speed controller Use these descriptions to thread the needle. When sewing cylindrical pieces, remove the flat bed attachment.

Users Manual - English
Page 13
...green, red or orange, depending on how the sewing machine is sewing, otherwise damage to start or stop sewing. e Sewing speed controller Slide the sewing speed controller to raise or lower the needle. a "Start/Stop" button Press the "Start/Stop" button to start sewing Orange... the presser foot or while the machine is being operated. c "Needle Position" button Press the "Needle Position" button to adjust the sewing speed. For details, refer to "Securing the stitching" (page 54). Reinforcement stitches are sewn by sewing 3 to sew reverse stitches or reinforcement stitches...
...green, red or orange, depending on how the sewing machine is sewing, otherwise damage to start or stop sewing. e Sewing speed controller Slide the sewing speed controller to raise or lower the needle. a "Start/Stop" button Press the "Start/Stop" button to start sewing Orange... the presser foot or while the machine is being operated. c "Needle Position" button Press the "Needle Position" button to adjust the sewing speed. For details, refer to "Securing the stitching" (page 54). Reinforcement stitches are sewn by sewing 3 to sew reverse stitches or reinforcement stitches...

Users Manual - English
Page 21
... the brightness of the pattern. page 131 Adjusts the left and right position of the LCD. z The default display language is sounded with the sewing speed controller. Attribute Check pattern Icon Details Allows combined patterns to be checked. Allows the language used in the screens to be changed. Specifies whether or...
... the brightness of the pattern. page 131 Adjusts the left and right position of the LCD. z The default display language is sounded with the sewing speed controller. Attribute Check pattern Icon Details Allows combined patterns to be checked. Allows the language used in the screens to be changed. Specifies whether or...

Users Manual - English
Page 26
a Sewing speed controller Press n ("Start/Stop" button) once. If the bobbin is wound without cutting the thread using the cutter built into the slit in the bobbin ... thread clockwise around the bobbin, otherwise the thread will become tangled in cutter) X The thread is pulled tight. Slide the sewing speed controller to the right m to increase the bobbin winding speed and slide to left to a suitable length. CAUTION ● Be sure to cut to decrease. 1 1 Note z Make sure that was...
a Sewing speed controller Press n ("Start/Stop" button) once. If the bobbin is wound without cutting the thread using the cutter built into the slit in the bobbin ... thread clockwise around the bobbin, otherwise the thread will become tangled in cutter) X The thread is pulled tight. Slide the sewing speed controller to the right m to increase the bobbin winding speed and slide to left to a suitable length. CAUTION ● Be sure to cut to decrease. 1 1 Note z Make sure that was...

Users Manual - English
Page 45
... b Needle clamp screw Lower the presser foot lever, insert the presser c foot holder screw, and then tighten the screw with the walking foot, sew at a speed between slow and medium. ■ Removing the walking foot Press ("Needle Position" button) once or a twice to "Removing the presser foot holder" (page 43). Note...
... b Needle clamp screw Lower the presser foot lever, insert the presser c foot holder screw, and then tighten the screw with the walking foot, sew at a speed between slow and medium. ■ Removing the walking foot Press ("Needle Position" button) once or a twice to "Removing the presser foot holder" (page 43). Note...

Users Manual - English
Page 53
... to the left or a right to hold ("Start/Stop" button) pressed immediately after the sewing starts, the machine will sew at a slow speed. X The machine stops sewing with the needle down (in order to "Cutting the thread" (page 55). ■ Using the foot controller Sewing can...When the foot controller is reached, press c ("Start/Stop" button) once. Turn off the sewing machine in the fabric). The sewing speed can be adjusted using either the sewing speed controller or the foot controller. When you are ready to sew Press b ("Start/Stop" button) once. When the end of the ...
... to the left or a right to hold ("Start/Stop" button) pressed immediately after the sewing starts, the machine will sew at a slow speed. X The machine stops sewing with the needle down (in order to "Cutting the thread" (page 55). ■ Using the foot controller Sewing can...When the foot controller is reached, press c ("Start/Stop" button) once. Turn off the sewing machine in the fabric). The sewing speed can be adjusted using either the sewing speed controller or the foot controller. When you are ready to sew Press b ("Start/Stop" button) once. When the end of the ...

Users Manual - English
Page 54
... 55). Sewing 53 releasing the pressure on this machine model NX-650. When the end of time, unplug the foot controller, otherwise a fire or an electric shock may occur. ● If the machine is not to be set using the sewing speed controller will stay up when sewing is plugged in the foot...
... 55). Sewing 53 releasing the pressure on this machine model NX-650. When the end of time, unplug the foot controller, otherwise a fire or an electric shock may occur. ● If the machine is not to be set using the sewing speed controller will stay up when sewing is plugged in the foot...

Users Manual - English
Page 55
... then lower the presser foot lever. 1 Press ("Start/Stop" button) or press down b on the foot controller. Lower the needle into the fabric at a low speed. At this time, if ("Start/Stop" button) is held down until 3 to the beginning of the stitching. Press ("Start/Stop" button), or press down , reverse...
... then lower the presser foot lever. 1 Press ("Start/Stop" button) or press down b on the foot controller. Lower the needle into the fabric at a low speed. At this time, if ("Start/Stop" button) is held down until 3 to the beginning of the stitching. Press ("Start/Stop" button), or press down , reverse...

Users Manual - English
Page 56
After 3 to "Stitch Settings" (page 138). Press ("Start/Stop" button), or press down , the machine sews at a slow speed. At this time, if ("Start/Stop" button) is selected. For details, refer to 5 reverse stitches have been sewn, g release ("Reverse/Reinforcement Stitch" button). Memo z The ...
After 3 to "Stitch Settings" (page 138). Press ("Start/Stop" button), or press down , the machine sews at a slow speed. At this time, if ("Start/Stop" button) is selected. For details, refer to 5 reverse stitches have been sewn, g release ("Reverse/Reinforcement Stitch" button). Memo z The ...
Users Manual - English
Page 60
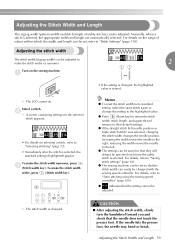
... selected. z Press (Reset key) to return the stitch width, stitch length, and upper thread tension to "Satin stitching using the sewing speed controller" (page 106). reducing the width moves the needle to the left needle position or triple stretch stitch) was selected, changing the stitch...same stitch again or change the setting to "Saving stitch settings" (page 64). z The settings can easily be changed with the sewing speed controller. For details, refer to the highlighted value. z indicates that the stitch width can be saved so that the needle does not ...
... selected. z Press (Reset key) to return the stitch width, stitch length, and upper thread tension to "Satin stitching using the sewing speed controller" (page 106). reducing the width moves the needle to the left needle position or triple stretch stitch) was selected, changing the stitch...same stitch again or change the setting to "Saving stitch settings" (page 64). z The settings can easily be changed with the sewing speed controller. For details, refer to the highlighted value. z indicates that the stitch width can be saved so that the needle does not ...

Users Manual - English
Page 70
... Quilt Stitching 100 Appliqué stitching 101 Patchwork (crazy quilt) stitching....... 102 Piecing 102 Quilting 104 Free-motion quilting 105 Satin stitching using the sewing speed controller 106 Reinforcement Stitching 108 Triple stretch stitching 108 Bar tack stitching 108 Darning 110 Eyelet Stitching 112 Horizontal Stitching 113 Decorative Stitching 115 Fagoting...
... Quilt Stitching 100 Appliqué stitching 101 Patchwork (crazy quilt) stitching....... 102 Piecing 102 Quilting 104 Free-motion quilting 105 Satin stitching using the sewing speed controller 106 Reinforcement Stitching 108 Triple stretch stitching 108 Bar tack stitching 108 Darning 110 Eyelet Stitching 112 Horizontal Stitching 113 Decorative Stitching 115 Fagoting...

Users Manual - English
Page 91
... upper thread at the end of the stitching to the right as seen from the rear of the stitching. h Set the sewing speed controller to the left (so that the speed will be slow). ■ Attaching a shank to secure the button, perform the button-sewing operation twice. • Do not press ("Thread...
... upper thread at the end of the stitching to the right as seen from the rear of the stitching. h Set the sewing speed controller to the left (so that the speed will be slow). ■ Attaching a shank to secure the button, perform the button-sewing operation twice. • Do not press ("Thread...

Users Manual - English
Page 105
Baste the fabric to "Selecting Stitching" (page 70). Insert the stem of the quilting guide into the a hole at a speed between the top and bottom layers of the presser d foot, and hold fabric taut while sewing. † Presser foot holder Note z When sewing with the ...
Baste the fabric to "Selecting Stitching" (page 70). Insert the stem of the quilting guide into the a hole at a speed between the top and bottom layers of the presser d foot, and hold fabric taut while sewing. † Presser foot holder Note z When sewing with the ...

Users Manual - English
Page 107
...stitch 24 . Slide the controller to the left to "Replacing the presser foot" (page 41). Press or e . X The machine is adjusted with the sewing speed controller. Press f key). (OK key) or (Cancel/clear X The initial stitch screen appears again. b J • For details, refer to make the ... X The screen for specifying that the stitch width can be controlled with the sewing speed controller appears. • Adjust the sewing speed with the foot controller. 106 In this case, the sewing speed is now set so that the stitch width can be adjusted using the sewing...
...stitch 24 . Slide the controller to the left to "Replacing the presser foot" (page 41). Press or e . X The machine is adjusted with the sewing speed controller. Press f key). (OK key) or (Cancel/clear X The initial stitch screen appears again. b J • For details, refer to make the ... X The screen for specifying that the stitch width can be controlled with the sewing speed controller appears. • Adjust the sewing speed with the foot controller. 106 In this case, the sewing speed is now set so that the stitch width can be adjusted using the sewing...

Users Manual - English
Page 132
... illustration is sewn uniformly, the pattern is selected. X The pattern alignment stitch is correctly aligned. X The saved contents of fabric being sewn or the sewing speed. If the pattern is saved. Press the numeric key (0 through 9) for making the adjustment is sewn. c X The pattern for the b pocket where the pattern is...
... illustration is sewn uniformly, the pattern is selected. X The pattern alignment stitch is correctly aligned. X The saved contents of fabric being sewn or the sewing speed. If the pattern is saved. Press the numeric key (0 through 9) for making the adjustment is sewn. c X The pattern for the b pocket where the pattern is...

Users Manual - English
Page 156
..., "Needle Position" button or "Thread Cutter" button was pressed without connecting the foot controller while the setting for adjusting the stitch width using the sewing speed controller is set up because the thread is tangled. The motor locked up or if an operation is performed incorrectly, an error message appears in...
..., "Needle Position" button or "Thread Cutter" button was pressed without connecting the foot controller while the setting for adjusting the stitch width using the sewing speed controller is set up because the thread is tangled. The motor locked up or if an operation is performed incorrectly, an error message appears in...
Users Manual - English
Page 160
... saving stitch settings 64 scallop stitching 117 , screwdriver 9 40 , seam ripper 9 87 selecting stitching 72 , settings key 13 19 sewing machine needles 37 sewing speed 52 , sewing speed controller 12 106 shell tuck stitch 118 shifting patterns 128 , side cutter 9 78 size 125 sleeves 108 smocking 117 spool cap 9 23, 29 spool...
... saving stitch settings 64 scallop stitching 117 , screwdriver 9 40 , seam ripper 9 87 selecting stitching 72 , settings key 13 19 sewing machine needles 37 sewing speed 52 , sewing speed controller 12 106 shell tuck stitch 118 shifting patterns 128 , side cutter 9 78 size 125 sleeves 108 smocking 117 spool cap 9 23, 29 spool...

