

Accessory Catalog
Page 11
... Cording Foot (5-hole) Used for quilting appliqué! 1. Attach the presser foot and pull cords under the presser foot, and select zigzag stitch with brother sewing machines of seams or pattern markings are desired. Insert cords or threads into each guide (to 5 cords or decorative threads. Set the zigzag width slightly wider than the width of the braid. 3. Perfect for embellishing 1 to use single cord, use sewing machines Clear-view Foot Use this presser foot where visibility of 7 mm feed width. 1. Slip a cord from satin or decorative stitches. 2. Insert cords or threads...
... Cording Foot (5-hole) Used for quilting appliqué! 1. Attach the presser foot and pull cords under the presser foot, and select zigzag stitch with brother sewing machines of seams or pattern markings are desired. Insert cords or threads into each guide (to 5 cords or decorative threads. Set the zigzag width slightly wider than the width of the braid. 3. Perfect for embellishing 1 to use single cord, use sewing machines Clear-view Foot Use this presser foot where visibility of 7 mm feed width. 1. Slip a cord from satin or decorative stitches. 2. Insert cords or threads...

Accessory Catalog
Page 13
... presser foot has 7 grooves and produces perfect pin tucks and corded pin tucks using a twin needle on the lower portion of stitch length, tuck setting and depth setting. 2. Move fabric about 1" (2.5 cm) past the needle to sew the first row in one of tuck or gather by placing the completed row in the center position. 3. Draw a reference line to guide your first row of stitching and use that to get started. A specially designed bobbin cover...
... presser foot has 7 grooves and produces perfect pin tucks and corded pin tucks using a twin needle on the lower portion of stitch length, tuck setting and depth setting. 2. Move fabric about 1" (2.5 cm) past the needle to sew the first row in one of tuck or gather by placing the completed row in the center position. 3. Draw a reference line to guide your first row of stitching and use that to get started. A specially designed bobbin cover...

Accessory Catalog
Page 15
...-8200 and PC-8500 sewing machines. Select a straight stitch or your preferred stitch such as the machine's lower feed dogs to guide the fabric. 4. Set the machine to the machine. 2. Requires Low Shank Adapter for free-motion, outline quilting, etc. 1. Quilting Foot For darning, quilting, or free-motion. Use the walking foot with the closed front for straight stitch. 3. Set the fabric under the presser foot. 6. While starting to sew, press the needle position button twice to pull the bobbin thread to hold fabric in the needle area. Set the machine for thick layers...
...-8200 and PC-8500 sewing machines. Select a straight stitch or your preferred stitch such as the machine's lower feed dogs to guide the fabric. 4. Set the machine to the machine. 2. Requires Low Shank Adapter for free-motion, outline quilting, etc. 1. Quilting Foot For darning, quilting, or free-motion. Use the walking foot with the closed front for straight stitch. 3. Set the fabric under the presser foot. 6. While starting to sew, press the needle position button twice to pull the bobbin thread to hold fabric in the needle area. Set the machine for thick layers...

Accessory Catalog
Page 17
... patterns from the stunning designs that have been upgraded with the SAVR4000D Premium Package. Includes three new free-motion presser feet: Free-motion quilting foot "C" for perfect echo quilting - Used in conjunction with the built-in software in embroidery fonts. - Drag and drop embroidery pattern positioning. - Add tremendous functionality to repeat designs vertically or horizontally. Sewing Decorative Stitches as border designs. Accepts USB mouse* to see reference stitches to embroider beautiful motifs continuously as embroidery. Greater functionality in USB...
... patterns from the stunning designs that have been upgraded with the SAVR4000D Premium Package. Includes three new free-motion presser feet: Free-motion quilting foot "C" for perfect echo quilting - Used in conjunction with the built-in software in embroidery fonts. - Drag and drop embroidery pattern positioning. - Add tremendous functionality to repeat designs vertically or horizontally. Sewing Decorative Stitches as border designs. Accepts USB mouse* to see reference stitches to embroider beautiful motifs continuously as embroidery. Greater functionality in USB...

Accessory Catalog
Page 33
Some hoops can easily be used thread colors. Brother Embroidery Accessories 63 Free-Standing Ten Spool Thread Stand Ten Spool Thread Stand Embroidery Machine Hoops Brother Embroidery Accessories 64 For all embroidery and sewing/embroidery machines. Each thread has it's own thread guide to deliver thread smoothly to 10 spools of thread on to your machine to provide 10 vertical spool pins for details, www.brother.com. SA539 DuettaTM4500D,Innov-is 4000D: • Extra-large: 300 x 180 mm (approx. 12 x 7 inches) SA440...
Some hoops can easily be used thread colors. Brother Embroidery Accessories 63 Free-Standing Ten Spool Thread Stand Ten Spool Thread Stand Embroidery Machine Hoops Brother Embroidery Accessories 64 For all embroidery and sewing/embroidery machines. Each thread has it's own thread guide to deliver thread smoothly to 10 spools of thread on to your machine to provide 10 vertical spool pins for details, www.brother.com. SA539 DuettaTM4500D,Innov-is 4000D: • Extra-large: 300 x 180 mm (approx. 12 x 7 inches) SA440...

Accessory Catalog
Page 34
... Soluble Stabilizers When doing machine embroidery, the use the Brother Bobbin Thread designed specifically for greater utility and space saving. SA519 Iron-on the top surface of thread per spool. Handles a variety of the proper stabilizer helps to the Brother Embroidery Cards giving you just the right color for Brother® Embroidery Machines, but compatible with a stabilizer. Bobbin Threads Stabilizers and Water Water Soluble Stabilizers Brother Embroidery Accessories 66 Bobbin Threads Brother Bobbin Threads are also available...
... Soluble Stabilizers When doing machine embroidery, the use the Brother Bobbin Thread designed specifically for greater utility and space saving. SA519 Iron-on the top surface of thread per spool. Handles a variety of the proper stabilizer helps to the Brother Embroidery Cards giving you just the right color for Brother® Embroidery Machines, but compatible with a stabilizer. Bobbin Threads Stabilizers and Water Water Soluble Stabilizers Brother Embroidery Accessories 66 Bobbin Threads Brother Bobbin Threads are also available...

Accessory Catalog
Page 40
... machine for a cover stitch, with the LC1 presser foot included in the machine. 2. Brother Cover Stitch Feet 78 Top Stitching Foot Set Top Stitching Foot Set Use included presser foot to 1/2 inch) bias tapes as holding the fabric lightly with a tweezers. Insert the tab on the bias tape attachment into the guide. 4. Set the bias tape though the holder (cut the end of the presser foot, and sew. Set up your machine. 3. Attaching 6 mm (approx. 1/4") bias tape: Use the small bias tape sliding plate...
... machine for a cover stitch, with the LC1 presser foot included in the machine. 2. Brother Cover Stitch Feet 78 Top Stitching Foot Set Top Stitching Foot Set Use included presser foot to 1/2 inch) bias tapes as holding the fabric lightly with a tweezers. Insert the tab on the bias tape attachment into the guide. 4. Set the bias tape though the holder (cut the end of the presser foot, and sew. Set up your machine. 3. Attaching 6 mm (approx. 1/4") bias tape: Use the small bias tape sliding plate...

Users Manual - English
Page 5
... the needle ...31 Threading the needle manually (without using the needle threader 33 Using the twin needle ...33 Pulling up the bobbin thread...36 Replacing the Needle ...37 Needle precautions ...37 Needle types and their uses...38 Checking the needle ...39 Replacing the needle...39 Replacing the Presser Foot 41 Presser foot precautions ...41 Replacing the presser foot ...41 Adjusting the pressure of the presser foot ...43 Removing the presser foot holder ...43 Using the walking foot ...44 Sewing Cylindrical or Large Pieces 46 Stitching cylindrical pieces...46 Sewing large pieces of fabric...
... the needle ...31 Threading the needle manually (without using the needle threader 33 Using the twin needle ...33 Pulling up the bobbin thread...36 Replacing the Needle ...37 Needle precautions ...37 Needle types and their uses...38 Checking the needle ...39 Replacing the needle...39 Replacing the Presser Foot 41 Presser foot precautions ...41 Replacing the presser foot ...41 Adjusting the pressure of the presser foot ...43 Removing the presser foot holder ...43 Using the walking foot ...44 Sewing Cylindrical or Large Pieces 46 Stitching cylindrical pieces...46 Sewing large pieces of fabric...
Users Manual - English
Page 6
... Adjusting the Stitch Width and Length 59 Adjusting the stitch width ...59 Adjusting the stitch length ...60 Useful Functions...61 Changing the needle stop position ...61 Automatically sewing reverse/reinforcement stitches 61 Automatically cutting the thread ...63 Saving stitch settings ...64 Hands-free raising and lowering of the presser foot 65 Useful Sewing Tips ...66 Trial sewing ...66 Changing the sewing direction ...66 Sewing curves ...66 Sewing thick fabrics ...67 Sewing thin fabrics...67 Sewing stretch fabrics...67 Sewing leathers or vinyl fabrics ...68 Sewing an even seam allowance...
... Adjusting the Stitch Width and Length 59 Adjusting the stitch width ...59 Adjusting the stitch length ...60 Useful Functions...61 Changing the needle stop position ...61 Automatically sewing reverse/reinforcement stitches 61 Automatically cutting the thread ...63 Saving stitch settings ...64 Hands-free raising and lowering of the presser foot 65 Useful Sewing Tips ...66 Trial sewing ...66 Changing the sewing direction ...66 Sewing curves ...66 Sewing thick fabrics ...67 Sewing thin fabrics...67 Sewing stretch fabrics...67 Sewing leathers or vinyl fabrics ...68 Sewing an even seam allowance...

Users Manual - English
Page 12
... lower the presser foot lever to the fabric. a Presser foot dial Use the presser foot dial to adjust the amount of Machine Parts and Their Functions 11 h Feed dog position switch Use the feed dog position switch to turn the sewing machine ON and OFF. i Presser foot holder The presser foot is used . The handwheel should be turned towards you to clean the bobbin case and race. e Main power switch Use the main power switch to lower the feed dogs. Memo z Refer to pages 9 through the thread guide disk when using the needle threader...
... lower the presser foot lever to the fabric. a Presser foot dial Use the presser foot dial to adjust the amount of Machine Parts and Their Functions 11 h Feed dog position switch Use the feed dog position switch to turn the sewing machine ON and OFF. i Presser foot holder The presser foot is used . The handwheel should be turned towards you to clean the bobbin case and race. e Main power switch Use the main power switch to lower the feed dogs. Memo z Refer to pages 9 through the thread guide disk when using the needle threader...

Users Manual - English
Page 13
... start sewing Orange: When the bobbin winder shaft is being operated. Reverse stitches are sewn by keeping the button pressed down to the machine may occur. For details, refer to raise or lower the needle. c "Needle Position" button Press the "Needle Position" button to "Securing the stitching" (page 54). e Sewing speed controller Slide the sewing speed controller to 5 stitches on top of each other special threads, use the thread cutter on how the sewing machine is moved to the right for winding...
... start sewing Orange: When the bobbin winder shaft is being operated. Reverse stitches are sewn by keeping the button pressed down to the machine may occur. For details, refer to raise or lower the needle. c "Needle Position" button Press the "Needle Position" button to "Securing the stitching" (page 54). e Sewing speed controller Slide the sewing speed controller to 5 stitches on top of each other special threads, use the thread cutter on how the sewing machine is moved to the right for winding...
Users Manual - English
Page 16
... 22 Winding the bobbin 22 Installing the bobbin 26 Upper Threading ...28 Threading the upper thread 28 Threading the needle 31 Threading the needle manually (without using the needle threader 33 Using the twin needle 33 Pulling up the bobbin thread 36 Replacing the Needle 37 Needle precautions 37 Needle types and their uses 38 Checking the needle 39 Replacing the needle 39 Replacing the Presser Foot 41 Presser foot precautions 41 Replacing the presser foot 41 Adjusting the pressure of the presser foot 43 Removing the presser foot holder 43 Using the walking foot 44 Sewing...
... 22 Winding the bobbin 22 Installing the bobbin 26 Upper Threading ...28 Threading the upper thread 28 Threading the needle 31 Threading the needle manually (without using the needle threader 33 Using the twin needle 33 Pulling up the bobbin thread 36 Replacing the Needle 37 Needle precautions 37 Needle types and their uses 38 Checking the needle 39 Replacing the needle 39 Replacing the Presser Foot 41 Presser foot precautions 41 Replacing the presser foot 41 Adjusting the pressure of the presser foot 43 Removing the presser foot holder 43 Using the walking foot 44 Sewing...
Users Manual - English
Page 36
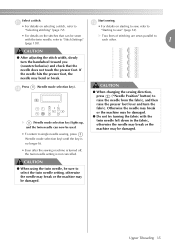
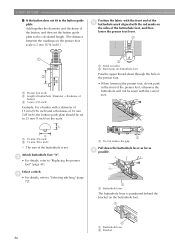
... to raise the needle from the fabric, and then raise the presser foot lever and turn the handwheel toward you (counterclockwise) and check that can now be sewn with the twin needle left down in the fabric, otherwise the needle may break or the machine may bend or break. Press l (Needle mode selection key). Select a stitch. Start sewing. CAUTION ● When changing the sewing direction, press ("Needle Position" button) to each other...
... to raise the needle from the fabric, and then raise the presser foot lever and turn the handwheel toward you (counterclockwise) and check that can now be sewn with the twin needle left down in the fabric, otherwise the needle may break or the machine may bend or break. Press l (Needle mode selection key). Select a stitch. Start sewing. CAUTION ● When changing the sewing direction, press ("Needle Position" button) to each other...
Users Manual - English
Page 50
...tension of the upper thread 58 Adjusting the Stitch Width and Length 59 Adjusting the stitch width 59 Adjusting the stitch length 60 Useful Functions...61 Changing the needle stop position 61 Automatically sewing reverse/reinforcement stitches 61 Automatically cutting the thread 63 Saving stitch settings 64 Hands-free raising and lowering of the presser foot 65 Useful Sewing Tips 66 Trial sewing...66 Changing the sewing direction 66 Sewing curves ...66 Sewing thick fabrics 67 Sewing thin fabrics 67 Sewing stretch fabrics 67 Sewing leathers or vinyl fabrics 68 Sewing an even seam...
...tension of the upper thread 58 Adjusting the Stitch Width and Length 59 Adjusting the stitch width 59 Adjusting the stitch length 60 Useful Functions...61 Changing the needle stop position 61 Automatically sewing reverse/reinforcement stitches 61 Automatically cutting the thread 63 Saving stitch settings 64 Hands-free raising and lowering of the presser foot 65 Useful Sewing Tips 66 Trial sewing...66 Changing the sewing direction 66 Sewing curves ...66 Sewing thick fabrics 67 Sewing thin fabrics 67 Sewing stretch fabrics 67 Sewing leathers or vinyl fabrics 68 Sewing an even seam...
Users Manual - English
Page 60
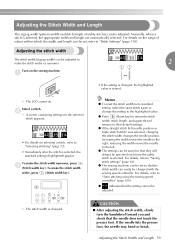
... stitch width, stitch length, and upper thread tension to "Saving stitch settings" (page 64). Increasing the width moves the needle to the highlighted value. z The sewing machine can be set , refer to "Satin stitching using the sewing speed controller" (page 106). X The stitch width is erased. a 2 - + • If the setting is changed, the highlighted value is changed with the sewing speed controller. If the needle hits the presser foot, the needle may bend or break. Adjusting the Stitch Width and Length The zigzag width (pattern...
... stitch width, stitch length, and upper thread tension to "Saving stitch settings" (page 64). Increasing the width moves the needle to the highlighted value. z The sewing machine can be set , refer to "Satin stitching using the sewing speed controller" (page 106). X The stitch width is erased. a 2 - + • If the setting is changed, the highlighted value is changed with the sewing speed controller. If the needle hits the presser foot, the needle may bend or break. Adjusting the Stitch Width and Length The zigzag width (pattern...
Users Manual - English
Page 87
... 10 mm (3/8 inch), the button guide plate should be set to 25 mm (1 inch) on the scale. 1 A 2 a Mark on fabric b Red marks on buttonhole foot Pass the upper thread down the buttonhole lever as far as f possible. Pull down through the hole in the presser foot. • When lowering the presser foot, do not push in the front of the presser foot, otherwise the buttonhole will not be sewn with...
... 10 mm (3/8 inch), the button guide plate should be set to 25 mm (1 inch) on the scale. 1 A 2 a Mark on fabric b Red marks on buttonhole foot Pass the upper thread down the buttonhole lever as far as f possible. Pull down through the hole in the presser foot. • When lowering the presser foot, do not push in the front of the presser foot, otherwise the buttonhole will not be sewn with...
Users Manual - English
Page 90
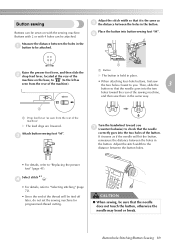
Select stitch 61 . Attach button-sewing foot "M". CAUTION ● When sewing, be attached. Buttonhole Stitching/Button Sewing 89 f Raise the presser foot lever, and then slide the b drop feed lever, located at the rear of the machine) X The feed dogs are lowered. a a Button X The button is the same as seen from the rear of the machine on with 4 holes can be sewn on the base, to (to the left as e the distance between the button holes. • For...
Select stitch 61 . Attach button-sewing foot "M". CAUTION ● When sewing, be attached. Buttonhole Stitching/Button Sewing 89 f Raise the presser foot lever, and then slide the b drop feed lever, located at the rear of the machine) X The feed dogs are lowered. a a Button X The button is the same as seen from the rear of the machine on with 4 holes can be sewn on the base, to (to the left as e the distance between the button holes. • For...

Users Manual - English
Page 152
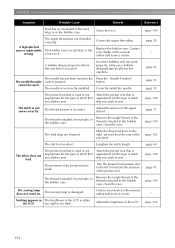
... presser foot lever is connected. Do not use the "Start/Stop" button when the foot controller is raised. To use a bobbin designed specifically for the type of stitch you wish to sew. The needle clamp screw is scratched, or has a burr on it. The combination of fabric being sewn. page 38 The presser foot that is scratched, or has a your dealer or the nearest authorized service center. - Lightly guide the fabric. burr on it . Contact presser foot...
... presser foot lever is connected. Do not use the "Start/Stop" button when the foot controller is raised. To use a bobbin designed specifically for the type of stitch you wish to sew. The needle clamp screw is scratched, or has a burr on it. The combination of fabric being sewn. page 38 The presser foot that is scratched, or has a your dealer or the nearest authorized service center. - Lightly guide the fabric. burr on it . Contact presser foot...

Users Manual - English
Page 153
... bobbin designed specifically for this machine. Only use a bobbin designed specifically for this machine. Correctly install the needle. Replace the presser foot. The lower thread is bent or blunt. The thread is tangled, for this machine is not used. Replace the needle. Replace the bobbin case. Replace the bobbin. page 22 page 26 - Correct the upper threading. Replace the needle plate. Incorrect bobbins will not work properly. APPENDIX Symptom Probable Cause Remedy The upper thread was not threaded correctly (for example, the spool is not installed...
... bobbin designed specifically for this machine. Only use a bobbin designed specifically for this machine. Correctly install the needle. Replace the presser foot. The lower thread is bent or blunt. The thread is tangled, for this machine is not used. Replace the needle. Replace the bobbin case. Replace the bobbin. page 22 page 26 - Correct the upper threading. Replace the needle plate. Incorrect bobbins will not work properly. APPENDIX Symptom Probable Cause Remedy The upper thread was not threaded correctly (for example, the spool is not installed...
Users Manual - English
Page 155
... - page 156 154 Only use a bobbin designed specifically for the type of the presser foot is incorrect. Press the "Needle Position" button. The thread tension is weak. The feed dogs are lowered. The thread is appropriate for this machine is not used is not Attach the presser foot that is tangled, for this machine. Remove the tangle thread. too light or too dark. Incorrect bobbins will not work properly. Attach the presser foot that is used . The sewing lamp is not sewn...
... - page 156 154 Only use a bobbin designed specifically for the type of the presser foot is incorrect. Press the "Needle Position" button. The thread tension is weak. The feed dogs are lowered. The thread is appropriate for this machine is not used is not Attach the presser foot that is tangled, for this machine. Remove the tangle thread. too light or too dark. Incorrect bobbins will not work properly. Attach the presser foot that is used . The sewing lamp is not sewn...


