
Accessory Catalog
Page 13
...The ruffling blade on lightweight fabric. Use a stiff card to slide the fabric from left into gathers or tucks. Sew slowly for details.) Brother Embellishment Feet Pin Tuck Foot 24 Ruffler Foot Pin Tuck Foot This presser foot has 7 grooves and produces perfect pin tucks and corded pin ...tucks using a twin needle on the lower portion of stitch length, tuck setting and depth setting. 2. Install and manually thread a twin needle. 2. Adjust the amount of tuck or gather by placing the completed row in the center position. 3. The intervals of tucks...
...The ruffling blade on lightweight fabric. Use a stiff card to slide the fabric from left into gathers or tucks. Sew slowly for details.) Brother Embellishment Feet Pin Tuck Foot 24 Ruffler Foot Pin Tuck Foot This presser foot has 7 grooves and produces perfect pin tucks and corded pin ...tucks using a twin needle on the lower portion of stitch length, tuck setting and depth setting. 2. Install and manually thread a twin needle. 2. Adjust the amount of tuck or gather by placing the completed row in the center position. 3. The intervals of tucks...

Accessory Catalog
Page 34
...are also available at selected Dealers. Designed for high speed embroidery stitching, made in a 5-pack sleeve) at selected dealers. 30-Pack: CYTPK30 Brother Countr y Yarn Embroider y Threads (30 Color Thread Pack) Attention all embroiderers, Quilters and Heirloom stitchers! Available in a 14-Pack and individual... Our high sheen 100% polyester mini king embroidery thread (1100 yds) is color keyed to the needle thread. Consult your instruction manual for our embroidery only machines, PE750D and PE700II. Available in a 5-pack sleeve). 300 meters (328 yards) of the proper ...
...are also available at selected Dealers. Designed for high speed embroidery stitching, made in a 5-pack sleeve) at selected dealers. 30-Pack: CYTPK30 Brother Countr y Yarn Embroider y Threads (30 Color Thread Pack) Attention all embroiderers, Quilters and Heirloom stitchers! Available in a 14-Pack and individual... Our high sheen 100% polyester mini king embroidery thread (1100 yds) is color keyed to the needle thread. Consult your instruction manual for our embroidery only machines, PE750D and PE700II. Available in a 5-pack sleeve). 300 meters (328 yards) of the proper ...
Users Manual - English
Page 1
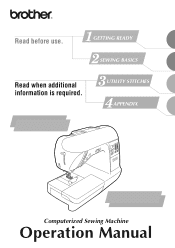
GETTING READY SEWING BASICS Read when additional information is required. Read before use. UTILITY STITCHES APPENDIX Computerized Sewing Machine Operation Manual
GETTING READY SEWING BASICS Read when additional information is required. Read before use. UTILITY STITCHES APPENDIX Computerized Sewing Machine Operation Manual
Users Manual - English
Page 2
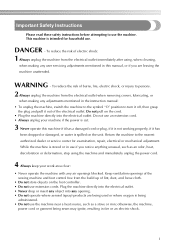
...of electric shock: 1 Always unplug the machine from the electrical outlet when removing covers, lubricating, or when making any adjustments mentioned in the instruction manual: • To unplug the machine, switch the machine to the symbol "O" position to turn it off, then grasp the plug and pull ... aerosol (spray) products are leaving the machine unattended. To reduce the risk of the electrical outlet. This machine is cut. 3 Never operate this manual, or if you notice anything unusual, such as a stove or iron; While the machine is stored or in use the machine near a heat ...
...of electric shock: 1 Always unplug the machine from the electrical outlet when removing covers, lubricating, or when making any adjustments mentioned in the instruction manual: • To unplug the machine, switch the machine to the symbol "O" position to turn it off, then grasp the plug and pull ... aerosol (spray) products are leaving the machine unattended. To reduce the risk of the electrical outlet. This machine is cut. 3 Never operate this manual, or if you notice anything unusual, such as a stove or iron; While the machine is stored or in use the machine near a heat ...
Users Manual - English
Page 3
...the machine needle. • Switch the sewing machine to the symbol "O" position to turn it must be used. • Always consult the operation manual when replacing or installing any adjustments in the needle area. • Do not use as contained in this machine, avoid direct sunlight and high ...or damaged needles. • Keep fingers away from all moving parts. Do not use outdoors. 7 For a longer service life: • When storing this manual. If the problem persists, please consult your local authorized Brother dealer. For additional product information, visit our web site at www...
...the machine needle. • Switch the sewing machine to the symbol "O" position to turn it must be used. • Always consult the operation manual when replacing or installing any adjustments in the needle area. • Do not use as contained in this machine, avoid direct sunlight and high ...or damaged needles. • Keep fingers away from all moving parts. Do not use outdoors. 7 For a longer service life: • When storing this manual. If the problem persists, please consult your local authorized Brother dealer. For additional product information, visit our web site at www...

Users Manual - English
Page 4
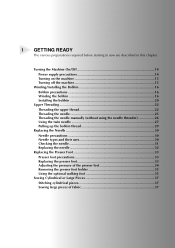
... precautions ...16 Winding the bobbin ...16 Installing the bobbin ...20 Upper Threading ...22 Threading the upper thread ...22 Threading the needle ...25 Threading the needle manually (without using the needle threader 26 Using the twin needle ...27 Pulling up the bobbin thread ...29 Replacing the Needle ...30 Needle precautions ...30 Needle...
... precautions ...16 Winding the bobbin ...16 Installing the bobbin ...20 Upper Threading ...22 Threading the upper thread ...22 Threading the needle ...25 Threading the needle manually (without using the needle threader 26 Using the twin needle ...27 Pulling up the bobbin thread ...29 Replacing the Needle ...30 Needle precautions ...30 Needle...
Users Manual - English
Page 7
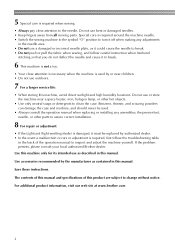
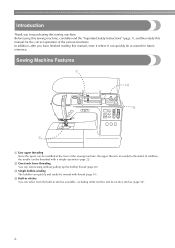
...spool can be accessed for purchasing this sewing machine. In addition, after you for future reference. Introduction Thank you have finished reading this manual, store it where it can quickly be installed at the front of the various functions. Before using this sewing machine, carefully read the... "Important Safety Instructions" (page 1), and then study this manual for the correct operation of the sewing machine, the upper thread can easily be wound with a simple operation (page 22). 2 One-touch ...
...spool can be accessed for purchasing this sewing machine. In addition, after you for future reference. Introduction Thank you have finished reading this manual, store it where it can quickly be installed at the front of the various functions. Before using this sewing machine, carefully read the... "Important Safety Instructions" (page 1), and then study this manual for the correct operation of the sewing machine, the upper thread can easily be wound with a simple operation (page 22). 2 One-touch ...
Users Manual - English
Page 8
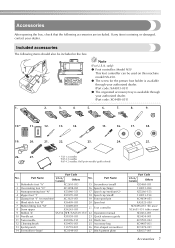
...foot "N" X53840-351 17 Spool cap (medium)(2) 4 Zipper foot "I" X59370-051 18 Spool cap (small) 5 Zigzag foot "J" (on this machine model NX-250. ● The screw for the presser foot holder is available through your dealer. only) ● Foot controller: Model N5V This foot controller can be included...net 7 Button fitting foot "M" 8 Seam ripper 130489-001 X54243-051 21 Foot controller 9 Bobbin (4) SA156 SFB (XA5539-151) 22 Operation manual 10 Needle set X58358-051 23 Quick reference guide 11 Twin needle X59296-151 24 Hard case 12 Cleaning brush X59476-051 25 Accessory bag...
...foot "N" X53840-351 17 Spool cap (medium)(2) 4 Zipper foot "I" X59370-051 18 Spool cap (small) 5 Zigzag foot "J" (on this machine model NX-250. ● The screw for the presser foot holder is available through your dealer. only) ● Foot controller: Model N5V This foot controller can be included...net 7 Button fitting foot "M" 8 Seam ripper 130489-001 X54243-051 21 Foot controller 9 Bobbin (4) SA156 SFB (XA5539-151) 22 Operation manual 10 Needle set X58358-051 23 Quick reference guide 11 Twin needle X59296-151 24 Hard case 12 Cleaning brush X59476-051 25 Accessory bag...
Users Manual - English
Page 14
... precautions 16 Winding the bobbin 16 Installing the bobbin 20 Upper Threading ...22 Threading the upper thread 22 Threading the needle 25 Threading the needle manually (without using the needle threader 26 Using the twin needle 27 Pulling up the bobbin thread 29 Replacing the Needle 30 Needle precautions 30 Needle...
... precautions 16 Winding the bobbin 16 Installing the bobbin 20 Upper Threading ...22 Threading the upper thread 22 Threading the needle 25 Threading the needle manually (without using the needle threader 26 Using the twin needle 27 Pulling up the bobbin thread 29 Replacing the Needle 30 Needle precautions 30 Needle...
Users Manual - English
Page 26
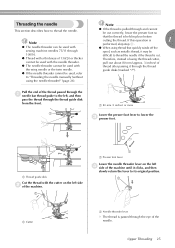
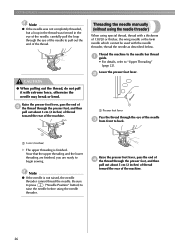
... the end of the thread passed through the eye of the machine until it clicks, and then slowly return the lever to "Threading the needle manually (without using the needle threader)" (page 26). Threading the needle This section describes how to thread the needle if the thread is cut correctly, lower...
... the end of the thread passed through the eye of the machine until it clicks, and then slowly return the lever to "Threading the needle manually (without using the needle threader)" (page 26). Threading the needle This section describes how to thread the needle if the thread is cut correctly, lower...
Users Manual - English
Page 27
... thicker, the wing needle or the twin needle which cannot be used with extreme force, otherwise the needle may break or bend. Threading the needle manually (without using the needle threader) When using the needle threader. GETTING READY Note ● If the needle was not completely threaded, but a loop in the...
... thicker, the wing needle or the twin needle which cannot be used with extreme force, otherwise the needle may break or bend. Threading the needle manually (without using the needle threader) When using the needle threader. GETTING READY Note ● If the needle was not completely threaded, but a loop in the...

Users Manual - English
Page 28
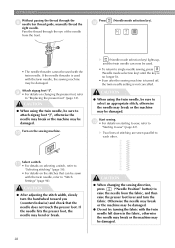
... the spool cap. Install the twin needle. 1 • For details on 6 the right side onto the extra spool pin, and then secure it is 5 horizontal. Manually thread the left needle 2 eye. • For details, refer to the bobbin winder shaft. 1 1 spool pin and the spool cap. The thread should have the...
... the spool cap. Install the twin needle. 1 • For details on 6 the right side onto the extra spool pin, and then secure it is 5 horizontal. Manually thread the left needle 2 eye. • For details, refer to the bobbin winder shaft. 1 1 spool pin and the spool cap. The thread should have the...
Users Manual - English
Page 29
... READY Without passing the thread through the eye of stitching are sewn parallel to each other. Pass the thread through the 8 needle bar thread guide, manually thread the right needle. Start sewing. Otherwise the needle may break or the machine may be damaged. ● Do not try turning the fabric with...
... READY Without passing the thread through the eye of stitching are sewn parallel to each other. Pass the thread through the 8 needle bar thread guide, manually thread the right needle. Start sewing. Otherwise the needle may break or the machine may be damaged. ● Do not try turning the fabric with...
Users Manual - English
Page 59
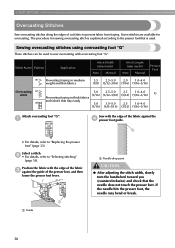
... may bend or break. 58 Stitch Name Pattern Application 06 Preventing fraying in medium weight and thin fabrics Stitch Width [mm (inch)] Auto Manual Stitch Length [mm (inch)] Auto Manual Presser Foot 3.5 2.5-5.0 2.0 1.0-4.0 (1/8) (3/32-3/16) (1/16) (1/16-3/16) Overcasting 07 stitch 08 5.0 2.5-5.0 2.5 1.0-4.0 (3/16) (3/32-3/16) (3/32) (1/16-3/16) G Preventing fraying in thick fabrics...
... may bend or break. 58 Stitch Name Pattern Application 06 Preventing fraying in medium weight and thin fabrics Stitch Width [mm (inch)] Auto Manual Stitch Length [mm (inch)] Auto Manual Presser Foot 3.5 2.5-5.0 2.0 1.0-4.0 (1/8) (3/32-3/16) (1/16) (1/16-3/16) Overcasting 07 stitch 08 5.0 2.5-5.0 2.5 1.0-4.0 (3/16) (3/32-3/16) (3/32) (1/16-3/16) G Preventing fraying in thick fabrics...
Users Manual - English
Page 60
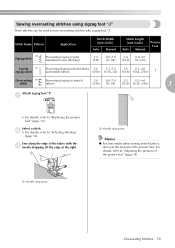
... drop point Overcasting Stitches 59 Stitch Name Pattern Application 04 Zigzag stitch Preventing fraying (center baseline/reverse stitching) Stitch Width [mm (inch)] Auto Manual 3.5 0.0-7.0 (1/8) (0-1/4) Stitch Length [mm (inch)] Auto Manual Presser Foot 1.4 0.0-4.0 (1/16) (0-3/16) 3-point 05 zigzag stitch Preventing fraying in thick fabrics 5.0 1.5-7.0 1.0 0.2-4.0 and stretch fabrics (3/16) (1/16-1/4) (1/16) (1/64-3/16) J Overcasting...
... drop point Overcasting Stitches 59 Stitch Name Pattern Application 04 Zigzag stitch Preventing fraying (center baseline/reverse stitching) Stitch Width [mm (inch)] Auto Manual 3.5 0.0-7.0 (1/8) (0-1/4) Stitch Length [mm (inch)] Auto Manual Presser Foot 1.4 0.0-4.0 (1/16) (0-3/16) 3-point 05 zigzag stitch Preventing fraying in thick fabrics 5.0 1.5-7.0 1.0 0.2-4.0 and stretch fabrics (3/16) (1/16-1/4) (1/16) (1/64-3/16) J Overcasting...
Users Manual - English
Page 61
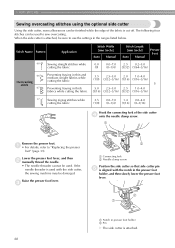
Stitch Name Pattern Application Stitch Width [mm (inch)] Auto Manual Stitch Length [mm (inch)] Auto Manual Presser Foot 00 Sewing straight stitches while 0.0 0.0-7.0 2.5 0.2-5.0 cutting the fabric (0) (0-1/4) (3/32) (1/64-3/16) 06 Overcasting stitch 07 Preventing fraying in thin ... 1 Connecting fork 2 Needle clamp screw Position the side cutter so that side cutter pin 5 is attached. 60 Lower the presser foot lever, and then 2 manually thread the needle. • The needle threader cannot be used with the notch in the ranges listed below. When the side cutter is attached, be...
Stitch Name Pattern Application Stitch Width [mm (inch)] Auto Manual Stitch Length [mm (inch)] Auto Manual Presser Foot 00 Sewing straight stitches while 0.0 0.0-7.0 2.5 0.2-5.0 cutting the fabric (0) (0-1/4) (3/32) (1/64-3/16) 06 Overcasting stitch 07 Preventing fraying in thin ... 1 Connecting fork 2 Needle clamp screw Position the side cutter so that side cutter pin 5 is attached. 60 Lower the presser foot lever, and then 2 manually thread the needle. • The needle threader cannot be used with the notch in the ranges listed below. When the side cutter is attached, be...
Users Manual - English
Page 63
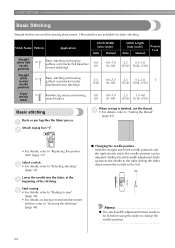
...(center baseline/reverse stitching) 3.5 0.0-7.0 (1/8) (0-1/4) Triple 02 stretch stitch Reinforcing seams and sewing stretch fabrics 0.0 0.0-7.0 (0) (0-1/4) Stitch Length [mm (inch)] Auto Manual Presser Foot 2.5 0.2-5.0 (3/32) (1/64-3/16) 2.5 0.2-5.0 J (3/32) (1/64-3/16) 2.5 1.5-4.0 (3/32) (1/16-3/16) Basic stitching Baste or pin together...refer to "Replacing the presser foot" (page 33). Stitch Name Pattern Application Stitch Width [mm (inch)] Auto Manual Straight stitch (left 00 needle position) Basic stitching and sewing gathers or pintucks (left needle position) and the...
...(center baseline/reverse stitching) 3.5 0.0-7.0 (1/8) (0-1/4) Triple 02 stretch stitch Reinforcing seams and sewing stretch fabrics 0.0 0.0-7.0 (0) (0-1/4) Stitch Length [mm (inch)] Auto Manual Presser Foot 2.5 0.2-5.0 (3/32) (1/64-3/16) 2.5 0.2-5.0 J (3/32) (1/64-3/16) 2.5 1.5-4.0 (3/32) (1/16-3/16) Basic stitching Baste or pin together...refer to "Replacing the presser foot" (page 33). Stitch Name Pattern Application Stitch Width [mm (inch)] Auto Manual Straight stitch (left 00 needle position) Basic stitching and sewing gathers or pintucks (left needle position) and the...
Users Manual - English
Page 64
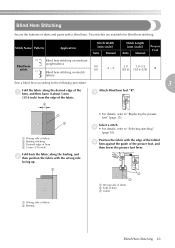
.... 3 1 2 1 Wrong side of fabric 2 Fold of hem 3 Guide 1 Wrong side of the fabric. Stitch Name Pattern Application Stitch Width [mm (inch)] Auto Manual Stitch Length [mm (inch)] Auto Manual Presser Foot 10 Blind hem stitch 11 Blind hem stitching on medium weight fabrics 00 (0) Blind hem stitching on stretch fabrics -3 - 3- 2.0 1.0-3.5 (1/16) (1/16...
.... 3 1 2 1 Wrong side of fabric 2 Fold of hem 3 Guide 1 Wrong side of the fabric. Stitch Name Pattern Application Stitch Width [mm (inch)] Auto Manual Stitch Length [mm (inch)] Auto Manual Presser Foot 10 Blind hem stitch 11 Blind hem stitching on medium weight fabrics 00 (0) Blind hem stitching on stretch fabrics -3 - 3- 2.0 1.0-3.5 (1/16) (1/16...

Users Manual - English
Page 66
... plush fabrics (1/4) (1/8-1/4) (1/32) (1/64-1/16) Button- 48 sewing stitch Button sewing 3.5 2.5-4.5 (1/8) (3/32-3/16) - - Stitch Name Pattern Application Stitch Width [mm (inch)] Auto Manual Stitch Length [mm (inch)] Auto Manual Presser Foot 40 Horizontal buttonholes on thin 5.0 3.0-5.0 0.4 0.2-1.0 and medium weight fabrics (3/16) (1/8-3/16) (1/64) (1/64-1/16) 41 Buttonholes with bar tacks on 5.0 3.0-5.0 0.4 0.2-1.0 both...
... plush fabrics (1/4) (1/8-1/4) (1/32) (1/64-1/16) Button- 48 sewing stitch Button sewing 3.5 2.5-4.5 (1/8) (3/32-3/16) - - Stitch Name Pattern Application Stitch Width [mm (inch)] Auto Manual Stitch Length [mm (inch)] Auto Manual Presser Foot 40 Horizontal buttonholes on thin 5.0 3.0-5.0 0.4 0.2-1.0 and medium weight fabrics (3/16) (1/8-3/16) (1/64) (1/64-1/16) 41 Buttonholes with bar tacks on 5.0 3.0-5.0 0.4 0.2-1.0 both...
Users Manual - English
Page 73
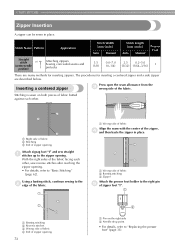
... "I". 1 I There are many methods for inserting a centered zipper and a side zipper are described below. Stitch Name Pattern Application Stitch Width [mm (inch)] Auto Manual Stitch Length [mm (inch)] Auto Manual Presser Foot Straight stitch 01 (center needle position) Attaching zippers Sewing concealed seams and pintucks 3.5 (1/8) 0.0-7.0 2.5 0.2-5.0 (0-1/4) (3/32) (1/64-3/16) I 2 1 Pin on both pieces...
... "I". 1 I There are many methods for inserting a centered zipper and a side zipper are described below. Stitch Name Pattern Application Stitch Width [mm (inch)] Auto Manual Stitch Length [mm (inch)] Auto Manual Presser Foot Straight stitch 01 (center needle position) Attaching zippers Sewing concealed seams and pintucks 3.5 (1/8) 0.0-7.0 2.5 0.2-5.0 (0-1/4) (3/32) (1/64-3/16) I 2 1 Pin on both pieces...


