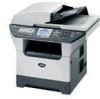
Users Manual - English
Page 6
...including but not limited to transporting this Product without authorization from Brother and/or alteration/removal of sale showing that you desire). The decision as Paper Feeding Kit, Fuser and Laser Units. Supply Brother or the Brother Authorized Service Center with this Product (including but not limited ...repair or replace the Machine and/or accompanying Consumable and Accessory Items is the length of the Warranty Periods: „ Machines: one year from the original purchase date. „ Accompanying Consumable and Accessory Items: 90 days from other than defects in any way...
...including but not limited to transporting this Product without authorization from Brother and/or alteration/removal of sale showing that you desire). The decision as Paper Feeding Kit, Fuser and Laser Units. Supply Brother or the Brother Authorized Service Center with this Product (including but not limited ...repair or replace the Machine and/or accompanying Consumable and Accessory Items is the length of the Warranty Periods: „ Machines: one year from the original purchase date. „ Accompanying Consumable and Accessory Items: 90 days from other than defects in any way...
Users Manual - English
Page 24
Replace the toner cartridge with a new one. If you cannot clear the error and you see the same service call indication after turning the machine back on, please call Brother Customer Service. (See Brother numbers on and try to print again. Note When the power switch is off or the machine is in the... tray or clear the paper jam. Chapter 1 Service error Red Cover open . Wait a few seconds, and then turn it back on page i.) The front cover or fuser cover is...
Replace the toner cartridge with a new one. If you cannot clear the error and you see the same service call indication after turning the machine back on, please call Brother Customer Service. (See Brother numbers on and try to print again. Note When the power switch is off or the machine is in the... tray or clear the paper jam. Chapter 1 Service error Red Cover open . Wait a few seconds, and then turn it back on page i.) The front cover or fuser cover is...

Users Manual - English
Page 37
General setup Sleep time 3 Setting the sleep time reduces power consumption by turning off the fuser while the machine is in sleep mode the LCD will display Sleep. You can change the contrast to make the LCD lighter. While the machine ... the d and c keys simultaneously. The 3 scanner lamp will remain turned off until the next time you turn off regularly will be a short delay while the fuser warms up. a Press Menu, 1, 8. 18.LCD Contrast -nnonn+ Select d c & OK b Press c to select Off (or On). c Press Stop/Exit. 23...
General setup Sleep time 3 Setting the sleep time reduces power consumption by turning off the fuser while the machine is in sleep mode the LCD will display Sleep. You can change the contrast to make the LCD lighter. While the machine ... the d and c keys simultaneously. The 3 scanner lamp will remain turned off until the next time you turn off regularly will be a short delay while the fuser warms up. a Press Menu, 1, 8. 18.LCD Contrast -nnonn+ Select d c & OK b Press c to select Off (or On). c Press Stop/Exit. 23...
Users Manual - English
Page 103
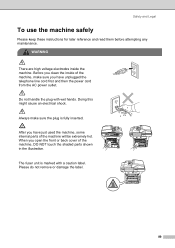
... cause an electrical shock. Always make sure you clean the inside the machine. The fuser unit is fully inserted. Please do not remove or damage the label. 89 Before you have just used the machine, some internal parts of the machine will be extremely hot. When you have unplugged the telephone line...
... cause an electrical shock. Always make sure you clean the inside the machine. The fuser unit is fully inserted. Please do not remove or damage the label. 89 Before you have just used the machine, some internal parts of the machine will be extremely hot. When you have unplugged the telephone line...

Users Manual - English
Page 126
... print media is at 1-877-BROTHER (1-877-276-8437) (in USA) or 1-877-BROTHER (in a new drum unit. (See Replacing the drum unit (DR-520) on page 132.) „ The fuser unit may be smudged. Put ...corona wire on page 130.) „ Clean the scanner window with a soft cloth. (See Cleaning the laser scanner window on page 128.) „ The drum unit may be damaged. Print multiple pages to clear this... been used for a long time. „ Clean the scanner window with a soft cloth. (See Cleaning the laser scanner window on page 128.) „ The drum unit may be damaged. Put in a new drum unit. ...
... print media is at 1-877-BROTHER (1-877-276-8437) (in USA) or 1-877-BROTHER (in a new drum unit. (See Replacing the drum unit (DR-520) on page 132.) „ The fuser unit may be smudged. Put ...corona wire on page 130.) „ Clean the scanner window with a soft cloth. (See Cleaning the laser scanner window on page 128.) „ The drum unit may be damaged. Print multiple pages to clear this... been used for a long time. „ Clean the scanner window with a soft cloth. (See Cleaning the laser scanner window on page 128.) „ The drum unit may be damaged. Put in a new drum unit. ...

Users Manual - English
Page 130
... on but do not use in the memory.) Cover is Open The front cover is too hot. Open the back cover, and then open the fuser cover. Check the other person's Try to 4 days without losing faxes stored in Fax mode on page 20. If the error message continues leave the... follow the suggestions below . Document Jam The document was not inserted or fed properly, or the document scanned from the ADF was too long. The fuser cover is not closed completely. fax machine stopped the call the telephone company and ask them to another telephone line. See Document jams on page...
... on but do not use in the memory.) Cover is Open The front cover is too hot. Open the back cover, and then open the fuser cover. Check the other person's Try to 4 days without losing faxes stored in Fax mode on page 20. If the error message continues leave the... follow the suggestions below . Document Jam The document was not inserted or fed properly, or the document scanned from the ADF was too long. The fuser cover is not closed completely. fax machine stopped the call the telephone company and ask them to another telephone line. See Document jams on page...

Users Manual - English
Page 131
... tray is too hot. See Replacing the drum unit (DR-520) on Drum The duplex tray is set to another mode. The fuser unit is not completely closed. Do one . Set up to 4 days without losing faxes stored in Use The machine is not installed properly. Set Distinctive Ring to reset. The... . (The machine can not change the Receive Mode from Manual to Distinctive Ring mode. See Turning off for 15 minutes with a new one of its memory on page 130.) Fuser Error The temperature of paper or paper is not properly loaded in its Use the drum unit until you dialed does not...
... tray is too hot. See Replacing the drum unit (DR-520) on Drum The duplex tray is set to another mode. The fuser unit is not completely closed. Do one . Set up to 4 days without losing faxes stored in Use The machine is not installed properly. Set Distinctive Ring to reset. The... . (The machine can not change the Receive Mode from Manual to Distinctive Ring mode. See Turning off for 15 minutes with a new one of its memory on page 130.) Fuser Error The temperature of paper or paper is not properly loaded in its Use the drum unit until you dialed does not...
Users Manual - English
Page 132
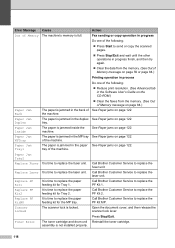
...on page 122. Paper Jam Tray2 Replace Fuser It is time to replace the laser unit. Call Brother Customer Service to replace the fuser unit. Call Brother Customer Service to replace the laser unit. Scanner Locked The scanner lock is jammed inside the machine. Replace Laser It is time to replace the paper feeding...again. „ Clear the data from the memory. (See Out of Memory message on page 39 or page 84.) Printing operation in process Do one of the following: „ Reduce print resolution. (See Advanced tab in the Software User's Guide on the CD-ROM.) „ Clear the ...
...on page 122. Paper Jam Tray2 Replace Fuser It is time to replace the laser unit. Call Brother Customer Service to replace the fuser unit. Call Brother Customer Service to replace the laser unit. Scanner Locked The scanner lock is jammed inside the machine. Replace Laser It is time to replace the paper feeding...again. „ Clear the data from the memory. (See Out of Memory message on page 39 or page 84.) Printing operation in process Do one of the following: „ Reduce print resolution. (See Advanced tab in the Software User's Guide on the CD-ROM.) „ Clear the ...
Users Manual - English
Page 138
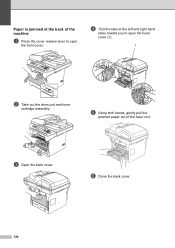
Paper is jammed at the left and right hand sides toward you to open the fuser cover (1). 1 b Take out the drum unit and toner cartridge assembly. e Using both hands, gently pull the jammed paper out of the machine C a Press the cover release lever to open the front cover. c Open the back cover. d Pull the tabs at the back of the fuser unit. f Close the back cover. 124
Paper is jammed at the left and right hand sides toward you to open the fuser cover (1). 1 b Take out the drum unit and toner cartridge assembly. e Using both hands, gently pull the jammed paper out of the machine C a Press the cover release lever to open the front cover. c Open the back cover. d Pull the tabs at the back of the fuser unit. f Close the back cover. 124
Users Manual - English
Page 151
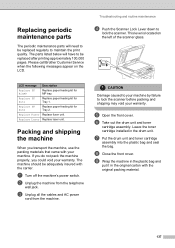
Please call Brother Customer Service when the following messages appear on the left of the scanner glass. This lever is located on the LCD. If you do not ... quality. Replace PF Kit2 Replace paper feeding kit for Tray 2. Leave the toner cartridge installed in the original carton with the carrier. Replace Fuser Replace fuser unit. Replace Laser Replace laser unit. a Turn off the machine's power switch. b Unplug the machine from the machine. CAUTION Damage caused to your warranty. g Put the drum unit...
Please call Brother Customer Service when the following messages appear on the left of the scanner glass. This lever is located on the LCD. If you do not ... quality. Replace PF Kit2 Replace paper feeding kit for Tray 2. Leave the toner cartridge installed in the original carton with the carrier. Replace Fuser Replace fuser unit. Replace Laser Replace laser unit. a Turn off the machine's power switch. b Unplug the machine from the machine. CAUTION Damage caused to your warranty. g Put the drum unit...
Users Manual - English
Page 153
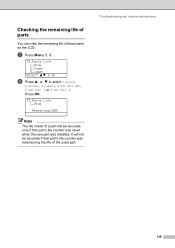
Checking the remaining life of parts C You can view the remaining life of the used part. Troubleshooting and routine maintenance 139 a Press Menu, 7, 3. 73.Parts Life 1.Drum 2.Fuser 3.Laser Select ab & OK b Press a or b to select 1.Drum, 2.Fuser, 3.Laser, 4.PF Kit MP, 5.PF Kit 1 or 6.PF Kit 2. It will be accurate if that part's life counter was reset when the new part was reset during the life of these parts on the LCD. Press OK. 73.Parts Life 1.Drum Remaining:100% Note The life check of a part will not be accurate only if that part's life counter was installed.
Checking the remaining life of parts C You can view the remaining life of the used part. Troubleshooting and routine maintenance 139 a Press Menu, 7, 3. 73.Parts Life 1.Drum 2.Fuser 3.Laser Select ab & OK b Press a or b to select 1.Drum, 2.Fuser, 3.Laser, 4.PF Kit MP, 5.PF Kit 1 or 6.PF Kit 2. It will be accurate if that part's life counter was reset when the new part was reset during the life of these parts on the LCD. Press OK. 73.Parts Life 1.Drum Remaining:100% Note The life check of a part will not be accurate only if that part's life counter was installed.
Users Manual - English
Page 170
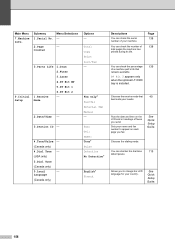
... only) 4.Dial Tone - (USA only) 5.Dial Tone (Canada only) 0.Local - You can check the number of faxes you fax. Counter 0.Initial Setup 3.Parts Life 1.Drum 2.Fuser 3.Laser 4.PF Kit MP 5.PF Kit 1 1.Receive Mode 6.PF Kit 2 - 2.Date/Time - PF Kit 2 appears only when the optional LT-5300 tray is installed. Allows you...
... only) 4.Dial Tone - (USA only) 5.Dial Tone (Canada only) 0.Local - You can check the number of faxes you fax. Counter 0.Initial Setup 3.Parts Life 1.Drum 2.Fuser 3.Laser 4.PF Kit MP 5.PF Kit 1 1.Receive Mode 6.PF Kit 2 - 2.Date/Time - PF Kit 2 appears only when the optional LT-5300 tray is installed. Allows you...


