Network Users Manual - English
Page 142
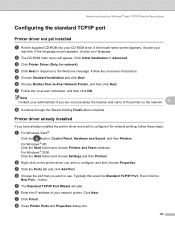
... configure, and then choose Properties. e The Standard TCP/IP Port Wizard will appear. g Follow the on -screen instructions. h Close Printer Ports and Properties dialog box. 132 For Windows® 2000: Click the Start button and choose ...network. 8 h Continue through the Wizard clicking Finish when complete. Click Next. Follow the on -screen instruction, and then click OK. f Choose Brother Peer-to the Welcome message. f Enter the IP address of the printer on the printer driver you...® XP: Click the Start button and choose Printers and Faxes windows. button.
... configure, and then choose Properties. e The Standard TCP/IP Port Wizard will appear. g Follow the on -screen instructions. h Close Printer Ports and Properties dialog box. 132 For Windows® 2000: Click the Start button and choose ...network. 8 h Continue through the Wizard clicking Finish when complete. Click Next. Follow the on -screen instruction, and then click OK. f Choose Brother Peer-to the Welcome message. f Enter the IP address of the printer on the printer driver you...® XP: Click the Start button and choose Printers and Faxes windows. button.

Network Users Manual - English
Page 170
...-Pro Suite from the CD-ROM follow the instructions below : 1. In External Port Number for example, "Brother Scanner". 2. Make sure UDP is set to configure Windows® Firewall. In Internal Port Number for Firewall configuration 13 UDP Port Network Scanning Network PC-Fax External Port number Internal Port number 54925 54925 54926 54926 Network Scanning...
...-Pro Suite from the CD-ROM follow the instructions below : 1. In External Port Number for example, "Brother Scanner". 2. Make sure UDP is set to configure Windows® Firewall. In Internal Port Number for Firewall configuration 13 UDP Port Network Scanning Network PC-Fax External Port number Internal Port number 54925 54925 54926 54926 Network Scanning...

Software Users Manual - English
Page 159
...follow the instructions below : 1 In Description of the computer hosting this service on your PC may reject the necessary network connection for Firewall configuration UDP Port Network Scanning Network PC-Fax Network Scanning and Network PC-Fax 1 External Port number 54925 54926 137 Internal Port ... Make sure that Windows Firewall on your network: Enter "Localhost". 151 8 Firewall settings (For Network users) 8 Before using the Brother software 8 Firewall settings on the General tab is set to configure Windows® Firewall. UDP Port number information for network printing, ...
...follow the instructions below : 1 In Description of the computer hosting this service on your PC may reject the necessary network connection for Firewall configuration UDP Port Network Scanning Network PC-Fax Network Scanning and Network PC-Fax 1 External Port number 54925 54926 137 Internal Port ... Make sure that Windows Firewall on your network: Enter "Localhost". 151 8 Firewall settings (For Network users) 8 Before using the Brother software 8 Firewall settings on the General tab is set to configure Windows® Firewall. UDP Port number information for network printing, ...
Quick Setup Guide - English
Page 8
... device (TAD) will conflict with each other names for receiving faxes? See the instructions below . Your machine automatically answers every call yourself. Choose Fax Only as Custom Ringing, RingMaster, Personalized Ring, Teen Ring, Ident-A-Call, and Smart Ring. See the instructions below . Press OK. Brother uses the term "Distinctive Ring" but telephone companies may have...
... device (TAD) will conflict with each other names for receiving faxes? See the instructions below . Your machine automatically answers every call yourself. Choose Fax Only as Custom Ringing, RingMaster, Personalized Ring, Teen Ring, Ident-A-Call, and Smart Ring. See the instructions below . Press OK. Brother uses the term "Distinctive Ring" but telephone companies may have...
Quick Setup Guide - English
Page 24
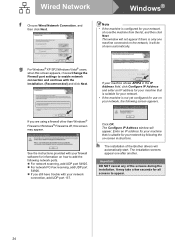
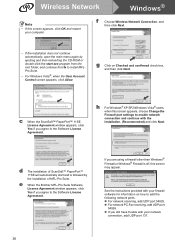
... network ports. „ For network scanning, add UDP port 54925. „ For network PC-Fax receiving, add UDP port 54926. „ If you still have trouble with the installation. (Recommended...field, click Configure IP Address and enter an IP address for your machine that is only one after another. If you are using a firewall other than Windows® Firewall or Windows...machine is configured for use on -screen instructions. Click OK. h The installation of the screens during the installation. Important DO NOT cancel any of the Brother drivers will appear. This window will be...
... network ports. „ For network scanning, add UDP port 54925. „ For network PC-Fax receiving, add UDP port 54926. „ If you still have trouble with the installation. (Recommended...field, click Configure IP Address and enter an IP address for your machine that is only one after another. If you are using a firewall other than Windows® Firewall or Windows...machine is configured for use on -screen instructions. Click OK. h The installation of the screens during the installation. Important DO NOT cancel any of the Brother drivers will appear. This window will be...
Quick Setup Guide - English
Page 36
...the Software License Agreement. e When the Brother MFL-Pro Suite Software License Agreement window appears, click Yes if you agree to enable network connection and continue with the installation. (Recommended) and click Next. See the instructions provided with your network connection, add UDP ...port 137. 36 c When the ScanSoft™ PaperPort™ 11SE License Agreement window appears, click Yes if you agree to add the following network ports. „ For network scanning, add UDP port 54925. „ For network PC-Fax...
...the Software License Agreement. e When the Brother MFL-Pro Suite Software License Agreement window appears, click Yes if you agree to enable network connection and continue with the installation. (Recommended) and click Next. See the instructions provided with your network connection, add UDP ...port 137. 36 c When the ScanSoft™ PaperPort™ 11SE License Agreement window appears, click Yes if you agree to add the following network ports. „ For network scanning, add UDP port 54925. „ For network PC-Fax...
Users Manual - English
Page 15
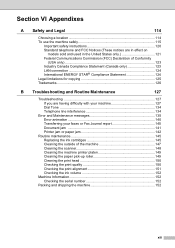
... safely 115 Important safety instructions 120 Standard telephone and FCC Notices (These notices are in effect on models sold and used in the United States only 121 Federal Communications Commission (FCC) Declaration of Conformity (USA only 123 Industry Canada Compliance Statement (Canada only 123 LAN connection 124 International ENERGY STAR® Compliance...
... safely 115 Important safety instructions 120 Standard telephone and FCC Notices (These notices are in effect on models sold and used in the United States only 121 Federal Communications Commission (FCC) Declaration of Conformity (USA only 123 Industry Canada Compliance Statement (Canada only 123 LAN connection 124 International ENERGY STAR® Compliance...

Users Manual - English
Page 18
... HTML format. If you have not installed the software, you to use the advanced features of the Printer, Scanner, PC Fax and Network. Italicized typeface emphasizes an important point or refers you can find the documentation by following symbols and conventions are on...;) 1 To view the documentation, from the programs group, and then choose User's Guides in the documentation 1 The following the instructions below: a Turn on the machine's control panel. Improper Setup icons alert you for buying a Brother machine! Symbols and conventions used throughout the documentation.
... HTML format. If you have not installed the software, you to use the advanced features of the Printer, Scanner, PC Fax and Network. Italicized typeface emphasizes an important point or refers you can find the documentation by following symbols and conventions are on...;) 1 To view the documentation, from the programs group, and then choose User's Guides in the documentation 1 The following the instructions below: a Turn on the machine's control panel. Improper Setup icons alert you for buying a Brother machine! Symbols and conventions used throughout the documentation.

Users Manual - English
Page 41
... current setting, and each key press will keep the new setting until you will need to change the volume through the menu, by following the instructions below: Setting the Ring Volume from High to the next level. e Press d or c to adjust the volume level. You can choose a range... Stop/Exit. Volume Settings 3 Ring Volume 3 You can also change the paper size setting at the same time so your machine can fit an incoming fax on the page. b Press a or b to choose General Setup. Press OK. b Press a or b to choose General Setup. Press OK. d Press d or c to...
... current setting, and each key press will keep the new setting until you will need to change the volume through the menu, by following the instructions below: Setting the Ring Volume from High to the next level. e Press d or c to adjust the volume level. You can choose a range... Stop/Exit. Volume Settings 3 Ring Volume 3 You can also change the paper size setting at the same time so your machine can fit an incoming fax on the page. b Press a or b to choose General Setup. Press OK. b Press a or b to choose General Setup. Press OK. d Press d or c to...
Users Manual - English
Page 56
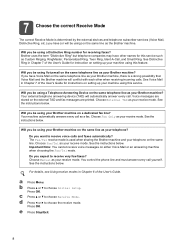
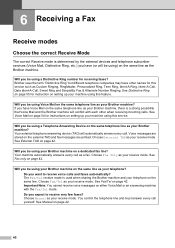
... receive very few faxes? Brother uses the term "Distinctive Ring" but different telephone companies may have other when receiving incoming calls. Important Note: You cannot receive voice messages on page 42. 40 See Voice Mail on page 54 for instructions on setting up your Brother machine? If you... have Voice Mail on the same line. See Manual on either Voice Mail or an answering machine with each other names for this feature. 6 Receiving a Fax 6 Receive modes 6 Choose the correct Receive ...
... receive very few faxes? Brother uses the term "Distinctive Ring" but different telephone companies may have other when receiving incoming calls. Important Note: You cannot receive voice messages on page 42. 40 See Voice Mail on page 54 for instructions on setting up your Brother machine? If you... have Voice Mail on the same line. See Manual on either Voice Mail or an answering machine with each other names for this feature. 6 Receiving a Fax 6 Receive modes 6 Choose the correct Receive ...

Users Manual - English
Page 57
Receiving a Fax To set the receive mode follow the instructions below: a Press Menu. Press OK. Press OK. The LCD will display the current receive mode. 6 41 b Press a or b to choose Receive Mode. c Press a or b to choose Initial Setup. d Press d or c to choose Fax Only, Fax/Tel, External TAD or Manual. e Press Stop/Exit.
Receiving a Fax To set the receive mode follow the instructions below: a Press Menu. Press OK. Press OK. The LCD will display the current receive mode. 6 41 b Press a or b to choose Receive Mode. c Press a or b to choose Initial Setup. d Press d or c to choose Fax Only, Fax/Tel, External TAD or Manual. e Press Stop/Exit.

Users Manual - English
Page 69
... pressing l 5 1. If you 'll need to send Tone signals (for example, for telephone banking), follow the instructions below: a Pick up the handset of the On/Off key to Fax Receive:On so that you can receive faxes when the power key is off. (See Power Off setting on 7 When the machine is off... digits dialed after this will keep ringing. If no one is off . If the other party says they want to send you to pick up , the machine will use the F/T Ring Time (pseudo/doubleringing) to answer. Fax/Tel mode does not work in Fax/Tel mode, it will return to the machine by...
... pressing l 5 1. If you 'll need to send Tone signals (for example, for telephone banking), follow the instructions below: a Pick up the handset of the On/Off key to Fax Receive:On so that you can receive faxes when the power key is off. (See Power Off setting on 7 When the machine is off... digits dialed after this will keep ringing. If no one is off . If the other party says they want to send you to pick up , the machine will use the F/T Ring Time (pseudo/doubleringing) to answer. Fax/Tel mode does not work in Fax/Tel mode, it will return to the machine by...
Users Manual - English
Page 74
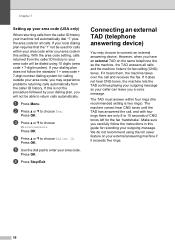
If your dialing plan does not follow the instructions in this guide for calls within four rings (the recommended setting is not the procedure followed by your dialing plan, you carefully follow the standard 1 + area code + 7-digit number dialing system for fax calling (CNG) tones. If this is two rings). c... seconds of CNG tones left for all calls and the machine 'listens' for calling outside your area code, you may choose to choose Fax. With the area code setting, calls returned from the caller ID history. Connecting an external TAD (telephone answering device) 7 You may ...
If your dialing plan does not follow the instructions in this guide for calls within four rings (the recommended setting is not the procedure followed by your dialing plan, you carefully follow the standard 1 + area code + 7-digit number dialing system for fax calling (CNG) tones. If this is two rings). c... seconds of CNG tones left for all calls and the machine 'listens' for calling outside your area code, you may choose to choose Fax. With the area code setting, calls returned from the caller ID history. Connecting an external TAD (telephone answering device) 7 You may ...

Users Manual - English
Page 136
...„ If the product exhibits a distinct change in damage and will block received faxes. DO NOT attempt to service this product yourself because opening or removing covers may void your nearest Brother Authorized Service Center, please call the following conditions: „ If liquid has been ... adjust only those controls that are provided for later reference. 3 Follow all warnings and instructions marked on the power cord. Improper adjustment of other risks and may expose you to a Brother Authorized Service Center. The openings should never be placed near water. 5 DO NOT place ...
...„ If the product exhibits a distinct change in damage and will block received faxes. DO NOT attempt to service this product yourself because opening or removing covers may void your nearest Brother Authorized Service Center, please call the following conditions: „ If liquid has been ... adjust only those controls that are provided for later reference. 3 Follow all warnings and instructions marked on the power cord. Improper adjustment of other risks and may expose you to a Brother Authorized Service Center. The openings should never be placed near water. 5 DO NOT place ...

Users Manual - English
Page 149
...to configure the Firewall. The network PC-Fax Receive feature does not work . Firewall settings on the CD-ROM. Make sure that the cabling and network connections are using a different cable. Follow the instructions below to verify that your PC may ...be rejecting the necessary network connection. For Windows® XP SP1 user's, please visit the Brother Solutions Center (http://solutions.brother.com). Troubleshooting and Routine Maintenance Network Difficulties ...
...to configure the Firewall. The network PC-Fax Receive feature does not work . Firewall settings on the CD-ROM. Make sure that the cabling and network connections are using a different cable. Follow the instructions below to verify that your PC may ...be rejecting the necessary network connection. For Windows® XP SP1 user's, please visit the Brother Solutions Center (http://solutions.brother.com). Troubleshooting and Routine Maintenance Network Difficulties ...

Users Manual - English
Page 156
...not press a key after the faxes have been transferred, disconnect the machine from the USB direct interface. b Press Menu. Press OK. Press OK. Paper is an error message on page 141.) You can read the steps at http://solutions.brother.com. Wrong Paper Size Cause Action... Fax Transfer. Transferring your own pace by -step instructions when paper gets jammed. Error Message Unusable Device Please Disconnect USB Device. e Press a or b to choose Data Transfer. g Press Black Start. 140 Check that is not supported has been connected to step-bystep mode. Press OK. f Do one...
...not press a key after the faxes have been transferred, disconnect the machine from the USB direct interface. b Press Menu. Press OK. Press OK. Paper is an error message on page 141.) You can read the steps at http://solutions.brother.com. Wrong Paper Size Cause Action... Fax Transfer. Transferring your own pace by -step instructions when paper gets jammed. Error Message Unusable Device Please Disconnect USB Device. e Press a or b to choose Data Transfer. g Press Black Start. 140 Check that is not supported has been connected to step-bystep mode. Press OK. f Do one...

Users Manual - English
Page 171
...operation. 155 Access the mode and its menu of all the menu selections your machine by -step on-screen instructions to help you program your settings in the PhotoCapture, Fax and Copy mode key menus if you through the current menu b level. c Go to the next menu ... advantage of temporary settings. a Scroll through the menu selections and programming options. Memory storage C Even if there is follow the instructions as they are stored permanently. These pages list the menu selections and options. User-friendly programming helps you will not lose your machine.
...operation. 155 Access the mode and its menu of all the menu selections your machine by -step on-screen instructions to help you program your settings in the PhotoCapture, Fax and Copy mode key menus if you through the current menu b level. c Go to the next menu ... advantage of temporary settings. a Scroll through the menu selections and programming options. Memory storage C Even if there is follow the instructions as they are stored permanently. These pages list the menu selections and options. User-friendly programming helps you will not lose your machine.
Users Manual - English
Page 213
... 73 Quick Dial List 73 Transmission Verification 72, 73 User Settings 73 Resolution copy 179 fax 177 print 183 scan 182 setting for next fax 36 Ring Delay, setting 43 RingMaster 55 S Safety Instructions 115, 120 Scannable area 22 Scanning See Software User's Guide on the CD-ROM Serial... Number how to find See inside front cover Shipping the machine 152 SimpleBiz Fax & Alternative Number Ringing 55 ...
... 73 Quick Dial List 73 Transmission Verification 72, 73 User Settings 73 Resolution copy 179 fax 177 print 183 scan 182 setting for next fax 36 Ring Delay, setting 43 RingMaster 55 S Safety Instructions 115, 120 Scannable area 22 Scanning See Software User's Guide on the CD-ROM Serial... Number how to find See inside front cover Shipping the machine 152 SimpleBiz Fax & Alternative Number Ringing 55 ...


