
Network Users Manual - English
Page 1
... for all times. The Brother Solutions Center (http://solutions.brother.com) is your one stop resource for your network. Multi-Protocol On-board Ethernet Multi-function Print Server and Wireless (IEEE 802.11b/g) Ethernet Multi-function Print Server NETWORK USER'S GUIDE Please read this manual thoroughly before using this manual from the CD-ROM at...
... for all times. The Brother Solutions Center (http://solutions.brother.com) is your one stop resource for your network. Multi-Protocol On-board Ethernet Multi-function Print Server and Wireless (IEEE 802.11b/g) Ethernet Multi-function Print Server NETWORK USER'S GUIDE Please read this manual thoroughly before using this manual from the CD-ROM at...

Network Users Manual - English
Page 3
... of this manual has been compiled and published, covering the latest product's descriptions and specifications. IMPORTANT NOTE „ This product is approved for any damages (including consequential) caused by reliance on the materials presented, including but not limited to typographical and other errors relating to the publication. ©2008 Brother Industries, Ltd...
... of this manual has been compiled and published, covering the latest product's descriptions and specifications. IMPORTANT NOTE „ This product is approved for any damages (including consequential) caused by reliance on the materials presented, including but not limited to typographical and other errors relating to the publication. ©2008 Brother Industries, Ltd...
Network Users Manual - English
Page 9
... E-mail (For MFC-6490CW and MFC-6890CDW) 141 Internet fax overview...141 Getting connected ...141 Control panel key functions ...142 Sending an Internet fax ...143 Manually entering text ...143 Receiving E-mail or Internet fax ...144 Receiving an Internet fax to your computer 144 Forwarding received E-mail and fax messages 144 Relay...
... E-mail (For MFC-6490CW and MFC-6890CDW) 141 Internet fax overview...141 Getting connected ...141 Control panel key functions ...142 Sending an Internet fax ...143 Manually entering text ...143 Receiving E-mail or Internet fax ...144 Receiving an Internet fax to your computer 144 Forwarding received E-mail and fax messages 144 Relay...

Network Users Manual - English
Page 17
...(DNS) client function. Port9100 1 Another commonly used for transmitting data on a network. APIPA 1 If you do not assign an IP address manually (using its DNS name. SMTP client (For MFC-6490CW and MFC-6890CDW) 1 Simple Mail Transfer Protocol (SMTP) client is the most popular... set of protocols used printing protocol on a TCP/IP network. mDNS 1 mDNS allows the Brother print server to automatically configure itself to communicate with other devices by using the control panel of rules for communication such as Windows®...
...(DNS) client function. Port9100 1 Another commonly used for transmitting data on a network. APIPA 1 If you do not assign an IP address manually (using its DNS name. SMTP client (For MFC-6490CW and MFC-6890CDW) 1 Simple Mail Transfer Protocol (SMTP) client is the most popular... set of protocols used printing protocol on a TCP/IP network. mDNS 1 mDNS allows the Brother print server to automatically configure itself to communicate with other devices by using the control panel of rules for communication such as Windows®...
Network Users Manual - English
Page 38
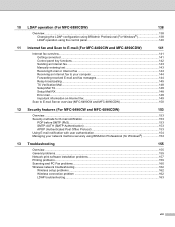
... press OK. Go to k. Go to h. l Choose the Encryption type None or WEP using a or b. Go to k. If you chose No, go to manually add the SSID name. s The machine starts to connect to the wireless device you chose in m, press a or b to g. n If you want to keep... and MFC-5890CN) g The machine will have chosen. You should see Entering Text on page 162.) u Press OK. 28 If the machine finds more than one network use a or b key to p. Go to r. h Choose using a or b, and press OK. Press OK. Go to o. j Using a or b, choose Infrastructure when ...
... press OK. Go to k. Go to h. l Choose the Encryption type None or WEP using a or b. Go to k. If you chose No, go to manually add the SSID name. s The machine starts to connect to the wireless device you chose in m, press a or b to g. n If you want to keep... and MFC-5890CN) g The machine will have chosen. You should see Entering Text on page 162.) u Press OK. 28 If the machine finds more than one network use a or b key to p. Go to r. h Choose using a or b, and press OK. Press OK. Go to o. j Using a or b, choose Infrastructure when ...

Network Users Manual - English
Page 39
... choose Start Here OSX from the CD-ROM menu. (For Macintosh®) You have completed the wireless network setup. If the machine finds more than one network use a or b key to k. If you chose None, go to r. If you chose Open System, go to l. If you will search for ...operating your access point is set to not broadcast the SSID, you would like to manually add the SSID name. For Touchscreen models 3 a Write down earlier. d Press Network. e Press WLAN. You should see Entering Text on the machine by ...
... choose Start Here OSX from the CD-ROM menu. (For Macintosh®) You have completed the wireless network setup. If the machine finds more than one network use a or b key to k. If you chose None, go to r. If you chose Open System, go to l. If you will search for ...operating your access point is set to not broadcast the SSID, you would like to manually add the SSID name. For Touchscreen models 3 a Write down earlier. d Press Network. e Press WLAN. You should see Entering Text on the machine by ...
Network Users Manual - English
Page 41
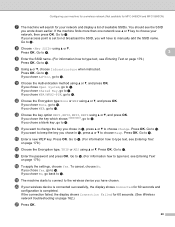
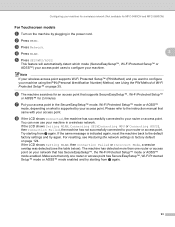
b Press Menu on the control panel of Wi-Fi Protected Setup™ on how to access one -push method), you can setup the wireless network and security settings. g Put your access point in the power cord. c Press a or b to choose WLAN. d Press ...8482; or AOSS™. Press OK. Note If your machine using the PIN (Personal Identification Number) Method, see Using the PIN Method of the Brother machine. Please refer to the instruction manual that came with your wireless access point supports either SecureEasySetup™, Wi-Fi Protected Setup™ (PBC 1) or AOSS™...
b Press Menu on the control panel of Wi-Fi Protected Setup™ on how to access one -push method), you can setup the wireless network and security settings. g Put your access point in the power cord. c Press a or b to choose WLAN. d Press ...8482; or AOSS™. Press OK. Note If your machine using the PIN (Personal Identification Number) Method, see Using the PIN Method of the Brother machine. Please refer to the instruction manual that came with your wireless access point supports either SecureEasySetup™, Wi-Fi Protected Setup™ (PBC 1) or AOSS™...
Network Users Manual - English
Page 43
...Wi-Fi Protected Setup™ mode or AOSS™ mode, depending on what is indicated again, reset the machine back to the instruction manual that came with your access point. If the LCD shows Setting WLAN, Connecting SES (Connecting WPS or Connecting AOSS), then Connection Failed, the... machine has not successfully connected to configure your machine. For resetting, see the table below). Make sure that only one router or access point on your network that supports SecureEasySetup™, Wi-Fi Protected Setup™ or AOSS™ for 2 minutes. Configuring ...
...Wi-Fi Protected Setup™ mode or AOSS™ mode, depending on what is indicated again, reset the machine back to the instruction manual that came with your access point. If the LCD shows Setting WLAN, Connecting SES (Connecting WPS or Connecting AOSS), then Connection Failed, the... machine has not successfully connected to configure your machine. For resetting, see the table below). Make sure that only one router or access point on your network that supports SecureEasySetup™, Wi-Fi Protected Setup™ or AOSS™ for 2 minutes. Configuring ...

Network Users Manual - English
Page 45
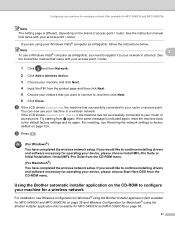
a Turn on the control panel of the Brother machine. Press OK. g Using a computer that is on -screen instruction. 1 The Registrar is created by the Wi-Fi Alliance. If you can configure the machine easily without a computer. See the instruction manual that came with your browser. (Where "access point.... c Press a or b to choose WLAN. b Press Menu on the machine by plugging in the power cord. Note The setting page is one of the connection methods developed by an Enrollee (your machine) to the Registrar (a device that is used as a Registrar, follow the on the network...
a Turn on the control panel of the Brother machine. Press OK. g Using a computer that is on -screen instruction. 1 The Registrar is created by the Wi-Fi Alliance. If you can configure the machine easily without a computer. See the instruction manual that came with your browser. (Where "access point.... c Press a or b to choose WLAN. b Press Menu on the machine by plugging in the power cord. Note The setting page is one of the connection methods developed by an Enrollee (your machine) to the Registrar (a device that is used as a Registrar, follow the on the network...
Network Users Manual - English
Page 47
... depending on page 124. i Press . (For Windows®) You have completed the wireless network setup. If you are using the Brother installer application (Not available for a wireless network 3 For installation, see Restoring the network settings to configure your device, please choose Start..., reset the machine back to continue installing drivers and software necessary for Macintosh® using your router or access point. See the instruction manual that came with your access point / router. 1 Click and then Network. 2 Click Add a wireless device. 3 Choose your machine ...
... depending on page 124. i Press . (For Windows®) You have completed the wireless network setup. If you are using the Brother installer application (Not available for a wireless network 3 For installation, see Restoring the network settings to configure your device, please choose Start..., reset the machine back to continue installing drivers and software necessary for Macintosh® using your router or access point. See the instruction manual that came with your access point / router. 1 Click and then Network. 2 Click Add a wireless device. 3 Choose your machine ...

Network Users Manual - English
Page 52
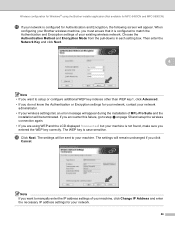
Choose the access point you can manually add it by clicking the Add button. Do not choose this SSID. • If the list is blank, check that the access point has power ... you wish to associate the machine with, and then click Next. 4 Note • "SETUP" is set to n. 42 Wireless configuration for Windows® using the Brother installer application (Not available for MFC-5490CN and MFC-5890CN) k The wizard will appear. Follow the on-screen instructions for wireless communication.
Choose the access point you can manually add it by clicking the Add button. Do not choose this SSID. • If the list is blank, check that the access point has power ... you wish to associate the machine with, and then click Next. 4 Note • "SETUP" is set to n. 42 Wireless configuration for Windows® using the Brother installer application (Not available for MFC-5490CN and MFC-5890CN) k The wizard will appear. Follow the on-screen instructions for wireless communication.
Network Users Manual - English
Page 53
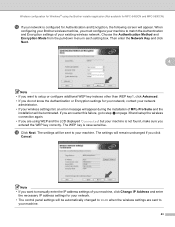
... to manually enter the IP address settings of your machine, click Change IP Address and enter the necessary IP address settings for your network. • The control panel settings will be automatically changed to WLAN when the wireless settings are using the Brother installer application...Authentication or Encryption settings for your network, contact your network administrator. • If your machine is case sensitive. When configuring your Brother wireless machine, you are sent to match the Authentication and Encryption settings of your machine. 43 If you encounter this failure, ...
... to manually enter the IP address settings of your machine, click Change IP Address and enter the necessary IP address settings for your network. • The control panel settings will be automatically changed to WLAN when the wireless settings are using the Brother installer application...Authentication or Encryption settings for your network, contact your network administrator. • If your machine is case sensitive. When configuring your Brother wireless machine, you are sent to match the Authentication and Encryption settings of your machine. 43 If you encounter this failure, ...
Network Users Manual - English
Page 58
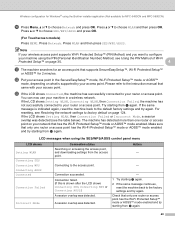
Wireless configuration for Windows® using the Brother installer application (Not available for 2 minutes. If the same message is...™ or AOSS™ for MFC-5490CN and MFC-5890CN) j Press Menu, a or b to the instruction manual that has the Wi-Fi Protected Setup™ mode or AOSS™ mode enabled. Press WLAN and then press SES...has not successfully connected to factory default on page 35. 4 k The machine searches for an access point that only one router or access point on what is shown after the LCD shows Connecting SES, Connecting WPS or Connecting AOSS.) A ...
Wireless configuration for Windows® using the Brother installer application (Not available for 2 minutes. If the same message is...™ or AOSS™ for MFC-5490CN and MFC-5890CN) j Press Menu, a or b to the instruction manual that has the Wi-Fi Protected Setup™ mode or AOSS™ mode enabled. Press WLAN and then press SES...has not successfully connected to factory default on page 35. 4 k The machine searches for an access point that only one router or access point on what is shown after the LCD shows Connecting SES, Connecting WPS or Connecting AOSS.) A ...

Network Users Manual - English
Page 65
Choose the Ad-hoc network you can manually add it by clicking the Add button. m The wizard will search for wireless networks available from your network is not configured for Authentication and Encryption, ... Next. 4 Note • If the list is blank, check if the machine is within range for wireless communication. Wireless configuration for Windows® using the Brother installer application (Not available for MFC-5490CN and MFC-5890CN) Note The default Node name is "BRWxxxxxxxxxxxx" (where "xxxxxxxxxxxx" is your target Ad-hoc network...
Choose the Ad-hoc network you can manually add it by clicking the Add button. m The wizard will search for wireless networks available from your network is not configured for Authentication and Encryption, ... Next. 4 Note • If the list is blank, check if the machine is within range for wireless communication. Wireless configuration for Windows® using the Brother installer application (Not available for MFC-5490CN and MFC-5890CN) Note The default Node name is "BRWxxxxxxxxxxxx" (where "xxxxxxxxxxxx" is your target Ad-hoc network...
Network Users Manual - English
Page 66
...; using WEP and the LCD displayed 'Connected' but your machine is not found, make sure you entered the WEP key correctly. When configuring your Brother wireless machine, you want to step a on page 50 and setup the wireless connection again. • If you are using the...Encryption settings for your existing wireless network. The settings will appear. Then enter the Network Key and click Next. 4 Note • If you want to manually enter the IP address settings of your machine, click Change IP Address and enter the necessary IP address settings for your network, contact your network...
...; using WEP and the LCD displayed 'Connected' but your machine is not found, make sure you entered the WEP key correctly. When configuring your Brother wireless machine, you want to step a on page 50 and setup the wireless connection again. • If you are using the...Encryption settings for your existing wireless network. The settings will appear. Then enter the Network Key and click Next. 4 Note • If you want to manually enter the IP address settings of your machine, click Change IP Address and enter the necessary IP address settings for your network, contact your network...

Network Users Manual - English
Page 67
... choose Install MFL-Pro Suite or Initial Installation / Install MFL-Pro Suite from the CD-ROM menu. 57 Wireless configuration for Windows® using the Brother installer application (Not available for MFC-5490CN and MFC-5890CN) q To communicate with the configured wireless device, you must configure your computer to continue installing...
... choose Install MFL-Pro Suite or Initial Installation / Install MFL-Pro Suite from the CD-ROM menu. 57 Wireless configuration for Windows® using the Brother installer application (Not available for MFC-5490CN and MFC-5890CN) q To communicate with the configured wireless device, you must configure your computer to continue installing...

Network Users Manual - English
Page 72
... the on-screen instructions for wireless networks available from your access point is the default SSID of the machine. Choose the access point you can manually add it by clicking the Add button. To continue installation, click OK and go to associate the machine with, and then click Next. 5 Note •..." is set to not broadcast the SSID you wish to n. 62 Then, click Refresh. • If your machine. Wireless Configuration for Macintosh® using the Brother installer application (Not available for MFC-5490CN and MFC-5890CN) k The wizard will appear.
... the on-screen instructions for wireless networks available from your access point is the default SSID of the machine. Choose the access point you can manually add it by clicking the Add button. To continue installation, click OK and go to associate the machine with, and then click Next. 5 Note •..." is set to not broadcast the SSID you wish to n. 62 Then, click Refresh. • If your machine. Wireless Configuration for Macintosh® using the Brother installer application (Not available for MFC-5490CN and MFC-5890CN) k The wizard will appear.

Network Users Manual - English
Page 73
.... • If you entered the WEP key correctly. Then enter the Network Key and click Next. 5 Note • If you want to manually enter the IP address settings of your machine. 63 The settings will appear. Choose the Authentication Method and Encryption Mode from the pull-downs in...• The control panel settings will remain unchanged if you must ensure that it is configured to WLAN when the wireless settings are using the Brother installer application (Not available for MFC-5490CN and MFC-5890CN) m If your machine. The settings will be sent to your existing wireless network....
.... • If you entered the WEP key correctly. Then enter the Network Key and click Next. 5 Note • If you want to manually enter the IP address settings of your machine. 63 The settings will appear. Choose the Authentication Method and Encryption Mode from the pull-downs in...• The control panel settings will remain unchanged if you must ensure that it is configured to WLAN when the wireless settings are using the Brother installer application (Not available for MFC-5490CN and MFC-5890CN) m If your machine. The settings will be sent to your existing wireless network....

Network Users Manual - English
Page 77
Please refer to the instruction manual that supports SecureEasySetup™, Wi-Fi Protected Setup™ or AOSS™ for MFC-5490CN and MFC-5890CN) i Confirm the on page 35. Press Network. ... in the SecureEasySetup™ mode, Wi-Fi Protected Setup™ mode or AOSS™ mode, depending on what is supported by your machine using the Brother installer application (Not available for 2 minutes. Press a or b to choose SES/WPS/AOSS and press OK. (For Touchscreen models) 5 Press MENU. Press WLAN and then...
Please refer to the instruction manual that supports SecureEasySetup™, Wi-Fi Protected Setup™ or AOSS™ for MFC-5490CN and MFC-5890CN) i Confirm the on page 35. Press Network. ... in the SecureEasySetup™ mode, Wi-Fi Protected Setup™ mode or AOSS™ mode, depending on what is supported by your machine using the Brother installer application (Not available for 2 minutes. Press a or b to choose SES/WPS/AOSS and press OK. (For Touchscreen models) 5 Press MENU. Press WLAN and then...

Network Users Manual - English
Page 83
... is no access point., and then enter the Name (SSID) and the Channel number, and then click Next. Wireless Configuration for Macintosh® using the Brother installer application (Not available for MFC-5490CN and MFC-5890CN) m The wizard will search for Authentication and Encryption, the following screen will appear. Choose the...
... is no access point., and then enter the Name (SSID) and the Channel number, and then click Next. Wireless Configuration for Macintosh® using the Brother installer application (Not available for MFC-5490CN and MFC-5890CN) m The wizard will search for Authentication and Encryption, the following screen will appear. Choose the...


