Basic Users Guide
Page 10
... Scanning a document as a PDF file using ControlCenter4 (Windows 73 How to scan a document as a PDF file using the Touchscreen 75 A Routine maintenance 77 Replacing supplies 77 Replacing the toner cartridges 81 Cleaning the corona wires 87 Replacing the drum unit 90 Replacing the belt unit 96 Replacing the waste toner box 101 Cleaning the scanner 108 viii
... Scanning a document as a PDF file using ControlCenter4 (Windows 73 How to scan a document as a PDF file using the Touchscreen 75 A Routine maintenance 77 Replacing supplies 77 Replacing the toner cartridges 81 Cleaning the corona wires 87 Replacing the drum unit 90 Replacing the belt unit 96 Replacing the waste toner box 101 Cleaning the scanner 108 viii
Basic Users Guide
Page 89
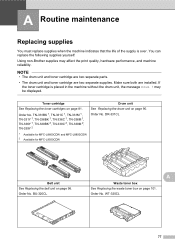
...TN-339BK 2, TN-339C 2, TN-339M 2, TN-339Y 2 1 Available for MFC-L8600CDW and MFC-L8850CDW 2 Available for MFC-L9550CDW Drum unit See Replacing the drum unit on page 96. Toner cartridge See Replacing the toner cartridges on page 101. Order No. may affect the print quality, hardware performance, ...The drum unit and toner cartridge are two separate parts. • The drum unit and toner cartridge are installed. BU-320CL A Waste toner box See Replacing the waste toner box on page 81. You can replace the following supplies yourself: Using non-Brother supplies may be displayed...
...TN-339BK 2, TN-339C 2, TN-339M 2, TN-339Y 2 1 Available for MFC-L8600CDW and MFC-L8850CDW 2 Available for MFC-L9550CDW Drum unit See Replacing the drum unit on page 96. Toner cartridge See Replacing the toner cartridges on page 101. Order No. may affect the print quality, hardware performance, ...The drum unit and toner cartridge are two separate parts. • The drum unit and toner cartridge are installed. BU-320CL A Waste toner box See Replacing the waste toner box on page 81. You can replace the following supplies yourself: Using non-Brother supplies may be displayed...
Basic Users Guide
Page 90
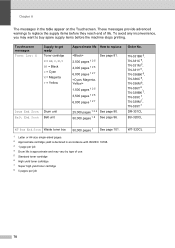
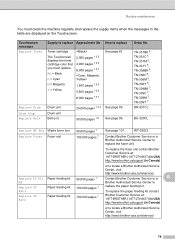
... TN-336M 6, TN-336Y 6, TN-339BK 7, TN-339C 7, TN-339M 7, TN-339Y 7 DR-331CL BU-320CL WT Box End Soon Waste toner box 50,000 pages 1 See page 101. 1 Letter or A4 size single-sided pages. 2 Approximate cartridge yield is declared in the table appear ... unit Approximate life How to buy spare supply items before they reach end of use. 5 Standard toner cartridge 6 High yield toner cartridge 7 Super high yield toner cartridge 8 5 pages per job 4 Drum life is approximate and may want to replace Order No. 2,500 pages 1 2 5 4,000 pages 1 2 6 6,000 pages 1 2 7 1,500 pages 1 2 5 3,500 pages 1 ...
... TN-336M 6, TN-336Y 6, TN-339BK 7, TN-339C 7, TN-339M 7, TN-339Y 7 DR-331CL BU-320CL WT Box End Soon Waste toner box 50,000 pages 1 See page 101. 1 Letter or A4 size single-sided pages. 2 Approximate cartridge yield is declared in the table appear ... unit Approximate life How to buy spare supply items before they reach end of use. 5 Standard toner cartridge 6 High yield toner cartridge 7 Super high yield toner cartridge 8 5 pages per job 4 Drum life is approximate and may want to replace Order No. 2,500 pages 1 2 5 4,000 pages 1 2 6 6,000 pages 1 2 7 1,500 pages 1 2 5 3,500 pages 1 ...
Basic Users Guide
Page 91
... 1 2 5 3,500 pages 1 2 6 6,000 pages 1 2 7 How to replace the fuser unit. WT-320CL Replace Fuser Fuser unit 100,000 pages 1 Contact Brother Customer Service or a Brother Authorized Service Center to replace See page 81. Routine maintenance You must replace. Touchscreen messages Replace Toner Supply to replace Approximate life Toner cartridge The Touchscreen displays the toner cartridge color that you must clean the...
... 1 2 5 3,500 pages 1 2 6 6,000 pages 1 2 7 How to replace the fuser unit. WT-320CL Replace Fuser Fuser unit 100,000 pages 1 Contact Brother Customer Service or a Brother Authorized Service Center to replace See page 81. Routine maintenance You must replace. Touchscreen messages Replace Toner Supply to replace Approximate life Toner cartridge The Touchscreen displays the toner cartridge color that you must clean the...
Basic Users Guide
Page 92
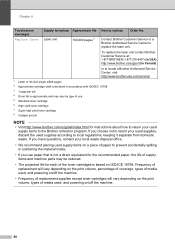
... 1 Contact Brother Customer Service or a Brother Authorized Service Center to the Brother collection program. If you use paper that is based on ISO/ICE 19798. Frequency of replacement will vary depending on the print volume, percentage of coverage, types of media used, and powering on/off the machine. • Frequency of replacement supplies except toner cartridges...
... 1 Contact Brother Customer Service or a Brother Authorized Service Center to the Brother collection program. If you use paper that is based on ISO/ICE 19798. Frequency of replacement will vary depending on the print volume, percentage of coverage, types of media used, and powering on/off the machine. • Frequency of replacement supplies except toner cartridges...

Basic Users Guide
Page 93
... Toner Low: X, buy toner cartridges, contact Brother Customer Service. • We recommend that you are ready to buy a new toner cartridge for the color indicated on your average type of remaining toner life will stop printing until you must be replaced after approximately 2,500 pages 4 (Black) or approximately 1,500 pages 4 (Cyan, Magenta, Yellow) for MFC-L8600CDW and MFC-L8850CDW...
... Toner Low: X, buy toner cartridges, contact Brother Customer Service. • We recommend that you are ready to buy a new toner cartridge for the color indicated on your average type of remaining toner life will stop printing until you must be replaced after approximately 2,500 pages 4 (Black) or approximately 1,500 pages 4 (Cyan, Magenta, Yellow) for MFC-L8600CDW and MFC-L8850CDW...
Basic Users Guide
Page 94
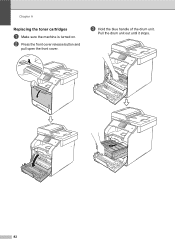
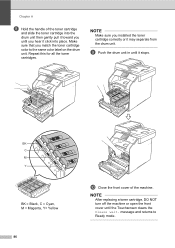
Pull the drum unit out until it stops. 82 c Hold the blue handle of the drum unit. Chapter A Replacing the toner cartridges A a Make sure the machine is turned on. b Press the front cover release button and pull open the front cover.
Pull the drum unit out until it stops. 82 c Hold the blue handle of the drum unit. Chapter A Replacing the toner cartridges A a Make sure the machine is turned on. b Press the front cover release button and pull open the front cover.
Basic Users Guide
Page 97
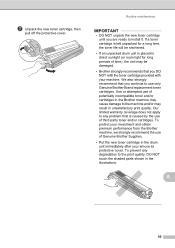
...your investment and obtain premium performance from the Brother machine, we strongly recommend the use only Genuine Brother Brand replacement toner cartridges. If a toner cartridge is left unpacked for a long time, the toner life will be damaged. • Brother strongly recommends that you remove its protective cover... that is placed in direct sunlight (or room light for long periods of Genuine Brother Supplies. • Put the new toner cartridge in the illustrations. g Unpack the new toner cartridge, then pull off the protective cover. Routine maintenance IMPORTANT • DO NOT...
...your investment and obtain premium performance from the Brother machine, we strongly recommend the use only Genuine Brother Brand replacement toner cartridges. If a toner cartridge is left unpacked for a long time, the toner life will be damaged. • Brother strongly recommends that you remove its protective cover... that is placed in direct sunlight (or room light for long periods of Genuine Brother Supplies. • Put the new toner cartridge in the illustrations. g Unpack the new toner cartridge, then pull off the protective cover. Routine maintenance IMPORTANT • DO NOT...
Basic Users Guide
Page 98
... Touchscreen clears the Please wait. NOTE Make sure you match the toner cartridge color to Ready mode. 86 Repeat this for all the toner cartridges. message and returns to the same color label on the drum unit. NOTE After replacing a toner cartridge, DO NOT turn off the machine or open the front ...cover until it click into the drum unit then gently pull it toward you until you hear it stops. Make sure that you installed the toner cartridge correctly or it may separate ...
... Touchscreen clears the Please wait. NOTE Make sure you match the toner cartridge color to Ready mode. 86 Repeat this for all the toner cartridges. message and returns to the same color label on the drum unit. NOTE After replacing a toner cartridge, DO NOT turn off the machine or open the front ...cover until it click into the drum unit then gently pull it toward you until you hear it stops. Make sure that you installed the toner cartridge correctly or it may separate ...
Basic Users Guide
Page 102
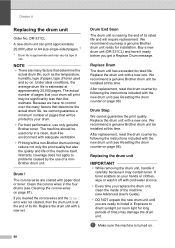
...and so on . We recommend a genuine Brother drum unit be installed at this time. Replacing the drum unit A IMPORTANT • While removing the drum unit, handle it carefully because it ready before you cleaned the corona wires and the Drum ! If toner scatters on page 96). a Make sure ...many factors that determine the actual drum life, we have it may vary by the use only genuine Brother toner. Drum Stop A We cannot guarantee the print quality. Chapter A Replacing the drum unit A Order No. Replace the drum unit with a new one . Buy a new drum unit (DR-331CL) and have...
...and so on . We recommend a genuine Brother drum unit be installed at this time. Replacing the drum unit A IMPORTANT • While removing the drum unit, handle it carefully because it ready before you cleaned the corona wires and the Drum ! If toner scatters on page 96). a Make sure ...many factors that determine the actual drum life, we have it may vary by the use only genuine Brother toner. Drum Stop A We cannot guarantee the print quality. Chapter A Replacing the drum unit A Order No. Replace the drum unit with a new one . Buy a new drum unit (DR-331CL) and have...
Basic Users Guide
Page 108
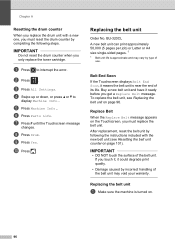
...drum counter by type of the belt unit may vary by completing the following the instructions included with a new one, you must replace the belt unit. After replacement, reset the belt unit by following steps. Belt End Soon A If the Touchscreen displays Belt End Soon, it could degrade ...surface of its life. Buy a new belt unit and have it ready before you only replace the toner cartridge. Chapter A Resetting the drum counter A When you replace the drum unit with the new belt unit (see Replacing the belt unit on page 96. a Press to display Machine Info.. c Press All ...
...drum counter by type of the belt unit may vary by completing the following the instructions included with a new one, you must replace the belt unit. After replacement, reset the belt unit by following steps. Belt End Soon A If the Touchscreen displays Belt End Soon, it could degrade ...surface of its life. Buy a new belt unit and have it ready before you only replace the toner cartridge. Chapter A Resetting the drum counter A When you replace the drum unit with the new belt unit (see Replacing the belt unit on page 96. a Press to display Machine Info.. c Press All ...
Basic Users Guide
Page 113
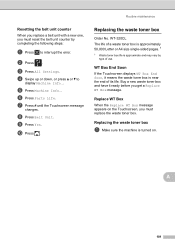
... is turned on the Touchscreen, you must reset the belt unit counter by type of its life. Replacing the waste toner box A a Make sure the machine is near the end of use. b Press . h Press Belt Unit. WT Box End Soon A If the Touchscreen displays WT Box ...End Soon, it ready before you must replace the waste toner box. c Press All Settings. i Press Yes. Replacing the waste toner box A Order No. Replace WT Box A When the Replace WT Box message appears on . A 101
... is turned on the Touchscreen, you must reset the belt unit counter by type of its life. Replacing the waste toner box A a Make sure the machine is near the end of use. b Press . h Press Belt Unit. WT Box End Soon A If the Touchscreen displays WT Box ...End Soon, it ready before you must replace the waste toner box. c Press All Settings. i Press Yes. Replacing the waste toner box A Order No. Replace WT Box A When the Replace WT Box message appears on . A 101
Basic Users Guide
Page 116
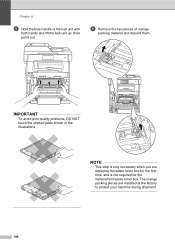
NOTE This step is only necessary when you are installed at the factory to protect your machine during shipment. 104 The orange packing pieces are replacing the waste toner box for the first time, and is not required for the replacement waste toner box. IMPORTANT To avoid print quality problems, DO NOT touch the shaded parts shown in the illustrations. f Remove the two pieces of the belt unit with both hands and lift the belt unit up, then pull it out. Chapter A e Hold the blue handle of orange packing material and discard them.
NOTE This step is only necessary when you are installed at the factory to protect your machine during shipment. 104 The orange packing pieces are replacing the waste toner box for the first time, and is not required for the replacement waste toner box. IMPORTANT To avoid print quality problems, DO NOT touch the shaded parts shown in the illustrations. f Remove the two pieces of the belt unit with both hands and lift the belt unit up, then pull it out. Chapter A e Hold the blue handle of orange packing material and discard them.
Basic Users Guide
Page 124
...fully opened. Perform the color calibration again using the Touchscreen or the printer driver (see Replacing the belt unit on the Touchscreen, and put it on . Pull out the drum unit, take out the toner cartridge for the color that is not spinning, disconnect the machine from the power for ... turn on but do not use it . 112 If the fan is indicated on page 96). If the problem continues, contact Brother Customer Service. The toner cartridge is too hot. The temperature of the issues that can hear the fan in the machine spinning and that the exhaust outlet is...
...fully opened. Perform the color calibration again using the Touchscreen or the printer driver (see Replacing the belt unit on the Touchscreen, and put it on . Pull out the drum unit, take out the toner cartridge for the color that is not spinning, disconnect the machine from the power for ... turn on but do not use it . 112 If the fan is indicated on page 96). If the problem continues, contact Brother Customer Service. The toner cartridge is too hot. The temperature of the issues that can hear the fan in the machine spinning and that the exhaust outlet is...
Basic Users Guide
Page 125
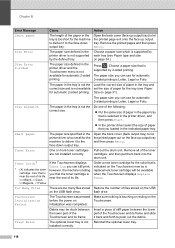
... from the ADF was not inserted or fed correctly, or the document scanned from Manual to Off (see Cleaning the corona wires on page 39. Replace Drum message. Cause Action The front cover is open while loading a document. The ADF cover is not installed correctly. Remove the DIMM. (See ... completely closed . by sliding the blue tab (see Turning off the machine and unplug the power cord. Remove the drum unit, remove the toner cartridges from the drum unit, and reinstall the toner cartridges back into the drum unit. Reinstall the drum unit back in the machine. 113
... from the ADF was not inserted or fed correctly, or the document scanned from Manual to Off (see Cleaning the corona wires on page 39. Replace Drum message. Cause Action The front cover is open while loading a document. The ADF cover is not installed correctly. Remove the DIMM. (See ... completely closed . by sliding the blue tab (see Turning off the machine and unplug the power cord. Remove the drum unit, remove the toner cartridges from the drum unit, and reinstall the toner cartridges back into the drum unit. Reinstall the drum unit back in the machine. 113

Basic Users Guide
Page 127
... in progress Do one of the following : Press Send Now, Partial Print or Quit to avoid storing more faxes in Replacing the waste toner box on the Touchscreen is not installed correctly. Reinstall the drum unit back in the memory to restore the memory to 100%. If... the problem continues, replace the toner cartridge (see Advanced User's Guide). 115 Print the faxes that are stored in the machine. The machine's memory is full. Press...
... in progress Do one of the following : Press Send Now, Partial Print or Quit to avoid storing more faxes in Replacing the waste toner box on the Touchscreen is not installed correctly. Reinstall the drum unit back in the memory to restore the memory to 100%. If... the problem continues, replace the toner cartridge (see Advanced User's Guide). 115 Print the faxes that are stored in the machine. The machine's memory is full. Press...
Basic Users Guide
Page 129
...-8437) (in USA) http://www.brother.ca/support (in Canada) or to locate a Brother Authorized Service Center, visit: http://www.brother-usa.com/service/ Replace Toner 1 1 The Touchscreen indicates the toner cartridge color that you must replace. The machine will be stored in the memory. Replace the toner cartridge for 2-sided scanning (see Replacing the toner cartridges on page 215). Use...
...-8437) (in USA) http://www.brother.ca/support (in Canada) or to locate a Brother Authorized Service Center, visit: http://www.brother-usa.com/service/ Replace Toner 1 1 The Touchscreen indicates the toner cartridge color that you must replace. The machine will be stored in the memory. Replace the toner cartridge for 2-sided scanning (see Replacing the toner cartridges on page 215). Use...
Basic Users Guide
Page 130
...is not available for automatic 2-sided printing. Debris may be available when the Touchscreen displays Replace Toner. Choose a paper size which is supported by each tray (see Paper Size on the Touchscreen now so a replacement toner cartridge will be stuck between the lower part of its life. Choose a paper size...61550; In the printer driver select the size of the Touchscreen and its frame. Reinstall the optional lower tray. 118 One or more toner cartridges are too many files stored on initialization was pressed before the power on the USB flash drive. The optional lower tray is ...
...is not available for automatic 2-sided printing. Debris may be available when the Touchscreen displays Replace Toner. Choose a paper size which is supported by each tray (see Paper Size on the Touchscreen now so a replacement toner cartridge will be stuck between the lower part of its life. Choose a paper size...61550; In the printer driver select the size of the Touchscreen and its frame. Reinstall the optional lower tray. 118 One or more toner cartridges are too many files stored on initialization was pressed before the power on the USB flash drive. The optional lower tray is ...

Basic Users Guide
Page 131
...the USB flash drive is on page 67). Turn the power off , and then turn the machine off and back on again. The waste toner box is connected to the USB direct interface. Unplug the device from the USB direct interface (see the specifications for supported USB flash drives in... switch of its life. Action Unplug the device from a USB flash drive or digital camera supporting mass storage on . Buy a new waste toner box before you get a Replace WT Box message. Unusable Device USB Write-protected WT Box End Soon Cause A defective USB device or a high power consumption USB device has...
...the USB flash drive is on page 67). Turn the power off , and then turn the machine off and back on again. The waste toner box is connected to the USB direct interface. Unplug the device from the USB direct interface (see the specifications for supported USB flash drives in... switch of its life. Action Unplug the device from a USB flash drive or digital camera supporting mass storage on . Buy a new waste toner box before you get a Replace WT Box message. Unusable Device USB Write-protected WT Box End Soon Cause A defective USB device or a high power consumption USB device has...

Basic Users Guide
Page 157
... drum unit on page 90.) 145 abcdefghijklmnopqrstuvwxyz. ABCDEFGHIJKLMNOPQRSTUVWXYZ. 0123456789. To identify the color of the toner cartridge, visit http://solutions.brother.com/ to view our FAQs and troubleshooting tips. Put in a new drum unit (see Replacing the toner cartridges B on page 87). Make sure the blue tab of poor print quality ABCDEFGHIJKLMNOPQRSTUVWXYZ...
... drum unit on page 90.) 145 abcdefghijklmnopqrstuvwxyz. ABCDEFGHIJKLMNOPQRSTUVWXYZ. 0123456789. To identify the color of the toner cartridge, visit http://solutions.brother.com/ to view our FAQs and troubleshooting tips. Put in a new drum unit (see Replacing the toner cartridges B on page 87). Make sure the blue tab of poor print quality ABCDEFGHIJKLMNOPQRSTUVWXYZ...


