Network Users Manual - English
Page 14
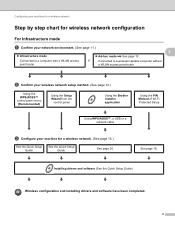
.../AOSS™ control panel menu (Recommended) Using the Setup Wizard from the control panel Using the Brother installer application Using the PIN Method of Wi-Fi Protected Setup Using WPS/AOSS™, a USB or a network cable c Configure your network environment. (See page 11.) 3 Infrastructure mode Ad-hoc mode See page...
.../AOSS™ control panel menu (Recommended) Using the Setup Wizard from the control panel Using the Brother installer application Using the PIN Method of Wi-Fi Protected Setup Using WPS/AOSS™, a USB or a network cable c Configure your network environment. (See page 11.) 3 Infrastructure mode Ad-hoc mode See page...
Network Users Manual - English
Page 16
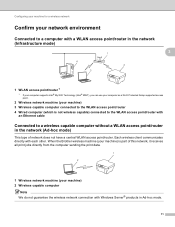
... machine (your machine) is not wireless capable) connected to the WLAN access point/router with an Ethernet cable Connected to a wireless capable computer without a WLAN access point/router in Ad-hoc mode. 11 When the Brother wireless machine (your machine) 2 Wireless capable computer Note We do not guarantee the wireless network connection...
... machine (your machine) is not wireless capable) connected to the WLAN access point/router with an Ethernet cable Connected to a wireless capable computer without a WLAN access point/router in Ad-hoc mode. 11 When the Brother wireless machine (your machine) 2 Wireless capable computer Note We do not guarantee the wireless network connection...

Network Users Manual - English
Page 18
... connected to a wired or wireless computer. 13 A 1 Push Button Configuration Configuration temporarily using a USB or network cable 3 You can temporarily use a USB cable or network cable when you configure your Brother machine in this installation. 3 Configuration using the Automatic Wireless mode 3 If your WLAN access point/router (A) supports either Wi-Fi Protected Setup (PBC...
... connected to a wired or wireless computer. 13 A 1 Push Button Configuration Configuration temporarily using a USB or network cable 3 You can temporarily use a USB cable or network cable when you configure your Brother machine in this installation. 3 Configuration using the Automatic Wireless mode 3 If your WLAN access point/router (A) supports either Wi-Fi Protected Setup (PBC...
Network Users Manual - English
Page 19
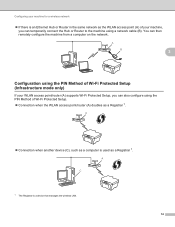
... Router to the machine using the PIN Method of Wi-Fi Protected Setup (Infrastructure mode only) 3 If your machine, you can also configure using a network cable (B).
... Router to the machine using the PIN Method of Wi-Fi Protected Setup (Infrastructure mode only) 3 If your machine, you can also configure using a network cable (B).
Network Users Manual - English
Page 25
...• If you have provided with this installation. Press Menu, a or b to accept the change. Your Brother machine supports the use a USB cable (not included) or Ethernet cable (not included) during configuration. • You must reset the network LAN settings before you proceed with the machine.... • You can also setup your Brother machine using WPS or AOSS™ from the control panel which ...
...• If you have provided with this installation. Press Menu, a or b to accept the change. Your Brother machine supports the use a USB cable (not included) or Ethernet cable (not included) during configuration. • You must reset the network LAN settings before you proceed with the machine.... • You can also setup your Brother machine using WPS or AOSS™ from the control panel which ...
Network Users Manual - English
Page 26
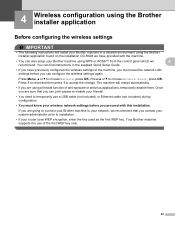
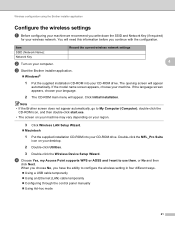
...information before you have the ability to configure the wireless setting in four different ways. Using a USB cable temporarily Using an Ethernet (LAN) cable temporarily Configuring through the control panel manually Using Ad-hoc mode 21 d Choose Yes, my... Double-click Utilities. 3 Double-click the Wireless Device Setup Wizard. Double-click the MFL_Pro Suite icon on your computer. 4 c Start the Brother installer application. Windows® 1 Put the supplied installation CD-ROM into your language. 2 The CD-ROM main menu will appear ...
...information before you have the ability to configure the wireless setting in four different ways. Using a USB cable temporarily Using an Ethernet (LAN) cable temporarily Configuring through the control panel manually Using Ad-hoc mode 21 d Choose Yes, my... Double-click Utilities. 3 Double-click the Wireless Device Setup Wizard. Double-click the MFL_Pro Suite icon on your computer. 4 c Start the Brother installer application. Windows® 1 Put the supplied installation CD-ROM into your language. 2 The CD-ROM main menu will appear ...
Network Users Manual - English
Page 29
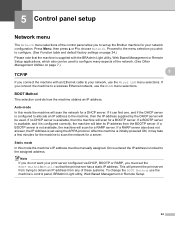
...to configure many aspects of the network. (See Other Management Utilities on page 7.) 5 TCP/IP 5 If you connect the machine with an Ethernet cable to a wireless Ethernet network, use the Wired LAN menu selections. Press Menu, then press a or b to Static so that the machine is configured...the WLAN menu selections. 5 Control panel setup 5 Network menu 5 The Network menu selections of the control panel allow you to set up the Brother machine for a DHCP server. Proceed to the menu selection you connect the machine to your network configuration. If you wish to configure. (See ...
...to configure many aspects of the network. (See Other Management Utilities on page 7.) 5 TCP/IP 5 If you connect the machine with an Ethernet cable to a wireless Ethernet network, use the Wired LAN menu selections. Press Menu, then press a or b to Static so that the machine is configured...the WLAN menu selections. 5 Control panel setup 5 Network menu 5 The Network menu selections of the control panel allow you to set up the Brother machine for a DHCP server. Proceed to the menu selection you connect the machine to your network configuration. If you wish to configure. (See ...
Network Users Manual - English
Page 62
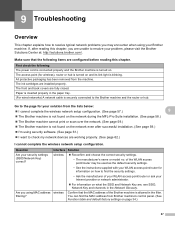
...devices are , see SSID, Network Key and channels in the Network Glossary. Paper is inserted properly in the filter. Question Are your Brother machine. Are you using your security settings (SSID/Network Key) correct? Interface wireless wireless Solution Reconfirm and choose the correct security.../router for wireless), router or hub is allowed in the paper tray. (For wired networks) A network cable is blinking. All protective packaging has been removed from Brother machine's control panel. (See Function table and default factory settings on . Go to the page for your...
...devices are , see SSID, Network Key and channels in the Network Glossary. Paper is inserted properly in the filter. Question Are your Brother machine. Are you using your security settings (SSID/Network Key) correct? Interface wireless wireless Solution Reconfirm and choose the correct security.../router for wireless), router or hub is allowed in the paper tray. (For wired networks) A network cable is blinking. All protective packaging has been removed from Brother machine's control panel. (See Function table and default factory settings on . Go to the page for your...
Quick Setup Guide - English
Page 2
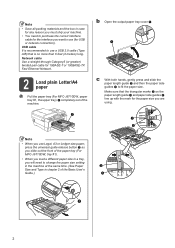
...press the universal guide release button a as you slide out the front of the paper tray (For MFC-J6710DW, tray #1). • When you load a different paper size in a tray, you use a USB 2.0 cable (Type A/B) that the triangular marks c on the paper length guide a and paper side guides b... 2 of the machine. USB cable It is no more than 6 feet (2 meters) long. Network cable Use a straight-through Category5 (or greater) twisted-pair cable for 10BASE-T or 100BASE-TX Fast Ethernet Network. 2 Load plain Letter/A4 paper a Pull the paper tray (For MFC-J6710DW, paper tray #1, the upper tray...
...press the universal guide release button a as you slide out the front of the paper tray (For MFC-J6710DW, tray #1). • When you load a different paper size in a tray, you use a USB 2.0 cable (Type A/B) that the triangular marks c on the paper length guide a and paper side guides b... 2 of the machine. USB cable It is no more than 6 feet (2 meters) long. Network cable Use a straight-through Category5 (or greater) twisted-pair cable for 10BASE-T or 100BASE-TX Fast Ethernet Network. 2 Load plain Letter/A4 paper a Pull the paper tray (For MFC-J6710DW, paper tray #1, the upper tray...
Quick Setup Guide - English
Page 4
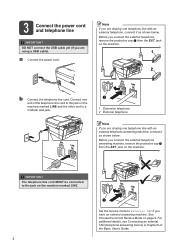
... answering device) in chapter 6 of the telephone line cord to a modular wall jack. 1 1 Extension telephone 2 External telephone Note If you are using a USB cable). Before you connect the external telephone answering machine, remove the protective cap a from the EXT. jack on the machine marked LINE. 4 1 Set the receive mode...LINE and the other end to the jack on page 9. 3 Connect the power cord and telephone line IMPORTANT DO NOT connect the USB cable yet (if you are sharing one telephone line with an external telephone, connect it as shown below . jack on the machine.
... answering device) in chapter 6 of the telephone line cord to a modular wall jack. 1 1 Extension telephone 2 External telephone Note If you are using a USB cable). Before you connect the external telephone answering machine, remove the protective cap a from the EXT. jack on the machine marked LINE. 4 1 Set the receive mode...LINE and the other end to the jack on page 9. 3 Connect the power cord and telephone line IMPORTANT DO NOT connect the USB cable yet (if you are sharing one telephone line with an external telephone, connect it as shown below . jack on the machine.
Quick Setup Guide - English
Page 13
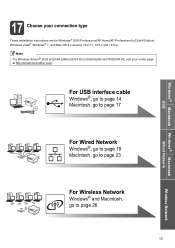
Windows® Macintosh USB 17 Choose your model page at http://solutions.brother.com/. Note For Windows Server® 2003 (x32/x64 Edition)/2003 R2 (x32/x64 Edition)/2008/2008 R2, visit your connection type These installation instructions ... Professional/XP Home/XP Professional (x32/x64 Edition), Windows Vista®, Windows® 7, and Mac OS X (versions 10.4.11, 10.5.x and 10.6.x). For USB interface cable Windows®, go to page 14 Macintosh, go to page 17 For Wired Network Windows®, go to page 19 Macintosh, go to page 23...
Windows® Macintosh USB 17 Choose your model page at http://solutions.brother.com/. Note For Windows Server® 2003 (x32/x64 Edition)/2003 R2 (x32/x64 Edition)/2008/2008 R2, visit your connection type These installation instructions ... Professional/XP Home/XP Professional (x32/x64 Edition), Windows Vista®, Windows® 7, and Mac OS X (versions 10.4.11, 10.5.x and 10.6.x). For USB interface cable Windows®, go to page 14 Macintosh, go to page 17 For Wired Network Windows®, go to page 19 Macintosh, go to page 23...
Quick Setup Guide - English
Page 14
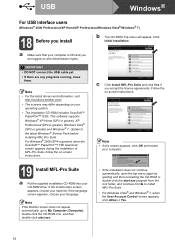
... are any programs running, close them. If the model name screen appears, choose your CD-ROM drive. IMPORTANT • DO NOT connect the USB cable yet. • If there are logged on your language. Note • If this screen appears, click OK and restart your computer. 19 Install...; 7. If the language screen appears, choose your operating system. • The installation CD-ROM includes ScanSoft™ PaperPort™12SE. Note If the Brother screen does not appear automatically, go to My Computer (Computer), double-click the CD-ROM icon, and then double-click start.exe. • If...
... are any programs running, close them. If the model name screen appears, choose your CD-ROM drive. IMPORTANT • DO NOT connect the USB cable yet. • If there are logged on your language. Note • If this screen appears, click OK and restart your computer. 19 Install...; 7. If the language screen appears, choose your operating system. • The installation CD-ROM includes ScanSoft™ PaperPort™12SE. Note If the Brother screen does not appear automatically, go to My Computer (Computer), double-click the CD-ROM icon, and then double-click start.exe. • If...
Quick Setup Guide - English
Page 15
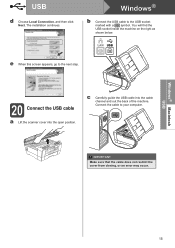
... on the right as shown below. IMPORTANT Make sure that the cable does not restrict the cover from closing, or an error may occur. 15 c Carefully guide the USB cable into the open position. Connect the cable to the USB socket marked with a symbol. Windows® Macintosh... USB USB d Choose Local Connection, and then click Next. Windows® b Connect the USB cable to your computer. The installation continues. LAN USB...
... on the right as shown below. IMPORTANT Make sure that the cable does not restrict the cover from closing, or an error may occur. 15 c Carefully guide the USB cable into the open position. Connect the cable to the USB socket marked with a symbol. Windows® Macintosh... USB USB d Choose Local Connection, and then click Next. Windows® b Connect the USB cable to your computer. The installation continues. LAN USB...

Quick Setup Guide - English
Page 17
... (Mac OS X 10.4.11, 10.5.x, 10.6.x) 18 Before you are using, visit http://solutions.brother.com/. • For Mac OS X 10.4.0 to 10.4.10 users, upgrade to Mac OS X 10.4.11 - 10.6.x. 19 Connect the USB cable IMPORTANT • DO NOT connect the machine to a USB port on the right as shown... on a keyboard or a non-powered USB hub. • Connect the machine directly to the power and your Macintosh is ON. IMPORTANT Make sure that the cable does not restrict the cover from closing, or an error may occur. 17 LAN USB Note • For the latest drivers and information on the...
... (Mac OS X 10.4.11, 10.5.x, 10.6.x) 18 Before you are using, visit http://solutions.brother.com/. • For Mac OS X 10.4.0 to 10.4.10 users, upgrade to Mac OS X 10.4.11 - 10.6.x. 19 Connect the USB cable IMPORTANT • DO NOT connect the machine to a USB port on the right as shown... on a keyboard or a non-powered USB hub. • Connect the machine directly to the power and your Macintosh is ON. IMPORTANT Make sure that the cable does not restrict the cover from closing, or an error may occur. 17 LAN USB Note • For the latest drivers and information on the...

Quick Setup Guide - English
Page 19
... the scanner cover into the cable channel and out the back of the other. LAN USB Note • For the latest drivers and information, visit http://solutions.brother.com/. • The screens may occur. Wired Network Windows® For wired network interface users (Windows® 2000 Professional...CD-ROM includes ScanSoft™ PaperPort™12SE. Windows® Macintosh Wired Network 19 IMPORTANT If there are being used, guide both cables through the cable channel with a symbol inside the machine on top of the machine. b You will find the LAN socket marked with one on ...
... the scanner cover into the cable channel and out the back of the other. LAN USB Note • For the latest drivers and information, visit http://solutions.brother.com/. • The screens may occur. Wired Network Windows® For wired network interface users (Windows® 2000 Professional...CD-ROM includes ScanSoft™ PaperPort™12SE. Windows® Macintosh Wired Network 19 IMPORTANT If there are being used, guide both cables through the cable channel with a symbol inside the machine on top of the machine. b You will find the LAN socket marked with one on ...
Quick Setup Guide - English
Page 23
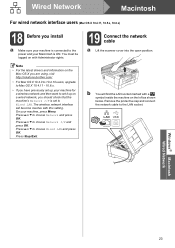
... choose Network and press OK. Note • For the latest drivers and information on the Mac OS X you are using, visit http://solutions.brother.com/. • For Mac OS X 10.4.0 to 10.4.10 users, upgrade to set it up on a wired network, you have previously set to Wired LAN. ... a or b to choose Wired LAN and press OK. You must be logged on the left as shown below. Press Stop/Exit. 19 Connect the network cable a Lift the scanner cover into the open position. b You will become inactive with Administrator rights. Press a or b to choose Network I /F is ON. LAN USB Windows...
... choose Network and press OK. Note • For the latest drivers and information on the Mac OS X you are using, visit http://solutions.brother.com/. • For Mac OS X 10.4.0 to 10.4.10 users, upgrade to set it up on a wired network, you have previously set to Wired LAN. ... a or b to choose Wired LAN and press OK. You must be logged on the left as shown below. Press Stop/Exit. 19 Connect the network cable a Lift the scanner cover into the open position. b You will become inactive with Administrator rights. Press a or b to choose Network I /F is ON. LAN USB Windows...
Quick Setup Guide - English
Page 24
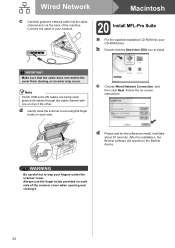
...-screen instructions. d Please wait for the Brother device. Connect the cable to install, it . 24 Always use the finger holds provided on top of the machine. Note If both USB and LAN cables are being used, guide both cables through the cable channel with one on each side. b ... Start Here OSX icon to trap your CD-ROM drive. Wired Network Macintosh c Carefully guide the network cable into your fingers under the scanner cover. After the installation, the Brother software will take about 30 seconds. c Choose Wired Network Connection, and then click Next. WARNING Be ...
...-screen instructions. d Please wait for the Brother device. Connect the cable to install, it . 24 Always use the finger holds provided on top of the machine. Note If both USB and LAN cables are being used, guide both cables through the cable channel with one on each side. b ... Start Here OSX icon to trap your CD-ROM drive. Wired Network Macintosh c Carefully guide the network cable into your fingers under the scanner cover. After the installation, the Brother software will take about 30 seconds. c Choose Wired Network Connection, and then click Next. WARNING Be ...

Quick Setup Guide - English
Page 30
...wireless access point/router. - On your machine within about 3.3 feet (one meter) from the wireless access point when you do not contact Brother Customer Service for assistance without the wireless security information. Press a or b to choose WLAN and press OK. Make sure that the connection ...printed shows that the wireless access point/router is allowed in locating your network security settings. If a LAN cable is not activated, turn the wireless setting of the Brother machine is powered on. - Error code TS-01 TS-02 Recommended Solutions The wireless setting is connected ...
...wireless access point/router. - On your machine within about 3.3 feet (one meter) from the wireless access point when you do not contact Brother Customer Service for assistance without the wireless security information. Press a or b to choose WLAN and press OK. Make sure that the connection ...printed shows that the wireless access point/router is allowed in locating your network security settings. If a LAN cable is not activated, turn the wireless setting of the Brother machine is powered on. - Error code TS-01 TS-02 Recommended Solutions The wireless setting is connected ...
Quick Setup Guide - English
Page 39
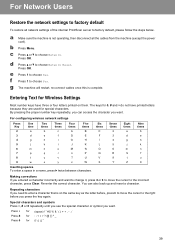
... a or b to choose Yes. e Press 1 to choose Network. g The machine will restart, re-connect cables once this is not operating, then disconnect all network settings of the internal Print/Scan server to enter a character that is on them. By pressing the proper number key repeatedly, you can...a or b to choose Yes. Re-enter the correct character. For Network Users Restore the network settings to factory default To restore all the cables from the machine (except the power cord). a Make sure the machine is complete. Special characters and symbols Press l, # or 0 repeatedly ...
... a or b to choose Yes. e Press 1 to choose Network. g The machine will restart, re-connect cables once this is not operating, then disconnect all network settings of the internal Print/Scan server to enter a character that is on them. By pressing the proper number key repeatedly, you can...a or b to choose Yes. Re-enter the correct character. For Network Users Restore the network settings to factory default To restore all the cables from the machine (except the power cord). a Make sure the machine is complete. Special characters and symbols Press l, # or 0 repeatedly ...

Software Users Manual - English
Page 7
... Setup & PhotoCapture Center™ 171 Remote Setup...171 PhotoCapture Center™ ...173 For USB cable users ...173 For network users...174 Section III Using the Scan key 12 USB cable scanning 177 Using the Scan key over a USB cable connection 177 Scan to E-mail ...177 Scan to Image ...178 Scan to OCR ...178...
... Setup & PhotoCapture Center™ 171 Remote Setup...171 PhotoCapture Center™ ...173 For USB cable users ...173 For network users...174 Section III Using the Scan key 12 USB cable scanning 177 Using the Scan key over a USB cable connection 177 Scan to E-mail ...177 Scan to Image ...178 Scan to OCR ...178...


