Software Users Manual - English
Page 2
... Advanced tab...12 Color/Grayscale ...13 Color Settings ...13 Ink Save Mode (For MFC-J615W and MFC-J630W 15 Use Watermark...15 Watermark Settings ...16 Other Print Options...18 Support ...25 Using FaceFilter Studio for photo printing by REALLUSION 27 Starting FaceFilter Studio with your Brother machine turned On 28 Starting FaceFilter Studio when your...
... Advanced tab...12 Color/Grayscale ...13 Color Settings ...13 Ink Save Mode (For MFC-J615W and MFC-J630W 15 Use Watermark...15 Watermark Settings ...16 Other Print Options...18 Support ...25 Using FaceFilter Studio for photo printing by REALLUSION 27 Starting FaceFilter Studio with your Brother machine turned On 28 Starting FaceFilter Studio when your...
Software Users Manual - English
Page 5
...Choosing the right type of paper...120 Simultaneous printing, scanning and faxing 120 Clearing data from the memory ...120 Status Monitor ...121 Using the Brother Ink driver ...122 Choosing page setup options ...122 Choosing printing options ...123 Basic settings...124 Media Type...124... Quality ...125 Color Mode ...126 Advanced settings ...127 Color/Grayscale ...127 Other Settings...129 Other Print Options...130 Support ...131 Sending a fax (MFC models ...
...Choosing the right type of paper...120 Simultaneous printing, scanning and faxing 120 Clearing data from the memory ...120 Status Monitor ...121 Using the Brother Ink driver ...122 Choosing page setup options ...122 Choosing printing options ...123 Basic settings...124 Media Type...124... Quality ...125 Color Mode ...126 Advanced settings ...127 Color/Grayscale ...127 Other Settings...129 Other Print Options...130 Support ...131 Sending a fax (MFC models ...
Software Users Manual - English
Page 7
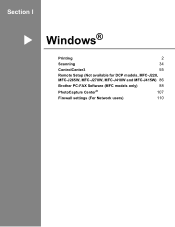
Section I Windows® I Printing 2 Scanning 34 ControlCenter3 55 Remote Setup (Not available for DCP models, MFC-J220, MFC-J265W, MFC-J270W, MFC-J410W and MFC-J415W) 86 Brother PC-FAX Software (MFC models only) 88 PhotoCapture Center® 107 Firewall settings (For Network users) 110
Section I Windows® I Printing 2 Scanning 34 ControlCenter3 55 Remote Setup (Not available for DCP models, MFC-J220, MFC-J265W, MFC-J270W, MFC-J410W and MFC-J415W) 86 Brother PC-FAX Software (MFC models only) 88 PhotoCapture Center® 107 Firewall settings (For Network users) 110
Software Users Manual - English
Page 8
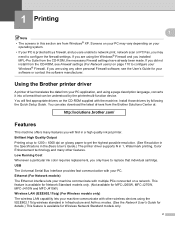
...; XP. If you are unable to network print, network scan or PC Fax, you may vary depending on a network. This feature is available for Network Standard models only. (Not available for MFC-J265W, MFC-J270W, MFC-J410W and MFC-J415W) Wireless LAN (IEEE802.11b/g) (For ...Wireless models only) The wireless LAN capability lets your software or contact the software manufacturer. Brilliant High Quality Output Printing at : http://solutions.brother.com/ Features 1 This machine...
...; XP. If you are unable to network print, network scan or PC Fax, you may vary depending on a network. This feature is available for Network Standard models only. (Not available for MFC-J265W, MFC-J270W, MFC-J410W and MFC-J415W) Wireless LAN (IEEE802.11b/g) (For ...Wireless models only) The wireless LAN capability lets your software or contact the software manufacturer. Brilliant High Quality Output Printing at : http://solutions.brother.com/ Features 1 This machine...
Software Users Manual - English
Page 9
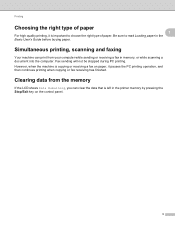
Be sure to choose the right type of paper 1 1 For high quality printing, it pauses the PC printing operation, and then continues printing when copying or fax receiving has finished. Simultaneous printing, scanning and faxing 1 Your machine can clear the data that is important to read Loading paper in ...left in the Basic User's Guide before buying paper. Fax sending will not be stopped during PC printing. Clearing data from the memory 1 If the LCD shows Data Remaining, you can print from your computer while sending or receiving a fax in memory, or while scanning a document into the...
Be sure to choose the right type of paper 1 1 For high quality printing, it pauses the PC printing operation, and then continues printing when copying or fax receiving has finished. Simultaneous printing, scanning and faxing 1 Your machine can clear the data that is important to read Loading paper in ...left in the Basic User's Guide before buying paper. Fax sending will not be stopped during PC printing. Clearing data from the memory 1 If the LCD shows Data Remaining, you can print from your computer while sending or receiving a fax in memory, or while scanning a document into the...
Software Users Manual - English
Page 10
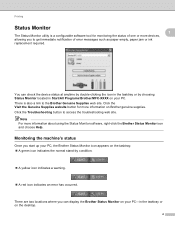
... start up your PC, the Brother Status Monitor icon appears on the tasktray. A green icon indicates the normal stand-by choosing Status Monitor located in Start/All Programs/Brother/MFC-XXXX on your PC-in the... tasktray or by condition. A yellow icon indicates a warning. A red icon indicates an error has occurred. You can display the Brother Status Monitor on Brother... on the desktop. 4 Click the Troubleshooting button to the Brother Genuine Supplies web site. There is a configurable software tool for more information about ...
... start up your PC, the Brother Status Monitor icon appears on the tasktray. A green icon indicates the normal stand-by choosing Status Monitor located in Start/All Programs/Brother/MFC-XXXX on your PC-in the... tasktray or by condition. A yellow icon indicates a warning. A red icon indicates an error has occurred. You can display the Brother Status Monitor on Brother... on the desktop. 4 Click the Troubleshooting button to the Brother Genuine Supplies web site. There is a configurable software tool for more information about ...
Software Users Manual - English
Page 11
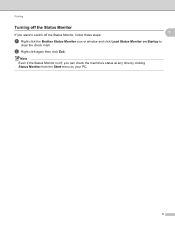
Note Even if the Status Monitor is off, you want to switch off the Status Monitor If you can check the machine's status at any time by clicking Status Monitor from the Start menu on Startup to clear the check mark. Printing Turning off the Status Monitor, follow these steps: 1 1 a Right-click the Brother Status Monitor icon or window and click Load Status Monitor on your PC. 5 b Right-click again then click Exit.
Note Even if the Status Monitor is off, you want to switch off the Status Monitor If you can check the machine's status at any time by clicking Status Monitor from the Start menu on Startup to clear the check mark. Printing Turning off the Status Monitor, follow these steps: 1 1 a Right-click the Brother Status Monitor icon or window and click Load Status Monitor on your PC. 5 b Right-click again then click Exit.
Software Users Manual - English
Page 12
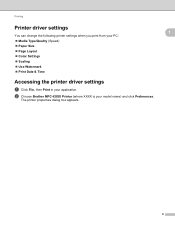
The printer properties dialog box appears. 1 1 1 6 b Choose Brother MFC-XXXX Printer (where XXXX is your application. Printing Printer driver settings You can change the following printer settings when you print from your PC: Media Type/Quality (Speed) Paper Size Page Layout Color Settings Scaling Use Watermark Print Date & Time Accessing the printer driver settings a Click File, then Print in your model name) and click Preferences.
The printer properties dialog box appears. 1 1 1 6 b Choose Brother MFC-XXXX Printer (where XXXX is your application. Printing Printer driver settings You can change the following printer settings when you print from your PC: Media Type/Quality (Speed) Paper Size Page Layout Color Settings Scaling Use Watermark Print Date & Time Accessing the printer driver settings a Click File, then Print in your model name) and click Preferences.
Software Users Manual - English
Page 13
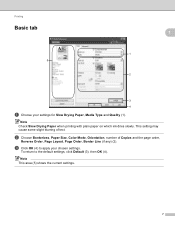
This setting may cause some slight blurring of Copies and the page order, Reverse Order, Page Layout, Page Order, Border Line (if any) (2). c Click OK (4) to the default settings, click Default (3), then OK (4). Note This area (5) shows the current settings. 7 Note Check Slow Drying Paper when printing with plain paper on which ink dries slowly. b Choose Borderless, Paper Size, Color Mode, Orientation, number of text. To return to apply your settings for Slow Drying Paper, Media Type and Quality (1). Printing Basic tab 5 1 1 1 2 3 4 a Choose your chosen settings.
This setting may cause some slight blurring of Copies and the page order, Reverse Order, Page Layout, Page Order, Border Line (if any) (2). c Click OK (4) to the default settings, click Default (3), then OK (4). Note This area (5) shows the current settings. 7 Note Check Slow Drying Paper when printing with plain paper on which ink dries slowly. b Choose Borderless, Paper Size, Color Mode, Orientation, number of text. To return to apply your settings for Slow Drying Paper, Media Type and Quality (1). Printing Basic tab 5 1 1 1 2 3 4 a Choose your chosen settings.
Software Users Manual - English
Page 14
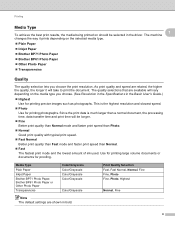
... a normal document, the processing time, data transfer time and print time will be selected in the driver. Printing Media Type 1 To achieve the best print results, the media being printed on the selected media type. Plain Paper Inkjet Paper Brother BP71 Photo Paper Brother BP61 Photo Paper Other Photo Paper ...
... a normal document, the processing time, data transfer time and print time will be selected in the driver. Printing Media Type 1 To achieve the best print results, the media being printed on the selected media type. Plain Paper Inkjet Paper Brother BP71 Photo Paper Brother BP61 Photo Paper Other Photo Paper ...
Software Users Manual - English
Page 15
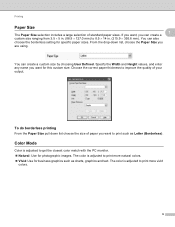
... are using. From the drop-down list choose the size of paper you want to print more natural colors. Vivid: Use for specific paper sizes. Choose the correct paper thickness to print more vivid colors. 9 The color is adjusted to improve the quality of standard paper ...sizes. You can also choose the borderless setting for business graphics such as Letter (Borderless). To do borderless printing 1 From the Paper Size pull down list, choose the Paper Size you can create a 1 custom size ranging from 3.5 5 in. (88.9 &#...
... are using. From the drop-down list choose the size of paper you want to print more natural colors. Vivid: Use for specific paper sizes. Choose the correct paper thickness to print more vivid colors. 9 The color is adjusted to improve the quality of standard paper ...sizes. You can also choose the borderless setting for business graphics such as Letter (Borderless). To do borderless printing 1 From the Paper Size pull down list, choose the Paper Size you can create a 1 custom size ranging from 3.5 5 in. (88.9 &#...
Software Users Manual - English
Page 16
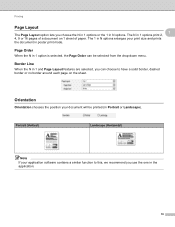
Border Line 1 When the N in 1 and Page Layout features are selected, you use the one in 1 options print 2, 1 4, 9 or 16 pages of paper. Printing Page Layout 1 The Page Layout option lets you choose the N in 1 options or the 1 in 1 option is selected, the Page Order can choose ...to this, we recommend you can be printed (in poster print mode. The N in the application. 10 The 1 in N options enlarges your document will be selected from the drop-down menu. Portrait (Vertical) Landscape...
Border Line 1 When the N in 1 and Page Layout features are selected, you use the one in 1 options print 2, 1 4, 9 or 16 pages of paper. Printing Page Layout 1 The Page Layout option lets you choose the N in 1 options or the 1 in 1 option is selected, the Page Order can choose ...to this, we recommend you can be printed (in poster print mode. The N in the application. 10 The 1 in N options enlarges your document will be selected from the drop-down menu. Portrait (Vertical) Landscape...
Software Users Manual - English
Page 17
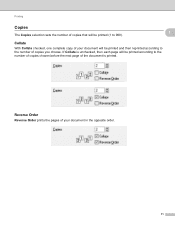
If Collate is printed. Printing Copies The Copies selection sets the number of copies that will be printed (1 to the number of your document in the opposite order. 11 Reverse Order 1 Reverse Order prints the pages of your document will be printed according to the number of copies chosen before the next page of the document is unchecked, then each page will be printed and then reprinted according to 999). 1 1 Collate 1 With Collate checked, one complete copy of copies you choose.
If Collate is printed. Printing Copies The Copies selection sets the number of copies that will be printed (1 to the number of your document in the opposite order. 11 Reverse Order 1 Reverse Order prints the pages of your document will be printed according to the number of copies chosen before the next page of the document is unchecked, then each page will be printed and then reprinted according to 999). 1 1 Collate 1 With Collate checked, one complete copy of copies you choose.
Software Users Manual - English
Page 18
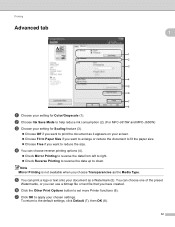
...more Printer functions (6). Printing Advanced tab 1 1 1 2 3 4 5 6 7 8 a Choose your setting for Scaling feature (3). Choose Off if you want to the default settings, click Default (7), then OK (8). 12 b Choose Ink Save Mode to help reduce ink consumption (2). (For MFC-J615W and MFC-J630W) c Choose your... setting for Color/Grayscale (1). e You can use a bitmap file or text file that you choose Transparencies as the Media Type. Note Mirror Printing is not available when you have created. You ...
...more Printer functions (6). Printing Advanced tab 1 1 1 2 3 4 5 6 7 8 a Choose your setting for Scaling feature (3). Choose Off if you want to the default settings, click Default (7), then OK (8). 12 b Choose Ink Save Mode to help reduce ink consumption (2). (For MFC-J615W and MFC-J630W) c Choose your... setting for Color/Grayscale (1). e You can use a bitmap file or text file that you choose Transparencies as the Media Type. Note Mirror Printing is not available when you have created. You ...
Software Users Manual - English
Page 19
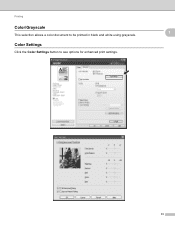
Color Settings Click the Color Settings button to be printed in black and white using grayscale. Printing Color/Grayscale This selection allows a color document to see options for enhanced print settings. 1 1 1 13
Color Settings Click the Color Settings button to be printed in black and white using grayscale. Printing Color/Grayscale This selection allows a color document to see options for enhanced print settings. 1 1 1 13
Software Users Manual - English
Page 20
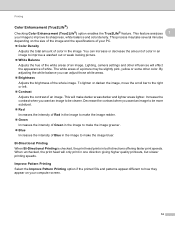
... balance you can increase or decrease the amount of color in one direction giving higher quality printouts, but slower printing speeds. This will only print in an image to be clearer. Decrease the contrast when you want an image to the right or left...improve its sharpness, white balance and color density. The white areas of the whole image. Bi-Directional Printing 1 When Bi-Directional Printing is checked, the print head prints in the image. Printing Color Enhancement (True2Life®) 1 Checking Color Enhancement (True2Life®) option enables the True2Life® ...
... balance you can increase or decrease the amount of color in one direction giving higher quality printouts, but slower printing speeds. This will only print in an image to be clearer. Decrease the contrast when you want an image to the right or left...improve its sharpness, white balance and color density. The white areas of the whole image. Bi-Directional Printing 1 When Bi-Directional Printing is checked, the print head prints in the image. Printing Color Enhancement (True2Life®) 1 Checking Color Enhancement (True2Life®) option enables the True2Life® ...
Software Users Manual - English
Page 21
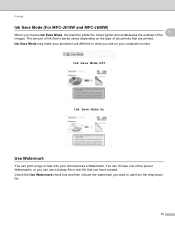
You can choose one of the preset Watermarks, or you can print a logo or text onto your computer monitor. Ink Save Mode: Off 1 Ink Save Mode: On 1 Use Watermark 1 You can use from the drop-down list. ... box and then choose the watermark you choose Ink Save Mode, the machine prints the colors lighter and emphasizes the outlines of documents that is saved varies depending on your document as a Watermark. Printing Ink Save Mode (For MFC-J615W and MFC-J630W) 1 When you want to what you have created. The amount of...
You can choose one of the preset Watermarks, or you can print a logo or text onto your computer monitor. Ink Save Mode: Off 1 Ink Save Mode: On 1 Use Watermark 1 You can use from the drop-down list. ... box and then choose the watermark you choose Ink Save Mode, the machine prints the colors lighter and emphasizes the outlines of documents that is saved varies depending on your document as a Watermark. Printing Ink Save Mode (For MFC-J615W and MFC-J630W) 1 When you want to what you have created. The amount of...
Software Users Manual - English
Page 22
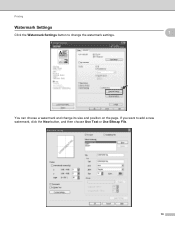
Printing Watermark Settings Click the Watermark Settings button to add a new watermark, click the New button, and then choose Use Text or Use Bitmap File. 16 If you want to change the watermark settings. 1 1 You can choose a watermark and change its size and position on the page.
Printing Watermark Settings Click the Watermark Settings button to add a new watermark, click the New button, and then choose Use Text or Use Bitmap File. 16 If you want to change the watermark settings. 1 1 You can choose a watermark and change its size and position on the page.
Software Users Manual - English
Page 23
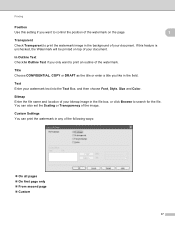
... you like in the field. Text 1 Enter your bitmap image in the file box, or click Browse to search for the file. You can print the watermark in any of the image. Custom Settings 1 You can also set the Scaling or Transparency of the following ways: On all... pages On first page only From second page Custom 17 Printing Position Use this feature is unchecked, the Watermark will be printed on the page. 1 1 Transparent 1 Check Transparent to print the watermark image in the background of your document. If this setting if you want to...
... you like in the field. Text 1 Enter your bitmap image in the file box, or click Browse to search for the file. You can print the watermark in any of the image. Custom Settings 1 You can also set the Scaling or Transparency of the following ways: On all... pages On first page only From second page Custom 17 Printing Position Use this feature is unchecked, the Watermark will be printed on the page. 1 1 Transparent 1 Check Transparent to print the watermark image in the background of your document. If this setting if you want to...

Software Users Manual - English
Page 24
Printing Other Print Options Click the Other Print Options button to set more Printer functions: 1 1 Note The screen shown in this section may vary depending on your machine. 18
Printing Other Print Options Click the Other Print Options button to set more Printer functions: 1 1 Note The screen shown in this section may vary depending on your machine. 18


