Owners Manual
Page 7
... Printing Features 62 Printing From Your PC 62 Simultaneous Printing/Faxing 66 Printer Menu Functions 67 Acceptable Paper 68 Printer Driver Settings (For Windows® Only) Using the Brother MFC-9880 Printer Driver 69 Basic Tab 69 Advanced Tab 72 Accessories Tab 78 Support Tab 80 General Tab 81 Layout Tab 81 Paper/Quality...
... Printing Features 62 Printing From Your PC 62 Simultaneous Printing/Faxing 66 Printer Menu Functions 67 Acceptable Paper 68 Printer Driver Settings (For Windows® Only) Using the Brother MFC-9880 Printer Driver 69 Basic Tab 69 Advanced Tab 72 Accessories Tab 78 Support Tab 80 General Tab 81 Layout Tab 81 Paper/Quality...
Owners Manual
Page 8
...97 Using ScanSoft™ PaperPort® for Brother and ScanSoft™ TextBridge® Setting Up and Using PC-FAX (For Windows® Only) Introduction 105 MFC Remote Setup 105 PC-FAX Sending (For Windows® Only 106 PC FAX Receiving 116 Using the Brother MFC with a New Power Macintosh® G3,... G4 or iMac™/iBook™ Set up Your USB Equipped Apple® Macintosh® G3,G4 or iMac™ with Mac OS 8.5/8.5.1/8.6/9.0/9.0.4/9.1 118 Using Brother Printer Driver...
...97 Using ScanSoft™ PaperPort® for Brother and ScanSoft™ TextBridge® Setting Up and Using PC-FAX (For Windows® Only) Introduction 105 MFC Remote Setup 105 PC-FAX Sending (For Windows® Only 106 PC FAX Receiving 116 Using the Brother MFC with a New Power Macintosh® G3,... G4 or iMac™/iBook™ Set up Your USB Equipped Apple® Macintosh® G3,G4 or iMac™ with Mac OS 8.5/8.5.1/8.6/9.0/9.0.4/9.1 118 Using Brother Printer Driver...

Owners Manual
Page 71
... and left margins in your application software. If your application software does not support your Windows® system using our installer program (see Quick Setup Guide). You can easily install them into the MFC's memory. I Select the print command from the paper tray. You can feed plain... paper and transparencies. Then adjust the print area by loading paper from your PC. You may select the proper paper source, paper size, and orientation in Windows® applications, ...
... and left margins in your application software. If your application software does not support your Windows® system using our installer program (see Quick Setup Guide). You can easily install them into the MFC's memory. I Select the print command from the paper tray. You can feed plain... paper and transparencies. Then adjust the print area by loading paper from your PC. You may select the proper paper source, paper size, and orientation in Windows® applications, ...
Owners Manual
Page 72
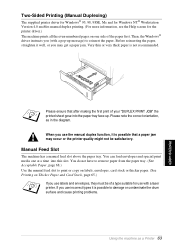
... is possible to damage or contaminate the drum surface and cause printing problems. Using the machine as in the diagram. Then, the Windows® driver instructs you (with a laser printer. Manual Feed Slot The machine has a manual feed slot above the paper tray. Please note the correct orientation, as a... paper tray. (See Acceptable Paper, page 68.) Use the manual feed slot to reinsert the paper. You can load envelopes and special print media one side of the paper first. When you use the manual duplex function, it is not recommended. Please ensure that a paper jam may get a...
... is possible to damage or contaminate the drum surface and cause printing problems. Using the machine as in the diagram. Then, the Windows® driver instructs you (with a laser printer. Manual Feed Slot The machine has a manual feed slot above the paper tray. Please note the correct orientation, as a... paper tray. (See Acceptable Paper, page 68.) Use the manual feed slot to reinsert the paper. You can load envelopes and special print media one side of the paper first. When you use the manual duplex function, it is not recommended. Please ensure that a paper jam may get a...
Owners Manual
Page 73
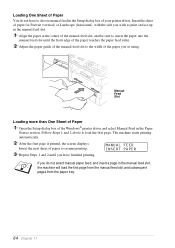
Manual Feed Slot Loading more than One Sheet of Paper 1 Open the Setup dialog box of the Windows® printer driver and select Manual Feed in the manual feed slot. 1 Align the paper at the centre of the manual feed slot, and be ... feed slot, the machine will load the first page from the manual feed slot and subsequent pages from the paper tray. 64 Chapter 11 Loading One Sheet of Paper You do not select manual paper feed, and insert a page in the Setup dialog box of your printer driver.
Manual Feed Slot Loading more than One Sheet of Paper 1 Open the Setup dialog box of the Windows® printer driver and select Manual Feed in the manual feed slot. 1 Align the paper at the centre of the manual feed slot, and be ... feed slot, the machine will load the first page from the manual feed slot and subsequent pages from the paper tray. 64 Chapter 11 Loading One Sheet of Paper You do not select manual paper feed, and insert a page in the Setup dialog box of your printer driver.

Owners Manual
Page 78
... and Media Type. 3. The screens on your Windows® Operating System. 12 Printer Driver Settings (For Windows® Only) Using the Brother MFC-9880 Printer Driver A Printer Driver is software that translates data from Windows® 98. You can also be downloaded from the Brother Solutions Centre at http://solutions.brother.com Features in the Printer Driver (For...
... and Media Type. 3. The screens on your Windows® Operating System. 12 Printer Driver Settings (For Windows® Only) Using the Brother MFC-9880 Printer Driver A Printer Driver is software that translates data from Windows® 98. You can also be downloaded from the Brother Solutions Centre at http://solutions.brother.com Features in the Printer Driver (For...
Owners Manual
Page 80
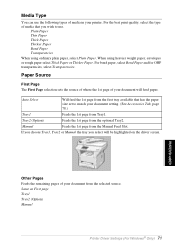
... heavier weight paper, envelopes or rough paper select Thick Paper or Thicker Paper. Same as First page Tray1 Tray2 (Option) Manual Printer Driver Settings (For Windows® Only) 71 When using ordinary plain paper, select Plain Paper. Manual Feeds the 1st page from Tray1. For bond paper, select Bond Paper and...
... heavier weight paper, envelopes or rough paper select Thick Paper or Thicker Paper. Same as First page Tray1 Tray2 (Option) Manual Printer Driver Settings (For Windows® Only) 71 When using ordinary plain paper, select Plain Paper. Manual Feeds the 1st page from Tray1. For bond paper, select Bond Paper and...
Owners Manual
Page 82
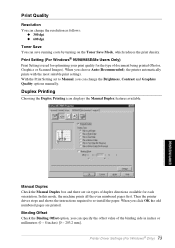
...printed (Photos, Graphics or Scanned Images). Duplex Printing Choosing the Duplex Printing icon displays the Manual Duplex features available. Print Setting (For Windows® 95/98/98SE/Me Users Only) Print Setting is used for optimizing your print quality for each orientation. With the Print Setting... (0 - 8 inches) [0 - 203.2 mm]. In this mode, the machine prints all the even numbered pages first. Printer Driver Settings (For Windows® Only) 73 PRINTER/SCANNER Print Quality Resolution You can change the Brightness, Contrast and Graphics Quality options manually.
...printed (Photos, Graphics or Scanned Images). Duplex Printing Choosing the Duplex Printing icon displays the Manual Duplex features available. Print Setting (For Windows® 95/98/98SE/Me Users Only) Print Setting is used for optimizing your print quality for each orientation. With the Print Setting... (0 - 8 inches) [0 - 203.2 mm]. In this mode, the machine prints all the even numbered pages first. Printer Driver Settings (For Windows® Only) 73 PRINTER/SCANNER Print Quality Resolution You can change the Brightness, Contrast and Graphics Quality options manually.

Owners Manual
Page 84
... can change the print size of your page setting. Check the Free box if you have only the standard size paper. 3. Printer Driver Settings (For Windows® Only) 75 PRINTER/SCANNER Watermark Bitmap Enter the file name and location of your screen. 2. Check Off if you want to print the document...
... can change the print size of your page setting. Check the Free box if you have only the standard size paper. 3. Printer Driver Settings (For Windows® Only) 75 PRINTER/SCANNER Watermark Bitmap Enter the file name and location of your screen. 2. Check Off if you want to print the document...

Owners Manual
Page 85
Device Options Set one of the following Printer Functions: • Quick Print Setup • Administrator (For Windows® 95/98/98SE/Me Users Only) • Print Date & Time Quick Print Setup The Quick Print Setup feature allows you to ON or OFF from the Device Options section. 76 Chapter 12 To view settings, simply click your mouse button on the task tray icon. This feature can be set to quickly select driver settings.
Device Options Set one of the following Printer Functions: • Quick Print Setup • Administrator (For Windows® 95/98/98SE/Me Users Only) • Print Date & Time Quick Print Setup The Quick Print Setup feature allows you to ON or OFF from the Device Options section. 76 Chapter 12 To view settings, simply click your mouse button on the task tray icon. This feature can be set to quickly select driver settings.
Owners Manual
Page 86
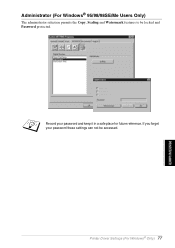
Printer Driver Settings (For Windows® Only) 77 PRINTER/SCANNER Administrator (For Windows® 95/98/98SE/Me Users Only) The administrator selection permits the Copy, Scaling and Watermark features to be accessed. Record your password these settings can not be locked and Password protected. If you forget your password and keep it in a safe place for future reference.
Printer Driver Settings (For Windows® Only) 77 PRINTER/SCANNER Administrator (For Windows® 95/98/98SE/Me Users Only) The administrator selection permits the Copy, Scaling and Watermark features to be accessed. Record your password these settings can not be locked and Password protected. If you forget your password and keep it in a safe place for future reference.
Owners Manual
Page 88
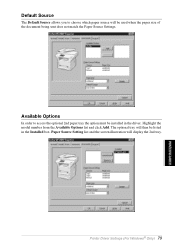
Available Options In order to choose which paper source will be listed in the driver. Printer Driver Settings (For Windows® Only) 79 PRINTER/SCANNER Highlight the model number from the Available Options list and click Add. Default Source The Default Source allows you to access the optional 2nd paper tray the option must be installed in the Installed box, Paper Source Setting list and the screen illustration will display the 2nd tray. The optional tray will then be used when the paper size of the document being sent does not match the Paper Source Settings.
Available Options In order to choose which paper source will be listed in the driver. Printer Driver Settings (For Windows® Only) 79 PRINTER/SCANNER Highlight the model number from the Available Options list and click Add. Default Source The Default Source allows you to access the optional 2nd paper tray the option must be installed in the Installed box, Paper Source Setting list and the screen illustration will display the 2nd tray. The optional tray will then be used when the paper size of the document being sent does not match the Paper Source Settings.
Owners Manual
Page 90
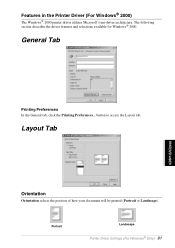
button to access the Layout tab. The following section describes the driver features and selections available for Windows® 2000. Portrait Landscape Printer Driver Settings (For Windows® Only) 81 General Tab PRINTER/SCANNER Printing Preferences In the General tab, click the Printing Preferences... Layout Tab Orientation Orientation selects the position of how your document will be printed (Portrait or Landscape). Features in the Printer Driver (For Windows® 2000) The Windows® 2000 printer driver utilizes Microsoft's uni-driver architecture.
button to access the Layout tab. The following section describes the driver features and selections available for Windows® 2000. Portrait Landscape Printer Driver Settings (For Windows® Only) 81 General Tab PRINTER/SCANNER Printing Preferences In the General tab, click the Printing Preferences... Layout Tab Orientation Orientation selects the position of how your document will be printed (Portrait or Landscape). Features in the Printer Driver (For Windows® 2000) The Windows® 2000 printer driver utilizes Microsoft's uni-driver architecture.

Owners Manual
Page 92
... OHP transparencies, select Transparency. Copy Count-Type the number of copies you are as follows: Auto Select Super Cell Dither 6 x 6 Dither 8 x 8 Printer Driver Settings (For Windows® Only) 83 PRINTER/SCANNER Media For the best print quality, select the type of media you disable it, Page Order, Pages Per Sheet, Copy...
... OHP transparencies, select Transparency. Copy Count-Type the number of copies you are as follows: Auto Select Super Cell Dither 6 x 6 Dither 8 x 8 Printer Driver Settings (For Windows® Only) 83 PRINTER/SCANNER Media For the best print quality, select the type of media you disable it, Page Order, Pages Per Sheet, Copy...

Owners Manual
Page 94
... Centre is placed in the task bar. Using the Windows®-Based Brother Control Centre (For Windows® Only) 85 PRINTER/SCANNER 13 Using the Windows®-Based Brother Control Centre (ForWindows®Only) Brother Control Centre The Brother Control Centre is a software utility that pops up on...turn off AutoLoad. Copy functions. 3. Using the Control Centre eliminates the need to automatically load each time Windows® is started. AutoLoad the Brother Control Centre The Control Centre is initially configured to manually launch the specific applications. PC-Faxing using the...
... Centre is placed in the task bar. Using the Windows®-Based Brother Control Centre (For Windows® Only) 85 PRINTER/SCANNER 13 Using the Windows®-Based Brother Control Centre (ForWindows®Only) Brother Control Centre The Brother Control Centre is a software utility that pops up on...turn off AutoLoad. Copy functions. 3. Using the Control Centre eliminates the need to automatically load each time Windows® is started. AutoLoad the Brother Control Centre The Control Centre is initially configured to manually launch the specific applications. PC-Faxing using the...
Owners Manual
Page 95
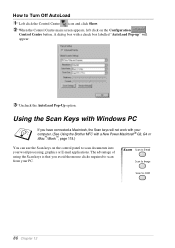
...icon and click Show. 2 When the Control Centre main screen appears, left click on the control panel to scan from your computer. (See Using the Brother MFC with a New Power Macintosh® G3, G4 or iMac™/iBook™, page 118.) You can use the Scan keys on the Configuration Control Centre... button. Using the Scan Keys with your PC. 86 Chapter 13 A dialog box with a check box labelled "AutoLoad Pop-up" will not work with Windows PC If you avoid the mouse clicks required to scan documents into your word processing, graphics or E-mail applications. The advantage of using the Scan...
...icon and click Show. 2 When the Control Centre main screen appears, left click on the control panel to scan from your computer. (See Using the Brother MFC with a New Power Macintosh® G3, G4 or iMac™/iBook™, page 118.) You can use the Scan keys on the Configuration Control Centre... button. Using the Scan Keys with your PC. 86 Chapter 13 A dialog box with a check box labelled "AutoLoad Pop-up" will not work with Windows PC If you avoid the mouse clicks required to scan documents into your word processing, graphics or E-mail applications. The advantage of using the Scan...

Owners Manual
Page 96
...processing application for viewing and editing. The default setting is black and white but this can easily be addressed. Using the Windows®-Based Brother Control Centre (For Windows® Only) 87 PRINTER/SCANNER Scan to Image You can scan a black and white or a colour picture into your... you can use the Scan keys, make sure the Brother Control Centre application is text, you can have connected the machine to your Windows® based PC and loaded the appropriate Brother Drivers for your version of Windows®. When you must have it automatically converted by ScanSoft...
...processing application for viewing and editing. The default setting is black and white but this can easily be addressed. Using the Windows®-Based Brother Control Centre (For Windows® Only) 87 PRINTER/SCANNER Scan to Image You can scan a black and white or a colour picture into your... you can use the Scan keys, make sure the Brother Control Centre application is text, you can have connected the machine to your Windows® based PC and loaded the appropriate Brother Drivers for your version of Windows®. When you must have it automatically converted by ScanSoft...

Owners Manual
Page 98
...; printer driver installed on the PC. PRINTER/SCANNER Using the Windows®-Based Brother Control Centre (For Windows® Only) 89 Click the Configuration icon at the top right of the Configuration screens. button on the Brother MFC and print the copies using the Brother PC-FAX software. You can scan the page on any of...
...; printer driver installed on the PC. PRINTER/SCANNER Using the Windows®-Based Brother Control Centre (For Windows® Only) 89 Click the Configuration icon at the top right of the Configuration screens. button on the Brother MFC and print the copies using the Brother PC-FAX software. You can scan the page on any of...
Owners Manual
Page 100
...PaperPort Folder-Select this checkbox, to scan the document as another file type and/or into your settings. Using the Windows®-Based Brother Control Centre (For Windows® Only) 91 PRINTER/SCANNER Photos; Custom; button. File-If you want, click the Browse... Click OK ...for the type of file: PaperPort Files (*.MAX) Self Viewing Files (*.EXE) PaperPort 5.0 Files (*.MAX) PaperPort 4.0 Files (*.MAX) PaperPort 3.0 Files (*.MAX) Windows Bitmap (*.BMP) PC Paintbrush (*.PCX) Multi-page PCX (*.DCX) JPEG Image Files (*.JPG) TIFF-Uncompressed (*.TIF) TIFF Group 4 (*.TIF) TIFF Class F ...
...PaperPort Folder-Select this checkbox, to scan the document as another file type and/or into your settings. Using the Windows®-Based Brother Control Centre (For Windows® Only) 91 PRINTER/SCANNER Photos; Custom; button. File-If you want, click the Browse... Click OK ...for the type of file: PaperPort Files (*.MAX) Self Viewing Files (*.EXE) PaperPort 5.0 Files (*.MAX) PaperPort 4.0 Files (*.MAX) PaperPort 3.0 Files (*.MAX) Windows Bitmap (*.BMP) PC Paintbrush (*.PCX) Multi-page PCX (*.DCX) JPEG Image Files (*.JPG) TIFF-Uncompressed (*.TIF) TIFF Group 4 (*.TIF) TIFF Class F ...
Owners Manual
Page 101
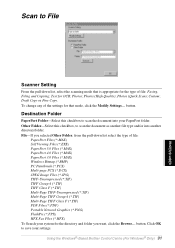
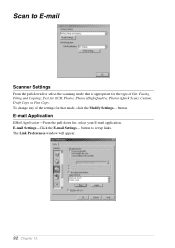
Text for the type of file: Faxing, Filing and Copying; Draft Copy or Fine Copy. E-mail Settings-Click the E-mail Settings... Custom; To change any of the settings for that is appropriate for OCR; E-mail Application EMail Application-From the pull-down list, select the scanning mode that mode, click the Modify Settings... Photos (High Quality); button to E-mail Scanner Settings From the pull-down list, select your E-mail application. Photos (Quick Scan); The Link Preferences window will appear: 92 Chapter 13 Scan to set up links. Photos; button.
Text for the type of file: Faxing, Filing and Copying; Draft Copy or Fine Copy. E-mail Settings-Click the E-mail Settings... Custom; To change any of the settings for that is appropriate for OCR; E-mail Application EMail Application-From the pull-down list, select the scanning mode that mode, click the Modify Settings... Photos (High Quality); button to E-mail Scanner Settings From the pull-down list, select your E-mail application. Photos (Quick Scan); The Link Preferences window will appear: 92 Chapter 13 Scan to set up links. Photos; button.

