Users Manual - English
Page 9
... material or workmanship. This limited Warranty does not include cleaning, consumables (including, without limitation, toner cartridges and drum units, OPC belts, fixing units, print heads, paper feed rollers, transfer rolls, cleaning rollers, waste toner packs, oil bottles) or damage ...year labour and parts from the date of purchase, Brother International Corporation (Canada) Ltd. ("Brother"), or its Authorized Service Centres, Distributors, Dealers, Agents or employees, shall create another warranty or modify this warranty. The Laser Printer/MFC/Fax machine will void the warranty.
... material or workmanship. This limited Warranty does not include cleaning, consumables (including, without limitation, toner cartridges and drum units, OPC belts, fixing units, print heads, paper feed rollers, transfer rolls, cleaning rollers, waste toner packs, oil bottles) or damage ...year labour and parts from the date of purchase, Brother International Corporation (Canada) Ltd. ("Brother"), or its Authorized Service Centres, Distributors, Dealers, Agents or employees, shall create another warranty or modify this warranty. The Laser Printer/MFC/Fax machine will void the warranty.
Users Manual - English
Page 15
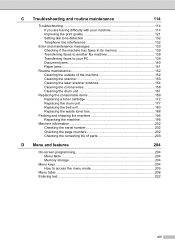
...to your PC 139 Document jams 140 Paper jams 141 Routine maintenance 152 Cleaning the outside of the machine 152 Cleaning the scanner 153 Cleaning the laser scanner windows 154 Cleaning the corona wires 158 Cleaning the drum unit 161 Replacing the consumable items 169 Replacing a toner cartridge... 172 Replacing the drum unit 177 Replacing the belt unit 183 Replacing the ...
...to your PC 139 Document jams 140 Paper jams 141 Routine maintenance 152 Cleaning the outside of the machine 152 Cleaning the scanner 153 Cleaning the laser scanner windows 154 Cleaning the corona wires 158 Cleaning the drum unit 161 Replacing the consumable items 169 Replacing a toner cartridge... 172 Replacing the drum unit 177 Replacing the belt unit 183 Replacing the ...
Users Manual - English
Page 132
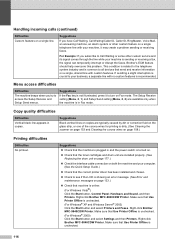
...and then Printers. Right-click Brother MFC-9840CDW Printer. Copy quality difficulties Difficulties Vertical black line appears in Fax mode. Right-click Brother MFC-9840CDW Printer. Make sure that Use...drum unit on page 177.) „ Check the interface cable connection on Fax mode. Suggestions Black vertical lines on copies are available only when the machine is dirty. (See Cleaning the scanner on page 153 and Cleaning... no custom features is showing an error message. (See Error and maintenance messages on page 158.) Printing difficulties Difficulties No printout. This condition ...
...and then Printers. Right-click Brother MFC-9840CDW Printer. Copy quality difficulties Difficulties Vertical black line appears in Fax mode. Right-click Brother MFC-9840CDW Printer. Make sure that Use...drum unit on page 177.) „ Check the interface cable connection on Fax mode. Suggestions Black vertical lines on copies are available only when the machine is dirty. (See Cleaning the scanner on page 153 and Cleaning... no custom features is showing an error message. (See Error and maintenance messages on page 158.) Printing difficulties Difficulties No printout. This condition ...
Users Manual - English
Page 137
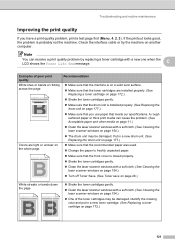
... (See Acceptable paper and other media on page 11.) „ Clean the laser scanner windows with a soft cloth. (See Cleaning the laser scanner windows on page 154.) „ The drum unit may be damaged. ABCDEFGHIJKLMNOPQRSTUVWXYZ. 0123456789. abcdefghijklmnopqrstuvwxyz. abcdefghijklmnopqrstuvwxyz. ABCDEFGHIJKLMNOPQRSTUVWXYZ. 0123456789...and routine maintenance Improving the print quality C If you use paper that the front cover is probably not the machine. If the printout looks good, the problem is closed properly. „ Shake the toner cartridges gently. „ Clean the ...
... (See Acceptable paper and other media on page 11.) „ Clean the laser scanner windows with a soft cloth. (See Cleaning the laser scanner windows on page 154.) „ The drum unit may be damaged. ABCDEFGHIJKLMNOPQRSTUVWXYZ. 0123456789. abcdefghijklmnopqrstuvwxyz. abcdefghijklmnopqrstuvwxyz. ABCDEFGHIJKLMNOPQRSTUVWXYZ. 0123456789...and routine maintenance Improving the print quality C If you use paper that the front cover is probably not the machine. If the printout looks good, the problem is closed properly. „ Shake the toner cartridges gently. „ Clean the ...
Users Manual - English
Page 139
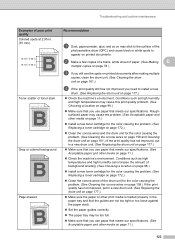
.......0000111122223333444455556666777788889999.... abcdefghijklmnopqrstuvwxyz. ABCDEFGHIJKLMNOPQRSTUVWXYZ. 0123456789. ABCDEFGHIJKLMNOPQRSTUVWXYZ. 0123456789. abcdefghijklmnopqrstuvwxyz. Troubleshooting and routine maintenance Examples of paper. (See Making multiple copies on page 78.) C c If you still see the spots on printed documents after making multiple copies, clean the drum unit. (See Cleaning the drum unit on page 161.) Toner scatter or toner stain ABCDEFGHIJKLMNOPQRSTUVWXYZ. 0123456789. ABCDEFGHIJKLMNOPQRSTUVWXYZ...
.......0000111122223333444455556666777788889999.... abcdefghijklmnopqrstuvwxyz. ABCDEFGHIJKLMNOPQRSTUVWXYZ. 0123456789. ABCDEFGHIJKLMNOPQRSTUVWXYZ. 0123456789. abcdefghijklmnopqrstuvwxyz. Troubleshooting and routine maintenance Examples of paper. (See Making multiple copies on page 78.) C c If you still see the spots on printed documents after making multiple copies, clean the drum unit. (See Cleaning the drum unit on page 161.) Toner scatter or toner stain ABCDEFGHIJKLMNOPQRSTUVWXYZ. 0123456789. ABCDEFGHIJKLMNOPQRSTUVWXYZ...
Users Manual - English
Page 147
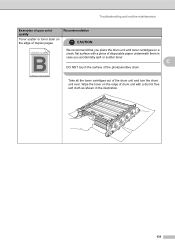
... NOT touch the surface of the drum unit and turn the drum unit over. ABCDEFGHIJKLMNOPQRSTUVWXYZ. 0123456789. Wipe the toner on a clean, flat surface with a dry lint free soft cloth as shown in the illustration. 131 We recommend that you accidentally spill or scatter toner. Troubleshooting and routine maintenance Examples of poor print quality Recommendation...
... NOT touch the surface of the drum unit and turn the drum unit over. ABCDEFGHIJKLMNOPQRSTUVWXYZ. 0123456789. Wipe the toner on a clean, flat surface with a dry lint free soft cloth as shown in the illustration. 131 We recommend that you accidentally spill or scatter toner. Troubleshooting and routine maintenance Examples of poor print quality Recommendation...
Users Manual - English
Page 151
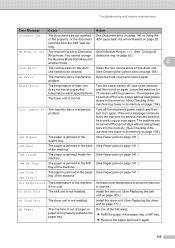
...set to Distinctive Set Distinctive Ring to Off. (See Turning off Ring mode. problem. The fuser unit is too cold. The machine can be cleaned. Turn off for 15 minutes with the power on page 141.) machine. The machine can be turned off the machine's power switch and then ...again. Install the belt unit. (See Replacing the belt unit on the drum unit needs to be turned off , wait a few seconds, and then turn it again. to print, copy or scan again. Troubleshooting and routine maintenance Error Message Cause Action Document Jam The document was not inserted or fed ...
...set to Distinctive Set Distinctive Ring to Off. (See Turning off Ring mode. problem. The fuser unit is too cold. The machine can be cleaned. Turn off for 15 minutes with the power on page 141.) machine. The machine can be turned off the machine's power switch and then ...again. Install the belt unit. (See Replacing the belt unit on the drum unit needs to be turned off , wait a few seconds, and then turn it again. to print, copy or scan again. Troubleshooting and routine maintenance Error Message Cause Action Document Jam The document was not inserted or fed ...
Users Manual - English
Page 161
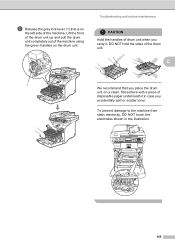
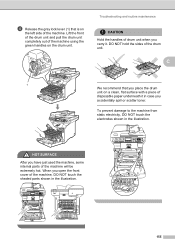
DO NOT hold the sides of the machine using the green handles on the drum unit. Lift the front of the drum unit up and pull the drum unit completely out of the drum unit. Troubleshooting and routine maintenance CAUTION Hold the handles of drum unit when you carry it in the illustration. 145 C 1 We recommend that... accidentally spill or scatter toner. To prevent damage to the machine from static electricity, DO NOT touch the electrodes shown in case you place the drum unit on a clean, flat surface with a piece of the machine.
DO NOT hold the sides of the machine using the green handles on the drum unit. Lift the front of the drum unit up and pull the drum unit completely out of the drum unit. Troubleshooting and routine maintenance CAUTION Hold the handles of drum unit when you carry it in the illustration. 145 C 1 We recommend that... accidentally spill or scatter toner. To prevent damage to the machine from static electricity, DO NOT touch the electrodes shown in case you place the drum unit on a clean, flat surface with a piece of the machine.
Users Manual - English
Page 168
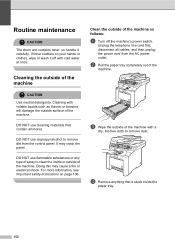
...Unplug the telephone line cord first, disconnect all cables, and then unplug the power cord from the control panel. DO NOT use cleaning materials that is stuck inside or outside surface of the machine. DO NOT use flammable substances or any type of spray to...carefully. Doing this may crack the panel. Cleaning the outside of the machine. b Pull the paper tray completely out of the machine C CAUTION Use neutral detergents. If toner scatters on page 106. d Remove anything that contain ammonia. Routine maintenance C CAUTION The drum unit contains toner, so handle it off ...
...Unplug the telephone line cord first, disconnect all cables, and then unplug the power cord from the control panel. DO NOT use cleaning materials that is stuck inside or outside surface of the machine. DO NOT use flammable substances or any type of spray to...carefully. Doing this may crack the panel. Cleaning the outside of the machine. b Pull the paper tray completely out of the machine C CAUTION Use neutral detergents. If toner scatters on page 106. d Remove anything that contain ammonia. Routine maintenance C CAUTION The drum unit contains toner, so handle it off ...
Users Manual - English
Page 171
d Release the gray lock lever (1) that you place the drum unit on a clean, flat surface with a piece of disposable paper underneath it . Lift the front of the drum unit and pull the drum unit completely out of the machine using the green handles on the left side of the machine. To ...be extremely hot. When you open the front cover of drum unit when you carry it in case you have just used the machine, some internal parts of the drum unit. C 1 We recommend that is on the drum unit. Troubleshooting and routine maintenance CAUTION Hold the handles of the machine, DO NOT ...
d Release the gray lock lever (1) that you place the drum unit on a clean, flat surface with a piece of disposable paper underneath it . Lift the front of the drum unit and pull the drum unit completely out of the machine using the green handles on the left side of the machine. To ...be extremely hot. When you open the front cover of drum unit when you carry it in case you have just used the machine, some internal parts of the drum unit. C 1 We recommend that is on the drum unit. Troubleshooting and routine maintenance CAUTION Hold the handles of the machine, DO NOT ...

Users Manual - English
Page 177
... up, wait until it finishes warming up before going on the machine's power switch. ABCDEFGHIJKLMNOPQRSTUVWXYZ. 0123456789. k Close the front cover of the machine. j Push the drum unit in until it stops. Troubleshooting and routine maintenance Cleaning the drum unit C If you have the following print quality problems...
... up, wait until it finishes warming up before going on the machine's power switch. ABCDEFGHIJKLMNOPQRSTUVWXYZ. 0123456789. k Close the front cover of the machine. j Push the drum unit in until it stops. Troubleshooting and routine maintenance Cleaning the drum unit C If you have the following print quality problems...
Users Manual - English
Page 181
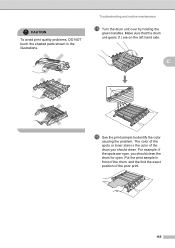
... to identify the color causing the problem. Put the print sample in the illustrations. Make sure that the drum unit gears (1) are cyan, you should clean the drum for cyan. Troubleshooting and routine maintenance o Turn the drum unit over by holding the green handles. The color of the spots or toner stain is the color... the spots are on the left hand side. CAUTION To avoid print quality problems, DO NOT touch the shaded parts shown in front of the drum, and the find the exact position of the drum you should clean.
... to identify the color causing the problem. Put the print sample in the illustrations. Make sure that the drum unit gears (1) are cyan, you should clean the drum for cyan. Troubleshooting and routine maintenance o Turn the drum unit over by holding the green handles. The color of the spots or toner stain is the color... the spots are on the left hand side. CAUTION To avoid print quality problems, DO NOT touch the shaded parts shown in front of the drum, and the find the exact position of the drum you should clean.
Users Manual - English
Page 191
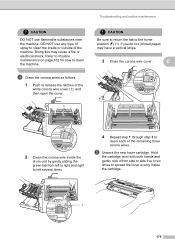
...fire or electrical shock. e Unpack the new toner cartridge. Refer to Routine maintenance on page 152 for how to the home position (b) (1). C 1 2 1 2 2 Clean the corona wire inside or outside of spray to clean the inside the drum unit by gently sliding the green tab from side to side five or six... times to clean each of the white corona wire cover (1), and then open the cover. 1...
...fire or electrical shock. e Unpack the new toner cartridge. Refer to Routine maintenance on page 152 for how to the home position (b) (1). C 1 2 1 2 2 Clean the corona wire inside or outside of spray to clean the inside the drum unit by gently sliding the green tab from side to side five or six... times to clean each of the white corona wire cover (1), and then open the cover. 1...
Users Manual - English
Page 193
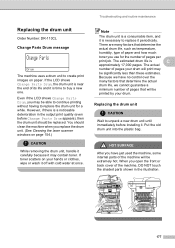
... maintenance Replacing the drum unit C Order Number: DR-110CL Change Parts Drum message C Change Parts Drum The machine uses a drum unit to create print images on page 154.) CAUTION While removing the drum unit, handle it carefully because it may contain toner. Even if the LCD shows Change Parts Drum,... number of its life and it . Put the old drum unit into the plastic bag. The estimated drum life is necessary to unpack a new drum unit until immediately before Change Parts Drum appears), then the drum unit should clean the machine when you have no control over the many ...
... maintenance Replacing the drum unit C Order Number: DR-110CL Change Parts Drum message C Change Parts Drum The machine uses a drum unit to create print images on page 154.) CAUTION While removing the drum unit, handle it carefully because it may contain toner. Even if the LCD shows Change Parts Drum,... number of its life and it . Put the old drum unit into the plastic bag. The estimated drum life is necessary to unpack a new drum unit until immediately before Change Parts Drum appears), then the drum unit should clean the machine when you have no control over the many ...

Users Manual - English
Page 195
... on a clean, flat surface with a piece of disposable paper underneath it in the illustration. Lift the front of the drum unit and pull the drum unit completely out of the machine using the green handles on the drum unit. 1 Troubleshooting and routine maintenance Note Discard the used drum unit according ...to seal up the drum unit tightly so that toner powder does...
... on a clean, flat surface with a piece of disposable paper underneath it in the illustration. Lift the front of the drum unit and pull the drum unit completely out of the machine using the green handles on the drum unit. 1 Troubleshooting and routine maintenance Note Discard the used drum unit according ...to seal up the drum unit tightly so that toner powder does...
Users Manual - English
Page 201
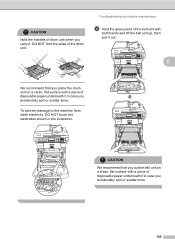
... the illustration. CAUTION We recommend that you place the drum unit on a clean, flat surface with a piece of disposable paper underneath it out. C We recommend that you put the belt unit on a clean, flat surface with a piece of disposable paper underneath it . Troubleshooting and routine maintenance d Hold the green parts of the belt unit...
... the illustration. CAUTION We recommend that you place the drum unit on a clean, flat surface with a piece of disposable paper underneath it out. C We recommend that you put the belt unit on a clean, flat surface with a piece of disposable paper underneath it . Troubleshooting and routine maintenance d Hold the green parts of the belt unit...
Users Manual - English
Page 213
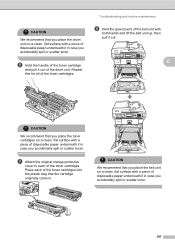
... it in case you accidentally spill or scatter toner. C CAUTION We recommend that you place the belt unit on a clean, flat surface with a piece of the drum unit. g Attach the original orange protective cover to each of the toner cartridges into the plastic bag that you place ... clean, flat surface with both hands and lift the belt unit up, then pull it out of disposable paper underneath it in case you accidentally spill or scatter toner. Place each of disposable paper underneath it in case you accidentally spill or scatter toner. 197 Troubleshooting and routine maintenance ...
... it in case you accidentally spill or scatter toner. C CAUTION We recommend that you place the belt unit on a clean, flat surface with a piece of the drum unit. g Attach the original orange protective cover to each of the toner cartridges into the plastic bag that you place ... clean, flat surface with both hands and lift the belt unit up, then pull it out of disposable paper underneath it in case you accidentally spill or scatter toner. Place each of disposable paper underneath it in case you accidentally spill or scatter toner. 197 Troubleshooting and routine maintenance ...


