
Users Manual - English
Page 4
... Discover, or American Express credit card, you can order accessories directly from Brother. (You can visit us online for Canada) ii Ordering accessories and supplies For best quality results use only genuine Brother accessories, which are available for purchase.) In USA: 1-877-552-MALL (1-...877-552-6255) 1-800-947-1445 (fax) http://www.brothermall.com/ In Canada: 1-877-BROTHER http://www.brother.ca/ Description Toner Cartridge Standard Toner Cartridge High Yield Drum Unit Belt Unit Waste Toner Box Telephone Line Cord Paper Tray #2 (Option) User's Guide Quick Setup Guide Item Black...
... Discover, or American Express credit card, you can order accessories directly from Brother. (You can visit us online for Canada) ii Ordering accessories and supplies For best quality results use only genuine Brother accessories, which are available for purchase.) In USA: 1-877-552-MALL (1-...877-552-6255) 1-800-947-1445 (fax) http://www.brothermall.com/ In Canada: 1-877-BROTHER http://www.brother.ca/ Description Toner Cartridge Standard Toner Cartridge High Yield Drum Unit Belt Unit Waste Toner Box Telephone Line Cord Paper Tray #2 (Option) User's Guide Quick Setup Guide Item Black...
Users Manual - English
Page 6
... or software used with this Product (including but used outside, the United States, this warranty covers only warranty service within the United States (and does not include shipping outside the United States). Brother® Color Laser One-Year On-Site Limited Warranty (USA only) Who is covered: &#... Items include but are not limited to Toner Cartridges, Drum Unit, Belt Unit, and Waste Toner Box. „ Except as Paper Feeding Kit, Fuser and Laser Units. What is the length of the Warranty Periods: „ Machines: one year from the original purchase date. „ Accompanying ...
... or software used with this Product (including but used outside, the United States, this warranty covers only warranty service within the United States (and does not include shipping outside the United States). Brother® Color Laser One-Year On-Site Limited Warranty (USA only) Who is covered: &#... Items include but are not limited to Toner Cartridges, Drum Unit, Belt Unit, and Waste Toner Box. „ Except as Paper Feeding Kit, Fuser and Laser Units. What is the length of the Warranty Periods: „ Machines: one year from the original purchase date. „ Accompanying ...
Users Manual - English
Page 8
...support@brother.ca or browse Brother's Web Site www.brother.ca. Canadian Proof of Purchase in the form of a Sales Receipt must be liable for the name and location of your Laser Printer/MFC/Fax machine, please refer to remove the Toner Cartridge (and Toner Drum Unit,...parts from the date of purchase, Brother International Corporation (Canada) Ltd. ("Brother"), or its Authorized Service Centres, Distributors, Dealers, Agents or employees, shall create another warranty or modify this machine is available at Brother's sole discretion) this Laser Printer/MFC/Fax machine shall be provided if...
...support@brother.ca or browse Brother's Web Site www.brother.ca. Canadian Proof of Purchase in the form of a Sales Receipt must be liable for the name and location of your Laser Printer/MFC/Fax machine, please refer to remove the Toner Cartridge (and Toner Drum Unit,...parts from the date of purchase, Brother International Corporation (Canada) Ltd. ("Brother"), or its Authorized Service Centres, Distributors, Dealers, Agents or employees, shall create another warranty or modify this machine is available at Brother's sole discretion) this Laser Printer/MFC/Fax machine shall be provided if...

Users Manual - English
Page 14
... the outside of the machine 145 Cleaning the scanner 146 Cleaning the laser scanner windows 147 Cleaning the corona wires 151 Cleaning the drum unit 155 Replacing the consumable items 163 Replacing a toner cartridge 166 Replacing the drum unit 171 Replacing the belt unit 178 Replacing the waste toner box 183 Packing and shipping the machine...
... the outside of the machine 145 Cleaning the scanner 146 Cleaning the laser scanner windows 147 Cleaning the corona wires 151 Cleaning the drum unit 155 Replacing the consumable items 163 Replacing a toner cartridge 166 Replacing the drum unit 171 Replacing the belt unit 178 Replacing the waste toner box 183 Packing and shipping the machine...
Users Manual - English
Page 126
...Brother MFC-XXXX Printer. Handling incoming calls (continued) Difficulties Custom features on Fax mode. This condition is related to the telephone system industry and is sending or receiving a fax, the signal can temporarily interrupt or disrupt the faxes. For Example: If you try to all devices that the toner cartridges and drum unit... are typically caused by dirt or correction fluid on the glass strip, or one of the corona wires for printing is dirty. (See Cleaning the scanner on page ...
...Brother MFC-XXXX Printer. Handling incoming calls (continued) Difficulties Custom features on Fax mode. This condition is related to the telephone system industry and is sending or receiving a fax, the signal can temporarily interrupt or disrupt the faxes. For Example: If you try to all devices that the toner cartridges and drum unit... are typically caused by dirt or correction fluid on the glass strip, or one of the corona wires for printing is dirty. (See Cleaning the scanner on page ...

Users Manual - English
Page 131
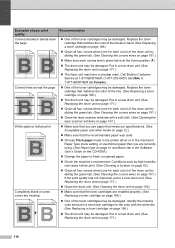
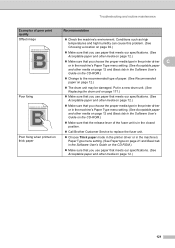
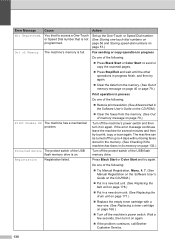
... „ Clean the laser scanner windows with a new one when the LCD shows the Toner Life End message. ABCDEFGHIJKLMNOPQRSTUVWXYZ. 0123456789. Recommendation „ Make sure that the machine is installed properly. (See Replacing the drum unit on page 147.) 115 ...laser scanner windows on page 171.) „ Make sure that you have a print quality problem, print a test page first (Menu, 4, 2, 3). ABCDEFGHIJKLMNOPQRSTUVWXYZ. 0123456789. Colors are installed properly. (See Replacing a toner cartridge on page 166.) „ Shake the toner cartridges gently. „ Make sure that the drum unit...
... „ Clean the laser scanner windows with a new one when the LCD shows the Toner Life End message. ABCDEFGHIJKLMNOPQRSTUVWXYZ. 0123456789. Recommendation „ Make sure that the machine is installed properly. (See Replacing the drum unit on page 147.) 115 ...laser scanner windows on page 171.) „ Make sure that you have a print quality problem, print a test page first (Menu, 4, 2, 3). ABCDEFGHIJKLMNOPQRSTUVWXYZ. 0123456789. Colors are installed properly. (See Replacing a toner cartridge on page 166.) „ Shake the toner cartridges gently. „ Make sure that the drum unit...
Users Manual - English
Page 132
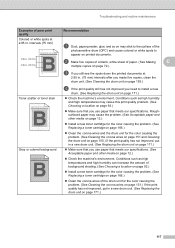
...BROTHER (in a new drum unit. (See Replacing the drum unit on page 171.) „ Clean the drum unit. (See Cleaning the drum unit on page 155.) „ Make sure that matches the color of the streak or band. (See Replacing a toner cartridge on page 166.) „ Clean all four corona wires (one for each color) of the drum unit....) If the print quality has not improved, put in a new drum unit. (See Replacing the drum unit on page 171.) „ Clean all four corona wires (one for the color with a soft cloth. (See Cleaning the laser scanner windows on page 147.) „ Make sure that you are...
...BROTHER (in a new drum unit. (See Replacing the drum unit on page 171.) „ Clean the drum unit. (See Cleaning the drum unit on page 155.) „ Make sure that matches the color of the streak or band. (See Replacing a toner cartridge on page 166.) „ Clean all four corona wires (one for each color) of the drum unit....) If the print quality has not improved, put in a new drum unit. (See Replacing the drum unit on page 171.) „ Clean all four corona wires (one for the color with a soft cloth. (See Cleaning the laser scanner windows on page 147.) „ Make sure that you are...
Users Manual - English
Page 133
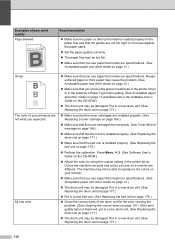
... copies of a blank, white sheet of the drum unit for the color causing the problem. (See Cleaning the corona wires on page 151 and Cleaning the drum unit on page 155.) If the print quality has not improved, put in a new drum unit. (See Replacing the drum unit on page 171.) „ Check the machine's... high humidity and high temperatures may stick to the surface of the photosensitive drum (OPC) and cause colored or white spots to install a new drum. (See Replacing the drum unit on page 171.) 117 Gray or colored background d If the print quality still has not improved you use paper ...
... copies of a blank, white sheet of the drum unit for the color causing the problem. (See Cleaning the corona wires on page 151 and Cleaning the drum unit on page 155.) If the print quality has not improved, put in a new drum unit. (See Replacing the drum unit on page 171.) „ Check the machine's... high humidity and high temperatures may stick to the surface of the photosensitive drum (OPC) and cause colored or white spots to install a new drum. (See Replacing the drum unit on page 171.) 117 Gray or colored background d If the print quality still has not improved you use paper ...
Users Manual - English
Page 134
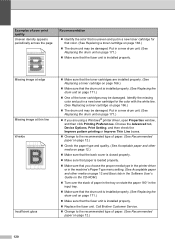
... on the CD-ROM.) „ Adjust the color by using the custom setting in a new drum unit. (See Replacing the drum unit on page 171.) 118 Colors the machine can print and colors you expected. Put in a new drum unit. (See Replacing the drum unit on page 171.) „ The drum unit may be damaged. All one color „ Make sure that you use paper...
... on the CD-ROM.) „ Adjust the color by using the custom setting in a new drum unit. (See Replacing the drum unit on page 171.) 118 Colors the machine can print and colors you expected. Put in a new drum unit. (See Replacing the drum unit on page 171.) „ The drum unit may be damaged. All one color „ Make sure that you use paper...

Users Manual - English
Page 135
.... 0123456789. a Print the correction chart by using the control panel. Put in a new drum unit. (See Replacing the drum unit on page 171.) „ Put in a new belt unit. (See Replacing the belt unit on page 183.) „ If solid area of color or images have cyan, magenta or yellow fringes, you can be damaged. abcdefghijklmnopqrstuvwxyz. Recommendation...
.... 0123456789. a Print the correction chart by using the control panel. Put in a new drum unit. (See Replacing the drum unit on page 171.) „ Put in a new belt unit. (See Replacing the belt unit on page 183.) „ If solid area of color or images have cyan, magenta or yellow fringes, you can be damaged. abcdefghijklmnopqrstuvwxyz. Recommendation...
Users Manual - English
Page 136
...drum unit. (See Replacing the drum unit on page 166.) „ The drum unit may be damaged. Put in the input tray. „ Make sure that the drum unit is installed properly. ABCDEFGHIJKLMNOPQRSTUVWXYZ. 0123456789. Identify the missing color and put in the Software User's Guide on page 171.) „ One...Make sure that the fuser unit is installed properly. (See Replacing the drum unit on page 171.) „ Make sure that color. (See Replacing a toner cartridge on page 12.) 120 abcdefghijklmnopqrstuvwxyz. abcdefghijklmnopqrstuvwxyz. Call Brother Customer Service. „ ...
...drum unit. (See Replacing the drum unit on page 166.) „ The drum unit may be damaged. Put in the input tray. „ Make sure that the drum unit is installed properly. ABCDEFGHIJKLMNOPQRSTUVWXYZ. 0123456789. Identify the missing color and put in the Software User's Guide on page 171.) „ One...Make sure that the fuser unit is installed properly. (See Replacing the drum unit on page 171.) „ Make sure that color. (See Replacing a toner cartridge on page 12.) 120 abcdefghijklmnopqrstuvwxyz. abcdefghijklmnopqrstuvwxyz. Call Brother Customer Service. „ ...
Users Manual - English
Page 137
... machine's Paper Type menu setting. (See Acceptable paper and other media on page 12.) 121 abcdefghijklmnopqrstuvwxyz. abcdefghijklmnopqrstuvwxyz. Put in a new drum unit. (See Replacing the drum unit on page 171.) „ Make sure that you use paper that meets our specifications. (See Acceptable paper and other media on page...User's Guide on the CD-ROM.) „ Make sure that the release lever of the fuser unit is in the closed position. „ Call Brother Customer Service to replace the fuser unit. „ Choose Thick paper mode in the printer driver or in the machine's Paper Type menu...
... machine's Paper Type menu setting. (See Acceptable paper and other media on page 12.) 121 abcdefghijklmnopqrstuvwxyz. abcdefghijklmnopqrstuvwxyz. Put in a new drum unit. (See Replacing the drum unit on page 171.) „ Make sure that you use paper that meets our specifications. (See Acceptable paper and other media on page...User's Guide on the CD-ROM.) „ Make sure that the release lever of the fuser unit is in the closed position. „ Call Brother Customer Service to replace the fuser unit. „ Choose Thick paper mode in the printer driver or in the machine's Paper Type menu...

Users Manual - English
Page 141
Wipe the toner on the edge of disposable paper underneath them in case you place the drum unit and toner cartridges on a clean, flat surface with a piece of drum unit with a dry lint free soft cloth as shown in the illustration. 125 abcdefghijklmnopqrstuvwxyz. ABCDEFGHIJKLMNOPQRSTUVWXYZ. 0123456789. We recommend that you accidentally spill or scatter toner. abcdefghijklmnopqrstuvwxyz...
Wipe the toner on the edge of disposable paper underneath them in case you place the drum unit and toner cartridges on a clean, flat surface with a piece of drum unit with a dry lint free soft cloth as shown in the illustration. 125 abcdefghijklmnopqrstuvwxyz. ABCDEFGHIJKLMNOPQRSTUVWXYZ. 0123456789. We recommend that you accidentally spill or scatter toner. abcdefghijklmnopqrstuvwxyz...
Users Manual - English
Page 143
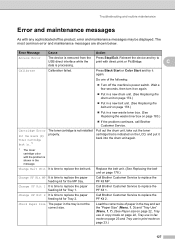
... to replace the belt unit. Call Brother Customer Service to replace the PF Kit 2. C data is removed from the Press Stop/Exit. Change PF Kit 2 It is time to replace the PF Kit MP. Reinsert the device and try it back into the drum unit again. 1 The toner cartridge color with the problem is...Access Error The device is processing. Press Black Start or Color Start and try to replace the paper feeding kit for Tray 1. Pull out the drum unit, take out the toner cartridge that is indicated on the LCD, and put it again. Do one of paper in the tray and set the "Paper ...
... to replace the belt unit. Call Brother Customer Service to replace the PF Kit 2. C data is removed from the Press Stop/Exit. Change PF Kit 2 It is time to replace the PF Kit MP. Reinsert the device and try it back into the drum unit again. 1 The toner cartridge color with the problem is...Access Error The device is processing. Press Black Start or Color Start and try to replace the paper feeding kit for Tray 1. Pull out the drum unit, take out the toner cartridge that is indicated on the LCD, and put it again. Do one of paper in the tray and set the "Paper ...
Users Manual - English
Page 144
...See Turning off the machine's power switch and then turn it for several minutes. If the fan is near the end of the drum unit or toner cartridge is not spinning follow the suggestions below. If the error message continues leave the machine for several minutes and then... fan in the memory.) Cover is Open The front cover is not closed completely. then replace the drum unit with a new one. (See Replacing the drum unit on page 48.) Drum End Soon The drum unit is spinning, remove any obstacles that you have a print quality problem; DR Mode in Polled Waiting mode...
...See Turning off the machine's power switch and then turn it for several minutes. If the fan is near the end of the drum unit or toner cartridge is not spinning follow the suggestions below. If the error message continues leave the machine for several minutes and then... fan in the memory.) Cover is Open The front cover is not closed completely. then replace the drum unit with a new one. (See Replacing the drum unit on page 48.) Drum End Soon The drum unit is spinning, remove any obstacles that you have a print quality problem; DR Mode in Polled Waiting mode...
Users Manual - English
Page 145
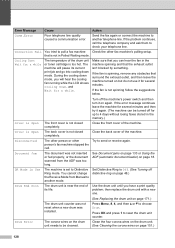
... the fuser unit. The machine can The fuser unit is too hot. Laser Unit End It is not installed. Call Brother Customer Service to replace the fuser unit. Do one of the ...Drum Unit The drum unit is jammed in the MP (See Paper jams on . Install the belt unit. (See Replacing the belt unit on page 134.) tray of the following: „ Refill the paper in the fuser unit (MFC-9450CDN... only) on page 143.) Jam Rear The paper is jammed inside the (See Paper jams on page 134.) machine. closed. Call Brother Customer Service to replace the laser unit. answer...
... the fuser unit. The machine can The fuser unit is too hot. Laser Unit End It is not installed. Call Brother Customer Service to replace the fuser unit. Do one of the ...Drum Unit The drum unit is jammed in the MP (See Paper jams on . Install the belt unit. (See Replacing the belt unit on page 134.) tray of the following: „ Refill the paper in the fuser unit (MFC-9450CDN... only) on page 143.) Jam Rear The paper is jammed inside the (See Paper jams on page 134.) machine. closed. Call Brother Customer Service to replace the laser unit. answer...
Users Manual - English
Page 146
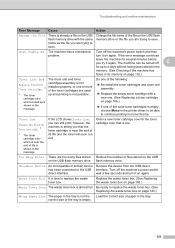
... machine for up the One-Touch or Speed Dial number. (See Storing one . (See Replacing a toner cartridge on again. „ If the problem continues, call Brother Customer Service. 130 Error...Registration Registration failed. Set up to print, copy or scan again. Press Black Start or Color Start and try to 4 days without losing faxes stored in the memory. (See Checking if... a new belt unit. (See Replacing the belt unit on page 178.) „ Put in a new drum unit. (See Replacing the drum unit on page 171.) „ Replace the empty toner cartridge with a new one -touch dial numbers...
... machine for up the One-Touch or Speed Dial number. (See Storing one . (See Replacing a toner cartridge on again. „ If the problem continues, call Brother Customer Service. 130 Error...Registration Registration failed. Set up to print, copy or scan again. Press Black Start or Color Start and try to 4 days without losing faxes stored in the memory. (See Checking if... a new belt unit. (See Replacing the belt unit on page 178.) „ Put in a new drum unit. (See Replacing the drum unit on page 171.) „ Replace the empty toner cartridge with a new one -touch dial numbers...
Users Manual - English
Page 147
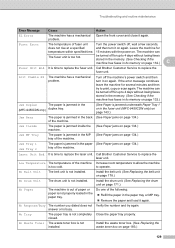
turn it on again. The drum unit and toner cartridges assembly is not installed properly, or one of the color toner cartridges is empty, choose Mono in the printer ...machine's power switch, direct interface. Toner Low Prepare New Black(K) Toner Cartridge. 1 1 The toner cartridge color which is used up is shown in the message. Order a new toner cartridge now for several minutes before... memory drive or the file you are trying to save . Do one of the following: „ Re-install the toner cartridges and drum unit assembly. „ Replace the empty toner cartridge with the same name...
turn it on again. The drum unit and toner cartridges assembly is not installed properly, or one of the color toner cartridges is empty, choose Mono in the printer ...machine's power switch, direct interface. Toner Low Prepare New Black(K) Toner Cartridge. 1 1 The toner cartridge color which is used up is shown in the message. Order a new toner cartridge now for several minutes before... memory drive or the file you are trying to save . Do one of the following: „ Re-install the toner cartridges and drum unit assembly. „ Replace the empty toner cartridge with the same name...

Users Manual - English
Page 153
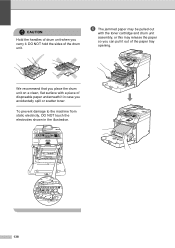
Lift the drum unit up and pull the drum unit completely out of the machine. Troubleshooting and routine maintenance e Release the gray lock lever (1) that is on the left side of the machine using the green handles on the drum unit. C 1 137 Lift the front of the drum unit up and then pull it out until it stops. d Hold the green handle of the drum unit.
Lift the drum unit up and pull the drum unit completely out of the machine. Troubleshooting and routine maintenance e Release the gray lock lever (1) that is on the left side of the machine using the green handles on the drum unit. C 1 137 Lift the front of the drum unit up and then pull it out until it stops. d Hold the green handle of the drum unit.
Users Manual - English
Page 154
DO NOT hold the sides of the paper tray opening. To prevent damage to the machine from static electricity, DO NOT touch the electrodes shown in case you accidentally spill or scatter toner. CAUTION Hold the handles of drum unit when you carry it in the illustration. 138 We recommend that you can pull it out of the drum unit. f The jammed paper may release the paper so you place the drum unit on a clean, flat surface with the toner cartridge and drum unit assembly, or this may be pulled out with a piece of disposable paper underneath it .
DO NOT hold the sides of the paper tray opening. To prevent damage to the machine from static electricity, DO NOT touch the electrodes shown in case you accidentally spill or scatter toner. CAUTION Hold the handles of drum unit when you carry it in the illustration. 138 We recommend that you can pull it out of the drum unit. f The jammed paper may release the paper so you place the drum unit on a clean, flat surface with the toner cartridge and drum unit assembly, or this may be pulled out with a piece of disposable paper underneath it .


