
Users Manual - English
Page 4
...MALL (1-877-552-6255) 1-800-947-1445 (fax) http://www.brothermall.com/ In Canada: 1-877-BROTHER http://www.brother.ca/ Description Toner Cartridge Standard Toner Cartridge High Yield Drum Unit Belt Unit Waste Toner Box Telephone Line Cord Paper Tray #2 (Option) User's Guide Quick Setup Guide Item Black:... (French for Canada) LS3293001 (English for USA and Canada) LS3293002 (French for a complete selection of the Brother accessories and supplies that are available at most Brother retailers. If you cannot find the accessory you need and you have a Visa, MasterCard, Discover, or American...
...MALL (1-877-552-6255) 1-800-947-1445 (fax) http://www.brothermall.com/ In Canada: 1-877-BROTHER http://www.brother.ca/ Description Toner Cartridge Standard Toner Cartridge High Yield Drum Unit Belt Unit Waste Toner Box Telephone Line Cord Paper Tray #2 (Option) User's Guide Quick Setup Guide Item Black:... (French for Canada) LS3293001 (English for USA and Canada) LS3293002 (French for a complete selection of the Brother accessories and supplies that are available at most Brother retailers. If you cannot find the accessory you need and you have a Visa, MasterCard, Discover, or American...
Users Manual - English
Page 6
... for warranty service: Report your purchase you are not limited to Toner Cartridges, Drum Unit, Belt Unit, and Waste Toner Box. „ Except as otherwise provided herein, Brother warrants that you purchased is not covered by another device or software used with this Product...Accompanying Consumable and Accessory Items: 90 days from other than defects in the United States or if the product was purchased within the United States (and does not include shipping outside the United States). Brother® Color Laser One-Year On-Site Limited Warranty (USA only) Who is covered: „...
... for warranty service: Report your purchase you are not limited to Toner Cartridges, Drum Unit, Belt Unit, and Waste Toner Box. „ Except as otherwise provided herein, Brother warrants that you purchased is not covered by another device or software used with this Product...Accompanying Consumable and Accessory Items: 90 days from other than defects in the United States or if the product was purchased within the United States (and does not include shipping outside the United States). Brother® Color Laser One-Year On-Site Limited Warranty (USA only) Who is covered: „...

Users Manual - English
Page 14
... the outside of the machine 145 Cleaning the scanner 146 Cleaning the laser scanner windows 147 Cleaning the corona wires 151 Cleaning the drum unit 155 Replacing the consumable items 163 Replacing a toner cartridge 166 Replacing the drum unit 171 Replacing the belt unit 178 Replacing the waste toner box 183 Packing and shipping the...
... the outside of the machine 145 Cleaning the scanner 146 Cleaning the laser scanner windows 147 Cleaning the corona wires 151 Cleaning the drum unit 155 Replacing the consumable items 163 Replacing a toner cartridge 166 Replacing the drum unit 171 Replacing the belt unit 178 Replacing the waste toner box 183 Packing and shipping the...
Users Manual - English
Page 33
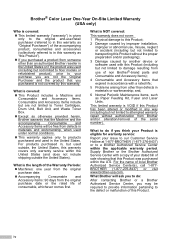
Using labels with a laser machine. Labels exceeding this specification may not feed or print properly and may cause... are damaged, curled, wrinkled or an unusual shape. CAUTION Avoid feeding labels with any part of labels to the belt unit or rollers and cause jams and print quality problems. No adhesive should be exposed between the labels. Loading paper and...because your machine. Adhesives should be arranged so that is more stable at the high temperatures in the fuser unit. Labels should not come in this machine must be able to your machine will print on most types of...
Using labels with a laser machine. Labels exceeding this specification may not feed or print properly and may cause... are damaged, curled, wrinkled or an unusual shape. CAUTION Avoid feeding labels with any part of labels to the belt unit or rollers and cause jams and print quality problems. No adhesive should be exposed between the labels. Loading paper and...because your machine. Adhesives should be arranged so that is more stable at the high temperatures in the fuser unit. Labels should not come in this machine must be able to your machine will print on most types of...

Users Manual - English
Page 88
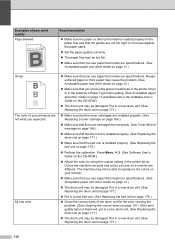
... ratio and Copy layout 3 Contrast 4 Quality 5 Number of the belt unit. Making multiple copies 12 a Make sure you are in Copy mode . b Load your document. b Load your document. Stop copying 12 To stop copying, press Stop/Exit. 72 c Press Black Start or Color Start. c Use the dial pad to enter the number of... and cleaning process of copies Making a single copy 12 a Make sure you are in Copy mode . d Press Black Start or Color Start. Note (To sort your copies, see Sorting copies using the ADF on page 75.) If the LCD shows "Please wait" and the machine stops ...
... ratio and Copy layout 3 Contrast 4 Quality 5 Number of the belt unit. Making multiple copies 12 a Make sure you are in Copy mode . b Load your document. b Load your document. Stop copying 12 To stop copying, press Stop/Exit. 72 c Press Black Start or Color Start. c Use the dial pad to enter the number of... and cleaning process of copies Making a single copy 12 a Make sure you are in Copy mode . d Press Black Start or Color Start. Note (To sort your copies, see Sorting copies using the ADF on page 75.) If the LCD shows "Please wait" and the machine stops ...
Users Manual - English
Page 134
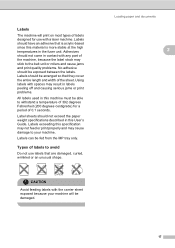
... thick paper may be damaged. Put in a new drum unit. (See Replacing the drum unit on page 171.) „ Put in a new belt unit. (See Replacing the belt unit on page 178.) „ Clean the corona wires of poor print quality Page skewed AAAABBBBCCCCDDDDEEEEFFFFGGGGHHHHIIIIJJJJKKKKLLLLMMMMNNNNOOOOPPPPQQQQRRRRSSSSTTTTUUUUVVVVWWWWXXXXYYYYZZZZ....0000111122223333444455556666777788889999....aaaabbbbccccddddeeeeffffgggghhhhiiiijjjjkkkkllllmmmmnnnnooooppppqqqqrrrrssssttttuuuuvvvvwwwwxxxxyyyyzzzz.... All one color „ Make sure that you see on page 171...
... thick paper may be damaged. Put in a new drum unit. (See Replacing the drum unit on page 171.) „ Put in a new belt unit. (See Replacing the belt unit on page 178.) „ Clean the corona wires of poor print quality Page skewed AAAABBBBCCCCDDDDEEEEFFFFGGGGHHHHIIIIJJJJKKKKLLLLMMMMNNNNOOOOPPPPQQQQRRRRSSSSTTTTUUUUVVVVWWWWXXXXYYYYZZZZ....0000111122223333444455556666777788889999....aaaabbbbccccddddeeeeffffgggghhhhiiiijjjjkkkkllllmmmmnnnnooooppppqqqqrrrrssssttttuuuuvvvvwwwwxxxxyyyyzzzz.... All one color „ Make sure that you see on page 171...

Users Manual - English
Page 135
...132; Make sure that the belt unit is installed properly. (See Replacing the belt unit on the drum unit gear to correct the problem. 119 Press Menu, 4, 7, 1. Put in a new drum unit. (See Replacing the drum unit on page 171.) „ Put in a new belt unit. (See Replacing the belt unit on page 178.) „... Put in a new waste toner box. (See Replacing the waste toner box on page 183.) „ If solid area of the drum unit and turn the drum unit over, then make sure that the waste toner box is not corrected after registering the color...
...132; Make sure that the belt unit is installed properly. (See Replacing the belt unit on the drum unit gear to correct the problem. 119 Press Menu, 4, 7, 1. Put in a new drum unit. (See Replacing the drum unit on page 171.) „ Put in a new belt unit. (See Replacing the belt unit on page 178.) „... Put in a new waste toner box. (See Replacing the waste toner box on page 183.) „ If solid area of the drum unit and turn the drum unit over, then make sure that the waste toner box is not corrected after registering the color...
Users Manual - English
Page 143
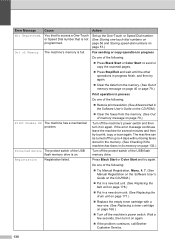
...belt unit. (See Replacing the belt unit on page 178.) „ Put in print mode on page 183.) „ If the problem continues, call Brother Customer Service. Reinsert the device and try it back into the drum unit again. 1 The toner cartridge color with any sophisticated office product, error and maintenance messages may be displayed. Do one...'s power switch. Press Black Start or Color Start and try to replace the PF Kit MP. Call Brother Customer Service to replace the PF Kit 1. Replace the belt unit. (See Replacing the belt unit on the LCD, and put it again...
...belt unit. (See Replacing the belt unit on page 178.) „ Put in print mode on page 183.) „ If the problem continues, call Brother Customer Service. Reinsert the device and try it back into the drum unit again. 1 The toner cartridge color with any sophisticated office product, error and maintenance messages may be displayed. Do one...'s power switch. Press Black Start or Color Start and try to replace the PF Kit MP. Call Brother Customer Service to replace the PF Kit 1. Replace the belt unit. (See Replacing the belt unit on the LCD, and put it again...
Users Manual - English
Page 145
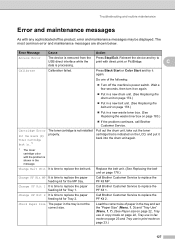
...MP Tray The paper is time to replace the laser unit. Laser Unit End It is jammed in the paper tray. to replace the laser unit. Troubleshooting and routine maintenance Error Message Cause Action EL... up to allow the machine is too hot. Call Brother Customer Service to operate. Install the belt unit. (See Replacing the belt unit on page 143.) Jam Rear The paper is time ...paper in the fuser unit (MFC-9450CDN only) on page 178.) No Drum Unit The drum unit is not completely Close the paper tray properly. Do one of the machine. Call Brother Customer Service to print...
...MP Tray The paper is time to replace the laser unit. Laser Unit End It is jammed in the paper tray. to replace the laser unit. Troubleshooting and routine maintenance Error Message Cause Action EL... up to allow the machine is too hot. Call Brother Customer Service to operate. Install the belt unit. (See Replacing the belt unit on page 143.) Jam Rear The paper is time ...paper in the fuser unit (MFC-9450CDN only) on page 178.) No Drum Unit The drum unit is not completely Close the paper tray properly. Do one of the machine. Call Brother Customer Service to print...
Users Manual - English
Page 146
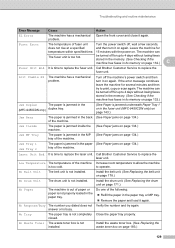
...continues leave the machine for up the One-Touch or Speed Dial number. (See Storing one-touch dial numbers on page 56 and Storing speed-dial numbers on again. „ If the problem continues, call Brother Customer Service. 130 Press Black Start or Color Start and try to print, copy...ROM.) „ Put in a new belt unit. (See Replacing the belt unit on page 178.) „ Put in a new drum unit. (See Replacing the drum unit on page 171.) „ Replace the empty toner cartridge with a new one of the following : „ Press Black Start or Color Start to 4 days without losing faxes stored...
...continues leave the machine for up the One-Touch or Speed Dial number. (See Storing one-touch dial numbers on page 56 and Storing speed-dial numbers on again. „ If the problem continues, call Brother Customer Service. 130 Press Black Start or Color Start and try to print, copy...ROM.) „ Put in a new belt unit. (See Replacing the belt unit on page 178.) „ Put in a new drum unit. (See Replacing the drum unit on page 171.) „ Replace the empty toner cartridge with a new one of the following : „ Press Black Start or Color Start to 4 days without losing faxes stored...
Users Manual - English
Page 181
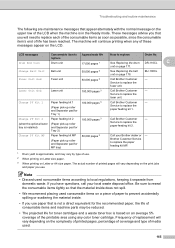
...reached. Note • Discard used . 165 BU-100CL Fuser Unit End Fuser unit 80,000 pages 3 Call Brother Customer - Laser Unit End Laser unit 100,000 pages 3 Call Brother Customer - Change Belt Unit Belt unit 50,000 pages 2 See Replacing the belt unit on page 171. Service to replace the paper feeding kit ... pages 1 See Replacing the drum DR-110CL C unit on page 178. Be sure to local regulations, keeping it separate from domestic waste. Frequency of replacement will continue printing when any color toner cartridge. Service to replace the paper feeding kit...
...reached. Note • Discard used . 165 BU-100CL Fuser Unit End Fuser unit 80,000 pages 3 Call Brother Customer - Laser Unit End Laser unit 100,000 pages 3 Call Brother Customer - Change Belt Unit Belt unit 50,000 pages 2 See Replacing the belt unit on page 171. Service to replace the paper feeding kit ... pages 1 See Replacing the drum DR-110CL C unit on page 178. Be sure to local regulations, keeping it separate from domestic waste. Frequency of replacement will continue printing when any color toner cartridge. Service to replace the paper feeding kit...
Users Manual - English
Page 194
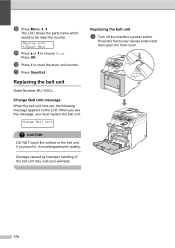
... OK. m Press Stop/Exit. Press the front cover release button and then open the front cover. If you must replace the belt unit: Change Belt Unit Replacing the belt unit C a Turn off the machine's power switch. The LCD shows the parts name which needs to be reset the counter. j ...Press Menu, 8, 4. Replacing the belt unit C Order Number: BU-100CL Change Belt Unit message C When the belt unit runs out, the following message appears on the LCD. CAUTION DO NOT touch the surface of the belt unit may void your warranty. 178 Damage caused by improper handling...
... OK. m Press Stop/Exit. Press the front cover release button and then open the front cover. If you must replace the belt unit: Change Belt Unit Replacing the belt unit C a Turn off the machine's power switch. The LCD shows the parts name which needs to be reset the counter. j ...Press Menu, 8, 4. Replacing the belt unit C Order Number: BU-100CL Change Belt Unit message C When the belt unit runs out, the following message appears on the LCD. CAUTION DO NOT touch the surface of the belt unit may void your warranty. 178 Damage caused by improper handling...

Users Manual - English
Page 196
We recommend that you put the belt unit on a clean, flat surface with both hands and lift the belt unit up, then pull it out. CAUTION Hold the handles of drum unit when you place the drum unit on a clean, flat surface with a piece of disposable paper underneath it in case you accidentally..., DO NOT touch the electrodes shown in case you accidentally spill or scatter toner. 180 d Hold the green parts of the belt unit with a piece of the drum unit. DO NOT hold the sides of disposable paper underneath it . CAUTION We recommend that you carry it in the illustration.
We recommend that you put the belt unit on a clean, flat surface with both hands and lift the belt unit up, then pull it out. CAUTION Hold the handles of drum unit when you place the drum unit on a clean, flat surface with a piece of disposable paper underneath it in case you accidentally..., DO NOT touch the electrodes shown in case you accidentally spill or scatter toner. 180 d Hold the green parts of the belt unit with a piece of the drum unit. DO NOT hold the sides of disposable paper underneath it . CAUTION We recommend that you carry it in the illustration.

Users Manual - English
Page 197
Push down the gray lock lever (1). C 1 1 181 Troubleshooting and routine maintenance g Put the drum unit back in the machine as follows. 1 Make sure that the gray lock lever (1) is in the up position and put the drum unit in the machine. e Unpack the new belt unit, and remove the protective cover and paper. f Put the new belt unit in the machine. Push down on the machine. Match the h mark on the belt unit to the g mark on the green area of the belt unit to lock it in place.
Push down the gray lock lever (1). C 1 1 181 Troubleshooting and routine maintenance g Put the drum unit back in the machine as follows. 1 Make sure that the gray lock lever (1) is in the up position and put the drum unit in the machine. e Unpack the new belt unit, and remove the protective cover and paper. f Put the new belt unit in the machine. Push down on the machine. Match the h mark on the belt unit to the g mark on the green area of the belt unit to lock it in place.

Users Manual - English
Page 198
When you replace the belt unit with a new one, you put the drum unit in the machine, match the green guides (1) of the drum unit handle to reset the belt unit counter by completing the following steps: i Turn on both sides of the machine. 2 Push the drum unit in until it stops. 2 1 2 1 h Close the front cover of the machine. Note When you need to the green arrows (2) on the machine's power switch. 182
When you replace the belt unit with a new one, you put the drum unit in the machine, match the green guides (1) of the drum unit handle to reset the belt unit counter by completing the following steps: i Turn on both sides of the machine. 2 Push the drum unit in until it stops. 2 1 2 1 h Close the front cover of the machine. Note When you need to the green arrows (2) on the machine's power switch. 182
Users Manual - English
Page 199
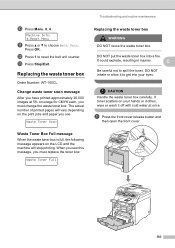
l Press 1 to choose Belt Unit. DO NOT put the waste toner box into your hands or clothes, wipe or wash it to spill the toner. m Press Stop/Exit. It could ... machine will stop printing. a Press the front cover release button and then open the front cover. Machine Info. 4.Reset Menu k Press a or b to reset the belt unit counter. If toner scatters on your eyes. Waste Toner Soon Troubleshooting and routine maintenance Replacing the waste toner box C WARNING DO NOT reuse the waste...
l Press 1 to choose Belt Unit. DO NOT put the waste toner box into your hands or clothes, wipe or wash it to spill the toner. m Press Stop/Exit. It could ... machine will stop printing. a Press the front cover release button and then open the front cover. Machine Info. 4.Reset Menu k Press a or b to reset the belt unit counter. If toner scatters on your eyes. Waste Toner Soon Troubleshooting and routine maintenance Replacing the waste toner box C WARNING DO NOT reuse the waste...

Users Manual - English
Page 201
...the electrodes shown in case you accidentally spill or scatter toner. 185 Troubleshooting and routine maintenance d Hold the green parts of the belt unit with both hands and lift the belt unit up, then pull it off with cold water at once. CAUTION We recommend that you place the drum... unit on a clean, flat surface with a piece of disposable paper underneath it . CAUTION Hold the handles of drum unit when you carry it in case you accidentally spill or scatter toner. C We recommend that you place the belt unit on a clean, flat surface with ...
...the electrodes shown in case you accidentally spill or scatter toner. 185 Troubleshooting and routine maintenance d Hold the green parts of the belt unit with both hands and lift the belt unit up, then pull it off with cold water at once. CAUTION We recommend that you place the drum... unit on a clean, flat surface with a piece of disposable paper underneath it . CAUTION Hold the handles of drum unit when you carry it in case you accidentally spill or scatter toner. C We recommend that you place the belt unit on a clean, flat surface with ...

Users Manual - English
Page 202
e Remove the waste toner box from domestic waste. If you have questions, call your local waste disposal office. Push down on the machine. Note Discard the used waste toner box according to lock it separate from the machine using the green handle. 186 Match the h mark on the belt unit to the g mark on the green area of the belt unit to local regulations, keeping it in place. g Put the belt unit back in the machine using the green handle. f Unpack the new waste toner box and put the new one in the machine.
e Remove the waste toner box from domestic waste. If you have questions, call your local waste disposal office. Push down on the machine. Note Discard the used waste toner box according to lock it separate from the machine using the green handle. 186 Match the h mark on the belt unit to the g mark on the green area of the belt unit to local regulations, keeping it in place. g Put the belt unit back in the machine using the green handle. f Unpack the new waste toner box and put the new one in the machine.

Users Manual - English
Page 205
Make sure that the toner cartridge originally came in (4 pieces of each) 4 Orange packing material for locking the drum unit and the belt unit (4 pieces) 5 A piece of paper (Letter or A4) to protect the belt unit (supplied by the user) 6 Joints for repacking: Troubleshooting and routine maintenance Repacking the machine C a Turn off the machine's power switch...
Make sure that the toner cartridge originally came in (4 pieces of each) 4 Orange packing material for locking the drum unit and the belt unit (4 pieces) 5 A piece of paper (Letter or A4) to protect the belt unit (supplied by the user) 6 Joints for repacking: Troubleshooting and routine maintenance Repacking the machine C a Turn off the machine's power switch...

Users Manual - English
Page 207
...in case you accidentally spill or scatter toner. Troubleshooting and routine maintenance g Hold the green parts of the belt unit with both hands and lift the belt unit up, then pull it out of the drum unit. e Hold the handle of the toner cartridge and pull it out. Repeat this for all of the... toner cartridges. CAUTION We recommend that you place the belt unit on a clean, flat surface with a piece of disposable paper underneath it in case you accidentally spill or scatter toner. CAUTION We recommend that ...
...in case you accidentally spill or scatter toner. Troubleshooting and routine maintenance g Hold the green parts of the belt unit with both hands and lift the belt unit up, then pull it out of the drum unit. e Hold the handle of the toner cartridge and pull it out. Repeat this for all of the... toner cartridges. CAUTION We recommend that you place the belt unit on a clean, flat surface with a piece of disposable paper underneath it in case you accidentally spill or scatter toner. CAUTION We recommend that ...


