
Users Manual - English
Page 3
... 24 hours a day, 7 days a week. You can use fax-back system, so you can get instant answers to common technical questions and product information for Brother driver updates. Visit us at: http://www.brother.com You can find more information about using the system, and an index of fax-back subjects... an easy-to-use the system to send faxes to any fax machine, not just the one from which you can't resolve difficulty with your MFC machine using this manual, call our fax-back system, and follow the voice prompts to receive faxed instructions about Brother products on One Touch key 1.
... 24 hours a day, 7 days a week. You can use fax-back system, so you can get instant answers to common technical questions and product information for Brother driver updates. Visit us at: http://www.brother.com You can find more information about using the system, and an index of fax-back subjects... an easy-to-use the system to send faxes to any fax machine, not just the one from which you can't resolve difficulty with your MFC machine using this manual, call our fax-back system, and follow the voice prompts to receive faxed instructions about Brother products on One Touch key 1.
Users Manual - English
Page 17
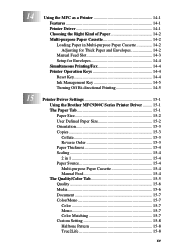
14 Using the MFC as a Printer 14-1 Features 14-1 Printer Driver 14-1 Choosing the Right Kind of Paper 14-2 Multi-purpose Paper Cassette 14-2 Loading Paper in Multi-purpose Paper Cassette 14-2 Adjusting for Thick Paper ... Printing/Fax 14-4 Printer Operation Keys 14-4 Reset Key 14-4 Ink Management Key 14-5 Turning Off Bi-directional Printing 14-5 15 Printer Driver Settings 15-1 Using the Brother MFC9200C Series Printer Driver ......... 15-1 The Paper Tab 15-1 Paper Size 15-2 User Defined Paper Size 15-2 Orientation 15-3 Copies 15-3 Collate 15-3 Reverse Order...
14 Using the MFC as a Printer 14-1 Features 14-1 Printer Driver 14-1 Choosing the Right Kind of Paper 14-2 Multi-purpose Paper Cassette 14-2 Loading Paper in Multi-purpose Paper Cassette 14-2 Adjusting for Thick Paper ... Printing/Fax 14-4 Printer Operation Keys 14-4 Reset Key 14-4 Ink Management Key 14-5 Turning Off Bi-directional Printing 14-5 15 Printer Driver Settings 15-1 Using the Brother MFC9200C Series Printer Driver ......... 15-1 The Paper Tab 15-1 Paper Size 15-2 User Defined Paper Size 15-2 Orientation 15-3 Copies 15-3 Collate 15-3 Reverse Order...
Users Manual - English
Page 20
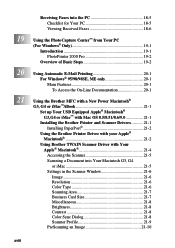
...20-1 For Windows® 95/98/98SE, ME only 20-1 Main Features 20-1 To Access the On-Line Documentation 20-1 21 Using the Brother MFC with a New Power Macintosh® G3, G4 or iMac™/iBook 21-1 Set up Your USB Equipped Apple® Macintosh® G3...,G4 or iMac™ with Mac OS 8.5/8.51/8.6/9.0 21-1 Installing the Brother Printer and Scanner Drivers 21-1 Installing PaperPort 21-2 Using the Brother Printer Driver with your Apple® Macintosh 21-2 Using Brother TWAIN Scanner Driver with Your Apple® Macintosh 21-4 Accessing the Scanner 21-5 Scanning a Document into ...
...20-1 For Windows® 95/98/98SE, ME only 20-1 Main Features 20-1 To Access the On-Line Documentation 20-1 21 Using the Brother MFC with a New Power Macintosh® G3, G4 or iMac™/iBook 21-1 Set up Your USB Equipped Apple® Macintosh® G3...,G4 or iMac™ with Mac OS 8.5/8.51/8.6/9.0 21-1 Installing the Brother Printer and Scanner Drivers 21-1 Installing PaperPort 21-2 Using the Brother Printer Driver with your Apple® Macintosh 21-2 Using Brother TWAIN Scanner Driver with Your Apple® Macintosh 21-4 Accessing the Scanner 21-5 Scanning a Document into ...
Users Manual - English
Page 32
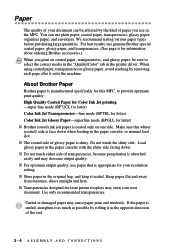
...and envelopes. s For optimum output quality, use genuine Brother special coated paper, glossy paper, and transparencies. (See page ii for this MFC, to select the correct media in the "Quality/Color" tab in the printer driver. Use only recommended transparencies. Curled or damaged paper may... stain your resolution setting. s Transparencies designed for letter) s Brother coated (ink jet) paper is curled...
...and envelopes. s For optimum output quality, use genuine Brother special coated paper, glossy paper, and transparencies. (See page ii for this MFC, to select the correct media in the "Quality/Color" tab in the printer driver. Use only recommended transparencies. Curled or damaged paper may... stain your resolution setting. s Transparencies designed for letter) s Brother coated (ink jet) paper is curled...
Users Manual - English
Page 34
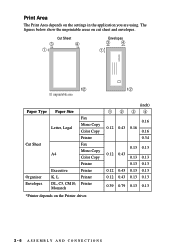
The figures below show the unprintable areas on the Printer driver. (inch) 1234 0.16 0.12 0.43 0.16 0.16 0.34 0.13 0.13 0.12 0.43 0.13 0.13 0.13 0.13 0.12 0.43 0.13 0.13 0.12 0.43 0.13 0.13 0.39 0....
The figures below show the unprintable areas on the Printer driver. (inch) 1234 0.16 0.12 0.43 0.16 0.16 0.34 0.13 0.13 0.12 0.43 0.13 0.13 0.13 0.13 0.12 0.43 0.13 0.13 0.12 0.43 0.13 0.13 0.39 0....
Users Manual - English
Page 114
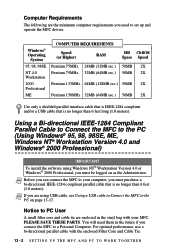
... PC User A small filter core and cable tie are enclosed in the future if you connect the MFC to set up and operate the MFC drivers. PLEASE SAVE THESE PARTS. You will need to a Personal Computer. Computer Requirements The following are the minimum computer requirements you need them...and/or a USB cable that is no longer than 6 feet long (1.8 meters). Using a Bi-directional IEEE-1284 Compliant Parallel Cable to Connect the MFC to the PC on as the Administrator. For optimal performance, use a bi-directional parallel cable with your computer, you must purchase a bi-directional ...
... PC User A small filter core and cable tie are enclosed in the future if you connect the MFC to set up and operate the MFC drivers. PLEASE SAVE THESE PARTS. You will need to a Personal Computer. Computer Requirements The following are the minimum computer requirements you need them...and/or a USB cable that is no longer than 6 feet long (1.8 meters). Using a Bi-directional IEEE-1284 Compliant Parallel Cable to Connect the MFC to the PC on as the Administrator. For optimal performance, use a bi-directional parallel cable with your computer, you must purchase a bi-directional ...
Users Manual - English
Page 116
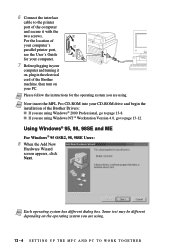
6 Connect the interface cable to the printer port of the Brother machine, then turn on your PC. s If you are using Windows® 2000 Professional, go to page 13-8. Using Windows® 95, 98, 98SE and ... you are using . 13 - 4 S E T T I N G U P T H E M F C A N D P C T O W O R K T O G E T H E R Note Please follow the instructions for your computer. 7 Before plugging in your CD-ROM drive and begin the installation of the Brother Drivers: s If you are using Windows NT ® Workstation Version 4.0, go to page 13-12. Note Now insert the MFL Pro CD-ROM into your computer...
6 Connect the interface cable to the printer port of the Brother machine, then turn on your PC. s If you are using Windows® 2000 Professional, go to page 13-8. Using Windows® 95, 98, 98SE and ... you are using . 13 - 4 S E T T I N G U P T H E M F C A N D P C T O W O R K T O G E T H E R Note Please follow the instructions for your computer. 7 Before plugging in your CD-ROM drive and begin the installation of the Brother Drivers: s If you are using Windows NT ® Workstation Version 4.0, go to page 13-12. Note Now insert the MFL Pro CD-ROM into your computer...
Users Manual - English
Page 117
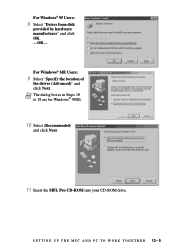
For Windows® 95 Users: 9 Select "Driver from disk provided by hardware manufacturer" and click OK. -OR- S E T T I N G U P T H E M F C A N D P C T O W O R K T O G E T H E R 13 - 5 For Windows® ME Users: 9 Select "Specify the location of the driver (Advanced)" and click Next. Note The dialog boxes in Steps 10 to 18 are for Windows® 98SE. 10 Select (Recommended) and click Next. 11 Insert the MFL Pro CD-ROM into your CD-ROM drive.
For Windows® 95 Users: 9 Select "Driver from disk provided by hardware manufacturer" and click OK. -OR- S E T T I N G U P T H E M F C A N D P C T O W O R K T O G E T H E R 13 - 5 For Windows® ME Users: 9 Select "Specify the location of the driver (Advanced)" and click Next. Note The dialog boxes in Steps 10 to 18 are for Windows® 98SE. 10 Select (Recommended) and click Next. 11 Insert the MFL Pro CD-ROM into your CD-ROM drive.
Users Manual - English
Page 119
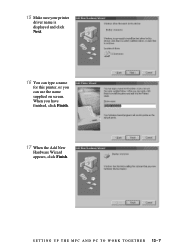
When you can use the name supplied on screen. 15 Make sure your printer driver name is displayed and click Next. 16 You can type a name for this printer, or you have finished, click Finish. 17 When the Add New Hardware Wizard appears, click Finish. S E T T I N G U P T H E M F C A N D P C T O W O R K T O G E T H E R 13 - 7
When you can use the name supplied on screen. 15 Make sure your printer driver name is displayed and click Next. 16 You can type a name for this printer, or you have finished, click Finish. 17 When the Add New Hardware Wizard appears, click Finish. S E T T I N G U P T H E M F C A N D P C T O W O R K T O G E T H E R 13 - 7

Users Manual - English
Page 120
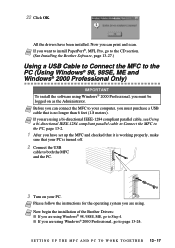
Now you want to install PaperPort® or Multi-Function Link® Pro, go to the CD section. (See Installing the Brother Software on page 13-27.) Using Windows® 2000 Professional 8 When the Found New Hardware Wizard screen appears, click Next. 13 - 8 S E T T I N G U P T H E M F C A N D P C T O W O R K T O G E T H E R All the drivers have been installed. Note If you can print and scan. When the Setup window appears, and the status bar reaches 100%, the remaining drivers will be copied. 18 Click OK.
Now you want to install PaperPort® or Multi-Function Link® Pro, go to the CD section. (See Installing the Brother Software on page 13-27.) Using Windows® 2000 Professional 8 When the Found New Hardware Wizard screen appears, click Next. 13 - 8 S E T T I N G U P T H E M F C A N D P C T O W O R K T O G E T H E R All the drivers have been installed. Note If you can print and scan. When the Setup window appears, and the status bar reaches 100%, the remaining drivers will be copied. 18 Click OK.
Users Manual - English
Page 123
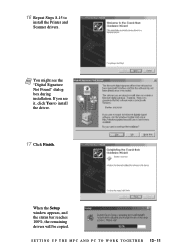
If you see the "Digital Signature Not Found" dialog box during installation. When the Setup window appears, and the status bar reaches 100%, the remaining drivers will be copied. S E T T I N G U P T H E M F C A N D P C T O W O R K T O G E T H E R 13 - 11 16 Repeat Steps 8-15 to install the driver. 17 Click Finish. Note You might see it, click Yes to install the Printer and Scanner drivers.
If you see the "Digital Signature Not Found" dialog box during installation. When the Setup window appears, and the status bar reaches 100%, the remaining drivers will be copied. S E T T I N G U P T H E M F C A N D P C T O W O R K T O G E T H E R 13 - 11 16 Repeat Steps 8-15 to install the driver. 17 Click Finish. Note You might see it, click Yes to install the Printer and Scanner drivers.
Users Manual - English
Page 124
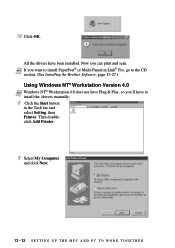
...; Pro, go to the CD section. (See Installing the Brother Software, page 13-27.) Using Windows NT® Workstation Version 4.0 Note Windows NT® Workstation 4.0 does not have Plug & Play, so you can print and scan. All the drivers have to install the drivers manually: 8 Click the Start button in the Task bar...
...; Pro, go to the CD section. (See Installing the Brother Software, page 13-27.) Using Windows NT® Workstation Version 4.0 Note Windows NT® Workstation 4.0 does not have Plug & Play, so you can print and scan. All the drivers have to install the drivers manually: 8 Click the Start button in the Task bar...
Users Manual - English
Page 128
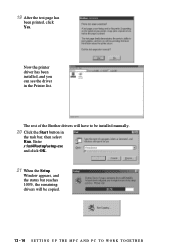
19 After the test page has been printed, click Yes. Enter x:\nt40\setup\setup.exe and click OK. 21 When the Setup Window appears, and the status bar reaches 100%, the remaining drivers will have to be copied. 13 - 16 S E T T I N G U P T H E M F C A N D P C T O W O R K T O G E T H E R The rest of the Brother drivers will be installed manually. 20 Click the Start button in the Printer list. Now the printer driver has been installed, and you can see the driver in the task bar, then select Run.
19 After the test page has been printed, click Yes. Enter x:\nt40\setup\setup.exe and click OK. 21 When the Setup Window appears, and the status bar reaches 100%, the remaining drivers will have to be copied. 13 - 16 S E T T I N G U P T H E M F C A N D P C T O W O R K T O G E T H E R The rest of the Brother drivers will be installed manually. 20 Click the Start button in the Printer list. Now the printer driver has been installed, and you can see the driver in the task bar, then select Run.
Users Manual - English
Page 129
... PaperPort®, MFL Pro, go to the CD section. (See Installing the Brother Software, page 13-27.) Using a USB Cable to Connect the MFC to page 13-24. Note Now begin the installation of the Brother Drivers: s If you are using Windows® 98, 98SE, ME, go to...your PC. Note Please follow the instructions for the operating system you are using . S E T T I N G U P T H E M F C A N D P C T O W O R K T O G E T H E R 13 - 17 All the drivers have set up the MFC and checked that it is working properly, make sure that is turned off. 2 Connect the USB cable to your computer, you are using...
... PaperPort®, MFL Pro, go to the CD section. (See Installing the Brother Software, page 13-27.) Using a USB Cable to Connect the MFC to page 13-24. Note Now begin the installation of the Brother Drivers: s If you are using Windows® 98, 98SE, ME, go to...your PC. Note Please follow the instructions for the operating system you are using . S E T T I N G U P T H E M F C A N D P C T O W O R K T O G E T H E R 13 - 17 All the drivers have set up the MFC and checked that it is working properly, make sure that is turned off. 2 Connect the USB cable to your computer, you are using...
Users Manual - English
Page 130
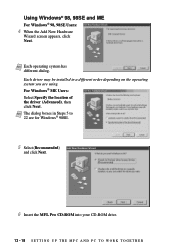
Note Each operating system has different dialog. Each driver may be installed in Steps 5 to 22 are using. Note The dialog boxes in a different order depending on the operating system you are for Windows&#...® 98, 98SE Users: 4 When the Add New Hardware Wizard screen appears, click Next. For Windows® ME Users: Select Specify the location of the driver (Advanced), then click Next.
Note Each operating system has different dialog. Each driver may be installed in Steps 5 to 22 are using. Note The dialog boxes in a different order depending on the operating system you are for Windows&#...® 98, 98SE Users: 4 When the Add New Hardware Wizard screen appears, click Next. For Windows® ME Users: Select Specify the location of the driver (Advanced), then click Next.
Users Manual - English
Page 132
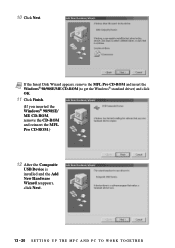
10 Click Next. Note If the Insert Disk Wizard appears, remove the MFL Pro CD-ROM and insert the Windows® 98/98SE/ME CD-ROM (to get the Windows® standard driver) and click OK. 11 Click Finish. (If you inserted the Windows® 98/98SE/ ME CD-ROM, remove the CD-ROM and reinsert the MFL Pro CD-ROM.) 12 After the Composite USB Device is installed and the Add New Hardware Wizard reappears, click Next. 13 - 20 S E T T I N G U P T H E M F C A N D P C T O W O R K T O G E T H E R
10 Click Next. Note If the Insert Disk Wizard appears, remove the MFL Pro CD-ROM and insert the Windows® 98/98SE/ME CD-ROM (to get the Windows® standard driver) and click OK. 11 Click Finish. (If you inserted the Windows® 98/98SE/ ME CD-ROM, remove the CD-ROM and reinsert the MFL Pro CD-ROM.) 12 After the Composite USB Device is installed and the Add New Hardware Wizard reappears, click Next. 13 - 20 S E T T I N G U P T H E M F C A N D P C T O W O R K T O G E T H E R

Users Manual - English
Page 134
When you have been installed, select BRUSB: USB Printer Port as the printer port and click Next. 19 Enter a name for the printer, or you can use the displayed name. 16 When the Add New Hardware Wizard displays the message that installation is completed, click Finish. 17 To install all the drivers, repeat Steps 4 to 10. 18 After the USB Composite Device, PhotoCapture Center™ Fax Modem, Scanner and Printer Drivers have finished, click Next. 13 - 22 S E T T I N G U P T H E M F C A N D P C T O W O R K T O G E T H E R
When you have been installed, select BRUSB: USB Printer Port as the printer port and click Next. 19 Enter a name for the printer, or you can use the displayed name. 16 When the Add New Hardware Wizard displays the message that installation is completed, click Finish. 17 To install all the drivers, repeat Steps 4 to 10. 18 After the USB Composite Device, PhotoCapture Center™ Fax Modem, Scanner and Printer Drivers have finished, click Next. 13 - 22 S E T T I N G U P T H E M F C A N D P C T O W O R K T O G E T H E R
Users Manual - English
Page 135
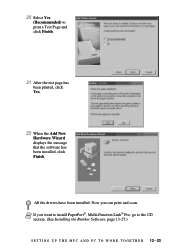
Now you want to install PaperPort®, Multi-Function Link® Pro, go to print a Test Page and click Finish. 21 After the test page has been printed, click Yes. 22 When the Add New Hardware Wizard displays the message that the software has been installed, click Finish. 20 Select Yes (Recommended) to the CD section. (See Installing the Brother Software, page 13-27.) S E T T I N G U P T H E M F C A N D P C T O W O R K T O G E T H E R 13 - 23 Note If you can print and scan. All the drivers have been installed.
Now you want to install PaperPort®, Multi-Function Link® Pro, go to print a Test Page and click Finish. 21 After the test page has been printed, click Yes. 22 When the Add New Hardware Wizard displays the message that the software has been installed, click Finish. 20 Select Yes (Recommended) to the CD section. (See Installing the Brother Software, page 13-27.) S E T T I N G U P T H E M F C A N D P C T O W O R K T O G E T H E R 13 - 23 Note If you can print and scan. All the drivers have been installed.
Users Manual - English
Page 137
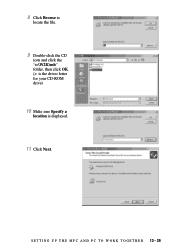
S E T T I N G U P T H E M F C A N D P C T O W O R K T O G E T H E R 13 - 25 8 Click Browse to locate the file. 9 Double-click the CD icon and click the "x:\W2K\usb" folder, then click OK. (x: is the driver letter for your CD-ROM drive) 10 Make sure Specify a location is displayed. 11 Click Next.
S E T T I N G U P T H E M F C A N D P C T O W O R K T O G E T H E R 13 - 25 8 Click Browse to locate the file. 9 Double-click the CD icon and click the "x:\W2K\usb" folder, then click OK. (x: is the driver letter for your CD-ROM drive) 10 Make sure Specify a location is displayed. 11 Click Next.
Users Manual - English
Page 138
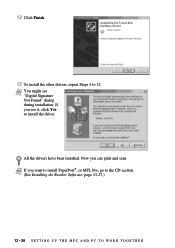
Now you want to install PaperPort®, or MFL Pro, go to the CD section. (See Installing the Brother Software, page 13-27.) 13 - 26 S E T T I N G U P T H E M F C A N D P C T O W O R K T O G E T H E R If you see "Digital Signature Not Found" dialog during installation. All the drivers have been installed. Note You might see it, click Yes to 12. 12 Click Finish. 13 To install the other drivers, repeat Steps 4 to install the driver. Note If you can print and scan.
Now you want to install PaperPort®, or MFL Pro, go to the CD section. (See Installing the Brother Software, page 13-27.) 13 - 26 S E T T I N G U P T H E M F C A N D P C T O W O R K T O G E T H E R If you see "Digital Signature Not Found" dialog during installation. All the drivers have been installed. Note You might see it, click Yes to 12. 12 Click Finish. 13 To install the other drivers, repeat Steps 4 to install the driver. Note If you can print and scan.


