
Users Manual - English
Page 16
... 98, 98SE and ME 13-18 Using Windows® 2000 Professional 13-24 Installing the Brother Software 13-27 To install Multi-Function Link® Pro (Main Application 13-27 To Install Automatic E-mail Printing (Optional Application 13-28 To Register Your MFC 9200C On-Line (For USA only 13-29 To... view On-Line Documentation 13-29 To Install PhotoPrinter Pro 13-30 To View Brother Support Information 13-30 Helpful Hints for Windows® 95/98/98SE/ME/ 2000 Professional or Windows NT® 4.0 13-31 Receiving...
... 98, 98SE and ME 13-18 Using Windows® 2000 Professional 13-24 Installing the Brother Software 13-27 To install Multi-Function Link® Pro (Main Application 13-27 To Install Automatic E-mail Printing (Optional Application 13-28 To Register Your MFC 9200C On-Line (For USA only 13-29 To... view On-Line Documentation 13-29 To Install PhotoPrinter Pro 13-30 To View Brother Support Information 13-30 Helpful Hints for Windows® 95/98/98SE/ME/ 2000 Professional or Windows NT® 4.0 13-31 Receiving...

Users Manual - English
Page 18
... your PC 15-9 Using the Windows®-Based Brother Control Center 16-1 Brother Control Center 16-1 AutoLoad the Brother Control Center 16-2 How to Turn Off AutoLoad 16-2 Using the Scan Keys 16-2 Using the Control Panel Keys 16-3 Scan Image 16-3 Scan/OCR 16-3 Scan to E-mail 16-3 Brother Control Center Features 16-4 Auto...
... your PC 15-9 Using the Windows®-Based Brother Control Center 16-1 Brother Control Center 16-1 AutoLoad the Brother Control Center 16-2 How to Turn Off AutoLoad 16-2 Using the Scan Keys 16-2 Using the Control Panel Keys 16-3 Scan Image 16-3 Scan/OCR 16-3 Scan to E-mail 16-3 Brother Control Center Features 16-4 Auto...
Users Manual - English
Page 19
...in Other Formats 17-4 Scanning a Document 17-4 TWAIN COMPLIANT 17-4 Accessing the Scanner 17-5 Scanning a Document into the PC 17-5 Settings in the Scanner Window 17-6 Resolution 17-6 Color Type 17-6 Size 17-7 Custom 17-7 Adjust 17-7 Paper 17-8 Video Capture 17-8 PreScanning an Image 17-8 How to ...An Image 17-10 To capture a frame as an image 17-11 18 Using Multi-Function Link® Pro Software 18-1 Introduction 18-1 Brother Resource Manager 18-1 MFC Remote Setup 18-2 Multi-Function Link® Pro Main Menu 18-3 Sending a Fax from Your PC 18-3 Sending a Fax from the Main...
...in Other Formats 17-4 Scanning a Document 17-4 TWAIN COMPLIANT 17-4 Accessing the Scanner 17-5 Scanning a Document into the PC 17-5 Settings in the Scanner Window 17-6 Resolution 17-6 Color Type 17-6 Size 17-7 Custom 17-7 Adjust 17-7 Paper 17-8 Video Capture 17-8 PreScanning an Image 17-8 How to ...An Image 17-10 To capture a frame as an image 17-11 18 Using Multi-Function Link® Pro Software 18-1 Introduction 18-1 Brother Resource Manager 18-1 MFC Remote Setup 18-2 Multi-Function Link® Pro Main Menu 18-3 Sending a Fax from Your PC 18-3 Sending a Fax from the Main...
Users Manual - English
Page 20
...19-2 Overview of Basic Steps 19-2 20 Using Automatic E-Mail Printing 20-1 For Windows® 95/98/98SE, ME only 20-1 Main Features 20-1 To Access the On-Line Documentation 20-1 21 Using the Brother MFC with a New Power Macintosh® G3, G4 or iMac™/iBook 21-1 ... Installing PaperPort 21-2 Using the Brother Printer Driver with your Apple® Macintosh 21-2 Using Brother TWAIN Scanner Driver with Your Apple® Macintosh 21-4 Accessing the Scanner 21-5 Scanning a Document into Your Macintosh G3, G4 or iMac 21-5 Settings in the Scanner Window 21-6 Image 21-6 Resolution 21...
...19-2 Overview of Basic Steps 19-2 20 Using Automatic E-Mail Printing 20-1 For Windows® 95/98/98SE, ME only 20-1 Main Features 20-1 To Access the On-Line Documentation 20-1 21 Using the Brother MFC with a New Power Macintosh® G3, G4 or iMac™/iBook 21-1 ... Installing PaperPort 21-2 Using the Brother Printer Driver with your Apple® Macintosh 21-2 Using Brother TWAIN Scanner Driver with Your Apple® Macintosh 21-4 Accessing the Scanner 21-5 Scanning a Document into Your Macintosh G3, G4 or iMac 21-5 Settings in the Scanner Window 21-6 Image 21-6 Resolution 21...

Users Manual - English
Page 112
...L K - U P P H O T O C A P T U R E C E N T E R ™ For the complete manual of a corrupted image may be printed. NO FILE-After you are too large for the MFC's memory. PhotoCaputure Center™ Requirements To avoid error conditions, please remember: • The DPOF file on the media card must be in the media drive... .JPG image that are working with images that is not on the card. Using PhotoCapture Center™ from your PC (For Windows® Only) Please see the On-Line Documentation on where the bad data occurs, a portion of the PhotoCapture Center™ ...
...L K - U P P H O T O C A P T U R E C E N T E R ™ For the complete manual of a corrupted image may be printed. NO FILE-After you are too large for the MFC's memory. PhotoCaputure Center™ Requirements To avoid error conditions, please remember: • The DPOF file on the media card must be in the media drive... .JPG image that are working with images that is not on the card. Using PhotoCapture Center™ from your PC (For Windows® Only) Please see the On-Line Documentation on where the bad data occurs, a portion of the PhotoCapture Center™ ...
Users Manual - English
Page 113
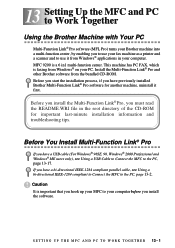
... start the installation process, if you have a USB cable (For Windows® 98SE, 98, Windows® 2000 Professional and Windows® ME users only), see Using a bi-directional IEEE-1284 compliant to Connect the MFC to your computer before you install the software. Before You Install Multi...-Function Link® Pro If you have previously installed Brother Multi-Function ...
... start the installation process, if you have a USB cable (For Windows® 98SE, 98, Windows® 2000 Professional and Windows® ME users only), see Using a bi-directional IEEE-1284 compliant to Connect the MFC to your computer before you install the software. Before You Install Multi...-Function Link® Pro If you have previously installed Brother Multi-Function ...
Users Manual - English
Page 114
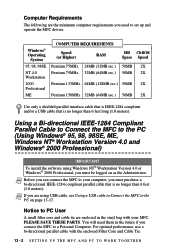
... a Personal Computer. Using a Bi-directional IEEE-1284 Compliant Parallel Cable to Connect the MFC to PC User A small filter core and cable tie are using Windows NT® Workstation Version 4.0 or Windows® 2000 Professional, you must purchase a bi-directional IEEE-1284 compliant parallel cable that is no longer than 6 feet (1.8 meters). Notice...
... a Personal Computer. Using a Bi-directional IEEE-1284 Compliant Parallel Cable to Connect the MFC to PC User A small filter core and cable tie are using Windows NT® Workstation Version 4.0 or Windows® 2000 Professional, you must purchase a bi-directional IEEE-1284 compliant parallel cable that is no longer than 6 feet (1.8 meters). Notice...
Users Manual - English
Page 116
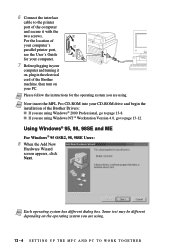
... insert the MFL Pro CD-ROM into your computer and turning it on, plug in your CD-ROM drive and begin the installation of the Brother Drivers: s If you are using Windows NT ® Workstation Version 4.0, go to page 13-12. 6 Connect the interface cable to the printer port of the... Brother machine, then turn on the operating system you are using. For the location of your computer's parallel printer port, see the User's Guide for the ...
... insert the MFL Pro CD-ROM into your computer and turning it on, plug in your CD-ROM drive and begin the installation of the Brother Drivers: s If you are using Windows NT ® Workstation Version 4.0, go to page 13-12. 6 Connect the interface cable to the printer port of the... Brother machine, then turn on the operating system you are using. For the location of your computer's parallel printer port, see the User's Guide for the ...
Users Manual - English
Page 117
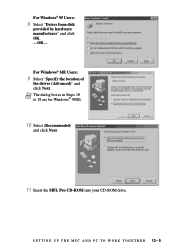
For Windows® ME Users: 9 Select "Specify the location of the driver (Advanced)" and click Next. S E T T I N G U P T H E M F C A N D P C T O W O R K T O G E T H E R 13 - 5 Note The dialog boxes in Steps 10 to 18 are for Windows® 98SE. 10 Select (Recommended) and click Next. 11 Insert the MFL Pro CD-ROM into your CD-ROM drive. For Windows® 95 Users: 9 Select "Driver from disk provided by hardware manufacturer" and click OK. -OR-
For Windows® ME Users: 9 Select "Specify the location of the driver (Advanced)" and click Next. S E T T I N G U P T H E M F C A N D P C T O W O R K T O G E T H E R 13 - 5 Note The dialog boxes in Steps 10 to 18 are for Windows® 98SE. 10 Select (Recommended) and click Next. 11 Insert the MFL Pro CD-ROM into your CD-ROM drive. For Windows® 95 Users: 9 Select "Driver from disk provided by hardware manufacturer" and click OK. -OR-

Users Manual - English
Page 120
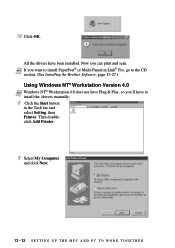
Note If you can print and scan. Now you want to install PaperPort® or Multi-Function Link® Pro, go to the CD section. (See Installing the Brother Software on page 13-27.) Using Windows® 2000 Professional 8 When the Found New Hardware Wizard screen appears, click Next. 13 - 8 S E T T I N G U P T H E M F C A N D P C T O W O R K T O G E T H E R All the drivers have been installed. When the Setup window appears, and the status bar reaches 100%, the remaining drivers will be copied. 18 Click OK.
Note If you can print and scan. Now you want to install PaperPort® or Multi-Function Link® Pro, go to the CD section. (See Installing the Brother Software on page 13-27.) Using Windows® 2000 Professional 8 When the Found New Hardware Wizard screen appears, click Next. 13 - 8 S E T T I N G U P T H E M F C A N D P C T O W O R K T O G E T H E R All the drivers have been installed. When the Setup window appears, and the status bar reaches 100%, the remaining drivers will be copied. 18 Click OK.
Users Manual - English
Page 123
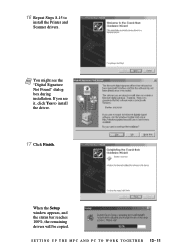
16 Repeat Steps 8-15 to install the driver. 17 Click Finish. S E T T I N G U P T H E M F C A N D P C T O W O R K T O G E T H E R 13 - 11 When the Setup window appears, and the status bar reaches 100%, the remaining drivers will be copied. If you see the "Digital Signature Not Found" dialog box during installation. Note You might see it, click Yes to install the Printer and Scanner drivers.
16 Repeat Steps 8-15 to install the driver. 17 Click Finish. S E T T I N G U P T H E M F C A N D P C T O W O R K T O G E T H E R 13 - 11 When the Setup window appears, and the status bar reaches 100%, the remaining drivers will be copied. If you see the "Digital Signature Not Found" dialog box during installation. Note You might see it, click Yes to install the Printer and Scanner drivers.
Users Manual - English
Page 124
... Setting, then Printer. Note If you want to install PaperPort® or Multi-Function Link® Pro, go to the CD section. (See Installing the Brother Software, page 13-27.) Using Windows NT® Workstation Version 4.0 Note Windows NT® Workstation 4.0 does not have Plug & Play, so you can print and scan.
... Setting, then Printer. Note If you want to install PaperPort® or Multi-Function Link® Pro, go to the CD section. (See Installing the Brother Software, page 13-27.) Using Windows NT® Workstation Version 4.0 Note Windows NT® Workstation 4.0 does not have Plug & Play, so you can print and scan.
Users Manual - English
Page 128
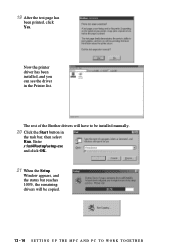
The rest of the Brother drivers will be installed manually. 20 Click the Start button in the Printer list. Enter x:\nt40\setup\setup.exe and click OK. 21 When the Setup Window appears, and the status bar reaches 100%, the remaining drivers will have to be copied. 13 - 16 S E T T I N G U P T H E M F C A N D P C T O W O R K T O G E T H E R Now the printer driver has been installed, and you can see the driver in the task bar, then select Run. 19 After the test page has been printed, click Yes.
The rest of the Brother drivers will be installed manually. 20 Click the Start button in the Printer list. Enter x:\nt40\setup\setup.exe and click OK. 21 When the Setup Window appears, and the status bar reaches 100%, the remaining drivers will have to be copied. 13 - 16 S E T T I N G U P T H E M F C A N D P C T O W O R K T O G E T H E R Now the printer driver has been installed, and you can see the driver in the task bar, then select Run. 19 After the test page has been printed, click Yes.
Users Manual - English
Page 129
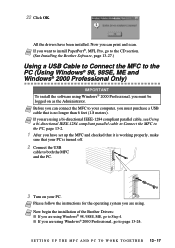
...parallel cable, see Using a bi-directional IEEE-1284 compliant parallel cable to Connect the MFC to the PC, page 13-2. 1 After you have been installed. Note If you are using Windows® 98, 98SE, ME, go to Step 4. s If you want to...®, MFL Pro, go to the CD section. (See Installing the Brother Software, page 13-27.) Using a USB Cable to Connect the MFC to the PC (Using Windows® 98, 98SE, ME and Windows® 2000 Professional Only) IMPORTANT To install the software using Windows® 2000 Professional, go to page 13-24. S E T T I N G U P T H E M F C A N D P C T O W O R ...
...parallel cable, see Using a bi-directional IEEE-1284 compliant parallel cable to Connect the MFC to the PC, page 13-2. 1 After you have been installed. Note If you are using Windows® 98, 98SE, ME, go to Step 4. s If you want to...®, MFL Pro, go to the CD section. (See Installing the Brother Software, page 13-27.) Using a USB Cable to Connect the MFC to the PC (Using Windows® 98, 98SE, ME and Windows® 2000 Professional Only) IMPORTANT To install the software using Windows® 2000 Professional, go to page 13-24. S E T T I N G U P T H E M F C A N D P C T O W O R ...
Users Manual - English
Page 130
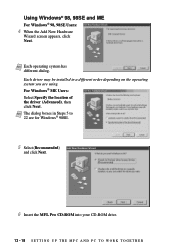
... (Recommended) and click Next. 6 Insert the MFL Pro CD-ROM into your CD-ROM drive. 13 - 18 S E T T I N G U P T H E M F C A N D P C T O W O R K T O G E T H E R Note Each operating system has different dialog. For Windows® ME Users: Select Specify the location of the driver (Advanced), then click Next. Each driver may be installed in Steps 5 to 22 are using...
... (Recommended) and click Next. 6 Insert the MFL Pro CD-ROM into your CD-ROM drive. 13 - 18 S E T T I N G U P T H E M F C A N D P C T O W O R K T O G E T H E R Note Each operating system has different dialog. For Windows® ME Users: Select Specify the location of the driver (Advanced), then click Next. Each driver may be installed in Steps 5 to 22 are using...

Users Manual - English
Page 131
For Windows® 98, 98SE users, click the "x:\W98\usb" folder -OR- Make sure the location is selected and click Next. S E T T I N G U P T H E M F C A N D P C T O W O R K T O G E T H E R 13 - 19 Then click OK. 9 Make sure Specify a location is "x:\w98\usb" for Windows® 98/98SE, or "x:\WME\usb" for Windows® ME. Note Windows® 98/98SE and ME use two different directories. For Windows® ME users, click the "x:\WME\usb" folder. 7 Select Specify a location and remove the other check marks, then click Browse to locate the file. 8 Double-click the CD icon.
For Windows® 98, 98SE users, click the "x:\W98\usb" folder -OR- Make sure the location is selected and click Next. S E T T I N G U P T H E M F C A N D P C T O W O R K T O G E T H E R 13 - 19 Then click OK. 9 Make sure Specify a location is "x:\w98\usb" for Windows® 98/98SE, or "x:\WME\usb" for Windows® ME. Note Windows® 98/98SE and ME use two different directories. For Windows® ME users, click the "x:\WME\usb" folder. 7 Select Specify a location and remove the other check marks, then click Browse to locate the file. 8 Double-click the CD icon.
Users Manual - English
Page 132
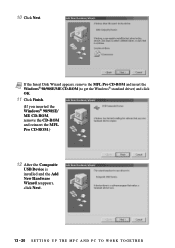
10 Click Next. Note If the Insert Disk Wizard appears, remove the MFL Pro CD-ROM and insert the Windows® 98/98SE/ME CD-ROM (to get the Windows® standard driver) and click OK. 11 Click Finish. (If you inserted the Windows® 98/98SE/ ME CD-ROM, remove the CD-ROM and reinsert the MFL Pro CD-ROM.) 12 After the Composite USB Device is installed and the Add New Hardware Wizard reappears, click Next. 13 - 20 S E T T I N G U P T H E M F C A N D P C T O W O R K T O G E T H E R
10 Click Next. Note If the Insert Disk Wizard appears, remove the MFL Pro CD-ROM and insert the Windows® 98/98SE/ME CD-ROM (to get the Windows® standard driver) and click OK. 11 Click Finish. (If you inserted the Windows® 98/98SE/ ME CD-ROM, remove the CD-ROM and reinsert the MFL Pro CD-ROM.) 12 After the Composite USB Device is installed and the Add New Hardware Wizard reappears, click Next. 13 - 20 S E T T I N G U P T H E M F C A N D P C T O W O R K T O G E T H E R

Users Manual - English
Page 136
Using Windows® 2000 Professional 4 When the Found New Hardware Wizard screen appears, click Next. 5 Select (Recommended) and click Next. 6 Insert the MFL Pro CD-ROM into your CD-ROM drive. 7 Select Specify a location and remove the other check marks, then click Next. 13 - 24 S E T T I N G U P T H E M F C A N D P C T O W O R K T O G E T H E R
Using Windows® 2000 Professional 4 When the Found New Hardware Wizard screen appears, click Next. 5 Select (Recommended) and click Next. 6 Insert the MFL Pro CD-ROM into your CD-ROM drive. 7 Select Specify a location and remove the other check marks, then click Next. 13 - 24 S E T T I N G U P T H E M F C A N D P C T O W O R K T O G E T H E R
Users Manual - English
Page 139
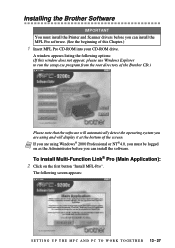
...: (If this Chapter.) 1 Insert MFL Pro CD-ROM into your CD-ROM drive. A window appears listing the following screen appears: S E T T I N G U P T H E M F C A N D P C T O W O R K T O G E T H E R 13 - 27 Note If you are using Windows® 2000 Professional or NT®4.0, you must install the Printer and Scanner drivers before you... can install the MFL Pro software. (See the beginning of this window does not appear, please use Windows Explorer to run the setup.exe program from the root directory of the Brother CD.) Please note that the software will automatically detect the operating system...
...: (If this Chapter.) 1 Insert MFL Pro CD-ROM into your CD-ROM drive. A window appears listing the following screen appears: S E T T I N G U P T H E M F C A N D P C T O W O R K T O G E T H E R 13 - 27 Note If you are using Windows® 2000 Professional or NT®4.0, you must install the Printer and Scanner drivers before you... can install the MFL Pro software. (See the beginning of this window does not appear, please use Windows Explorer to run the setup.exe program from the root directory of the Brother CD.) Please note that the software will automatically detect the operating system...
Users Manual - English
Page 140
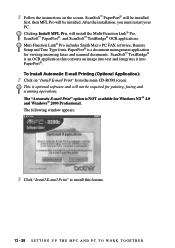
... is optional software and will install the Multi-Function Link® Pro, ScanSoft™ PaperPort®, and ScanSoft™ TextBridge® OCR applications. The following window appears: 3 Click "Install E-mail Print" to install this feature. 13 - 28 S E T T I N G U P T H E M F C A N D P C T O W O R K T O G E T H E ...software, Remote Setup and True Type fonts. ScanSoft™ TextBridge® is a document management application for Windows NT ® 4.0 and Windows® 2000 Professional. This is NOT available for viewing incoming faxes and scanned documents. After the installation,...
... is optional software and will install the Multi-Function Link® Pro, ScanSoft™ PaperPort®, and ScanSoft™ TextBridge® OCR applications. The following window appears: 3 Click "Install E-mail Print" to install this feature. 13 - 28 S E T T I N G U P T H E M F C A N D P C T O W O R K T O G E T H E ...software, Remote Setup and True Type fonts. ScanSoft™ TextBridge® is a document management application for Windows NT ® 4.0 and Windows® 2000 Professional. This is NOT available for viewing incoming faxes and scanned documents. After the installation,...

