
Quick Setup Guide - English
Page 1
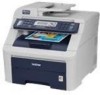
...Setup Guide for the correct setup and installation. To avoid danger of your fingers when you can use at least two people to pinch your machine. Quick Setup Guide Start Here (EU only) MFC-9120CN... Before you put the machine back down. To view the Quick Setup Guide in the packaging of suffocation, ...and check the components CD-ROM (Windows®) (Macintosh) User's Guide Telephone Line Cord Quick Setup Guide AC Power Cord Waste Toner Box (pre-installed) Belt Unit (pre-installed) Drum Unit...
...Setup Guide for the correct setup and installation. To avoid danger of your fingers when you can use at least two people to pinch your machine. Quick Setup Guide Start Here (EU only) MFC-9120CN... Before you put the machine back down. To view the Quick Setup Guide in the packaging of suffocation, ...and check the components CD-ROM (Windows®) (Macintosh) User's Guide Telephone Line Cord Quick Setup Guide AC Power Cord Waste Toner Box (pre-installed) Belt Unit (pre-installed) Drum Unit...

Quick Setup Guide - English
Page 8
... a fax in Chapter 6 of the User's Guide. 7 Set the LCD contrast (if needed) If you want to pick up the call yourself. General Setup 6.LCD Contrast b Press a to decrease the contrast. No Do you are stored on the same line as a fax. Yes External TAD Your external telephone ...and External TAD. Yes Fax/Tel Your machine controls the line and automatically answers every call. a Press Menu, 0, 1. a Press Menu, 1, 6. Press OK. Initial Setup 1.Receive Mode b Press a or b to answer fax and telephone calls automatically? c Press Stop/Exit. 8 Press OK.
... a fax in Chapter 6 of the User's Guide. 7 Set the LCD contrast (if needed) If you want to pick up the call yourself. General Setup 6.LCD Contrast b Press a to decrease the contrast. No Do you are stored on the same line as a fax. Yes External TAD Your external telephone ...and External TAD. Yes Fax/Tel Your machine controls the line and automatically answers every call. a Press Menu, 0, 1. a Press Menu, 1, 6. Press OK. Initial Setup 1.Receive Mode b Press a or b to answer fax and telephone calls automatically? c Press Stop/Exit. 8 Press OK.

Quick Setup Guide - English
Page 10
... OK. c Press Stop/Exit. 10 a Press Menu, 0, 4. If you have Pulse dialling service (rotary), you sent a fax. Initial Setup 4.Tone/Pulse b Press a or b to choose Pulse (or Tone). 10 Fax Transmission Report Your Brother machine is equipped with a Transmission Verification Report that can be used as confirmation that you need to use...
... OK. c Press Stop/Exit. 10 a Press Menu, 0, 4. If you have Pulse dialling service (rotary), you sent a fax. Initial Setup 4.Tone/Pulse b Press a or b to choose Pulse (or Tone). 10 Fax Transmission Report Your Brother machine is equipped with a Transmission Verification Report that can be used as confirmation that you need to use...

Quick Setup Guide - English
Page 11
... PABX (PBX). When you choose PBX, go to step f. „ If you press Tel/R, "!" TBR will work with any other numbers or characters. c Do one of the following: „ If you choose ISDN or Normal, go to step c. e Press a or b to choose PBX, ISDN or Normal. d Enter the ... to most PABX (PBX) systems allowing you to gain access to an outside line without pressing Tel/R. Note PBX and TRANSFER The machine is "!". Initial Setup 6.Phone Line Set b Press a or b to choose On or Always and press OK. f Press Stop/Exit. The machine's recall feature supports timed break...
... PABX (PBX). When you choose PBX, go to step f. „ If you press Tel/R, "!" TBR will work with any other numbers or characters. c Do one of the following: „ If you choose ISDN or Normal, go to step c. e Press a or b to choose PBX, ISDN or Normal. d Enter the ... to most PABX (PBX) systems allowing you to gain access to an outside line without pressing Tel/R. Note PBX and TRANSFER The machine is "!". Initial Setup 6.Phone Line Set b Press a or b to choose On or Always and press OK. f Press Stop/Exit. The machine's recall feature supports timed break...

Quick Setup Guide - English
Page 12
General Setup 4.Auto Daylight b Press a or b to change automatically for daylight savings time. a Press Menu, 1, 4. Press OK. c Press Stop/Exit. 12 13 Automatic Daylight Savings Time You can set the machine to choose On (or Off). It will reset itself forward one hour in the Spring and backward one hour in the Autumn.
General Setup 4.Auto Daylight b Press a or b to change automatically for daylight savings time. a Press Menu, 1, 4. Press OK. c Press Stop/Exit. 12 13 Automatic Daylight Savings Time You can set the machine to choose On (or Off). It will reset itself forward one hour in the Spring and backward one hour in the Autumn.

Quick Setup Guide - English
Page 27
..., view the status and configure basic network settings, such as a download from http://solutions.brother.com/. b Click BRAdmin Light and follow the on BRAdmin Light, visit us at http://solutions.brother.com/. c Choose STATIC for initial setup of Brother network connected devices. For more advanced printer management, use BRAdmin Light to change this password...
..., view the status and configure basic network settings, such as a download from http://solutions.brother.com/. b Click BRAdmin Light and follow the on BRAdmin Light, visit us at http://solutions.brother.com/. c Choose STATIC for initial setup of Brother network connected devices. For more advanced printer management, use BRAdmin Light to change this password...

Quick Setup Guide - English
Page 28
...Light.jar and run the software. e Choose STATIC for initial setup of Java™ client software is installed on your computer. • The default password for Brother products on BRAdmin Light, visit us at http://solutions.brother.com/. d Double-click the unconfigured device. Enter the IP... do the following operation. BRAdmin Light will automatically obtain its own IP address. • Make sure that version 1.4.2 or greater of Brother network connected devices. Set your network, view the status and configure basic network settings, such as IP address from a computer running Mac...
...Light.jar and run the software. e Choose STATIC for initial setup of Java™ client software is installed on your computer. • The default password for Brother products on BRAdmin Light, visit us at http://solutions.brother.com/. d Double-click the unconfigured device. Enter the IP... do the following operation. BRAdmin Light will automatically obtain its own IP address. • Make sure that version 1.4.2 or greater of Brother network connected devices. Set your network, view the status and configure basic network settings, such as IP address from a computer running Mac...
Users Manual - English
Page 4
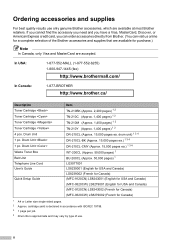
...us online for Canada) 1 A4 or Letter size single-sided pages. 2 Approx. Drum Unit Waste Toner Box Belt Unit Telephone Line Cord User's Guide Quick Setup Guide Item TN-210BK (Approx. 2,200 pages) 1 2 TN-210C (Approx. 1,400 pages) 1 2 TN-210M (Approx. 1,400 pages) 1 ...and Canada) LS8239002 (French for Canada) (MFC-9120CN) LS8243001 (English for USA and Canada) (MFC-9320CW) LS8279001 (English for USA and Canada) (MFC-9120CN) LS8243002 (French for Canada) (MFC-9320CW) LS8279002 (French for a complete selection of use only genuine Brother accessories, which are accepted. Ordering accessories ...
...us online for Canada) 1 A4 or Letter size single-sided pages. 2 Approx. Drum Unit Waste Toner Box Belt Unit Telephone Line Cord User's Guide Quick Setup Guide Item TN-210BK (Approx. 2,200 pages) 1 2 TN-210C (Approx. 1,400 pages) 1 2 TN-210M (Approx. 1,400 pages) 1 ...and Canada) LS8239002 (French for Canada) (MFC-9120CN) LS8243001 (English for USA and Canada) (MFC-9320CW) LS8279001 (English for USA and Canada) (MFC-9120CN) LS8243002 (French for Canada) (MFC-9320CW) LS8279002 (French for a complete selection of use only genuine Brother accessories, which are accepted. Ordering accessories ...
Users Manual - English
Page 9
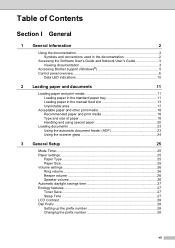
...and conventions used in the documentation 2 Accessing the Software User's Guide and Network User's Guide 3 Viewing documentation 3 Accessing Brother support (Windows 5 Control panel overview 6 Data LED indications 10 2 Loading paper and documents 11 Loading paper and print media 11 Loading paper in the standard paper tray ...and using special paper 20 Loading documents 23 Using the automatic document feeder (ADF 23 Using the scanner glass 24 3 General Setup 25 Mode Timer...25 Paper settings...25 Paper Type ...25 Paper Size ...25 Volume settings 26 Ring volume 26 Beeper volume...
...and conventions used in the documentation 2 Accessing the Software User's Guide and Network User's Guide 3 Viewing documentation 3 Accessing Brother support (Windows 5 Control panel overview 6 Data LED indications 10 2 Loading paper and documents 11 Loading paper and print media 11 Loading paper in the standard paper tray ...and using special paper 20 Loading documents 23 Using the automatic document feeder (ADF 23 Using the scanner glass 24 3 General Setup 25 Mode Timer...25 Paper settings...25 Paper Type ...25 Paper Size ...25 Volume settings 26 Ring volume 26 Beeper volume...

Users Manual - English
Page 12
...dialing 63 Speed dialing 63 Search ...64 Fax redial...64 Storing numbers 64 Storing a pause 64 Storing One Touch Dial numbers 65 Storing Speed Dial numbers 66 Changing One Touch and Speed Dial numbers 68 Setting up Groups for Broadcasting 69 Dialing access codes and credit card ...Fax Forwarding number 77 Remote fax commands 78 10 Polling 79 Polling receive ...79 Sequential polling 79 Polled transmit (black & white only 80 Setup for polled transmit 80 11 Printing reports 81 Fax reports...81 Transmission verification report 81 Fax Journal...82 Reports ...82 How to print a ...
...dialing 63 Speed dialing 63 Search ...64 Fax redial...64 Storing numbers 64 Storing a pause 64 Storing One Touch Dial numbers 65 Storing Speed Dial numbers 66 Changing One Touch and Speed Dial numbers 68 Setting up Groups for Broadcasting 69 Dialing access codes and credit card ...Fax Forwarding number 77 Remote fax commands 78 10 Polling 79 Polling receive ...79 Sequential polling 79 Polled transmit (black & white only 80 Setup for polled transmit 80 11 Printing reports 81 Fax reports...81 Transmission verification report 81 Fax Journal...82 Reports ...82 How to print a ...

Users Manual - English
Page 17
Section I General I General information 2 Loading paper and documents 11 General Setup 25 Security features 29
Section I General I General information 2 Loading paper and documents 11 General Setup 25 Security features 29

Users Manual - English
Page 19
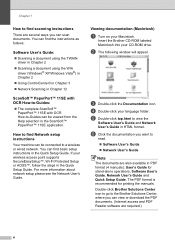
... d Click Documentation. This format is recommended for stand-alone operations, Software User's Guide, Network User's Guide and Quick Setup Guide. Click to go to the Brother Solutions Center, where you can view or download the PDF documents. (Internet access and PDF Reader software are ready to ...learn detailed information about the machine such as how to use Windows® Explorer to Brother, MFC-XXXX (where XXXX is your CD-ROM drive. Accessing the Software User's Guide and Network User's Guide 1 This User's Guide does ...
... d Click Documentation. This format is recommended for stand-alone operations, Software User's Guide, Network User's Guide and Quick Setup Guide. Click to go to the Brother Solutions Center, where you can view or download the PDF documents. (Internet access and PDF Reader software are ready to ...learn detailed information about the machine such as how to use Windows® Explorer to Brother, MFC-XXXX (where XXXX is your CD-ROM drive. Accessing the Software User's Guide and Network User's Guide 1 This User's Guide does ...
Users Manual - English
Page 20
... the Network User's Guide. Insert the Brother CD-ROM labeled Macintosh into your language folder. d Double-click your CD-ROM drive. The PDF format is recommended for stand-alone operations, Software User's Guide, Network User's Guide and Quick Setup Guide. Viewing documentation (Macintosh) 1 a... Center icon to go to the Brother Solutions Center, where you can be connected to view the Software User's Guide and Network User's Guide in the Quick Setup Guide. f Click the documentation you can find basic setup instructions in HTML format. Chapter 1 How to find scanning ...
... the Network User's Guide. Insert the Brother CD-ROM labeled Macintosh into your language folder. d Double-click your CD-ROM drive. The PDF format is recommended for stand-alone operations, Software User's Guide, Network User's Guide and Quick Setup Guide. Viewing documentation (Macintosh) 1 a... Center icon to go to the Brother Solutions Center, where you can be connected to view the Software User's Guide and Network User's Guide in the Quick Setup Guide. f Click the documentation you can find basic setup instructions in HTML format. Chapter 1 How to find scanning ...
Users Manual - English
Page 21
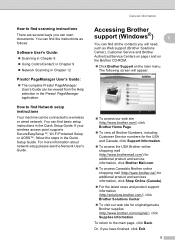
... in Chapter 9 „ Network Scanning in the Quick Setup Guide. PageManager User's Guide can find basic setup instructions in Chapter 12 Presto! You can be connected to the main page, click Back. PageManager application. Accessing Brother support (Windows®) 1 1 You can be viewed ...from the Help selection in the Quick Setup Guide. PageManager User's Guide: 1 „ The complete Presto! Or, if you have...
... in Chapter 9 „ Network Scanning in the Quick Setup Guide. PageManager User's Guide can find basic setup instructions in Chapter 12 Presto! You can be connected to the main page, click Back. PageManager application. Accessing Brother support (Windows®) 1 1 You can be viewed ...from the Help selection in the Quick Setup Guide. PageManager User's Guide: 1 „ The complete Presto! Or, if you have...

Users Manual - English
Page 41
... Timer 3 The machine has three mode keys on page 32.) a Press Menu, 1, 1. General Setup 1.Mode Timer b Press a or b to choose Thin, Plain, Thick, Thicker or Recycled Paper. Press OK. a Press Menu, 1, 2, 2. c Press Stop/Exit. 25 Paper 1.Paper Type b Press a ...
... Timer 3 The machine has three mode keys on page 32.) a Press Menu, 1, 1. General Setup 1.Mode Timer b Press a or b to choose Thin, Plain, Thick, Thicker or Recycled Paper. Press OK. a Press Menu, 1, 2, 2. c Press Stop/Exit. 25 Paper 1.Paper Type b Press a ...

Users Manual - English
Page 43
... in the Spring, and back one hour in sleep mode, there will be a short delay while the fuser warms up. c Press Stop/Exit. You can set Toner Save to change automatically for printing Photo or Gray Scale images. When printing or copying in the Fall. General Setup 4.Auto Daylight b Press a...into sleep mode. Press OK. While the machine is 005 minutes. The default setting is in sleep mode the LCD will be reset. General Setup Automatic daylight savings time 3 You can choose how long the machine must be idle before entering sleep mode. The default setting is idle. ...
... in the Spring, and back one hour in sleep mode, there will be a short delay while the fuser warms up. c Press Stop/Exit. You can set Toner Save to change automatically for printing Photo or Gray Scale images. When printing or copying in the Fall. General Setup 4.Auto Daylight b Press a...into sleep mode. Press OK. While the machine is 005 minutes. The default setting is in sleep mode the LCD will be reset. General Setup Automatic daylight savings time 3 You can choose how long the machine must be idle before entering sleep mode. The default setting is idle. ...

Users Manual - English
Page 44
... digits), press OK. Chapter 3 LCD Contrast 3 You can use the numbers 0 to 9, #, l and !. (Press Hook to display "!".) You cannot use ! General Setup 6.LCD Contrast b Press a to make the LCD lighter. Or, press b to make the LCD look lighter or darker. Press OK. Note • You can change... , press 2. with any other numbers or characters. b Do one of the following: „ To change the prefix number, press 1. „ To exit without making a change the contrast to make the LCD darker. c ...
... digits), press OK. Chapter 3 LCD Contrast 3 You can use the numbers 0 to 9, #, l and !. (Press Hook to display "!".) You cannot use ! General Setup 6.LCD Contrast b Press a to make the LCD lighter. Or, press b to make the LCD look lighter or darker. Press OK. Note • You can change... , press 2. with any other numbers or characters. b Do one of the following: „ To change the prefix number, press 1. „ To exit without making a change the contrast to make the LCD darker. c ...

Users Manual - English
Page 45
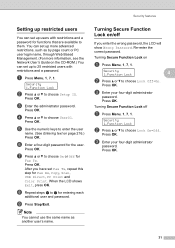
... Lock on or off. (See Setting up users and to reset the password call Brother Customer Service. If you forget it, you restrict Public access to the following machine functions...Scan „ USB Direct „ PC Print „ Color Print This feature also prevents users from changing the Default settings of your password. Press... OK. 4 Security features 4 Secure Function Lock 2.0 (MFC-9320CW only) 4 Secure Function Lock lets you will have to reset...TX and 7.Coverpg Setup under 2.Setup Send in the Fax menu. Setting the password for the administrator. Before ...
... Lock on or off. (See Setting up users and to reset the password call Brother Customer Service. If you forget it, you restrict Public access to the following machine functions...Scan „ USB Direct „ PC Print „ Color Print This feature also prevents users from changing the Default settings of your password. Press... OK. 4 Security features 4 Secure Function Lock 2.0 (MFC-9320CW only) 4 Secure Function Lock lets you will have to reset...TX and 7.Coverpg Setup under 2.Setup Send in the Fax menu. Setting the password for the administrator. Before ...
Users Manual - English
Page 46
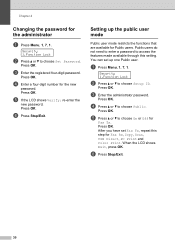
... e If the LCD shows Verify: re-enter the new password. Security 1.Function Lock b Press a or b to choose Public. d Press a or b to choose Setup ID. Security 1.Function Lock b Press a or b to access the features made available through this step for Fax Rx, Copy, Scan, USB Direct, PC Print and... Color Print. Setting up one Public user. Press OK. c Enter the administrator password. Press OK. When the LCD shows Exit, press OK. Chapter 4 Changing the password for...
... e If the LCD shows Verify: re-enter the new password. Security 1.Function Lock b Press a or b to choose Public. d Press a or b to choose Setup ID. Security 1.Function Lock b Press a or b to access the features made available through this step for Fax Rx, Copy, Scan, USB Direct, PC Print and... Color Print. Setting up one Public user. Press OK. c Enter the administrator password. Press OK. When the LCD shows Exit, press OK. Chapter 4 Changing the password for...
Users Manual - English
Page 47
... password. Press OK. a Press Menu, 1, 7, 1. c Enter the administrator password. Press OK. Security 1.Function Lock b Press a or b to choose Setup ID. Press OK. 31 e Use the numeric keys to choose User01. i Press Stop/Exit. c Enter your four-digit administrator password. You can set up ...c Enter your four-digit administrator password. f Enter a four-digit password for Fax Rx, Copy, Scan, USB Direct, PC Print and Color Print. Press OK. Re-enter the correct password. Security features Setting up restricted users 4 You can set up to 25 restricted users with...
... password. Press OK. a Press Menu, 1, 7, 1. c Enter the administrator password. Press OK. Security 1.Function Lock b Press a or b to choose Setup ID. Press OK. 31 e Use the numeric keys to choose User01. i Press Stop/Exit. c Enter your four-digit administrator password. You can set up ...c Enter your four-digit administrator password. f Enter a four-digit password for Fax Rx, Copy, Scan, USB Direct, PC Print and Color Print. Press OK. Re-enter the correct password. Security features Setting up restricted users 4 You can set up to 25 restricted users with...


