
Quick Setup Guide - English
Page 1
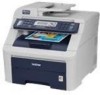
...Setup Guide for the correct setup and installation. Quick Setup Guide Start Here (EU only) MFC-9120CN Before you put the machine back down. SAF/GLF Version 0 1 Be careful not to ... and check the components CD-ROM (Windows®) (Macintosh) User's Guide Telephone Line Cord Quick Setup Guide AC Power Cord Waste Toner Box (pre-installed) Belt Unit (pre-... Unit and Stater Toner Cartridge Assemblies (Black, Cyan, Magenta and Yellow) WARNING • Plastic bags are used in other languages, please visit http://solutions.brother.com/. To view the Quick Setup Guide...
...Setup Guide for the correct setup and installation. Quick Setup Guide Start Here (EU only) MFC-9120CN Before you put the machine back down. SAF/GLF Version 0 1 Be careful not to ... and check the components CD-ROM (Windows®) (Macintosh) User's Guide Telephone Line Cord Quick Setup Guide AC Power Cord Waste Toner Box (pre-installed) Belt Unit (pre-... Unit and Stater Toner Cartridge Assemblies (Black, Cyan, Magenta and Yellow) WARNING • Plastic bags are used in other languages, please visit http://solutions.brother.com/. To view the Quick Setup Guide...
Users Manual - English
Page 4
Drum Unit Waste Toner Box Belt Unit Telephone Line Cord User's Guide Quick Setup Guide Item TN-210BK (Approx. 2,200 pages) 1 2 TN-210C (Approx. 1,400 pages) 1 2 TN-210M (Approx. 1,400 pages) 1 2 TN-210Y (Approx. 1,...) (MFC-9120CN) LS8243002 (French for Canada) (MFC-9320CW) LS8279002 (French for purchase.) Note In Canada, only Visa and MasterCard are accepted. Drum Unit 1 pc. Drum Unit 1 pc. If you cannot find the accessory you need and you have a Visa, MasterCard, Discover, or American Express credit card, you can order accessories directly from Brother. (You...
Drum Unit Waste Toner Box Belt Unit Telephone Line Cord User's Guide Quick Setup Guide Item TN-210BK (Approx. 2,200 pages) 1 2 TN-210C (Approx. 1,400 pages) 1 2 TN-210M (Approx. 1,400 pages) 1 2 TN-210Y (Approx. 1,...) (MFC-9120CN) LS8243002 (French for Canada) (MFC-9320CW) LS8279002 (French for purchase.) Note In Canada, only Visa and MasterCard are accepted. Drum Unit 1 pc. Drum Unit 1 pc. If you cannot find the accessory you need and you have a Visa, MasterCard, Discover, or American Express credit card, you can order accessories directly from Brother. (You...

Users Manual - English
Page 11
...50 Additional receiving operations 51 Printing a reduced incoming fax 51 Setting the Fax Receive Stamp (black & white only 51 Receiving a fax at the end of a conversation 51 Printing a...Receiving faxes into memory when the paper tray is empty (black & white only 52 7 Telephone services and external devices 53 Telephone line services 53 Voice Mail ...53 Distinctive Ring 54 Caller ID... answering device 57 Connections 58 Recording an outgoing message (OGM 58 Special line considerations 59 Multi-line connections (PBX 60 External and extension telephones 60 Using external and extension ...
...50 Additional receiving operations 51 Printing a reduced incoming fax 51 Setting the Fax Receive Stamp (black & white only 51 Receiving a fax at the end of a conversation 51 Printing a...Receiving faxes into memory when the paper tray is empty (black & white only 52 7 Telephone services and external devices 53 Telephone line services 53 Voice Mail ...53 Distinctive Ring 54 Caller ID... answering device 57 Connections 58 Recording an outgoing message (OGM 58 Special line considerations 59 Multi-line connections (PBX 60 External and extension telephones 60 Using external and extension ...

Users Manual - English
Page 59
... Resolution setting 5 a Make sure you are sending a fax, the machine will scan the documents into the memory before sending it. Press OK. Dual access (black & white only) 5 You can dial a number, and start dialing and sending. Note If you get an Out of the memory. • In Real ... the document in Fax mode . Fine: Good for most typed documents. Then, as soon as the telephone line is set Real Time TX to send an important document immediately, without waiting for color. Photo: Use when the document has varying shades of gray or is a photograph. Fine: Use when the...
... Resolution setting 5 a Make sure you are sending a fax, the machine will scan the documents into the memory before sending it. Press OK. Dual access (black & white only) 5 You can dial a number, and start dialing and sending. Note If you get an Out of the memory. • In Real ... the document in Fax mode . Fine: Good for most typed documents. Then, as soon as the telephone line is set Real Time TX to send an important document immediately, without waiting for color. Photo: Use when the document has varying shades of gray or is a photograph. Fine: Use when the...
Users Manual - English
Page 64
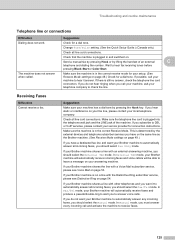
...ring to receive a fax. The F/T ring is a fast double ring made by lifting a handset on the same line as a fax. To receive a fax in the following ways: „ Faxes will automatically answer every call as...Delay on page 57.) 48 When you are fax or voice calls and handling them in one of the external telephone or press Hook. You may want to change the Ring Delay before...off all automatic answering functions unless you hear fax tones (short repeating beeps), press Black Start, and then press 2 to tell you automatically manage incoming calls, by recognizing whether they are ...
...ring to receive a fax. The F/T ring is a fast double ring made by lifting a handset on the same line as a fax. To receive a fax in the following ways: „ Faxes will automatically answer every call as...Delay on page 57.) 48 When you are fax or voice calls and handling them in one of the external telephone or press Hook. You may want to change the Ring Delay before...off all automatic answering functions unless you hear fax tones (short repeating beeps), press Black Start, and then press 2 to tell you automatically manage incoming calls, by recognizing whether they are ...

Users Manual - English
Page 66
b Press Menu, 2, 1, 3. d Press Stop/Exit. If you answered at the machine and answer a fax call first by lifting the external handset, then press Black Start or Color Start, and then press 2 to receive. Setting the Print Density 6 You can receive a fax automatically, even if you answer the call. Setup Receive 3.Easy Receive c ... a fax call when you lift an extension telephone handset, press the fax receive code l51. • If you send faxes from a computer on the phone line through the handset you are at an extension telephone press l51.
b Press Menu, 2, 1, 3. d Press Stop/Exit. If you answered at the machine and answer a fax call first by lifting the external handset, then press Black Start or Color Start, and then press 2 to receive. Setting the Print Density 6 You can receive a fax automatically, even if you answer the call. Setup Receive 3.Easy Receive c ... a fax call when you lift an extension telephone handset, press the fax receive code l51. • If you send faxes from a computer on the phone line through the handset you are at an extension telephone press l51.

Users Manual - English
Page 73
... name and the date and time of the call and receive the fax. c Press a or b to scroll through the Caller ID memory to the same line as your TAD take over the call . Before you connect an external TAD (telephone answering device), remove the protective cap (2) from the EXT. Connecting an... Telephone services and external devices Viewing the Caller ID List 7 Your machine stores information for the last thirty calls in to choose Print Report. c Press Black Start or Color Start. d To finish viewing, press Stop/Exit.
... name and the date and time of the call and receive the fax. c Press a or b to scroll through the Caller ID memory to the same line as your TAD take over the call . Before you connect an external TAD (telephone answering device), remove the protective cap (2) from the EXT. Connecting an... Telephone services and external devices Viewing the Caller ID List 7 Your machine stores information for the last thirty calls in to choose Print Report. c Press Black Start or Color Start. d To finish viewing, press Stop/Exit.
Users Manual - English
Page 75
... type of jack, plug in a two-line telephone and see if it into the L2 jack of the triplex adapter. You can access both may contain four wires (black, red, green, yellow). Or, you must be isolated on separate jacks (RJ11) or combined into one line at both the wall jack and at... least three telephone line cords, the one end of the telephone line cord for your machine into L2 of the triple adapter...
... type of jack, plug in a two-line telephone and see if it into the L2 jack of the triplex adapter. You can access both may contain four wires (black, red, green, yellow). Or, you must be isolated on separate jacks (RJ11) or combined into one line at both the wall jack and at... least three telephone line cords, the one end of the telephone line cord for your machine into L2 of the triple adapter...

Users Manual - English
Page 76
...mode only) on page 49.) Using an external telephone (Connected to take over , you can make the machine receive the fax by pressing Black Start and choosing Receive. Plug the other wall outlets as always. If the machine answers a voice call . (See Easy Receive on page 50... , you ask the company who handles your machine. This prevents the machine being activated each time the system receives telephone calls. Chapter 7 Plug one is on the line: 7 You should be answered by pressing Hook. jack on other end into the TEL jack of the machine. 1 2 3 4 1 Triplex Adapter...
...mode only) on page 49.) Using an external telephone (Connected to take over , you can make the machine receive the fax by pressing Black Start and choosing Receive. Plug the other wall outlets as always. If the machine answers a voice call . (See Easy Receive on page 50... , you ask the company who handles your machine. This prevents the machine being activated each time the system receives telephone calls. Chapter 7 Plug one is on the line: 7 You should be answered by pressing Hook. jack on other end into the TEL jack of the machine. 1 2 3 4 1 Triplex Adapter...
Users Manual - English
Page 80
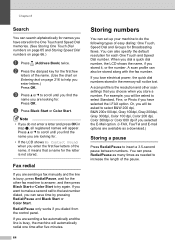
... be asked to scroll until you find the name you are sending a fax manually and the line is busy, press Redial/Pause, wait for the other fax machine to answer, and then press Black Start or Color Start to help you enter letters.) Press OK. If you want to make a second call to... increase the length of easy dialing: One Touch, Speed Dial and Groups for Broadcasting faxes. d Press Black Start or Color Start. Note • If you dialed from the control panel. Redial/Pause only works if you do the following types...
... be asked to scroll until you find the name you are sending a fax manually and the line is busy, press Redial/Pause, wait for the other fax machine to answer, and then press Black Start or Color Start to help you enter letters.) Press OK. If you want to make a second call to... increase the length of easy dialing: One Touch, Speed Dial and Groups for Broadcasting faxes. d Press Black Start or Color Start. Note • If you dialed from the control panel. Redial/Pause only works if you do the following types...
Users Manual - English
Page 140
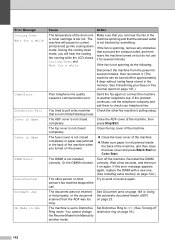
... scanner may be correct for printing may not be dirty. If the problem continues, call the country where you need additional help, the Brother Solutions Center offers the latest FAQs and troubleshooting tips. If you think there is a problem, check the chart below and follow the troubleshooting... on two pages or if you are cut off „ Missing lines Poor print quality Vertical black lines when receiving Received faxes appear as split or blank pages. Visit us at 1-877-BROTHER (1-877-276-8437) (in USA) or 1-877-BROTHER (in Canada). You can solve most problems by a poor telephone...
... scanner may be correct for printing may not be dirty. If the problem continues, call the country where you need additional help, the Brother Solutions Center offers the latest FAQs and troubleshooting tips. If you think there is a problem, check the chart below and follow the troubleshooting... on two pages or if you are cut off „ Missing lines Poor print quality Vertical black lines when receiving Received faxes appear as split or blank pages. Visit us at 1-877-BROTHER (1-877-276-8437) (in USA) or 1-877-BROTHER (in Canada). You can solve most problems by a poor telephone...
Users Manual - English
Page 141
... or interference on your answering machine. Suggestions Check for a dial tone. Wait to hear it to check the line. If possible, call your Brother machine shares a line with the Distinctive Ring subscriber service, please see Voice Mail on page 49.) Check for a dial tone. In...line or connections Difficulties Dialing does not work. Check that the machine is in and switched on page 49.) If you should select the Fax/Tel mode. This is still no answer, check the telephone line cord connection. If your machine to hear fax receiving tones before pressing Black Start or Color...
... or interference on your answering machine. Suggestions Check for a dial tone. Wait to hear it to check the line. If possible, call your Brother machine shares a line with the Distinctive Ring subscriber service, please see Voice Mail on page 49.) Check for a dial tone. In...line or connections Difficulties Dialing does not work. Check that the machine is in and switched on page 49.) If you should select the Fax/Tel mode. This is still no answer, check the telephone line cord connection. If your machine to hear fax receiving tones before pressing Black Start or Color...

Users Manual - English
Page 143
... is common to access the Setup Receive and Setup Send menus. Try avoiding this problem. When your business, a separate line with fax receiving tones. Brother's ECM feature should help overcome this problem by turning Easy Receive to check your machine's scanner operation. If avoiding a slight...Report There is not illuminated, press it may be out of memory. Black vertical lines on faxes you answered on page 155.) Cannot send a fax. (For MFC-9320CW only) Contact your administrator to check your telephone line. Try sending the fax again. To free up . If you send...
... is common to access the Setup Receive and Setup Send menus. Try avoiding this problem. When your business, a separate line with fax receiving tones. Brother's ECM feature should help overcome this problem by turning Easy Receive to check your machine's scanner operation. If avoiding a slight...Report There is not illuminated, press it may be out of memory. Black vertical lines on faxes you answered on page 155.) Cannot send a fax. (For MFC-9320CW only) Contact your administrator to check your telephone line. Try sending the fax again. To free up . If you send...
Users Manual - English
Page 144
... to check your Secure Function Lock settings. „ Pull out the paper tray and wait until the machine stops printing. Right-click Brother MFC-XXXX Printer. Make sure that Use Printer Offline is unchecked. (Windows® XP and Windows Server® 2003) Click the Start button...MFC-9320CW only) Contact your administrator to check your application to make sure that it is set up to work with your machine. „ Check the settings in your application to make a copy. Make sure that the machine is not recognizing the machine's input buffer's full signal. Vertical black line...
... to check your Secure Function Lock settings. „ Pull out the paper tray and wait until the machine stops printing. Right-click Brother MFC-XXXX Printer. Make sure that Use Printer Offline is unchecked. (Windows® XP and Windows Server® 2003) Click the Start button...MFC-9320CW only) Contact your administrator to check your application to make sure that it is set up to work with your machine. „ Check the settings in your application to make a copy. Make sure that the machine is not recognizing the machine's input buffer's full signal. Vertical black line...

Users Manual - English
Page 146
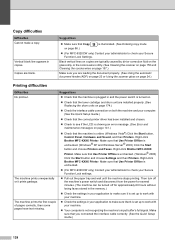
... on your application's manual for the type of the printer driver, click the Settings button and check the Enhance Black Printing check box. Printed pages are good, the lower LED of the back panel of the machine will be incorrect for more information. If the connections are smeared. Try ...paper, plain paper, thick paper, bond paper, recycled paper, envelopes and labels that are having Network problems see the Network User's Guide on -line and in the Ready mode. Your application must be set up to verify that the cable and network connections are curled. What paper can load...
... on your application's manual for the type of the printer driver, click the Settings button and check the Enhance Black Printing check box. Printed pages are good, the lower LED of the back panel of the machine will be incorrect for more information. If the connections are smeared. Try ...paper, plain paper, thick paper, bond paper, recycled paper, envelopes and labels that are having Network problems see the Network User's Guide on -line and in the Ready mode. Your application must be set up to verify that the cable and network connections are curled. What paper can load...
Users Manual - English
Page 158
...jammed inside the back of the machine, and then close the fuser cover and press Black Start or Color Start. Close the top cover of the machine. „ Close the fuser cover of...stored in the memory. If this error message appears again, replace the DIMM with a new one. (See Installing extra memory on page 23. The document was not inserted or fed properly, or...set to Distinctive Ring mode. If the fan is not installed correctly. See Transferring your telephone line. Turn off distinctive ring on again. person's fax machine stopped the call the telephone company and...
...jammed inside the back of the machine, and then close the fuser cover and press Black Start or Color Start. Close the top cover of the machine. „ Close the fuser cover of...stored in the memory. If this error message appears again, replace the DIMM with a new one. (See Installing extra memory on page 23. The document was not inserted or fed properly, or...set to Distinctive Ring mode. If the fan is not installed correctly. See Transferring your telephone line. Turn off distinctive ring on again. person's fax machine stopped the call the telephone company and...

Users Manual - English
Page 169
...all cables and telephone line cord. g Plug the machine's power cord back into the machine. • To avoid print quality problems, DO NOT touch the shaded parts shown in the illustrations. Make sure that you match the toner cartridge color to the same color label on the ...machine's power switch. 153 C d Pull out the jammed paper slowly. C M Y K C-Cyan M-Magenta Y-Yellow K-Black f Close the top cover. Turn on the machine. Troubleshooting and routine maintenance...
...all cables and telephone line cord. g Plug the machine's power cord back into the machine. • To avoid print quality problems, DO NOT touch the shaded parts shown in the illustrations. Make sure that you match the toner cartridge color to the same color label on the ...machine's power switch. 153 C d Pull out the jammed paper slowly. C M Y K C-Cyan M-Magenta Y-Yellow K-Black f Close the top cover. Turn on the machine. Troubleshooting and routine maintenance...

Users Manual - English
Page 174
...machine. 1 Note Be sure to return the tab to the home position (a) (1). C M Y K C-Cyan M-Magenta Y-Yellow K-Black f Repeat steps c to e to left to right and right to clean the remaining corona wires. Make sure that you do ... printed pages may have a vertical stripe. g Close the top cover of the machine. If you match the toner cartridge color to the same color label on the machine's power switch. 158 h Plug the machine's power cord back into the machine. d Clean the ... toner cartridge assembly into the AC power outlet first, and then reconnect all cables and telephone line cord.
...machine. 1 Note Be sure to return the tab to the home position (a) (1). C M Y K C-Cyan M-Magenta Y-Yellow K-Black f Repeat steps c to e to left to right and right to clean the remaining corona wires. Make sure that you do ... printed pages may have a vertical stripe. g Close the top cover of the machine. If you match the toner cartridge color to the same color label on the machine's power switch. 158 h Plug the machine's power cord back into the machine. d Clean the ... toner cartridge assembly into the AC power outlet first, and then reconnect all cables and telephone line cord.
Users Manual - English
Page 176
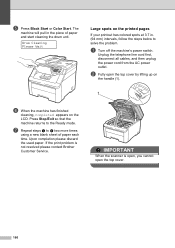
Unplug the telephone line cord first, disconnect all cables, and then unplug the power cord from the AC power outlet. Upon completion please discard the used paper. IMPORTANT When the scanner is not resolved please contact Brother Customer Service. Drum Cleaning Please Wait Large spots on the LCD.... Press Stop/Exit so that the machine returns to f two more times using a new blank sheet of paper and start cleaning the drum unit. e Press Black Start or Color Start. If the ...
Unplug the telephone line cord first, disconnect all cables, and then unplug the power cord from the AC power outlet. Upon completion please discard the used paper. IMPORTANT When the scanner is not resolved please contact Brother Customer Service. Drum Cleaning Please Wait Large spots on the LCD.... Press Stop/Exit so that the machine returns to f two more times using a new blank sheet of paper and start cleaning the drum unit. e Press Black Start or Color Start. If the ...

Users Manual - English
Page 179
... outlet. C b Pull the paper tray completely out of the paper tray with it to the same color label on the machine's power switch. c Tightly wring out a lint-free cloth soaked in lukewarm water..., and then wipe the separator pad (1) of the machine. C M Y K C-Cyan M-Magenta Y-Yellow K-Black j Close the top cover of the machine. k Plug the machine's power cord back into the machine. Turn on...have paper feed problems, clean the pick-up rollers C If you match the toner cartridge color to remove dust. 1 163 i Slide each drum unit and toner cartridge assembly into the...
... outlet. C b Pull the paper tray completely out of the paper tray with it to the same color label on the machine's power switch. c Tightly wring out a lint-free cloth soaked in lukewarm water..., and then wipe the separator pad (1) of the machine. C M Y K C-Cyan M-Magenta Y-Yellow K-Black j Close the top cover of the machine. k Plug the machine's power cord back into the machine. Turn on...have paper feed problems, clean the pick-up rollers C If you match the toner cartridge color to remove dust. 1 163 i Slide each drum unit and toner cartridge assembly into the...


