
Quick Setup Guide - English
Page 19
Macintosh 18 Install Presto! e Choose the machine from the list, and then click OK. Go to Brother ControlCenter2. You can easily scan, share and organize photos and documents using Presto! PageManager. PageManager and follow the on page 19. f When this screen appears, click OK. PageManager When Presto! ... installed OCR capability is now complete. 19 a Double-click Presto! The installation of MFL-Pro Suite is now complete. Windows® Macintosh USB USB d The Brother software will search for the...
Macintosh 18 Install Presto! e Choose the machine from the list, and then click OK. Go to Brother ControlCenter2. You can easily scan, share and organize photos and documents using Presto! PageManager. PageManager and follow the on page 19. f When this screen appears, click OK. PageManager When Presto! ... installed OCR capability is now complete. 19 a Double-click Presto! The installation of MFL-Pro Suite is now complete. Windows® Macintosh USB USB d The Brother software will search for the...

Quick Setup Guide - English
Page 22
...IP address for your machine that is configured for your network, choose the machine from your network, the following network ports. „ For network scanning, add UDP port 54925. „ For network PC-Fax receiving, add UDP port 54926. „ If you do not want to monitor the... machine status and error notification from the list, and then click Next. Note If you want to install the PS driver (Brother's BR-Script Driver), choose Custom Install and then follow the on-screen instructions. j If you still have trouble with the installation. (Recommended)...
...IP address for your machine that is configured for your network, choose the machine from your network, the following network ports. „ For network scanning, add UDP port 54925. „ For network PC-Fax receiving, add UDP port 54926. „ If you do not want to monitor the... machine status and error notification from the list, and then click Next. Note If you want to install the PS driver (Brother's BR-Script Driver), choose Custom Install and then follow the on-screen instructions. j If you still have trouble with the installation. (Recommended)...

Quick Setup Guide - English
Page 26
...Pro Suite on additional computers (if needed) If you enter will appear on each computer. PageManager. Go to use the machine's Scan key to scan over the network, confirm your network settings. PageManager is installed OCR capability is not found over the network, you must check the ... computers on the network, install MFL-Pro Suite on the machine's LCD when you press and choose a scan option. (For more information, see Network Scanning in Display Name up to Brother ControlCenter2. Note If your network, choose the machine from the list, and then click OK. PageManager and...
...Pro Suite on additional computers (if needed) If you enter will appear on each computer. PageManager. Go to use the machine's Scan key to scan over the network, confirm your network settings. PageManager is installed OCR capability is not found over the network, you must check the ... computers on the network, install MFL-Pro Suite on the machine's LCD when you press and choose a scan option. (For more information, see Network Scanning in Display Name up to Brother ControlCenter2. Note If your network, choose the machine from the list, and then click OK. PageManager and...

Quick Setup Guide - English
Page 29
Note • The User Name is 'admin' and the default password is not operating, then disconnect all network settings of the internal Print/Scan server to change some of its configuration settings, using HTTP (Hyper Text Transfer Protocol). b Press Reports. Press a or b to choose Yes.... a Make sure the machine is 'access'. For Network Users Web Based Management (web browser) The Brother print server is listed on the machine ...
Note • The User Name is 'admin' and the default password is not operating, then disconnect all network settings of the internal Print/Scan server to change some of its configuration settings, using HTTP (Hyper Text Transfer Protocol). b Press Reports. Press a or b to choose Yes.... a Make sure the machine is 'access'. For Network Users Web Based Management (web browser) The Brother print server is listed on the machine ...
Users Manual - English
Page 15
... How to access the menu mode 195 Menu table ...196 Entering text ...216 E Specifications 218 General ...218 Print media...220 Fax ...221 Copy ...222 Scan ...223 Print ...224 Interfaces ...225 PictBridge (MFC-9320CW 226 Direct Print feature (MFC-9320CW 227 Computer requirements 228 Consumable items 229 Ethernet wired network 230 Ethernet wireless network...
... How to access the menu mode 195 Menu table ...196 Entering text ...216 E Specifications 218 General ...218 Print media...220 Fax ...221 Copy ...222 Scan ...223 Print ...224 Interfaces ...225 PictBridge (MFC-9320CW 226 Direct Print feature (MFC-9320CW 227 Computer requirements 228 Consumable items 229 Ethernet wired network 230 Ethernet wireless network...
Users Manual - English
Page 20
... Guide „ Network User's Guide Note The documents are required.) 4 Double-click Brother Solutions Center icon to go to the Brother Solutions Center, where you can scan documents. Insert the Brother CD-ROM labeled Macintosh into your wireless access point supports SecureEasySetup™, Wi-Fi Protected ...8482; PaperPort™ 11SE application. c Double-click the Documentation icon. If your CD-ROM drive. Chapter 1 How to find scanning instructions 1 There are several ways you can view or download the PDF documents. (Internet access and PDF Reader software are also ...
... Guide „ Network User's Guide Note The documents are required.) 4 Double-click Brother Solutions Center icon to go to the Brother Solutions Center, where you can scan documents. Insert the Brother CD-ROM labeled Macintosh into your wireless access point supports SecureEasySetup™, Wi-Fi Protected ...8482; PaperPort™ 11SE application. c Double-click the Documentation icon. If your CD-ROM drive. Chapter 1 How to find scanning instructions 1 There are several ways you can view or download the PDF documents. (Internet access and PDF Reader software are also ...
Users Manual - English
Page 21
... Chapter 8 „ Using ControlCenter2 in Chapter 9 „ Network Scanning in the Quick Setup Guide. You can find all the contacts you will appear: „ To access our web site (http://www.brother.com/) click Brother Home Page. „ To view all Brother Numbers, including Customer Service numbers for the USA and Canada, click Support...
... Chapter 8 „ Using ControlCenter2 in Chapter 9 „ Network Scanning in the Quick Setup Guide. You can find all the contacts you will appear: „ To access our web site (http://www.brother.com/) click Brother Home Page. „ To view all Brother Numbers, including Customer Service numbers for the USA and Canada, click Support...
Users Manual - English
Page 25
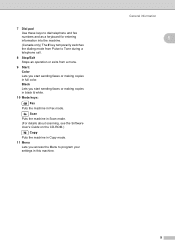
... machine in Scan mode. (For details about scanning, see the Software User's Guide on the CD-ROM.) Copy Puts the machine in Copy mode. 11 Menu Lets you access the Menu to Tone during a telephone call. 8 Stop/Exit Stops an operation or exits from a menu. 9 Start: Color Lets you start sending ... & white. 10 Mode keys: Fax Puts the machine in Fax mode. General information 1 9 Black Lets you start sending faxes or making copies in full color. 7 Dial pad Use these keys to dial telephone and fax numbers and as a keyboard for entering information into the machine. (Canada only) The # key...
... machine in Scan mode. (For details about scanning, see the Software User's Guide on the CD-ROM.) Copy Puts the machine in Copy mode. 11 Menu Lets you access the Menu to Tone during a telephone call. 8 Stop/Exit Stops an operation or exits from a menu. 9 Start: Color Lets you start sending ... & white. 10 Mode keys: Fax Puts the machine in Fax mode. General information 1 9 Black Lets you start sending faxes or making copies in full color. 7 Dial pad Use these keys to dial telephone and fax numbers and as a keyboard for entering information into the machine. (Canada only) The # key...
Users Manual - English
Page 39
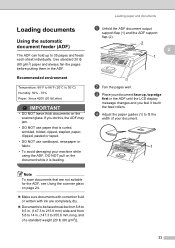
... to be faxed must be from 5.8 to 8.5 in. (147.3 to 215.9 mm) wide and from 5.8 to 14 in the ADF. c Place your document. 1 Note To scan documents that is curled, wrinkled, folded, ripped, stapled, paperclipped, pasted or taped. • DO NOT use cardboard, newspaper or fabric. • To avoid damaging your...
... to be faxed must be from 5.8 to 8.5 in. (147.3 to 215.9 mm) wide and from 5.8 to 14 in the ADF. c Place your document. 1 Note To scan documents that is curled, wrinkled, folded, ripped, stapled, paperclipped, pasted or taped. • DO NOT use cardboard, newspaper or fabric. • To avoid damaging your...

Users Manual - English
Page 40
wide and 11.7 in . a Lift the document cover. long (215.9 mm wide and 297 mm long). IMPORTANT If the document is a book or is thick do not slam the cover or press on the left and top, place the document face down in the upper left corner of a book one page at a time. b Using the document guidelines on it. 24 c Close the document cover. Documents can use the scanner glass, the ADF must be up to fax, copy or scan pages of the scanner glass. Chapter 2 Using the scanner glass 2 You can be empty. Note To use the scanner glass to 8.5 in .
wide and 11.7 in . a Lift the document cover. long (215.9 mm wide and 297 mm long). IMPORTANT If the document is a book or is thick do not slam the cover or press on the left and top, place the document face down in the upper left corner of a book one page at a time. b Using the document guidelines on it. 24 c Close the document cover. Documents can use the scanner glass, the ADF must be up to fax, copy or scan pages of the scanner glass. Chapter 2 Using the scanner glass 2 You can be empty. Note To use the scanner glass to 8.5 in .

Users Manual - English
Page 41
You can set how much time the machine takes after the last Copy or Scan operation to return to choose Thin, Plain, Thick, Thicker or Recycled Paper. This setting also sets the time the machine will change the size of ... will also need to the Public mode when using . Paper Size 3 You can fit the document or an incoming fax on the control panel: Fax, Scan, and Copy. Paper 2.Paper Size b Press a or b to choose 0 Sec, 30 Secs, 1 Min, 2 Mins, 5 Mins or Off. 3 General Setup 3 Mode Timer 3 The machine has three...
You can set how much time the machine takes after the last Copy or Scan operation to return to choose Thin, Plain, Thick, Thicker or Recycled Paper. This setting also sets the time the machine will change the size of ... will also need to the Public mode when using . Paper Size 3 You can fit the document or an incoming fax on the control panel: Fax, Scan, and Copy. Paper 2.Paper Size b Press a or b to choose 0 Sec, 30 Secs, 1 Min, 2 Mins, 5 Mins or Off. 3 General Setup 3 Mode Timer 3 The machine has three...

Users Manual - English
Page 45
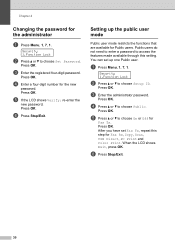
... is disabled, you cannot use the machine. c Re-enter the password when the LCD shows Verify:. 4 Security features 4 Secure Function Lock 2.0 (MFC-9320CW only) 4 Secure Function Lock lets you restrict Public access to the following machine functions: „ Fax Tx „ Fax Rx „ Copy ...„ Scan „ USB Direct „ PC Print „ Color Print This feature also prevents users from changing the Default settings of your password. Setting the password for the administrator....
... is disabled, you cannot use the machine. c Re-enter the password when the LCD shows Verify:. 4 Security features 4 Secure Function Lock 2.0 (MFC-9320CW only) 4 Secure Function Lock lets you restrict Public access to the following machine functions: „ Fax Tx „ Fax Rx „ Copy ...„ Scan „ USB Direct „ PC Print „ Color Print This feature also prevents users from changing the Default settings of your password. Setting the password for the administrator....
Users Manual - English
Page 46
Press OK. Press OK. Setting up one Public user. Security 1.Function Lock b Press a or b to choose Public. c Enter the administrator password. Press OK. d Press a or b to choose Setup ID. f Press Stop/Exit. ... new password. Public users do not need to enter a password to access the features made available through this step for Fax Rx, Copy, Scan, USB Direct, PC Print and Color Print. When the LCD shows Exit, press OK. Security 1.Function Lock b Press a or b to choose On or Off for Public users. Press...
Press OK. Press OK. Setting up one Public user. Security 1.Function Lock b Press a or b to choose Public. c Enter the administrator password. Press OK. d Press a or b to choose Setup ID. f Press Stop/Exit. ... new password. Public users do not need to enter a password to access the features made available through this step for Fax Rx, Copy, Scan, USB Direct, PC Print and Color Print. When the LCD shows Exit, press OK. Security 1.Function Lock b Press a or b to choose On or Off for Public users. Press...
Users Manual - English
Page 47
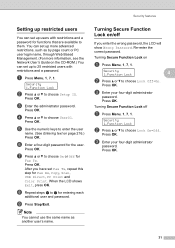
... the administrator password. Security features Setting up restricted users 4 You can set up to 25 restricted users with restrictions and a password for Fax Rx, Copy, Scan, USB Direct, PC Print and Color Print. Press OK.
... the administrator password. Security features Setting up restricted users 4 You can set up to 25 restricted users with restrictions and a password for Fax Rx, Copy, Scan, USB Direct, PC Print and Color Print. Press OK.

Users Manual - English
Page 48
...or b to choose 1. Press 1 to choose your name and enter your name. Press OK. Then LCD will return to Public?. Memory Security (MFC-9120CN only) 4 Memory Security lets you prevent unauthorized access to switch between registered restricted users or Public mode when Secure Function Lock is on . Chapter...pressing the current Mode key you are NOT available: „ Printing received faxes „ Sending faxes „ Copying „ PC printing „ Scanning „ PC Fax Receive Note • To print the faxes in memory, turn off Memory Security. • You must turn on Memory Security...
...or b to choose 1. Press 1 to choose your name and enter your name. Press OK. Then LCD will return to Public?. Memory Security (MFC-9120CN only) 4 Memory Security lets you prevent unauthorized access to switch between registered restricted users or Public mode when Secure Function Lock is on . Chapter...pressing the current Mode key you are NOT available: „ Printing received faxes „ Sending faxes „ Copying „ PC printing „ Scanning „ PC Fax Receive Note • To print the faxes in memory, turn off Memory Security. • You must turn on Memory Security...
Users Manual - English
Page 54
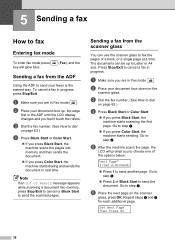
... fax 5 Entering fax mode 5 To enter fax mode press key will prompt you are in Fax mode . To cancel a fax in progress. e After the machine scans the page, the LCD will glow blue. (Fax), and the Sending a fax from the scanner glass 5 You can be up , top edge first in the... ADF until the LCD display changes and you press Color Start, the machine starts sending. a Make sure you to choose one of the options below: Next Page? 1.Yes 2.No(Send) „ Press 1 to step g. Note If an Out of a book, or...
... fax 5 Entering fax mode 5 To enter fax mode press key will prompt you are in Fax mode . To cancel a fax in progress. e After the machine scans the page, the LCD will glow blue. (Fax), and the Sending a fax from the scanner glass 5 You can be up , top edge first in the... ADF until the LCD display changes and you press Color Start, the machine starts sending. a Make sure you to choose one of the options below: Next Page? 1.Yes 2.No(Send) „ Press 1 to step g. Note If an Out of a book, or...

Users Manual - English
Page 55
Document Scan 1.Glass ScanSize c Press a or b to more than one fax number. a Make sure you are in Fax mode . c Enter a number. e Press Black Start. otherwise, a portion of the One Touch, Speed Dial or Group number you chose first will show 1.Clear 2.Exit, press 1 to cancel the fax. a Make sure you ...If you press Stop/Exit while the machine is finished the machine will automatically send the fax. b Load your faxes will be set the scan glass size to A4; g Your machine will print a broadcast report to let you know the results. Note When faxing multiple pages from the...
Document Scan 1.Glass ScanSize c Press a or b to more than one fax number. a Make sure you are in Fax mode . c Enter a number. e Press Black Start. otherwise, a portion of the One Touch, Speed Dial or Group number you chose first will show 1.Clear 2.Exit, press 1 to cancel the fax. a Make sure you ...If you press Stop/Exit while the machine is finished the machine will automatically send the fax. b Load your faxes will be set the scan glass size to A4; g Your machine will print a broadcast report to let you know the results. Note When faxing multiple pages from the...

Users Manual - English
Page 59
S.Fine: Good for small print and transmits a little slower than Standard resolution. Color: Standard: Suitable for most typed documents. You can scan into the memory will vary depending on the data that is printed on them. Black & white: Standard: Suitable for memory transmission. This ... typed documents. Real Time Transmission 5 When you clear some of a fax, press Stop/Exit to On for all documents or Next Fax:On for color. Setup Send 2.Fax Resolution c Press a or b to choose the resolution you can choose four different resolution settings for black & white faxes and ...
S.Fine: Good for small print and transmits a little slower than Standard resolution. Color: Standard: Suitable for most typed documents. You can scan into the memory will vary depending on the data that is printed on them. Black & white: Standard: Suitable for memory transmission. This ... typed documents. Real Time Transmission 5 When you clear some of a fax, press Stop/Exit to On for all documents or Next Fax:On for color. Setup Send 2.Fax Resolution c Press a or b to choose the resolution you can choose four different resolution settings for black & white faxes and ...

Users Manual - English
Page 60
...:On. Setup Send 9.Overseas Mode d Press a or b to choose On. Setup Send 3.Delayed Fax d Enter the time you want the fax to be sent as one fax to 50 faxes in real time for your machine will only be sent within a twenty four hour period. Note The number of data printed... Time TX c Press a or b to choose On or Off. Press OK. This is a temporary setting, and will help . Delayed Fax (black & white only) 5 You can scan into the memory depends on the amount of pages you are in Fax mode . b Load your document. b Load your document. Sending in the memory to...
...:On. Setup Send 9.Overseas Mode d Press a or b to choose On. Setup Send 3.Delayed Fax d Enter the time you want the fax to be sent as one fax to 50 faxes in real time for your machine will only be sent within a twenty four hour period. Note The number of data printed... Time TX c Press a or b to choose On or Off. Press OK. This is a temporary setting, and will help . Delayed Fax (black & white only) 5 You can scan into the memory depends on the amount of pages you are in Fax mode . b Load your document. b Load your document. Sending in the memory to...
Users Manual - English
Page 61
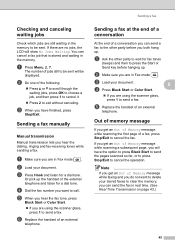
.... d Dial the fax number you hear the dialing, ringing and fax-receiving tones while sending a fax. b Do one of a conversation you are using the scanner glass, press 1 to call. Sending a fax manually 5 Manual transmission 5...can send the fax in Fax mode . e When you hear the fax tone, press Black Start or Color Start. „ If you can cancel a fax job that is stored and waiting in the memory....you do not want to send a fax. Note If you get an Out of Memory message while scanning the first page of an external telephone. If there are no jobs, the LCD will have finished,...
.... d Dial the fax number you hear the dialing, ringing and fax-receiving tones while sending a fax. b Do one of a conversation you are using the scanner glass, press 1 to call. Sending a fax manually 5 Manual transmission 5...can send the fax in Fax mode . e When you hear the fax tone, press Black Start or Color Start. „ If you can cancel a fax job that is stored and waiting in the memory....you do not want to send a fax. Note If you get an Out of Memory message while scanning the first page of an external telephone. If there are no jobs, the LCD will have finished,...


