
Service Manual
Page 7
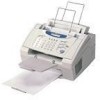
1. Weight: Machine proper Machine (incl. drum unit & toner cartridge) In package 1.2 Components The equipment consists of the following major components: Approx. 7.2 kg Approx. 8.5 kg Approx. 12 kg I - 1 *1 Not provided on the FAX8060P/MFC9060. *2 Provided on the FAX8060P/MFC9060. EQUIPMENT OUTLINE 1.1 External Appearance and Weight The figure below shows the equipment appearance and approximate dimensions.
1. Weight: Machine proper Machine (incl. drum unit & toner cartridge) In package 1.2 Components The equipment consists of the following major components: Approx. 7.2 kg Approx. 8.5 kg Approx. 12 kg I - 1 *1 Not provided on the FAX8060P/MFC9060. *2 Provided on the FAX8060P/MFC9060. EQUIPMENT OUTLINE 1.1 External Appearance and Weight The figure below shows the equipment appearance and approximate dimensions.

Service Manual
Page 27
...photointerrupter consisting of the fixing unit. • Hook switch* which detects whether the handset is loaded. • Toner thermister which detects the ambient temperature of the toner cartridge. • Heater thermister which detects the temperature of the heater roller of a light-emitting diode and a ... jam. • Paper ejection sensor which detects whether the recording paper goes out of the equipment. • Toner sensor which detects whether there is toner or a toner cartridge is placed on the next page. III - 8 2.3 Sensors and Actuators This equipment has ten sensors: six ...
...photointerrupter consisting of the fixing unit. • Hook switch* which detects whether the handset is loaded. • Toner thermister which detects the ambient temperature of the toner cartridge. • Heater thermister which detects the temperature of the heater roller of a light-emitting diode and a ... jam. • Paper ejection sensor which detects whether the recording paper goes out of the equipment. • Toner sensor which detects whether there is toner or a toner cartridge is placed on the next page. III - 8 2.3 Sensors and Actuators This equipment has ten sensors: six ...

Service Manual
Page 35
... access the gear drive unit. • Unless otherwise specified, the disassembled parts or components should be reassembled in this case). the drum unit (with the toner cartridge loaded) (*Not provided on the flow and learn its number ( in the reverse order of the curled cord (and remove the handset), - the PC interface...
... access the gear drive unit. • Unless otherwise specified, the disassembled parts or components should be reassembled in this case). the drum unit (with the toner cartridge loaded) (*Not provided on the flow and learn its number ( in the reverse order of the curled cord (and remove the handset), - the PC interface...

Service Manual
Page 130
...- 50 Selector No. 1 | 8 WSW50 (Function setting 28) Function Setting and Specifications Idle time of the main motor when the and keys are pressed at one time Set half of the value of the desired idle time to these selectors in binary notation. WSW48 (Function setting 26) Selector No. 1 | 8 Function... : 2 sec. | : 12 sec. | : 510 sec. WSW49 (Function setting 27) Selector No. 1 | 8 Function Idle time of the main motor after replacement of the toner cartridge Setting and Specifications Set half of the value of the desired idle time to these selectors in binary notation.
...- 50 Selector No. 1 | 8 WSW50 (Function setting 28) Function Setting and Specifications Idle time of the main motor when the and keys are pressed at one time Set half of the value of the desired idle time to these selectors in binary notation. WSW48 (Function setting 26) Selector No. 1 | 8 Function... : 2 sec. | : 12 sec. | : 510 sec. WSW49 (Function setting 27) Selector No. 1 | 8 Function Idle time of the main motor after replacement of the toner cartridge Setting and Specifications Set half of the value of the desired idle time to these selectors in binary notation.
Service Manual
Page 134
... Check Function This function allows you to the initial maintenance mode, press the Stop key. the top cover is closed (CV), - the toner sensor detects toner (TN). In other models, LCD should show "FRRECVRGHATNHK" if the detecting conditions of the maintenance mode. the document front sensor detects no ...tones cyclically through the document sensors or the registration sensor, or the top cover, jam paper at the paper outlet, remove the toner cartridge, and lift up the handset), and then check that the indication on -hook state (HK). the registration sensor detects no paper (RG),...
... Check Function This function allows you to the initial maintenance mode, press the Stop key. the top cover is closed (CV), - the toner sensor detects toner (TN). In other models, LCD should show "FRRECVRGHATNHK" if the detecting conditions of the maintenance mode. the document front sensor detects no ...tones cyclically through the document sensors or the registration sensor, or the top cover, jam paper at the paper outlet, remove the toner cartridge, and lift up the handset), and then check that the indication on -hook state (HK). the registration sensor detects no paper (RG),...
Service Manual
Page 141
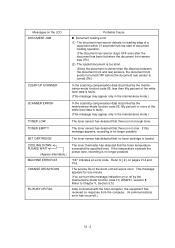
... has detected that there is loaded. SET CARTRIDGE The toner sensor has detected that no toner cartridge is no toner. COOLING DOWN PLEASE WAIT (Appear alternately.) MACHINE ERROR XX CHANGE DRUM SOON PC BUSY OR FAIL The toner thermister has detected that the toner temperature exceeded the specified level. Refer to [... has detected that there is no longer possible. If the temperature exceeds the preset level, recording is not enough toner. This message appears for one minute. (You can turn this message appears, recording is no response from the start of document loading operation....
... has detected that there is loaded. SET CARTRIDGE The toner sensor has detected that no toner cartridge is no toner. COOLING DOWN PLEASE WAIT (Appear alternately.) MACHINE ERROR XX CHANGE DRUM SOON PC BUSY OR FAIL The toner thermister has detected that the toner temperature exceeded the specified level. Refer to [... has detected that there is no longer possible. If the temperature exceeds the preset level, recording is not enough toner. This message appears for one minute. (You can turn this message appears, recording is no response from the start of document loading operation....

Service Manual
Page 143
... 83 ( 84 ( 88 ( A1 ( A2 ( A3 ( A4 ( A7 ( A8 ( A9 ( AC Error factor Laser scanner motor does not lock. ) Cannot detect Beam Detect signal. ) No toner cartridge loaded. ) Toner empty. ) In-house temperature error. ) Fixing heater harness disconnected or broken. ) Heater thermister short circuit.) Heater thermister harness ... ) Toner thermister disconnected or broken. ) Paper size setting error. ) Paper feeding error. ) Paper jam. Refer to scan. ) Document not detected by the document rear sensor. ) 50% or more faulty of white level data. ) One-line feeding time-out error. ) One-line scanning...
... 83 ( 84 ( 88 ( A1 ( A2 ( A3 ( A4 ( A7 ( A8 ( A9 ( AC Error factor Laser scanner motor does not lock. ) Cannot detect Beam Detect signal. ) No toner cartridge loaded. ) Toner empty. ) In-house temperature error. ) Fixing heater harness disconnected or broken. ) Heater thermister short circuit.) Heater thermister harness ... ) Toner thermister disconnected or broken. ) Paper size setting error. ) Paper feeding error. ) Paper jam. Refer to scan. ) Document not detected by the document rear sensor. ) 50% or more faulty of white level data. ) One-line feeding time-out error. ) One-line scanning...

Service Manual
Page 156
If printing takes place, clean the toner sensor or replace the toner sensor PCB. VI - 17 Clean the high-voltage contacts for the transfer roller on the drum unit, main cover, and high-voltage power supply PCB. (... the corona wire inside the drum unit. Replace the drum unit. Trouble (3) Light (4) Dark Action to 5 pages. Main PCB At the printer side Replace the toner cartridge with a new one and print 4 to be taken At the scanner Check the following components: - At the scanner Check the following components: - CIS unit - Remove the...
If printing takes place, clean the toner sensor or replace the toner sensor PCB. VI - 17 Clean the high-voltage contacts for the transfer roller on the drum unit, main cover, and high-voltage power supply PCB. (... the corona wire inside the drum unit. Replace the drum unit. Trouble (3) Light (4) Dark Action to 5 pages. Main PCB At the printer side Replace the toner cartridge with a new one and print 4 to be taken At the scanner Check the following components: - At the scanner Check the following components: - CIS unit - Remove the...

Service Manual
Page 159
VI - 20 Replace the heat-fixing unit. Trouble (11) Blurred at either side (12) Dirt back of the recommended weight (less than 36 lb./m2). Shake the drum unit from left to right and front to be taken At the printer side Shake the toner cartridge. Replace the heat-fixing unit. Check that the equipment is placed on a flat surface. At the printer side Replace the drum unit. If the problem persists, replace it. At the printer side Instruct the user to use paper of paper (13) Poor fixing Action to back.
VI - 20 Replace the heat-fixing unit. Trouble (11) Blurred at either side (12) Dirt back of the recommended weight (less than 36 lb./m2). Shake the drum unit from left to right and front to be taken At the printer side Shake the toner cartridge. Replace the heat-fixing unit. Check that the equipment is placed on a flat surface. At the printer side Replace the drum unit. If the problem persists, replace it. At the printer side Instruct the user to use paper of paper (13) Poor fixing Action to back.


