Wi-Fi Direct Guide - English
Page 24
... check the following items are unable to resolve your problem, please visit the Brother Solutions Center at (http://solutions.brother.com/). 3 For additional information, please go to the Brother Solutions Center at (http://solutions.brother.com/) and click Manuals on . See I want to the page for ... to check my network devices are working correctly. See I cannot complete the Wi-Fi Direct network setup configuration. The toner cartridges and drum unit are fully closed. If, after reading this chapter, you may encounter when using the Wi-Fi Direct control panel menu. Go...
... check the following items are unable to resolve your problem, please visit the Brother Solutions Center at (http://solutions.brother.com/). 3 For additional information, please go to the Brother Solutions Center at (http://solutions.brother.com/) and click Manuals on . See I want to the page for ... to check my network devices are working correctly. See I cannot complete the Wi-Fi Direct network setup configuration. The toner cartridges and drum unit are fully closed. If, after reading this chapter, you may encounter when using the Wi-Fi Direct control panel menu. Go...
Network User's Guide - English
Page 16
.... 9 This utility allows a client computer to check items such as page counts, toner and drum status and the firmware version. Changing your machine's network settings BRPrint Auditor (Windows®) 2 The BRPrint Auditor software brings the monitoring power of Brother network management tools to a predefined E-mail address in a CSV or XML file format...
.... 9 This utility allows a client computer to check items such as page counts, toner and drum status and the firmware version. Changing your machine's network settings BRPrint Auditor (Windows®) 2 The BRPrint Auditor software brings the monitoring power of Brother network management tools to a predefined E-mail address in a CSV or XML file format...

Network User's Guide - English
Page 151
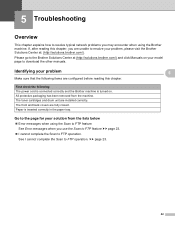
... successful installation. (See page 146.) I cannot complete the wireless network setup configuration. The toner cartridges and drum unit are unable to resolve your problem, please visit the Brother Solutions Center at http://solutions.brother.com/ and click Manuals on the network even after reading this chapter. 9 Troubleshooting 9 Overview 9 This chapter explains how...
... successful installation. (See page 146.) I cannot complete the wireless network setup configuration. The toner cartridges and drum unit are unable to resolve your problem, please visit the Brother Solutions Center at http://solutions.brother.com/ and click Manuals on the network even after reading this chapter. 9 Troubleshooting 9 Overview 9 This chapter explains how...
SSL Guide - English
Page 31
... IPPS. Paper is turned on your problem, please visit the Brother Solutions Center at (http://solutions.brother.com/) and click Manuals on . The toner cartridges and drum unit are fully closed. Please go to the Brother Solutions Center at : (http://solutions.brother.com/). The machine is connected to download the other manuals. ... you are unable to the page for your problem Make sure that the following : The power cord is connected properly and the Brother machine is inserted properly in the paper tray. See I cannot print the document over the internet using the...
... IPPS. Paper is turned on your problem, please visit the Brother Solutions Center at (http://solutions.brother.com/) and click Manuals on . The toner cartridges and drum unit are fully closed. Please go to the Brother Solutions Center at : (http://solutions.brother.com/). The machine is connected to download the other manuals. ... you are unable to the page for your problem Make sure that the following : The power cord is connected properly and the Brother machine is inserted properly in the paper tray. See I cannot print the document over the internet using the...
Scan to FTP Guide - English
Page 25
... packaging has been removed from the lists below 5 Error messages when using the Brother machine. The front and back covers are installed correctly. uu page 23. 22 The toner cartridges and drum unit are fully closed. Identifying your problem Make sure that the following : The power cord... is connected correctly and the Brother machine is inserted correctly in the paper tray. 5 5 Go to the page...
... packaging has been removed from the lists below 5 Error messages when using the Brother machine. The front and back covers are installed correctly. uu page 23. 22 The toner cartridges and drum unit are fully closed. Identifying your problem Make sure that the following : The power cord... is connected correctly and the Brother machine is inserted correctly in the paper tray. 5 5 Go to the page...

Scan to Network Guide - English
Page 27
.... 5 Troubleshooting 5 Overview 5 This chapter explains how to resolve your problem, please visit the Brother Solutions Center at (http://solutions.brother.com/) and click Manuals on . The toner cartridges and drum unit are configured before reading this chapter, you are fully closed. Paper is turned on your ... below 5 Error messages when using the Scan to Network feature See Error messages when you may encounter when using the Brother machine. The front and back covers are unable to resolve typical network problems you use the Scan to download the other manuals....
.... 5 Troubleshooting 5 Overview 5 This chapter explains how to resolve your problem, please visit the Brother Solutions Center at (http://solutions.brother.com/) and click Manuals on . The toner cartridges and drum unit are configured before reading this chapter, you are fully closed. Paper is turned on your ... below 5 Error messages when using the Scan to Network feature See Error messages when you may encounter when using the Brother machine. The front and back covers are unable to resolve typical network problems you use the Scan to download the other manuals....
Basic User's Guide - English
Page 4
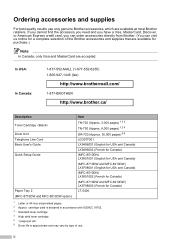
...: 1-877-552-MALL (1-877-552-6255) 1-800-947-1445 (fax) http://www.brothermall.com/ 1-877-BROTHER http://www.brother.ca/ Description Toner Cartridge Drum Unit Telephone Line Cord Basic User's Guide Quick Setup Guide Paper Tray 2 (MFC-8710DW and MFC-8910DW option) Item TN-720 (Approx. 3,000 pages) 1 2 3 TN-750 (Approx. 8,000 pages) 1 2 4 DR-720 (Approx...
...: 1-877-552-MALL (1-877-552-6255) 1-800-947-1445 (fax) http://www.brothermall.com/ 1-877-BROTHER http://www.brother.ca/ Description Toner Cartridge Drum Unit Telephone Line Cord Basic User's Guide Quick Setup Guide Paper Tray 2 (MFC-8710DW and MFC-8910DW option) Item TN-720 (Approx. 3,000 pages) 1 2 3 TN-750 (Approx. 8,000 pages) 1 2 4 DR-720 (Approx...
Basic User's Guide - English
Page 9
... using the SCAN key 65 A Routine maintenance 66 Replacing the consumable items 66 Replacing the toner cartridge 68 Cleaning the corona wire 74 Replacing the drum unit 76 vii
... using the SCAN key 65 A Routine maintenance 66 Replacing the consumable items 66 Replacing the toner cartridge 68 Cleaning the corona wire 74 Replacing the drum unit 76 vii
Basic User's Guide - English
Page 35
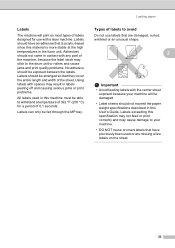
... entire length and width of the sheet. Adhesives should not come in this specification may not feed or print correctly and may stick to the drum unit or rollers and cause jams and print quality problems. No adhesive should be exposed between the labels. Labels should be fed through the MP...
... entire length and width of the sheet. Adhesives should not come in this specification may not feed or print correctly and may stick to the drum unit or rollers and cause jams and print quality problems. No adhesive should be exposed between the labels. Labels should be fed through the MP...
Basic User's Guide - English
Page 78
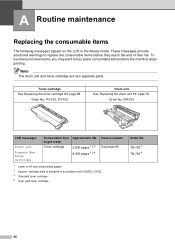
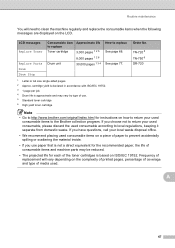
.... Order No. DR-720 LCD messages Toner Low Prepare New Toner Cartridge. TN-720, TN-750 Drum unit See Replacing the drum unit uu page 76. cartridge yield is declared in the Ready mode. Note The drum unit and toner cartridge are two separate parts. Consumable item to get ready Toner cartridge Approximate...
.... Order No. DR-720 LCD messages Toner Low Prepare New Toner Cartridge. TN-720, TN-750 Drum unit See Replacing the drum unit uu page 76. cartridge yield is declared in the Ready mode. Note The drum unit and toner cartridge are two separate parts. Consumable item to get ready Toner cartridge Approximate...
Basic User's Guide - English
Page 79
... on the complexity of printed pages, percentage of coverage and type of media used. Drum Stop 1 Letter or A4 size single-sided pages. 2 Approx. A 67 LCD messages Replace Toner Replace Parts Drum Consumable item to replace Toner cartridge Drum unit Approximate life 3,000 pages 1 2 5 8,000 pages 1 2 6 30,000 ...consumable, please discard the used consumable items on ISO/IEC 19752. Frequency of paper to the Brother collection program. TN-720 5 TN-750 6 DR-720 Note • Go to http://www.brother.com/original/index.html for each of use. 5 Standard toner cartridge 6 High yield toner...
... on the complexity of printed pages, percentage of coverage and type of media used. Drum Stop 1 Letter or A4 size single-sided pages. 2 Approx. A 67 LCD messages Replace Toner Replace Parts Drum Consumable item to replace Toner cartridge Drum unit Approximate life 3,000 pages 1 2 5 8,000 pages 1 2 6 30,000 ...consumable, please discard the used consumable items on ISO/IEC 19752. Frequency of paper to the Brother collection program. TN-720 5 TN-750 6 DR-720 Note • Go to http://www.brother.com/original/index.html for each of use. 5 Standard toner cartridge 6 High yield toner...
Basic User's Guide - English
Page 81
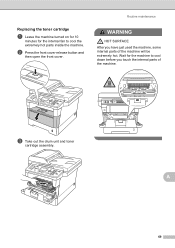
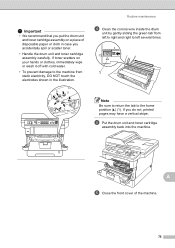
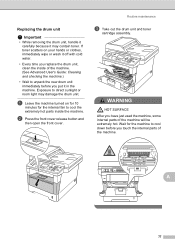
Replacing the toner cartridge A a Leave the machine turned on for 10 minutes for the machine to cool the extremely hot parts inside the machine. A 69 c Take out the drum unit and toner cartridge assembly. Wait for the internal fan to cool down before you have just used the machine, some internal parts of the machine. b Press the front cover release button and then open the front cover. Routine maintenance WARNING HOT SURFACE After you touch the internal parts of the machine will be extremely hot.
Replacing the toner cartridge A a Leave the machine turned on for 10 minutes for the machine to cool the extremely hot parts inside the machine. A 69 c Take out the drum unit and toner cartridge assembly. Wait for the internal fan to cool down before you have just used the machine, some internal parts of the machine. b Press the front cover release button and then open the front cover. Routine maintenance WARNING HOT SURFACE After you touch the internal parts of the machine will be extremely hot.
Basic User's Guide - English
Page 82
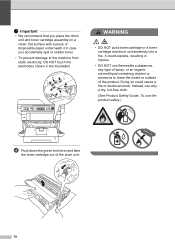
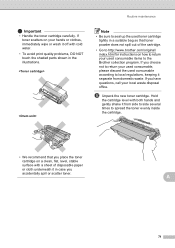
... and take the toner cartridge out of disposable paper underneath it in the illustration. WARNING • DO NOT put a toner cartridge or a toner cartridge and drum unit assembly into a fire. It could cause a fire or electrical shock. Important • We recommend that you place the...
... and take the toner cartridge out of disposable paper underneath it in the illustration. WARNING • DO NOT put a toner cartridge or a toner cartridge and drum unit assembly into a fire. It could cause a fire or electrical shock. Important • We recommend that you place the...
Basic User's Guide - English
Page 83
... scatters on how to return your hands or clothes, immediately wipe or wash it off with a sheet of the cartridge. • Go to http://www.brother.com/original/ index.html for instructions on your used consumable, please discard the used consumable items to local regulations, keeping it in the illustrations. Note.... • To avoid print quality problems, DO NOT touch the shaded parts shown in case you have questions, call your used consumable according to the Brother collection program.
... scatters on how to return your hands or clothes, immediately wipe or wash it off with a sheet of the cartridge. • Go to http://www.brother.com/original/ index.html for instructions on your used consumable, please discard the used consumable items to local regulations, keeping it in the illustrations. Note.... • To avoid print quality problems, DO NOT touch the shaded parts shown in case you have questions, call your used consumable according to the Brother collection program.
Basic User's Guide - English
Page 84
...in direct sunlight or room light, the unit may be shortened. • If an unpacked drum unit is caused by the use of third party toner and/or cartridges in the Brother machine may cause damage to the print quality, DO NOT touch the shaded parts shown in unsatisfactory... recommends that you DO NOT refill the toner cartridge provided with your investment and obtain premium performance from the Brother machine, we strongly recommend the use only Genuine Brother Brand replacement toner cartridges. Use or attempted use of third party toner and/or cartridges may result in the illustrations...
...in direct sunlight or room light, the unit may be shortened. • If an unpacked drum unit is caused by the use of third party toner and/or cartridges in the Brother machine may cause damage to the print quality, DO NOT touch the shaded parts shown in unsatisfactory... recommends that you DO NOT refill the toner cartridge provided with your investment and obtain premium performance from the Brother machine, we strongly recommend the use only Genuine Brother Brand replacement toner cartridges. Use or attempted use of third party toner and/or cartridges may result in the illustrations...

Basic User's Guide - English
Page 85
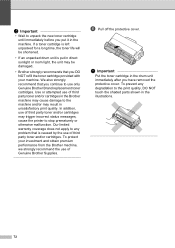
i Put the drum unit and toner cartridge assembly back into the machine. If you do not, printed pages may separate from left to right and right to left ... place. A j Close the front cover of the machine. Routine maintenance h Clean the corona wire inside the drum unit by gently sliding the green tab from the drum unit. g Put the new toner cartridge firmly into the drum unit until you replace a toner cartridge, DO NOT turn off the machine's power switch or open...
i Put the drum unit and toner cartridge assembly back into the machine. If you do not, printed pages may separate from left to right and right to left ... place. A j Close the front cover of the machine. Routine maintenance h Clean the corona wire inside the drum unit by gently sliding the green tab from the drum unit. g Put the new toner cartridge firmly into the drum unit until you replace a toner cartridge, DO NOT turn off the machine's power switch or open...
Basic User's Guide - English
Page 86
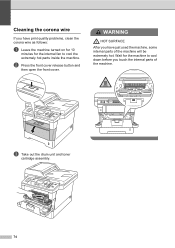
Cleaning the corona wire A If you have print quality problems, clean the corona wire as follows: a Leave the machine turned on for 10 minutes for the machine to cool the extremely hot parts inside the machine. c Take out the drum unit and toner cartridge assembly. 74 Wait for the internal fan to cool down before you have just used the machine, some internal parts of the machine. b Press the front cover release button and then open the front cover. WARNING HOT SURFACE After you touch the internal parts of the machine will be extremely hot.
Cleaning the corona wire A If you have print quality problems, clean the corona wire as follows: a Leave the machine turned on for 10 minutes for the machine to cool the extremely hot parts inside the machine. c Take out the drum unit and toner cartridge assembly. 74 Wait for the internal fan to cool down before you have just used the machine, some internal parts of the machine. b Press the front cover release button and then open the front cover. WARNING HOT SURFACE After you touch the internal parts of the machine will be extremely hot.
Basic User's Guide - English
Page 87
... to left several times. 1 Note Be sure to return the tab to the home position (a) (1). Routine maintenance d Clean the corona wire inside the drum unit by gently sliding the green tab from static electricity, DO NOT touch the electrodes shown in case you do not, printed pages may have... a vertical stripe. e Put the drum unit and toner cartridge assembly back into the machine. A f Close the front cover of disposable paper or cloth in the illustration. If toner scatters on...
... to left several times. 1 Note Be sure to return the tab to the home position (a) (1). Routine maintenance d Clean the corona wire inside the drum unit by gently sliding the green tab from static electricity, DO NOT touch the electrodes shown in case you do not, printed pages may have... a vertical stripe. e Put the drum unit and toner cartridge assembly back into the machine. A f Close the front cover of disposable paper or cloth in the illustration. If toner scatters on...
Basic User's Guide - English
Page 88
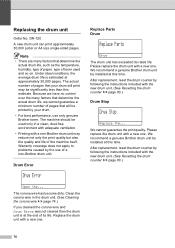
... at approximately 30,000 pages. We recommend a genuine Brother drum unit be printed by the use only genuine Brother toner. Replace Parts Drum A Replace Parts Drum The drum unit has exceeded its life. We recommend a genuine Brother drum unit be significantly less than this time. After replacement, reset the drum counter by following the instructions included with the new...
... at approximately 30,000 pages. We recommend a genuine Brother drum unit be printed by the use only genuine Brother toner. Replace Parts Drum A Replace Parts Drum The drum unit has exceeded its life. We recommend a genuine Brother drum unit be significantly less than this time. After replacement, reset the drum counter by following the instructions included with the new...
Basic User's Guide - English
Page 89
... because it in the machine. If toner scatters on for 10 minutes for the machine to unpack the new drum unit immediately before you have just used the machine, some internal parts of the machine. a Leave the machine turned on your hands or clothes, immediately wipe or wash it...8226; Every time you replace the drum unit, clean the inside the machine. Routine maintenance c Take out the drum unit and toner cartridge assembly. A 77 b Press the front cover release button and then open the front cover. WARNING HOT SURFACE After you touch the internal parts of the machine will be ...
... because it in the machine. If toner scatters on for 10 minutes for the machine to unpack the new drum unit immediately before you have just used the machine, some internal parts of the machine. a Leave the machine turned on your hands or clothes, immediately wipe or wash it...8226; Every time you replace the drum unit, clean the inside the machine. Routine maintenance c Take out the drum unit and toner cartridge assembly. A 77 b Press the front cover release button and then open the front cover. WARNING HOT SURFACE After you touch the internal parts of the machine will be ...


