Users Manual - English
Page 8
...BY LAW CANNOT BE VALIDLY WAIVED. For laser products: Failure to remove the Toner Cartridge (and Toner Drum Unit on applicable models) during shipping. Internet support: support@brother.ca or browse Brother's Web Site: www.brother.com Brother International Corporation (Canada) Ltd. 1 Rue Hô... Limited Warranty does not include cleaning, consumables (including, without limitation, print cartridges, print head, toner and drum) or damage caused by anyone else involved in the development, production, or delivery of this MFC/Facsimile machine shall be liable for any indirect, ...
...BY LAW CANNOT BE VALIDLY WAIVED. For laser products: Failure to remove the Toner Cartridge (and Toner Drum Unit on applicable models) during shipping. Internet support: support@brother.ca or browse Brother's Web Site: www.brother.com Brother International Corporation (Canada) Ltd. 1 Rue Hô... Limited Warranty does not include cleaning, consumables (including, without limitation, print cartridges, print head, toner and drum) or damage caused by anyone else involved in the development, production, or delivery of this MFC/Facsimile machine shall be liable for any indirect, ...
Users Manual - English
Page 20
...the duplex tray (For MFC-8640D, MFC-8840D and MFC-8840DN 12-11 If you are having difficulty with your MFC 12-13 Improving the print quality 12-18 Packing and shipping the MFC 12-22 Routine maintenance 12-25 Cleaning the scanner 12-25 Cleaning the printer 12-26 Cleaning the drum unit 12-27 Replacing... the toner cartridge 12-28 How to replace the toner cartridge 12-29 Replacing the drum unit 12-34 Checking the drum life 12-37 Page...
...the duplex tray (For MFC-8640D, MFC-8840D and MFC-8840DN 12-11 If you are having difficulty with your MFC 12-13 Improving the print quality 12-18 Packing and shipping the MFC 12-22 Routine maintenance 12-25 Cleaning the scanner 12-25 Cleaning the printer 12-26 Cleaning the drum unit 12-27 Replacing... the toner cartridge 12-28 How to replace the toner cartridge 12-29 Replacing the drum unit 12-34 Checking the drum life 12-37 Page...
Users Manual - English
Page 174
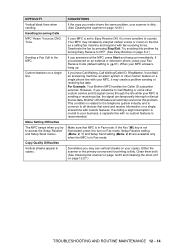
... you can turn off . If you are having difficulty with your MFC If you think there is a problem with the way your MFC. Poor quality print. Transmission Verification Report says 'RESULT:NG' or ... your primary corona wire (See Cleaning the drum unit on page 12-27), or ask the sender to make a copy first. If the copy looks bad, clean the scanner area. Clean your copy looks good, you ... possible, call Brother Customer Service at 1-800-284-4329 (In USA) or 1-877-BROTHER (In Canada). If there is with missing lines. If copy quality is not good, clean the scanner. (See Cleaning the scanner on...
... you can turn off . If you are having difficulty with your MFC If you think there is a problem with the way your MFC. Poor quality print. Transmission Verification Report says 'RESULT:NG' or ... your primary corona wire (See Cleaning the drum unit on page 12-27), or ask the sender to make a copy first. If the copy looks bad, clean the scanner area. Clean your copy looks good, you ... possible, call Brother Customer Service at 1-800-284-4329 (In USA) or 1-877-BROTHER (In Canada). If there is with missing lines. If copy quality is not good, clean the scanner. (See Cleaning the scanner on...
Users Manual - English
Page 175
...(See Easy Receive on Fax mode. If you made shows the same problem, your scanner is dirty. (See Cleaning the scanner on your MFC answers, hang up immediately. When your copies. Brother's ECM feature should help overcome this problem by pressing Stop/Exit. Setup Receive setting (Menu, 2, 1) and ... separate line with fax receiving tones. However, if you answered at the MFC, press Start and hang up . If the Fax key is recommended. Clean them both. (See Cleaning the scanner on page 12-25 and Cleaning the drum unit on a single line. Sometimes you try to Easy Receive ON, it...
...(See Easy Receive on Fax mode. If you made shows the same problem, your scanner is dirty. (See Cleaning the scanner on your MFC answers, hang up immediately. When your copies. Brother's ECM feature should help overcome this problem by pressing Stop/Exit. Setup Receive setting (Menu, 2, 1) and ... separate line with fax receiving tones. However, if you answered at the MFC, press Start and hang up . If the Fax key is recommended. Clean them both. (See Cleaning the scanner on page 12-25 and Cleaning the drum unit on a single line. Sometimes you try to Easy Receive ON, it...
Users Manual - English
Page 179
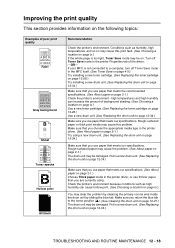
.... (See Replacing the toner cartridge on page 12-28.) Use a new drum unit. (See Replacing the drum unit on page ix.) You may clear the problem by cleaning the primary corona wire inside the drum unit by sliding the blue tab. If your MFC is too light, Toner Save mode may cause this print fault.... (See Choosing a location on page ix.) If the whole page is not connected to the home position (▲). (See Cleaning the drum unit on the following topics: ...
.... (See Replacing the toner cartridge on page 12-28.) Use a new drum unit. (See Replacing the drum unit on page ix.) You may clear the problem by cleaning the primary corona wire inside the drum unit by sliding the blue tab. If your MFC is too light, Toner Save mode may cause this print fault.... (See Choosing a location on page ix.) If the whole page is not connected to the home position (▲). (See Cleaning the drum unit on the following topics: ...
Users Manual - English
Page 180
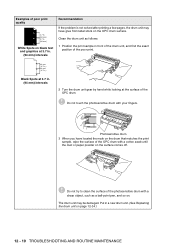
Do not try to clean the surface of the photosensitive drum with your fingers. Put in a new drum unit. (See Replacing the drum unit on . Do not touch the photosensitive drum with a sharp object, such as follows: 1 Position the print sample in front of the drum unit, and find the exact position of the poor ...and graphics at the surface of the OPC drum. The drum unit may have located the mark on the drum that matches the print sample, wipe the surface of the OPC drum with a cotton swab until the dust or paper powder on the surface comes off. Clean the drum unit as a ball-point pen, and...
Do not try to clean the surface of the photosensitive drum with your fingers. Put in a new drum unit. (See Replacing the drum unit on . Do not touch the photosensitive drum with a sharp object, such as follows: 1 Position the print sample in front of the drum unit, and find the exact position of the poor ...and graphics at the surface of the OPC drum. The drum unit may have located the mark on the drum that matches the print sample, wipe the surface of the OPC drum with a cotton swab until the dust or paper powder on the surface comes off. Clean the drum unit as a ball-point pen, and...
Users Manual - English
Page 181
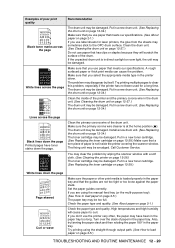
...the multi-purpose tray). (See How to clear this problem, especially if the printer has not been used for laser printers, the glue from the sheets may be damaged. If the unpacked drum unit is at the home position (▲). Make sure that you use label sheets for a long time. ...12-28.) Make sure the paper or other print media is not inside of the printer and the primary corona wire in the drum unit. (See Cleaning the drum unit on page 12-26.) The toner cartridge may have toner stains down the page AAa0abBb1cCBdDc2eEfCgdF3hGDie4jHk Page skewed Curl or wave Recommendation The...
...the multi-purpose tray). (See How to clear this problem, especially if the printer has not been used for laser printers, the glue from the sheets may be damaged. If the unpacked drum unit is at the home position (▲). Make sure that you use label sheets for a long time. ...12-28.) Make sure the paper or other print media is not inside of the printer and the primary corona wire in the drum unit. (See Cleaning the drum unit on page 12-26.) The toner cartridge may have toner stains down the page AAa0abBb1cCBdDc2eEfCgdF3hGDie4jHk Page skewed Curl or wave Recommendation The...
Users Manual - English
Page 187
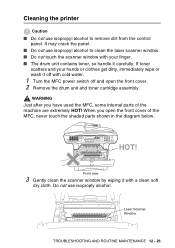
...or wash it off with a clean soft dry cloth. It may crack the panel. ■ Do not use isoproply alcohol. When you have used the MFC, some internal parts of the MFC, never touch the shaded parts shown in the diagram below. Laser Scanner Window TROUBLESHOOTING AND ROUTINE MAINTENANCE... 12 - 26 WARNING Just after you open the front cover. 2 Remove the drum unit and toner cartridge assembly. HOT! Front view 3 Gently clean ...
...or wash it off with a clean soft dry cloth. It may crack the panel. ■ Do not use isoproply alcohol. When you have used the MFC, some internal parts of the MFC, never touch the shaded parts shown in the diagram below. Laser Scanner Window TROUBLESHOOTING AND ROUTINE MAINTENANCE... 12 - 26 WARNING Just after you open the front cover. 2 Remove the drum unit and toner cartridge assembly. HOT! Front view 3 Gently clean ...
Users Manual - English
Page 188
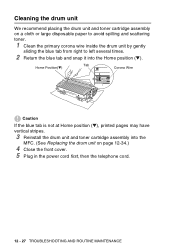
Cleaning the drum unit We recommend placing the drum unit and toner cartridge assembly on page 12-34.) 4 Close the front cover. 5 Plug in the power cord first, then the telephone cord. 12 - 27 ... position (▼), printed pages may have vertical stripes. 3 Reinstall the drum unit and toner cartridge assembly into the MFC. (See Replacing the drum unit on a cloth or large disposable paper to avoid spilling and scattering toner. 1 Clean the primary corona wire inside the drum unit by gently sliding the blue tab from right to left...
Cleaning the drum unit We recommend placing the drum unit and toner cartridge assembly on page 12-34.) 4 Close the front cover. 5 Plug in the power cord first, then the telephone cord. 12 - 27 ... position (▼), printed pages may have vertical stripes. 3 Reinstall the drum unit and toner cartridge assembly into the MFC. (See Replacing the drum unit on a cloth or large disposable paper to avoid spilling and scattering toner. 1 Clean the primary corona wire inside the drum unit by gently sliding the blue tab from right to left...
Users Manual - English
Page 193
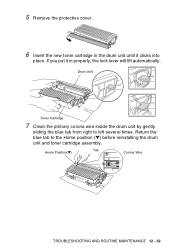
If you put it in the drum unit until it clicks into place. Return the blue tab to left several times. 5 Remove the protective cover. 6 Insert the new toner cartridge in properly, the lock lever will lift automatically. Drum Unit Toner Cartridge 7 Clean the primary corona wire inside the drum unit by gently sliding the blue tab from right to the Home position (▼) before reinstalling the drum unit and toner cartridge assembly. Home Position(▼) Tab Corona Wire TROUBLESHOOTING AND ROUTINE MAINTENANCE 12 - 32
If you put it in the drum unit until it clicks into place. Return the blue tab to left several times. 5 Remove the protective cover. 6 Insert the new toner cartridge in properly, the lock lever will lift automatically. Drum Unit Toner Cartridge 7 Clean the primary corona wire inside the drum unit by gently sliding the blue tab from right to the Home position (▼) before reinstalling the drum unit and toner cartridge assembly. Home Position(▼) Tab Corona Wire TROUBLESHOOTING AND ROUTINE MAINTENANCE 12 - 32
Users Manual - English
Page 195
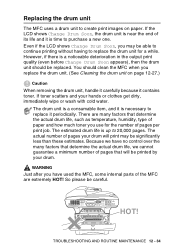
...the MFC, some internal parts of its life and it contains toner. You should be replaced. The drum unit is a consumable item, and it periodically. HOT! TROUBLESHOOTING AND ROUTINE MAINTENANCE 12 - 34 Replacing the drum unit The MFC uses a drum unit to purchase a new one. If the LCD shows Change Drum Soon, the drum unit... for the number of paper and how much toner you replace the drum unit. (See Cleaning the drum unit on paper. WARNING Just after you may be printed by your drum. Even if the LCD shows Change Drum Soon, you have no control over the many factors that will print ...
...the MFC, some internal parts of its life and it contains toner. You should be replaced. The drum unit is a consumable item, and it periodically. HOT! TROUBLESHOOTING AND ROUTINE MAINTENANCE 12 - 34 Replacing the drum unit The MFC uses a drum unit to purchase a new one. If the LCD shows Change Drum Soon, the drum unit... for the number of paper and how much toner you replace the drum unit. (See Cleaning the drum unit on paper. WARNING Just after you may be printed by your drum. Even if the LCD shows Change Drum Soon, you have no control over the many factors that will print ...
Users Manual - English
Page 223
... fax receive 5-1 fax redial 6-8 transmission 6-5 B Broadcasting 6-16 setting up Groups for ........7-4 Brother accessories and supplies .....ii Brother numbers i Customer Service i fax back system ii Frequently Asked Questions (FAQs i product support ...i test sheet, sending 1-2 Warranties iii, iv, vi C Caller ID 5-14, 5-15 canceling fax forwarding 8-6 fax jobs in memory ......... 6-11 jobs awaiting redial ......... 6-11 paging 8-6 cleaning (routine maintenance) drum...
... fax receive 5-1 fax redial 6-8 transmission 6-5 B Broadcasting 6-16 setting up Groups for ........7-4 Brother accessories and supplies .....ii Brother numbers i Customer Service i fax back system ii Frequently Asked Questions (FAQs i product support ...i test sheet, sending 1-2 Warranties iii, iv, vi C Caller ID 5-14, 5-15 canceling fax forwarding 8-6 fax jobs in memory ......... 6-11 jobs awaiting redial ......... 6-11 paging 8-6 cleaning (routine maintenance) drum...


