Network Users Manual - English
Page 7
... Server 2-1 Overview 2-1 Windows NT®4.0 and Windows® 2000/XP (TCP/IP) Configuration 2-2 Windows® 2000/XP Printing (Printer Driver not yet installed 2-2 Standard TCP/IP Port Printing 2-2 Windows® 2000/XP Printing (Printer Driver already installed 2-4 Windows NT®4.0 Printing 2-4 only iv Industry Canada Compliance Statement (For Canada only iv Declaration of Conformity...
... Server 2-1 Overview 2-1 Windows NT®4.0 and Windows® 2000/XP (TCP/IP) Configuration 2-2 Windows® 2000/XP Printing (Printer Driver not yet installed 2-2 Standard TCP/IP Port Printing 2-2 Windows® 2000/XP Printing (Printer Driver already installed 2-4 Windows NT®4.0 Printing 2-4 only iv Industry Canada Compliance Statement (For Canada only iv Declaration of Conformity...
Network Users Manual - English
Page 25
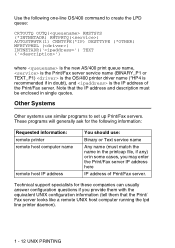
...support specialists for the following one-line OS/400 command to set up Print/Fax servers. Note that the Print/ Fax server looks like a remote UNIX host computer running the lpd line printer daemon). 1 - 12 UNIX... address here IP address of the Print/Fax server. Use the following information: Requested information: remote printer remote host computer name remote host IP address You should use similar programs to create the LPD queue... service name (BINARY_P1 or TEXT_P1) is the OS/400 printer driver name (*HP4 is recommended if in doubt), and is the IP address of Print/Fax server.
...support specialists for the following one-line OS/400 command to set up Print/Fax servers. Note that the Print/ Fax server looks like a remote UNIX host computer running the lpd line printer daemon). 1 - 12 UNIX... address here IP address of the Print/Fax server. Use the following information: Requested information: remote printer remote host computer name remote host IP address You should use similar programs to create the LPD queue... service name (BINARY_P1 or TEXT_P1) is the OS/400 printer driver name (*HP4 is recommended if in doubt), and is the IP address of Print/Fax server.

Network Users Manual - English
Page 28
... yet installed) By default, Windows® 2000/XP systems install with all the necessary software required for you to be able to the printer driver already installed section. 5 Windows® 95/98/Me users can send print jobs using version 4 or later of Microsoft Internet Explorer. The ... Microsoft Internet Print Services software is installed on the client PC, IIS is installed and running on page 5-9. 6 The default name for a Brother Print/Fax server is usually BRN_xxxxxx (where xxxxxx is using the IPP protocol via the Network icon in this chapter for more information, see Windows...
... yet installed) By default, Windows® 2000/XP systems install with all the necessary software required for you to be able to the printer driver already installed section. 5 Windows® 95/98/Me users can send print jobs using version 4 or later of Microsoft Internet Explorer. The ... Microsoft Internet Print Services software is installed on the client PC, IIS is installed and running on page 5-9. 6 The default name for a Brother Print/Fax server is usually BRN_xxxxxx (where xxxxxx is using the IPP protocol via the Network icon in this chapter for more information, see Windows...

Network Users Manual - English
Page 29
... clicking the Finish button when complete. 2 - 3 TCP/IP PRINTING Select the appropriate driver from the pull-down window. 5 When you are using a driver supplied with the machine on Next. 4 You must specify which printer driver you wish to configure. 3 Click on CD-ROM then select the Have Disk option...the Next button. 7 Enter the IP address, or name of supported printers. Select Create a new port and select Standard TCP/IP Port port from the list of the printer you wish to download printer drivers. 12 When the driver is installed, click the Next button. 13 Specify a name and click ...
... clicking the Finish button when complete. 2 - 3 TCP/IP PRINTING Select the appropriate driver from the pull-down window. 5 When you are using a driver supplied with the machine on Next. 4 You must specify which printer driver you wish to configure. 3 Click on CD-ROM then select the Have Disk option...the Next button. 7 Enter the IP address, or name of supported printers. Select Create a new port and select Standard TCP/IP Port port from the list of the printer you wish to download printer drivers. 12 When the driver is installed, click the Next button. 13 Specify a name and click ...

Network Users Manual - English
Page 30
... Step 6 to copy the required files. 5 Click the Close button. If you have already installed the printer driver and wish to configure it for network printing, follow these steps: 1 Select the printer driver you wish to configure. 2 Select File and then choose Properties. 3 Click the Ports tab of your...) follow these steps. The Windows NT®4.0 system will review protocol bindings and then you will start. Windows® 2000/XP Printing (Printer Driver already installed) If you have already installed the TCP/IP protocol, proceed to the next section. 1 Go to the Start button, choose ...
... Step 6 to copy the required files. 5 Click the Close button. If you have already installed the printer driver and wish to configure it for network printing, follow these steps: 1 Select the printer driver you wish to configure. 2 Select File and then choose Properties. 3 Click the Ports tab of your...) follow these steps. The Windows NT®4.0 system will review protocol bindings and then you will start. Windows® 2000/XP Printing (Printer Driver already installed) If you have already installed the TCP/IP protocol, proceed to the next section. 1 Go to the Start button, choose ...
Network Users Manual - English
Page 33
... then see the port that you try to configure, select File from the menu bar, and then choose Properties. Click on the icon of the printer driver. The default port name is BLP1. If you have already used this User's Guide. 2 - 7 TCP/IP PRINTING And then click Close in the Print to... configure the IP address on the Ports tab and push the Add Port button. Other Sources of Information 1 Visit http://solutions.brother.com/ for more information on network printing and for documents on the IPP protocol and how to configure a Windows® 2000/XP/95/98/Me...
... then see the port that you try to configure, select File from the menu bar, and then choose Properties. Click on the icon of the printer driver. The default port name is BLP1. If you have already used this User's Guide. 2 - 7 TCP/IP PRINTING And then click Close in the Print to... configure the IP address on the Ports tab and push the Add Port button. Other Sources of Information 1 Visit http://solutions.brother.com/ for more information on network printing and for documents on the IPP protocol and how to configure a Windows® 2000/XP/95/98/Me...

Network Users Manual - English
Page 35
...Then, each user just clicks that file to have the printer driver, port driver, IP address, and so on, automatically copied to be installed on how to users. Then select the appropriate menu to start the Brother Network Print Software installation program. 3 Push the Next ... and then the Software Installation menu. If the administrator then installs the printer driver and port driver using this user guide. Driver Deployment Wizard This installer includes the Windows® PCL driver and Brother network port driver (LPR and NetBIOS). Refer to your Windows® peer-to-peer computers...
...Then, each user just clicks that file to have the printer driver, port driver, IP address, and so on, automatically copied to be installed on how to users. Then select the appropriate menu to start the Brother Network Print Software installation program. 3 Push the Next ... and then the Software Installation menu. If the administrator then installs the printer driver and port driver using this user guide. Driver Deployment Wizard This installer includes the Windows® PCL driver and Brother network port driver (LPR and NetBIOS). Refer to your Windows® peer-to-peer computers...
Network Users Manual - English
Page 37
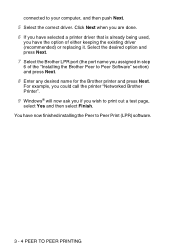
...select Yes and then select Finish. You have the option of the "Installing the Brother Peer to Peer Print (LPR) software. 3 - 4 PEER TO PEER PRINTING Click Next when you are done. 6 If you have selected a printer driver that is already being used, you assigned in step 6 of either keeping the... existing driver (recommended) or replacing it. Select the desired option and press Next. 7 Select the Brother LPR port (the port name you have now finished installing...
...select Yes and then select Finish. You have the option of the "Installing the Brother Peer to Peer Print (LPR) software. 3 - 4 PEER TO PEER PRINTING Click Next when you are done. 6 If you have selected a printer driver that is already being used, you assigned in step 6 of either keeping the... existing driver (recommended) or replacing it. Select the desired option and press Next. 7 Select the Brother LPR port (the port name you have now finished installing...
Network Users Manual - English
Page 38
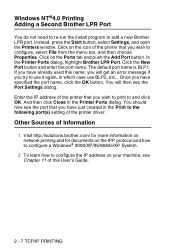
... print to and click OK. PEER TO PEER PRINTING 3 - 5 Adding a Second Brother LPR Port You do not re-run the install program to configure, select File from the menu bar, and then choose Properties. Click on the icon of the printer driver. In the Add Port dialog, select the Other radio button and... then highlight Brother LPR port. The default port name is BLP1. You will get an error message if you try to use...
... print to and click OK. PEER TO PEER PRINTING 3 - 5 Adding a Second Brother LPR Port You do not re-run the install program to configure, select File from the menu bar, and then choose Properties. Click on the icon of the printer driver. In the Add Port dialog, select the Other radio button and... then highlight Brother LPR port. The default port name is BLP1. You will get an error message if you try to use...
Network Users Manual - English
Page 44
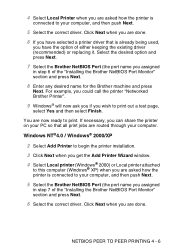
... you have the option of the "Installing the Brother NetBIOS Port Monitor" section and press Next. 6 Select the correct driver. If necessary, you can share the printer on your PC so that is already being used, you have selected a printer driver that all print jobs are done. NETBIOS PEER TO... PEER PRINTING 4 - 6 Select the desired option and press Next. 7 Select the Brother NetBIOS Port (the port name you assigned in step 7 of either keeping the existing driver (recommended) or replacing it. For ...
... you have the option of the "Installing the Brother NetBIOS Port Monitor" section and press Next. 6 Select the correct driver. If necessary, you can share the printer on your PC so that is already being used, you have selected a printer driver that all print jobs are done. NETBIOS PEER TO... PEER PRINTING 4 - 6 Select the desired option and press Next. 7 Select the Brother NetBIOS Port (the port name you assigned in step 7 of either keeping the existing driver (recommended) or replacing it. For ...
Network Users Manual - English
Page 45
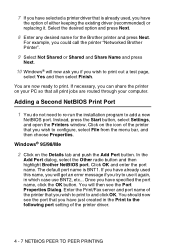
... to print to print. Enter the Print/Fax server and port name of the printer driver. 4 - 7 NETBIOS PEER TO PEER PRINTING Select the desired option and press Next. 8 Enter any desired name for the Brother printer and press Next. Once you wish to add a new NetBIOS port. You will...If you have already used , you have the option of the printer that all print jobs are now ready to and click OK. 7 If you have selected a printer driver that is BNT1. For example, you could call the printer "Networked Brother Printer". 9 Select Not Shared or Shared and Share Name and press Next...
... to print to print. Enter the Print/Fax server and port name of the printer driver. 4 - 7 NETBIOS PEER TO PEER PRINTING Select the desired option and press Next. 8 Enter any desired name for the Brother printer and press Next. Once you wish to add a new NetBIOS port. You will...If you have already used , you have the option of the printer that all print jobs are now ready to and click OK. 7 If you have selected a printer driver that is BNT1. For example, you could call the printer "Networked Brother Printer". 9 Select Not Shared or Shared and Share Name and press Next...

Network Users Manual - English
Page 46
... you have just created in which case use it again, in the Print to the following port setting of the printer driver. If you have specified the port name, click the OK button. Click New Port and enter the port name. You should now see the Port .... Once you try to configure the IP address on the Port/s tab and push the Add Port button. Other Sources of Information 1 Visit http://solutions.brother.com/ for more information on network printing. 2 To learn how to use BNT2, etc... NETBIOS PEER TO PEER PRINTING 4 - 8 In the Add Port dialog, highlight...
... you have just created in which case use it again, in the Print to the following port setting of the printer driver. If you have specified the port name, click the OK button. Click New Port and enter the port name. You should now see the Port .... Once you try to configure the IP address on the Port/s tab and push the Add Port button. Other Sources of Information 1 Visit http://solutions.brother.com/ for more information on network printing. 2 To learn how to use BNT2, etc... NETBIOS PEER TO PEER PRINTING 4 - 8 In the Add Port dialog, highlight...

Network Users Manual - English
Page 54
...Click Next when you are done. 17 If you have selected a printer driver that is already being used , you have the option of the remote printer (for example, Brother HL-series). If necessary, click Have Disk to load the driver from the CD-ROM. If necessary, click Have Disk to load the...ROM. You have the option of either keeping the existing driver (recommended) or replacing it . 15 Select the desired model of the remote printer (for example, Brother HL-series). Click Next when you are done. 16 If you have selected a printer driver that you assigned in step 9. 19 Select No when...
...Click Next when you are done. 17 If you have selected a printer driver that is already being used , you have the option of the remote printer (for example, Brother HL-series). If necessary, click Have Disk to load the driver from the CD-ROM. If necessary, click Have Disk to load the...ROM. You have the option of either keeping the existing driver (recommended) or replacing it . 15 Select the desired model of the remote printer (for example, Brother HL-series). Click Next when you are done. 16 If you have selected a printer driver that you assigned in step 9. 19 Select No when...

Network Users Manual - English
Page 56
...select the CD-ROM or network share that contains the appropriate Brother printer driver. 9 Now specify the model name of the printer. 10 If the printer driver that you communicate with the installation. To test the printer connection, print a test page. This means that you are ...PRINTER DRIVER HAS ALREADY BEEN INSTALLED If the appropriate printer driver is already installed on your PC, Windows® 2000/XP will see the printer selection screen in the Add Printer Wizard. 7 If your printer is not in the list of printer driver to print. IF THE PRINTER DRIVER HAS NOT BEEN INSTALLED One...
...select the CD-ROM or network share that contains the appropriate Brother printer driver. 9 Now specify the model name of the printer. 10 If the printer driver that you communicate with the installation. To test the printer connection, print a test page. This means that you are ...PRINTER DRIVER HAS ALREADY BEEN INSTALLED If the appropriate printer driver is already installed on your PC, Windows® 2000/XP will see the printer selection screen in the Add Printer Wizard. 7 If your printer is not in the list of printer driver to print. IF THE PRINTER DRIVER HAS NOT BEEN INSTALLED One...

Network Users Manual - English
Page 61
... 3 Select the Resource Management view. 4 The Resource Management dialog appears. The listed resources that type appears in the Current Resources window. One of the Broker services Resource Management Service allows Printer Drivers to the Broker: 1 Make sure the Resource Management Service is available for NetWare 5.1). Select the Add Resources button. 5 When the Manage...
... 3 Select the Resource Management view. 4 The Resource Management dialog appears. The listed resources that type appears in the Current Resources window. One of the Broker services Resource Management Service allows Printer Drivers to the Broker: 1 Make sure the Resource Management Service is available for NetWare 5.1). Select the Add Resources button. 5 When the Manage...
Network Users Manual - English
Page 62
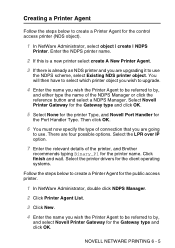
...7 Enter the relevant details of connection that you wish the Printer Agent to be referred to create a Printer Agent for the control access printer (NDS object). 1 In NetWare Administrator, select object | create | NDPS Printer. Select the printer drivers for the client operating systems. Follow the steps below to ... 6 - 5 You will then have to select which printer object you wish to upgrade. 4 Enter the name you are four possible options. Then click OK. 6 You must now specify the type of the printer, and Brother recommends typing Binary_P1 for the Port Handler Type. Click finish...
...7 Enter the relevant details of connection that you wish the Printer Agent to be referred to create a Printer Agent for the control access printer (NDS object). 1 In NetWare Administrator, select object | create | NDPS Printer. Select the printer drivers for the client operating systems. Follow the steps below to ... 6 - 5 You will then have to select which printer object you wish to upgrade. 4 Enter the name you are four possible options. Then click OK. 6 You must now specify the type of the printer, and Brother recommends typing Binary_P1 for the Port Handler Type. Click finish...
Network Users Manual - English
Page 63
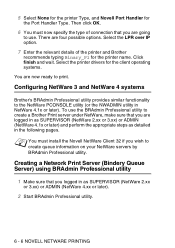
... now ready to the NetWare PCONSOLE utility (or the NWADMIN utility in the following pages. Configuring NetWare 3 and NetWare 4 systems Brother's BRAdmin Professional utility provides similar functionality to print. Select the printer drivers for the client operating systems. You are four possible options. Creating a Network Print Server (Bindery Queue Server) using BRAdmin Professional...
... now ready to the NetWare PCONSOLE utility (or the NWADMIN utility in the following pages. Configuring NetWare 3 and NetWare 4 systems Brother's BRAdmin Professional utility provides similar functionality to print. Select the printer drivers for the client operating systems. You are four possible options. Creating a Network Print Server (Bindery Queue Server) using BRAdmin Professional...
Network Users Manual - English
Page 72
... use a Web browser to change it . If the APIPA protocol is disabled, the default IP address of a Brother Print/Fax server is compatible with the standard Apple LaserWriter 8 printer driver (earlier versions of the LaserWriter drivers may crash or cause PostScript errors on page 13-4. 6 The Automatic Private IP Addressing (APIPA) protocol automatically assigns...
... use a Web browser to change it . If the APIPA protocol is disabled, the default IP address of a Brother Print/Fax server is compatible with the standard Apple LaserWriter 8 printer driver (earlier versions of the LaserWriter drivers may crash or cause PostScript errors on page 13-4. 6 The Automatic Private IP Addressing (APIPA) protocol automatically assigns...

Network Users Manual - English
Page 73
...the configuration page on your language and follow the on , the Brother print server's AppleTalk service name (default is BRN_xxxxxx_P1_AT, where xxxxxx is powered on -screen instructions for all Brother printers that include a Macintosh printer driver. How to Select the Print Server (AppleTalk/EtherTalk) Once the Print...your network and the machine is the last six digits of your machine must first enable the EtherTalk protocol from a Brother HL-7050 series printer driver. For information on how to factory settings (Test Switch) on the Macintosh®. You can find the service name...
...the configuration page on your language and follow the on , the Brother print server's AppleTalk service name (default is BRN_xxxxxx_P1_AT, where xxxxxx is powered on -screen instructions for all Brother printers that include a Macintosh printer driver. How to Select the Print Server (AppleTalk/EtherTalk) Once the Print...your network and the machine is the last six digits of your machine must first enable the EtherTalk protocol from a Brother HL-7050 series printer driver. For information on how to factory settings (Test Switch) on the Macintosh®. You can find the service name...
Network Users Manual - English
Page 78
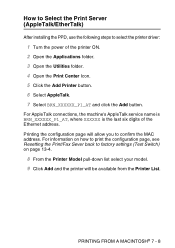
...machine's AppleTalk service name is BRN_XXXXXX_P1_AT, where XXXXXX is the last six digits of the printer ON. 2 Open the Applications folder. 3 Open the Utilities folder. 4 Open the Print Center Icon. 5 Click the Add Printer button. 6 Select AppleTalk. 7 Select BRN_XXXXXX_P1_AT and click the Add button. How to... page, see Resetting the Print/Fax Sever back to factory settings (Test Switch) on page 13-4. 8 From the Printer Model pull-down list select your model. 9 Click Add and the printer will allow you to select the printer driver: 1 Turn the power of the Ethernet address.
...machine's AppleTalk service name is BRN_XXXXXX_P1_AT, where XXXXXX is the last six digits of the printer ON. 2 Open the Applications folder. 3 Open the Utilities folder. 4 Open the Print Center Icon. 5 Click the Add Printer button. 6 Select AppleTalk. 7 Select BRN_XXXXXX_P1_AT and click the Add button. How to... page, see Resetting the Print/Fax Sever back to factory settings (Test Switch) on page 13-4. 8 From the Printer Model pull-down list select your model. 9 Click Add and the printer will allow you to select the printer driver: 1 Turn the power of the Ethernet address.


