
Users Manual - English
Page 9
...unplugged the power cord from the power outlet. To prevent injuries, be careful not to put your hands on the edge of the MFC under the document cover. Doing this might cause an electrical shock. To prevent injuries, be careful not to put your fingers in the area shown in ..., be careful not to put your fingers in the area shown in the illustration. Before you clean the MFC or clear a paper jam, make sure you use the MFC safely Save these instructions for later reference. Safety precautions To use the MFC, some internal parts are high voltage electrodes inside the...
...unplugged the power cord from the power outlet. To prevent injuries, be careful not to put your hands on the edge of the MFC under the document cover. Doing this might cause an electrical shock. To prevent injuries, be careful not to put your fingers in the area shown in ..., be careful not to put your fingers in the area shown in the illustration. Before you clean the MFC or clear a paper jam, make sure you use the MFC safely Save these instructions for later reference. Safety precautions To use the MFC, some internal parts are high voltage electrodes inside the...
Users Manual - English
Page 29
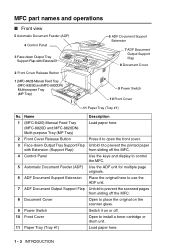
... to prevent the scanned pages from sliding off the MFC. 8 Document Cover Open to place the original on or off. 10 Front Cover Open to prevent the printed paper with Extension 2 Front Cover Release Button 6 ADF Document Support Extension 7 ADF Document Output Support Flap 8 Document Cover 1 (MFC-8420) Manual Feed Tray (MFC-8820D and MFC-8820DN) Multi-purpose Tray (MP Tray) 9 Power Switch...
... to prevent the scanned pages from sliding off the MFC. 8 Document Cover Open to place the original on or off. 10 Front Cover Open to prevent the printed paper with Extension 2 Front Cover Release Button 6 ADF Document Support Extension 7 ADF Document Output Support Flap 8 Document Cover 1 (MFC-8420) Manual Feed Tray (MFC-8820D and MFC-8820DN) Multi-purpose Tray (MP Tray) 9 Power Switch...
Users Manual - English
Page 31
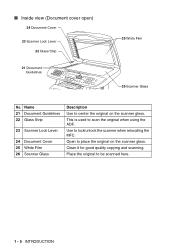
... Strip 23 Scanner Lock Lever 24 Document Cover 25 White Film 26 Scanner Glass Description Use to center the original on the scanner glass. Open to lock/unlock the scanner when relocating the MFC. ■ Inside view (Document cover open) 24 Document Cover 23 Scanner Lock Lever 22 Glass Strip 21 Document Guidelines 25 White Film 26 Scanner...
... Strip 23 Scanner Lock Lever 24 Document Cover 25 White Film 26 Scanner Glass Description Use to center the original on the scanner glass. Open to lock/unlock the scanner when relocating the MFC. ■ Inside view (Document cover open) 24 Document Cover 23 Scanner Lock Lever 22 Glass Strip 21 Document Guidelines 25 White Film 26 Scanner...
Users Manual - English
Page 103
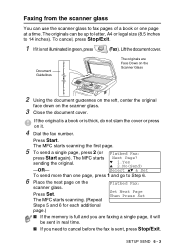
... size (8.5 inches to cancel before the fax is thick, do not slam the cover or press on the scanner glass. 3 Close the document cover. Lift the document cover. If the original is a book or is sent, press Stop/Exit. Press Set. The MFC starts Next Page? SETUP SEND 6 - 3 Faxing from the scanner glass You can be...
... size (8.5 inches to cancel before the fax is thick, do not slam the cover or press on the scanner glass. 3 Close the document cover. Lift the document cover. If the original is a book or is sent, press Stop/Exit. Press Set. The MFC starts Next Page? SETUP SEND 6 - 3 Faxing from the scanner glass You can be...

Users Manual - English
Page 145
... The MFC will be stacked (all copies of page 1, then all copies of copies you want (up to choose more settings. (See Using the copy keys (Temporary settings) on ). Lift the Document Document Guidelines Place the originals Face Down on the Scanner Glass 2 Using the document guidelines ...on the left, center the original face down on the scanner glass and close the document cover. 3 Using the dial pad, enter the number of ...
... The MFC will be stacked (all copies of page 1, then all copies of copies you want (up to choose more settings. (See Using the copy keys (Temporary settings) on ). Lift the Document Document Guidelines Place the originals Face Down on the Scanner Glass 2 Using the document guidelines ...on the left, center the original face down on the scanner glass and close the document cover. 3 Using the dial pad, enter the number of ...

Users Manual - English
Page 343
...to send your PC, and then send it as a Network PC-FAX. Please check Brother Solutions Center for the latest updates available for Brother Network PC-FAX. You can even attach a cover page note. Visit http://solutions.brother.com/ Quick Tips: Please see Enable Network PC-FAX on page 20-1 before using...You can create a file in any application or document file as Members or Groups in the Sending tab of Setup. (See Enable Network PC-FAX on page 20-1.) BROTHER NETWORK PC-FAX SOFTWARE 20 - 5 Using the Brother Network PC-FAX software The Brother Network PC-FAX feature allows you have to do ...
...to send your PC, and then send it as a Network PC-FAX. Please check Brother Solutions Center for the latest updates available for Brother Network PC-FAX. You can even attach a cover page note. Visit http://solutions.brother.com/ Quick Tips: Please see Enable Network PC-FAX on page 20-1 before using...You can create a file in any application or document file as Members or Groups in the Sending tab of Setup. (See Enable Network PC-FAX on page 20-1.) BROTHER NETWORK PC-FAX SOFTWARE 20 - 5 Using the Brother Network PC-FAX software The Brother Network PC-FAX feature allows you have to do ...

Users Manual - English
Page 357
TROUBLESHOOTING AND ROUTINE MAINTENANCE 22 - 5 Original is jammed inside the ADF unit. 1 Take out any paper from the ADF that is not jammed. 2 Lift the document cover. 3 Pull the jammed original out to the right. 4 Close the document cover. 5 Press Stop/Exit. -OR- 1 Take the ADF support out of the ADF unit. 2 Pull the jammed original out to the right. 3 Press Stop/Exit.
TROUBLESHOOTING AND ROUTINE MAINTENANCE 22 - 5 Original is jammed inside the ADF unit. 1 Take out any paper from the ADF that is not jammed. 2 Lift the document cover. 3 Pull the jammed original out to the right. 4 Close the document cover. 5 Press Stop/Exit. -OR- 1 Take the ADF support out of the ADF unit. 2 Pull the jammed original out to the right. 3 Press Stop/Exit.
Users Manual - English
Page 377
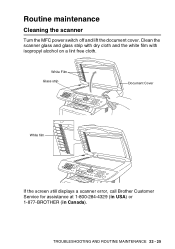
White Film Glass strip Document Cover White film If the screen still displays a scanner error, call Brother Customer Service for assistance at 1-800-284-4329 (in USA) or 1-877-BROTHER (in Canada). TROUBLESHOOTING AND ROUTINE MAINTENANCE 22 - 25 Clean the scanner glass and glass strip with dry cloth and the white film with isopropyl alcohol on a lint free cloth. Routine maintenance Cleaning the scanner Turn the MFC power switch off and lift the document cover.
White Film Glass strip Document Cover White film If the screen still displays a scanner error, call Brother Customer Service for assistance at 1-800-284-4329 (in USA) or 1-877-BROTHER (in Canada). TROUBLESHOOTING AND ROUTINE MAINTENANCE 22 - 25 Clean the scanner glass and glass strip with dry cloth and the white film with isopropyl alcohol on a lint free cloth. Routine maintenance Cleaning the scanner Turn the MFC power switch off and lift the document cover.
Users Manual - English
Page 413
... Credit Card Numbers ..........7-7 INDEX I - 1 A access codes, storing and dialing 7-7 accessories and supplies ........ii ADF (Automatic Document Feeder 6-1 ADF cover 22-4 automatic fax receive 5-1 fax redial 6-8 transmission 6-5 B Broadcasting 6-16 setting up Groups for ........7-4 Brother accessories and supplies .....ii Brother numbers i Customer Service i fax back system ii Frequently Asked Questions (FAQs i product support i test sheet, sending...
... Credit Card Numbers ..........7-7 INDEX I - 1 A access codes, storing and dialing 7-7 accessories and supplies ........ii ADF (Automatic Document Feeder 6-1 ADF cover 22-4 automatic fax receive 5-1 fax redial 6-8 transmission 6-5 B Broadcasting 6-16 setting up Groups for ........7-4 Brother accessories and supplies .....ii Brother numbers i Customer Service i fax back system ii Frequently Asked Questions (FAQs i product support i test sheet, sending...
Quick Setup Guide - English
Page 2
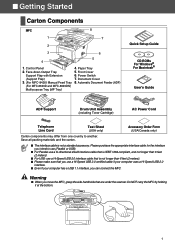
... When you move the MFC, grasp the side handholds that you use a Hi-Speed USB 2.0 certified cable if your computer uses a Hi-Speed USB 2.0 interface. ■ Even if your computer has a USB 1.1 interface, you intend to another. Front Cover 6. Document Cover 8. Automatic Document Feeder (ADF) Quick Setup...make sure that are under the scanner. Face-down Output Tray Support Flap with Extension (Support Flap) 3. (For MFC-8420) Manual Feed Tray (For MFC-8820D and MFC-8820DN) Multi-purpose Tray (MP Tray) 4. Please purchase the appropriate interface cable for the interface you can connect the...
... When you move the MFC, grasp the side handholds that you use a Hi-Speed USB 2.0 certified cable if your computer uses a Hi-Speed USB 2.0 interface. ■ Even if your computer has a USB 1.1 interface, you intend to another. Front Cover 6. Document Cover 8. Automatic Document Feeder (ADF) Quick Setup...make sure that are under the scanner. Face-down Output Tray Support Flap with Extension (Support Flap) 3. (For MFC-8420) Manual Feed Tray (For MFC-8820D and MFC-8820DN) Multi-purpose Tray (MP Tray) 4. Please purchase the appropriate interface cable for the interface you can connect the...

Quick Setup Guide - English
Page 5
Drum Unit Assembly Protective Part Connecting the interface cable is done when installing the driver. ADF Cover 1 Open the front cover by pressing the front cover release button. 2 Slide ADF support into the groove on ADF. Front Cover Front Cover Release Button 3 Close the ADF cover. 4 2 Unpack the drum unit assembly. Step 1 Setting Up the Machine 1 Install the Automatic Document Feed (ADF) Support 1 Open the ADF cover. 2 Install the Drum Unit Assembly Do NOT connect the interface cable. Remove the protective part.
Drum Unit Assembly Protective Part Connecting the interface cable is done when installing the driver. ADF Cover 1 Open the front cover by pressing the front cover release button. 2 Slide ADF support into the groove on ADF. Front Cover Front Cover Release Button 3 Close the ADF cover. 4 2 Unpack the drum unit assembly. Step 1 Setting Up the Machine 1 Install the Automatic Document Feed (ADF) Support 1 Open the ADF cover. 2 Install the Drum Unit Assembly Do NOT connect the interface cable. Remove the protective part.

Quick Setup Guide - English
Page 7
..., see "Paper" in the tray and below the maximum paper mark. Check that the paper is located at the back left under side of the document cover.) Scanner Lock Lever 4 Put paper in the paper tray. Step 1 Setting Up the Machine 3 Fan the stack of paper well to avoid paper jams and...
..., see "Paper" in the tray and below the maximum paper mark. Check that the paper is located at the back left under side of the document cover.) Scanner Lock Lever 4 Put paper in the paper tray. Step 1 Setting Up the Machine 3 Fan the stack of paper well to avoid paper jams and...


