Users Manual - English
Page 4
...800-947-1445 (fax) http://www.brothermall.com In Canada: 1-877-BROTHER (voice) Description Item Laser Fax Toner TN-430 (Able to print 3000 pages) TN-460 (Able to print 6000 pages) Laser Fax Drum DR400 Telephone Line Cord LG3077001 Telephone Handset UF6857010 Handset Curled Cord ...UF7204008 Document Tray and Extension UU2069008 Document Support UU2080008 IEEE 1284 Bi-directional Cable Multi-purpose Paper ...
...800-947-1445 (fax) http://www.brothermall.com In Canada: 1-877-BROTHER (voice) Description Item Laser Fax Toner TN-430 (Able to print 3000 pages) TN-460 (Able to print 6000 pages) Laser Fax Drum DR400 Telephone Line Cord LG3077001 Telephone Handset UF6857010 Handset Curled Cord ...UF7204008 Document Tray and Extension UU2069008 Document Support UU2080008 IEEE 1284 Bi-directional Cable Multi-purpose Paper ...
Users Manual - English
Page 11
...this Manual 1-1 Test Sheet Procedure and Product Registration (For USA Only 1-2 To Complete Your MFC-8500 Registration On-Line (For USA Only 1-2 MFC-8500 Control Panel Overview 1-3 About Fax Machines 1-5 Custom Features 1-5 Do You Have Voice Mail ...Assembly and Connections 2-1 Packing List 2-1 Choosing a Location 2-2 Assembly 2-3 Installing the Drum Unit Assembly (with Toner Cartridge 2-3 Attaching the Trays 2-4 Connecting Paper Cassette #2 (Option 2-4 Manual Feed Slot 2-5 Paper 2-6 Acceptable Paper 2-6 Paper Capacity of Paper Cassette 2-6 Paper Specification...
...this Manual 1-1 Test Sheet Procedure and Product Registration (For USA Only 1-2 To Complete Your MFC-8500 Registration On-Line (For USA Only 1-2 MFC-8500 Control Panel Overview 1-3 About Fax Machines 1-5 Custom Features 1-5 Do You Have Voice Mail ...Assembly and Connections 2-1 Packing List 2-1 Choosing a Location 2-2 Assembly 2-3 Installing the Drum Unit Assembly (with Toner Cartridge 2-3 Attaching the Trays 2-4 Connecting Paper Cassette #2 (Option 2-4 Manual Feed Slot 2-5 Paper 2-6 Acceptable Paper 2-6 Paper Capacity of Paper Cassette 2-6 Paper Specification...
Users Manual - English
Page 29
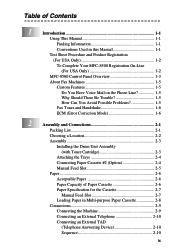
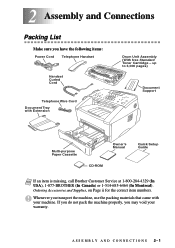
...2 Assembly and Connections 2 Packing List Make sure you have the following items: Power Cord Telephone Handset Handset Curled Cord Telephone Wire Cord Document Tray with your warranty. ASSEMBLY AND CONNECTIONS 2-1 up to 3,000 pages) Document Support Multi-purpose Paper Cassette Owner's Manual CD-ROM Quick Setup... Guide Note If an item is missing, call Brother Customer Service at 1-800-284-4329 (In USA), 1-877-BROTHER (In Canada) or 1-514-685-6464 (In Montreal). Whenever you transport the machine, use the packing materials...
...2 Assembly and Connections 2 Packing List Make sure you have the following items: Power Cord Telephone Handset Handset Curled Cord Telephone Wire Cord Document Tray with your warranty. ASSEMBLY AND CONNECTIONS 2-1 up to 3,000 pages) Document Support Multi-purpose Paper Cassette Owner's Manual CD-ROM Quick Setup... Guide Note If an item is missing, call Brother Customer Service at 1-800-284-4329 (In USA), 1-877-BROTHER (In Canada) or 1-514-685-6464 (In Montreal). Whenever you transport the machine, use the packing materials...
Users Manual - English
Page 32
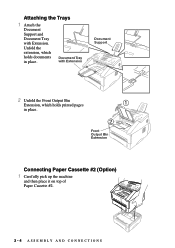
Attaching the Trays 1 Attach the Document Support and Document Tray with Extension Document Support 2 Unfold the Front Output Bin Extension, which holds documents in place. Document Tray with Extension. Unfold the extension, which holds printed pages in place. Front Output Bin Extension Connecting Paper Cassette #2 (Option) 1 Carefully pick up the machine and then place it on top of Paper Cassette #2. 2-4 ASSEMBLY AND CONNECTIONS
Attaching the Trays 1 Attach the Document Support and Document Tray with Extension Document Support 2 Unfold the Front Output Bin Extension, which holds documents in place. Document Tray with Extension. Unfold the extension, which holds printed pages in place. Front Output Bin Extension Connecting Paper Cassette #2 (Option) 1 Carefully pick up the machine and then place it on top of Paper Cassette #2. 2-4 ASSEMBLY AND CONNECTIONS
Users Manual - English
Page 126
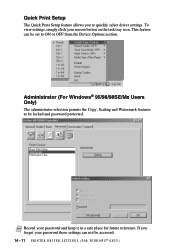
... Only) The administrator selection permits the Copy, Scaling and Watermark features to be locked and password protected. Note Record your mouse button on the task tray icon. This feature can not be accessed. 14 - 11 P R I N T E R D R I V E R S E T T I N G S ( F O R W I N D O W S ® O N L Y ) To view settings, simply click your password and keep it in a safe place for future...
... Only) The administrator selection permits the Copy, Scaling and Watermark features to be locked and password protected. Note Record your mouse button on the task tray icon. This feature can not be accessed. 14 - 11 P R I N T E R D R I V E R S E T T I N G S ( F O R W I N D O W S ® O N L Y ) To view settings, simply click your password and keep it in a safe place for future...
Users Manual - English
Page 128
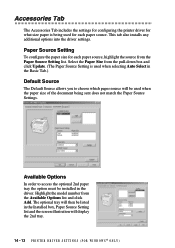
...The Paper Source Setting is being sent does not match the Paper Source Settings. The optional tray will then be used when the paper size of the document being used for each paper source...Source The Default Source allows you to access the optional 2nd paper tray the option must be installed in the Installed box, Paper Source Setting list and the screen... illustration will display the 2nd tray. 14 - 13 P R I N T E R D R I V E R S E T T I N G S ( F O R W I N D O W S ® O N L Y ) This tab also ...
...The Paper Source Setting is being sent does not match the Paper Source Settings. The optional tray will then be used when the paper size of the document being used for each paper source...Source The Default Source allows you to access the optional 2nd paper tray the option must be installed in the Installed box, Paper Source Setting list and the screen... illustration will display the 2nd tray. 14 - 13 P R I N T E R D R I V E R S E T T I N G S ( F O R W I N D O W S ® O N L Y ) This tab also ...
Users Manual - English
Page 132
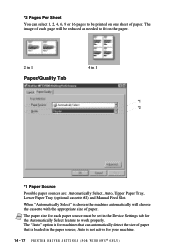
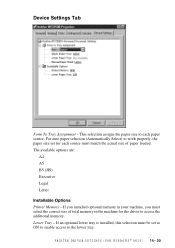
...of paper. Auto is loaded in 1 Paper/Quality Tab *1 *2 *1 Paper Source Possible paper sources are: Automatically Select, Auto, Upper Paper Tray, Lower Paper Tray (optional cassette #2) and Manual Feed Slot. When "Automatically Select" is chosen the machine automatically will be printed on the paper. 2 in... 1 4 in the paper source; Note The paper size for the Automatically Select feature to fit on one sheet of paper. *2...
...of paper. Auto is loaded in 1 Paper/Quality Tab *1 *2 *1 Paper Source Possible paper sources are: Automatically Select, Auto, Upper Paper Tray, Lower Paper Tray (optional cassette #2) and Manual Feed Slot. When "Automatically Select" is chosen the machine automatically will be printed on the paper. 2 in... 1 4 in the paper source; Note The paper size for the Automatically Select feature to fit on one sheet of paper. *2...
Users Manual - English
Page 135
If you installed optional memory in the machine for each paper source. If an optional lower tray is installed, this selection must be set for the driver to access the additional memory. For auto paper selection (Automatically Select) to work properly, the ... loaded. The available options are: A4 A5 B5 (JIS) Executive Legal Letter Installable Options Printer Memory - This selection assigns the paper size to the lower tray. Device Settings Tab Form To Tray Assignment - Lower Tray - P R I N T E R D R I V E R S E T T I N G S ( F O R W I N D O W S ® O N L Y ) 14 - 20...
If you installed optional memory in the machine for each paper source. If an optional lower tray is installed, this selection must be set for the driver to access the additional memory. For auto paper selection (Automatically Select) to work properly, the ... loaded. The available options are: A4 A5 B5 (JIS) Executive Legal Letter Installable Options Printer Memory - This selection assigns the paper size to the lower tray. Device Settings Tab Form To Tray Assignment - Lower Tray - P R I N T E R D R I V E R S E T T I N G S ( F O R W I N D O W S ® O N L Y ) 14 - 20...
Users Manual - English
Page 173
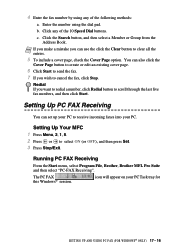
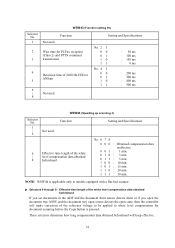
Click the Search button, and then select a Member or Group from the Address Book. Setting Up Your MFC 1 Press Menu, 2, 1, 8. 2 Press or to scroll through the last five fax numbers, and then click Start...or edit an existing cover page. 6 Click Start to send the fax. 7 If you can set up your PC Task tray for SETTING UP AND USING PC FAX (FOR WINDOWS® ONLY) 17 - 16 Setting Up PC FAX Receiving You can...receive incoming faxes into your PC. Running PC FAX Receiving Form the Start menu, select Program File, Brother, Brother MFL Pro Suite and then select "PC-FAX Receiving".
Click the Search button, and then select a Member or Group from the Address Book. Setting Up Your MFC 1 Press Menu, 2, 1, 8. 2 Press or to scroll through the last five fax numbers, and then click Start...or edit an existing cover page. 6 Click Start to send the fax. 7 If you can set up your PC Task tray for SETTING UP AND USING PC FAX (FOR WINDOWS® ONLY) 17 - 16 Setting Up PC FAX Receiving You can...receive incoming faxes into your PC. Running PC FAX Receiving Form the Start menu, select Program File, Brother, Brother MFL Pro Suite and then select "PC-FAX Receiving".
Users Manual - English
Page 197
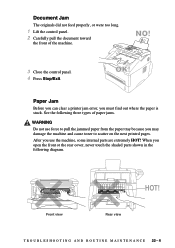
... the document toward the front of paper jams. WARNING Do not use the machine, some internal parts are extremely HOT! See the following diagram. After you use force to pull the jammed paper from the paper tray because you may damage the machine and cause toner to scatter on the next printed...
... the document toward the front of paper jams. WARNING Do not use the machine, some internal parts are extremely HOT! See the following diagram. After you use force to pull the jammed paper from the paper tray because you may damage the machine and cause toner to scatter on the next printed...
Users Manual - English
Page 206
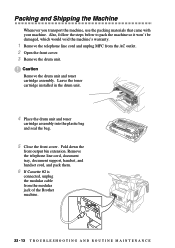
Fold down the front output bin extension. Remove the telephone line cord, document tray, document support, handset, and handset cord, and pack them. 6 If Cassette #2 is connected, unplug the modular cable from the AC outlet. 2 Open the front cover. 3 ... the steps below to pack the machine so it won't be damaged, which would void the machine's warranty. 1 Remove the telephone line cord and unplug MFC from the modular jack of the Brother machine. 22 - 13 T R O U B L E S H O O T I N G A N D R O U T I N E M A I N T E N A N C E
Fold down the front output bin extension. Remove the telephone line cord, document tray, document support, handset, and handset cord, and pack them. 6 If Cassette #2 is connected, unplug the modular cable from the AC outlet. 2 Open the front cover. 3 ... the steps below to pack the machine so it won't be damaged, which would void the machine's warranty. 1 Remove the telephone line cord and unplug MFC from the modular jack of the Brother machine. 22 - 13 T R O U B L E S H O O T I N G A N D R O U T I N E M A I N T E N A N C E
Users Manual - English
Page 226
...assembly 2-3 document tray 2-4 document wire 2-4 drum unit assembly 2-3 grounded three-prong plug 2-9 handset 2-9 loading paper 2-8 power cord 2-9 telephone line code 2-9 Toner Cartridge 2-3 automatic dialing 7-5 fax receive 5-1 fax redial 6-2 transmission 6-2 B Broadcasting 7-6 setting up Groups for 7-3 Brother accessories and supplies ii Brother numbers i ...i fax-back system i Test Sheet, sending 1-2 warranties Canada vi Notice-Disclaimer of Warranties iii USA iv, v Brother Control Center using and configurating 15-1 to 15-15 C Call Waiting Caller ID 8-4 Caller ID 8-3 CallManage 8-5 canceling...
...assembly 2-3 document tray 2-4 document wire 2-4 drum unit assembly 2-3 grounded three-prong plug 2-9 handset 2-9 loading paper 2-8 power cord 2-9 telephone line code 2-9 Toner Cartridge 2-3 automatic dialing 7-5 fax receive 5-1 fax redial 6-2 transmission 6-2 B Broadcasting 7-6 setting up Groups for 7-3 Brother accessories and supplies ii Brother numbers i ...i fax-back system i Test Sheet, sending 1-2 warranties Canada vi Notice-Disclaimer of Warranties iii USA iv, v Brother Control Center using and configurating 15-1 to 15-15 C Call Waiting Caller ID 8-4 Caller ID 8-3 CallManage 8-5 canceling...
Quick Setup Guide - English
Page 1
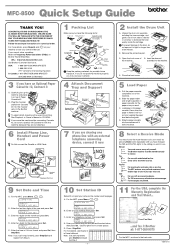
... voice calls on Brother World Wide Web; TAD The TAD answers every call and receives a fax or FAX/ TEL double rings for possible future transport. MFC-8500 Quick Setup Guide ...://solutions.brother.com Call Brother Customer Service at : 1-877-268-9575 For the MFC, continue to flatten in Owner's Manual. Carefully pick up to Frequently Asked Questions (FAQs) on one phone ...Height Guide 8 Select a Receive Mode You may void your warranty. 4 Attach Document Tray and Support Document Tray with an external telephone answering device, connect it now 10 Set Station ID Station ID ...
... voice calls on Brother World Wide Web; TAD The TAD answers every call and receives a fax or FAX/ TEL double rings for possible future transport. MFC-8500 Quick Setup Guide ...://solutions.brother.com Call Brother Customer Service at : 1-877-268-9575 For the MFC, continue to flatten in Owner's Manual. Carefully pick up to Frequently Asked Questions (FAQs) on one phone ...Height Guide 8 Select a Receive Mode You may void your warranty. 4 Attach Document Tray and Support Document Tray with an external telephone answering device, connect it now 10 Set Station ID Station ID ...
Quick Setup Guide - English
Page 3
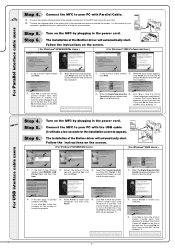
...the above screen appears, click Next. If you click No the Scan keys on the MFC by plugging in the task tray. Step 4. Turn on the MFC will be disabled. *3 The Brother PC fax, Printer and Scanner drivers have been installed and the installation is now complete. 3. The installation of ...the MFC and secure the wire clips. Follow the instructions on the screen. ( For Windows® 95/...
...the above screen appears, click Next. If you click No the Scan keys on the MFC by plugging in the task tray. Step 4. Turn on the MFC will be disabled. *3 The Brother PC fax, Printer and Scanner drivers have been installed and the installation is now complete. 3. The installation of ...the MFC and secure the wire clips. Follow the instructions on the screen. ( For Windows® 95/...
Service Manual
Page 16
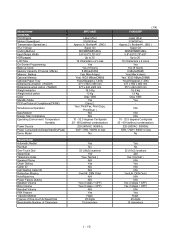
... Width ADF(pages) LCD Size On-Screen Programming Back up Clock Memory Capacity (Physical: MByte) Memory Backup Optional Memory Optional Paper Tray Dimensions w/carton (WxDxH) Dimensions w/out carton (WxDxH) Weight w/carton Weight w/out carton Color Standby Mode PC-Fax Protocol Compliance(TX...Hold/Mute Key Power Failure Dialing Speaker Volume Ring Volume Handset Volume PBX Feature Transfer Method Figures of One-touch & Speed Dial Resisterable Number of Characters MFC-9660 Laser (ZLe) 33,600(Fax) Approx.2 ( Brother#1, JBIG ) Super G3 MH/MR/MMR/JBIG 5.8"-8.5"/2.75"-8.5" Up to 30 16 Characters x 2...
... Width ADF(pages) LCD Size On-Screen Programming Back up Clock Memory Capacity (Physical: MByte) Memory Backup Optional Memory Optional Paper Tray Dimensions w/carton (WxDxH) Dimensions w/out carton (WxDxH) Weight w/carton Weight w/out carton Color Standby Mode PC-Fax Protocol Compliance(TX...Hold/Mute Key Power Failure Dialing Speaker Volume Ring Volume Handset Volume PBX Feature Transfer Method Figures of One-touch & Speed Dial Resisterable Number of Characters MFC-9660 Laser (ZLe) 33,600(Fax) Approx.2 ( Brother#1, JBIG ) Super G3 MH/MR/MMR/JBIG 5.8"-8.5"/2.75"-8.5" Up to 30 16 Characters x 2...
Service Manual
Page 40
... Guides IV-15 1.9 Handset Mount and Hook Switch PCB (for models equipped with a handset) Side Cover (for models without handset IV-21 1.10 Paper Sub Tray IV-23 1.11 VC Cover, VC Bracket, and VC Connector PCB (for models supporting video capture IV-24 1.12 Front Cover Front Sub Cover (for... supporting video capture IV-25 1.13 Outer Chute and Paper Pinch Rollers IV-26 1.14 Main Cover ...IV-27 1.15 Switch Cover ...IV-28 1.16 Laser Unit ...IV-29 1.17 Heat-fixing Unit and FU Lamp IV-30 [Disassembling the heat-fixing unit IV-32 1.18 Fan ...IV-44 1.19 Drive...
... Guides IV-15 1.9 Handset Mount and Hook Switch PCB (for models equipped with a handset) Side Cover (for models without handset IV-21 1.10 Paper Sub Tray IV-23 1.11 VC Cover, VC Bracket, and VC Connector PCB (for models supporting video capture IV-24 1.12 Front Cover Front Sub Cover (for... supporting video capture IV-25 1.13 Outer Chute and Paper Pinch Rollers IV-26 1.14 Main Cover ...IV-27 1.15 Switch Cover ...IV-28 1.16 Laser Unit ...IV-29 1.17 Heat-fixing Unit and FU Lamp IV-30 [Disassembling the heat-fixing unit IV-32 1.18 Fan ...IV-44 1.19 Drive...
Service Manual
Page 43
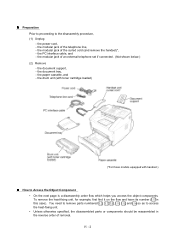
the document tray, - You need to remove parts numbered , , , , , and so as to Access the Object Component • On the next page is a disassembly order flow which helps ...
the document tray, - You need to remove parts numbered , , , , , and so as to Access the Object Component • On the next page is a disassembly order flow which helps ...
Service Manual
Page 44
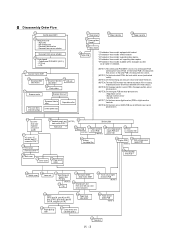
...heat-fixing unit are a jam sensor and heater thermistor. (NOTE 4) The main PCB monitors the internal resistance of a control panel PCB and document sensor PCB. Heater roller - LCD 1.7 Scanner frame ...roller 1.1 Rear cover 1.2 Access plates R and F 1.20 NCU shield 1.10 Paper sub tray 1.28 Paper cassette 1.20 NCU PCB *1 Provided on those models equipped with a 2nd paper... cover 1.232nd cassette relay PCB *5 1.13 1.13 Outer chute Paper pinch rollers 1.15 1.16 Switch cover Laser unit 1.17 Heat-fixing unit - n Disassembly Order Flow 1.3 Control panel ASSY 1.4 Panel rear cover - ADF...
...heat-fixing unit are a jam sensor and heater thermistor. (NOTE 4) The main PCB monitors the internal resistance of a control panel PCB and document sensor PCB. Heater roller - LCD 1.7 Scanner frame ...roller 1.1 Rear cover 1.2 Access plates R and F 1.20 NCU shield 1.10 Paper sub tray 1.28 Paper cassette 1.20 NCU PCB *1 Provided on those models equipped with a 2nd paper... cover 1.232nd cassette relay PCB *5 1.13 1.13 Outer chute Paper pinch rollers 1.15 1.16 Switch cover Laser unit 1.17 Heat-fixing unit - n Disassembly Order Flow 1.3 Control panel ASSY 1.4 Panel rear cover - ADF...
Service Manual
Page 64
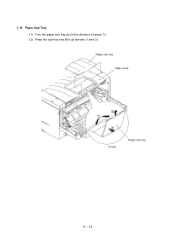
IV - 23 1.10 Paper Sub Tray (1) Turn the paper sub tray up (in the direction of arrow Q). (2) Warp the sub tray and lift it up (arrows R and S).
IV - 23 1.10 Paper Sub Tray (1) Turn the paper sub tray up (in the direction of arrow Q). (2) Warp the sub tray and lift it up (arrows R and S).
Service Manual
Page 211
... data obtained beforehand If you set documents in the ADF and the document front sensor detects them or if you open the document tray ASSY and the document tray open sensor detects the open state, then the controller will keep effective. 44 Function Wait time for document scanning before the Copy button...
... data obtained beforehand If you set documents in the ADF and the document front sensor detects them or if you open the document tray ASSY and the document tray open sensor detects the open state, then the controller will keep effective. 44 Function Wait time for document scanning before the Copy button...


