Users Manual - English
Page 4
... USA: 1-877-552-MALL (6255) 1-800-947-1445 (fax) http://www.brothermall.com In Canada: 1-877-BROTHER Description Toner Cartridge Drum Unit Telephone Line Cord Telephone Handset Handset Curled Cord IEEE-1284 Bi-directional Cable (MFC-7220 and MFC-7225N only) Power Protector for A/C Power Telephone Line Surges and Voltage Spikes (2 outlets) Power Protector for...
... USA: 1-877-552-MALL (6255) 1-800-947-1445 (fax) http://www.brothermall.com In Canada: 1-877-BROTHER Description Toner Cartridge Drum Unit Telephone Line Cord Telephone Handset Handset Curled Cord IEEE-1284 Bi-directional Cable (MFC-7220 and MFC-7225N only) Power Protector for A/C Power Telephone Line Surges and Voltage Spikes (2 outlets) Power Protector for...
Users Manual - English
Page 6
...Maintenance Items, such as Paper Feeding Kit, Fuser and Laser Units. This limited warranty is VOID if this Product ...cartridges, refill ribbons, thermal PLUS paper, thermal paper, and the cordless handset battery. • Except as otherwise provided herein, Brother warrants that the Machine and the accompanying Consumable and Accessory Items will repair or replace the Machine and/or accompanying Consumable and Accessory Items at 1-800-284-4329 for Fax, MFC... products purchased and used in the United States. iv Brother® One Year Limited Warranty and Replacement Service (USA only) Who...
...Maintenance Items, such as Paper Feeding Kit, Fuser and Laser Units. This limited warranty is VOID if this Product ...cartridges, refill ribbons, thermal PLUS paper, thermal paper, and the cordless handset battery. • Except as otherwise provided herein, Brother warrants that the Machine and the accompanying Consumable and Accessory Items will repair or replace the Machine and/or accompanying Consumable and Accessory Items at 1-800-284-4329 for Fax, MFC... products purchased and used in the United States. iv Brother® One Year Limited Warranty and Replacement Service (USA only) Who...
Users Manual - English
Page 8
... Cartridge (and Toner Drum Unit on applicable models) during shipping will cause severe damage to the MFC/Facsimile and will VOID your warranty. (Refer to your nearest Authorized Service Center call 1-877-BROTHER. Warranty Service is available at Brother Authorized Service Centers throughout Canada. Internet support: support@brother.ca or browse Brother's Web Site: www.brother.com Brother International...
... Cartridge (and Toner Drum Unit on applicable models) during shipping will cause severe damage to the MFC/Facsimile and will VOID your warranty. (Refer to your nearest Authorized Service Center call 1-877-BROTHER. Warranty Service is available at Brother Authorized Service Centers throughout Canada. Internet support: support@brother.ca or browse Brother's Web Site: www.brother.com Brother International...

Users Manual - English
Page 16
...Laser safety 10-3 FDA regulations 10-3 Important safety instructions 10-4 Trademarks 10-5 Troubleshooting and routine maintenance Troubleshooting 11-1 Error messages 11-1 Checking if the machine has faxes in the United States only 10-1 Federal Communications Commission (FCC) Declaration of the machine 11-9 Paper is jammed inside the drum unit and toner cartridge... 8-7 Quality ...8-7 Adjusting contrast 8-7 Out of Memory message 8-7 Software and Network Features (MFC-7220 and MFC-7225N only) 9-1 Important information Standard telephone and FCC Notices These notices are in effect ...
...Laser safety 10-3 FDA regulations 10-3 Important safety instructions 10-4 Trademarks 10-5 Troubleshooting and routine maintenance Troubleshooting 11-1 Error messages 11-1 Checking if the machine has faxes in the United States only 10-1 Federal Communications Commission (FCC) Declaration of the machine 11-9 Paper is jammed inside the drum unit and toner cartridge... 8-7 Quality ...8-7 Adjusting contrast 8-7 Out of Memory message 8-7 Software and Network Features (MFC-7220 and MFC-7225N only) 9-1 Important information Standard telephone and FCC Notices These notices are in effect ...
Users Manual - English
Page 17
...the machine 11-21 Cleaning the scanner glass 11-22 Cleaning the laser scanner window 11-22 Cleaning the corona wire 11-24 Replacing the toner cartridge (TN-350 11-24 How to replace the toner cartridge 11-25 Replacing the drum unit (DR-350 11-27 Machine ...Information 11-29 Checking the Serial Numbers 11-29 Checking the Page Counters 11-29 Checking the Drum Life 11-29 A Appendix A Setting up telephone services A-1 Distinctive Ring A-1 What does your telephone company's 'Distinctive Ring' do A-1 What does Brother...
...the machine 11-21 Cleaning the scanner glass 11-22 Cleaning the laser scanner window 11-22 Cleaning the corona wire 11-24 Replacing the toner cartridge (TN-350 11-24 How to replace the toner cartridge 11-25 Replacing the drum unit (DR-350 11-27 Machine ...Information 11-29 Checking the Serial Numbers 11-29 Checking the Page Counters 11-29 Checking the Drum Life 11-29 A Appendix A Setting up telephone services A-1 Distinctive Ring A-1 What does your telephone company's 'Distinctive Ring' do A-1 What does Brother...
Users Manual - English
Page 89
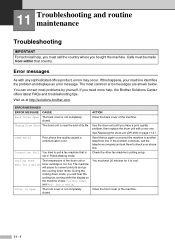
11 Troubleshooting and routine maintenance Troubleshooting IMPORTANT For technical help , the Brother Solutions Center offers latest FAQs and troubleshooting tips. Error messages As with a new one. The most problems by yourself. Change Drum Soon The drum unit is near the end of the machine. 11 - 1 Connection Fail...too hot. Cooling Down Wait for a while The temperature of the machine. ACTION Close the back cover of the drum unit or toner cartridge is not completely closed . See Replacing the drum unit (DR-350) on the machine shows Cooling Down, and Wait for it to poll...
11 Troubleshooting and routine maintenance Troubleshooting IMPORTANT For technical help , the Brother Solutions Center offers latest FAQs and troubleshooting tips. Error messages As with a new one. The most problems by yourself. Change Drum Soon The drum unit is near the end of the machine. 11 - 1 Connection Fail...too hot. Cooling Down Wait for a while The temperature of the machine. ACTION Close the back cover of the drum unit or toner cartridge is not completely closed . See Replacing the drum unit (DR-350) on the machine shows Cooling Down, and Wait for it to poll...
Users Manual - English
Page 91
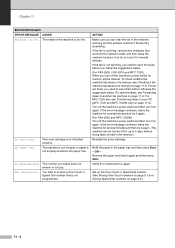
...is not spinning, you need to access a One-Touch or Speed Dial number that surround the exhuast outlet, and then leave the machine turned on again. Not Registered You tried to save the faxes, see Forwarding faxes to your PC (MFC-7220 and MFC-7225N only) on page 11-6). If there ... (See Storing One-Touch numbers on page 5-1 and Storing Speed-Dial numbers on page 11-6. No cartridge No Paper Fed The toner cartridge is busy. No Response/Busy The number you can be cleared. ACTION Make sure you dialed does not answer or is not installed properly. For MFC-7220 also see Checking...
...is not spinning, you need to access a One-Touch or Speed Dial number that surround the exhuast outlet, and then leave the machine turned on again. Not Registered You tried to save the faxes, see Forwarding faxes to your PC (MFC-7220 and MFC-7225N only) on page 11-6). If there ... (See Storing One-Touch numbers on page 5-1 and Storing Speed-Dial numbers on page 11-6. No cartridge No Paper Fed The toner cartridge is busy. No Response/Busy The number you can be cleared. ACTION Make sure you dialed does not answer or is not installed properly. For MFC-7220 also see Checking...
Users Manual - English
Page 92
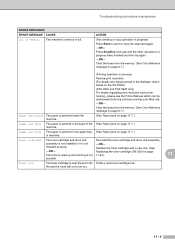
...Life End The toner cartridge and drum unit Re-install the toner cartridge and drum unit assembly. installed properly. assembly is not installed or it is not 11-24.) 11 possible. Replace the toner cartridge with a new one. (See -OR- Clear the faxes from the solutions.brother.com Web site. ...-OR- Troubleshooting and routine maintenance ERROR MESSAGES ERROR MESSAGE CAUSE Out of its Order a new toner cartridge now. life and the toner will soon ...
...Life End The toner cartridge and drum unit Re-install the toner cartridge and drum unit assembly. installed properly. assembly is not installed or it is not 11-24.) 11 possible. Replace the toner cartridge with a new one. (See -OR- Clear the faxes from the solutions.brother.com Web site. ...-OR- Troubleshooting and routine maintenance ERROR MESSAGES ERROR MESSAGE CAUSE Out of its Order a new toner cartridge now. life and the toner will soon ...
Users Manual - English
Page 96
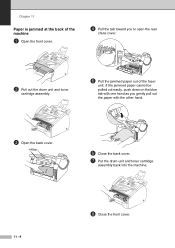
3 Open the front cover. The jammed paper may be pulled out with the toner cartridge and drum unit assembly, or this may release the paper so you can pull it out of the paper tray opening. 6 Close the front cover. 7 Put the paper tray in the following diagram. 11 - 8 CAUTION 11 To prevent damage to the machine caused by static electricity, do not touch the electrodes shown in the machine. Troubleshooting and routine maintenance 5 Put the drum unit and toner cartridge assembly back into the machine. 4 Pull out the drum unit and toner cartridge assembly.
3 Open the front cover. The jammed paper may be pulled out with the toner cartridge and drum unit assembly, or this may release the paper so you can pull it out of the paper tray opening. 6 Close the front cover. 7 Put the paper tray in the following diagram. 11 - 8 CAUTION 11 To prevent damage to the machine caused by static electricity, do not touch the electrodes shown in the machine. Troubleshooting and routine maintenance 5 Put the drum unit and toner cartridge assembly back into the machine. 4 Pull out the drum unit and toner cartridge assembly.
Users Manual - English
Page 97
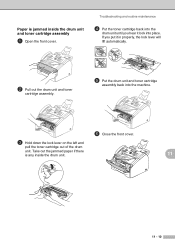
If the jammed paper cannot be pulled out easily, push down on the blue tab with the other hand. 3 Open the back cover. 6 Close the back cover. 7 Put the drum unit and toner cartridge assembly back into the machine. 11 - 9 8 Close the front cover. Chapter 11 Paper is jammed at the back of the machine 1 Open the front cover. 4 Pull the tab toward you gently pull out the paper with one hand as you to open the rear chute cover. 2 Pull out the drum unit and toner cartridge assembly. 5 Pull the jammed paper out of the fuser unit.
If the jammed paper cannot be pulled out easily, push down on the blue tab with the other hand. 3 Open the back cover. 6 Close the back cover. 7 Put the drum unit and toner cartridge assembly back into the machine. 11 - 9 8 Close the front cover. Chapter 11 Paper is jammed at the back of the machine 1 Open the front cover. 4 Pull the tab toward you gently pull out the paper with one hand as you to open the rear chute cover. 2 Pull out the drum unit and toner cartridge assembly. 5 Pull the jammed paper out of the fuser unit.
Users Manual - English
Page 98
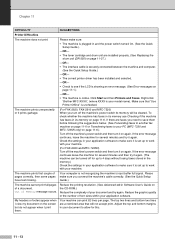
Take out the jammed paper if there is jammed inside the drum unit. 11 11 - 10 Troubleshooting and routine maintenance 4 Put the toner cartridge back into the drum unit until you put it lock into the machine. 6 Close the front cover. 3 Hold down the lock lever on the left ...and pull the toner cartridge out of the drum unit. If you hear it in properly, the lock lever will lift automatically. 2 Pull out the drum unit and toner...
Take out the jammed paper if there is jammed inside the drum unit. 11 11 - 10 Troubleshooting and routine maintenance 4 Put the toner cartridge back into the drum unit until you put it lock into the machine. 6 Close the front cover. 3 Hold down the lock lever on the left ...and pull the toner cartridge out of the drum unit. If you hear it in properly, the lock lever will lift automatically. 2 Pull out the drum unit and toner...
Users Manual - English
Page 101
Right-click 'Brother MFC-XXXX,' (where XXXX is not recognizing the machine's input buffer full signal. To check ...before following the suggestions below. (See Forwarding faxes to another fax machine on page 11-6 or Transferring faxes to your PC (MFC-7220 and MFC-7225N only) on page 11-6.) Turn off the machine's power switch and then turn it on page 11-1.) -OR- &#...8226; The machine is plugged in and the power switch turned On. (See the Quick Setup Guide.) -OR- • The toner cartridge and drum unit are installed properly. (See Replacing the drum unit (DR-350) on page 11-27.) -OR- • The...
Right-click 'Brother MFC-XXXX,' (where XXXX is not recognizing the machine's input buffer full signal. To check ...before following the suggestions below. (See Forwarding faxes to another fax machine on page 11-6 or Transferring faxes to your PC (MFC-7220 and MFC-7225N only) on page 11-6.) Turn off the machine's power switch and then turn it on page 11-1.) -OR- &#...8226; The machine is plugged in and the power switch turned On. (See the Quick Setup Guide.) -OR- • The toner cartridge and drum unit are installed properly. (See Replacing the drum unit (DR-350) on page 11-27.) -OR- • The...
Users Manual - English
Page 104
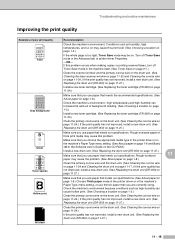
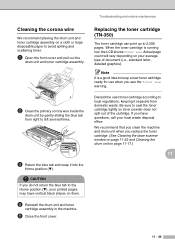
... our specifications. Conditions such as high humidity can increase the amount of background shading. (See Choosing a location on page 1-2.) Install a new toner cartridge. (See Replacing the toner cartridge (TN-350) on page 11-24.) Clean the primary corona wire on the drum unit. (See Cleaning the corona wire on page 11... the machine itself. (See Toner Save on page 2-7.) Clean the scanner window and the primary corona wire on the drum unit. (See Cleaning the laser scanner window on page 11-22 and Cleaning the corona wire on page 11-24.) If the print quality has not improved, install a new drum...
... our specifications. Conditions such as high humidity can increase the amount of background shading. (See Choosing a location on page 1-2.) Install a new toner cartridge. (See Replacing the toner cartridge (TN-350) on page 11-24.) Clean the primary corona wire on the drum unit. (See Cleaning the corona wire on page 11... the machine itself. (See Toner Save on page 2-7.) Clean the scanner window and the primary corona wire on the drum unit. (See Cleaning the laser scanner window on page 11-22 and Cleaning the corona wire on page 11-24.) If the print quality has not improved, install a new drum...
Users Manual - English
Page 105
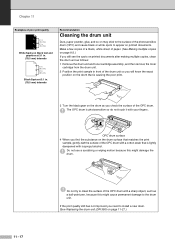
... see the spots on printed documents after making multiple copies, clean the drum unit as follows: 1 Remove the drum unit and toner cartridge assembly, and then remove the toner cartridge from the drum unit. 2 Position the print sample in . (78.5 mm) intervals Recommendation Cleaning the drum unit Dust, paper powder, glue, and...
... see the spots on printed documents after making multiple copies, clean the drum unit as follows: 1 Remove the drum unit and toner cartridge assembly, and then remove the toner cartridge from the drum unit. 2 Position the print sample in . (78.5 mm) intervals Recommendation Cleaning the drum unit Dust, paper powder, glue, and...
Users Manual - English
Page 106
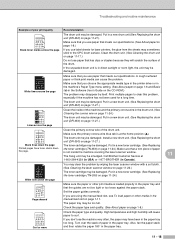
...inside the machine covering the laser scanner window. Put in the drum unit. (See Cleaning the corona wire on page 11-24.) Make sure that a torn piece of paper is at 1-800-284-4329 (in USA) or 1-877-BROTHER (in a new toner cartridge. (See Replacing the toner cartridge (TN-350) on page... 11-24.) The drum unit may be damaged. Put in Canada). Call Brother Customer Service at the home position (▲). Set the paper guides correctly. ABCDEFGH...
...inside the machine covering the laser scanner window. Put in the drum unit. (See Cleaning the corona wire on page 11-24.) Make sure that a torn piece of paper is at 1-800-284-4329 (in USA) or 1-877-BROTHER (in a new toner cartridge. (See Replacing the toner cartridge (TN-350) on page... 11-24.) The drum unit may be damaged. Put in Canada). Call Brother Customer Service at the home position (▲). Set the paper guides correctly. ABCDEFGH...

Users Manual - English
Page 108
... may prefer to use the packing materials that you adjust the Equalization for compatibility to reduce the modem speed for FAX-2910, FAX-2920 and MFC-7225 only. Press Menu/Set. 3 Press Stop/Exit. * High is a recurring problem on the phone line, we recommend that came with your machine.... The machine should be adequately insured with the original packing material. 11 - 20 Leave the toner cartridge installed in the drum unit. 7 Place the drum unit and toner cartridge assembly into the plastic bag and seal the bag. 8 Close the front cover. 11 Remove the telephone line ...
... may prefer to use the packing materials that you adjust the Equalization for compatibility to reduce the modem speed for FAX-2910, FAX-2920 and MFC-7225 only. Press Menu/Set. 3 Press Stop/Exit. * High is a recurring problem on the phone line, we recommend that came with your machine.... The machine should be adequately insured with the original packing material. 11 - 20 Leave the toner cartridge installed in the drum unit. 7 Place the drum unit and toner cartridge assembly into the plastic bag and seal the bag. 8 Close the front cover. 11 Remove the telephone line ...
Users Manual - English
Page 109
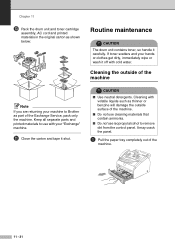
...thinner or benzine will damage the outside of the machine. 11 - 21 Keep all separate parts and printed materials to use isopropyl alcohol to Brother as part of the machine. ■ Do not use cleaning materials that contain ammonia. ■ Do not use with your machine to ...outside surface of the Exchange Service, pack only the machine. CAUTION ■ Use neutral detergents. Chapter 11 0 Pack the drum unit and toner cartridge assembly, AC cord and printed materials in the original carton as shown below: Routine maintenance CAUTION The drum unit contains toner, so handle it shut....
...thinner or benzine will damage the outside of the machine. 11 - 21 Keep all separate parts and printed materials to use isopropyl alcohol to Brother as part of the machine. ■ Do not use cleaning materials that contain ammonia. ■ Do not use with your machine to ...outside surface of the Exchange Service, pack only the machine. CAUTION ■ Use neutral detergents. Chapter 11 0 Pack the drum unit and toner cartridge assembly, AC cord and printed materials in the original carton as shown below: Routine maintenance CAUTION The drum unit contains toner, so handle it shut....

Users Manual - English
Page 111
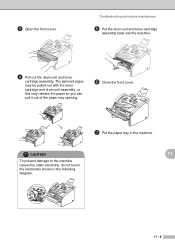
Laser Scanner Window 4 Put the drum unit and toner cartridge assembly back into the AC power outlet first, and then plug in the diagram below . 5 Close the front cover. 6 Plug the machine's power cord back into the machine. When you have used the machine, some internal parts of the machine, ...never touch the shaded parts shown in the telephone line cord. Chapter 11 2 Open the front cover and pull out the drum unit and toner cartridge assembly. 3 Gently clean the laser scanner window by wiping it with a clean...
Laser Scanner Window 4 Put the drum unit and toner cartridge assembly back into the AC power outlet first, and then plug in the diagram below . 5 Close the front cover. 6 Plug the machine's power cord back into the machine. When you have used the machine, some internal parts of the machine, ...never touch the shaded parts shown in the telephone line cord. Chapter 11 2 Open the front cover and pull out the drum unit and toner cartridge assembly. 3 Gently clean the laser scanner window by wiping it with a clean...
Users Manual - English
Page 112
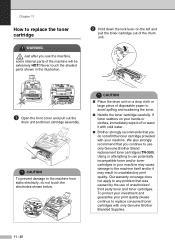
... Be sure to the Home position (▼), your printed pages may have questions, call your average type of the cartridge. CAUTION If you replace the toner cartridge. (See Cleaning the laser scanner window on page 11-22 and Cleaning the drum unit on your local waste disposal office. We recommend that ...you clean the machine and drum unit when you do not return the blue tab to seal the toner cartridge tightly so toner...
... Be sure to the Home position (▼), your printed pages may have questions, call your average type of the cartridge. CAUTION If you replace the toner cartridge. (See Cleaning the laser scanner window on page 11-22 and Cleaning the drum unit on your local waste disposal office. We recommend that ...you clean the machine and drum unit when you do not return the blue tab to seal the toner cartridge tightly so toner...
Users Manual - English
Page 113
... from static electricity, do not refill the toner cartridge provided with your print quality please continue to replace consumed toner cartridges with only Genuine Brother Branded Supplies. 11 - 25 We also strongly recommend that you use the machine, some internal parts of the drum unit. 1 Open the... front cover and pull out the drum unit and toner cartridge assembly. Our warranty coverage ...
... from static electricity, do not refill the toner cartridge provided with your print quality please continue to replace consumed toner cartridges with only Genuine Brother Branded Supplies. 11 - 25 We also strongly recommend that you use the machine, some internal parts of the drum unit. 1 Open the... front cover and pull out the drum unit and toner cartridge assembly. Our warranty coverage ...


