
Users Manual - English
Page 4
...Brother accessories and supplies available for purchase.) USA: 1-888-879-3232 (voice) 1-800-947-1445 (fax) http://www.brothermall.com From within Canada: 1-800-668-2768 (voice) DESCRIPTION Laser Fax Toner ITEM TN5000PF Laser Fax Drum DR200 1 MB Expandable Memory Board (For MFC 4350, MFC 4650 and MFC 6650MC... Only) ME1000 2 MB Expandable Memory Board (For MFC 4350, MFC 4650 and MFC 6650MC Only) ME2000 Telephone Line Cord UG157001 (USA) UG3565001...
...Brother accessories and supplies available for purchase.) USA: 1-888-879-3232 (voice) 1-800-947-1445 (fax) http://www.brothermall.com From within Canada: 1-800-668-2768 (voice) DESCRIPTION Laser Fax Toner ITEM TN5000PF Laser Fax Drum DR200 1 MB Expandable Memory Board (For MFC 4350, MFC 4650 and MFC 6650MC... Only) ME1000 2 MB Expandable Memory Board (For MFC 4350, MFC 4650 and MFC 6650MC Only) ME2000 Telephone Line Cord UG157001 (USA) UG3565001...
Users Manual - English
Page 5
... Tones and Handshake 2 ECM (Error Correction Mode 3 MFC 4350, MFC 4650 and MFC 7750 Control Panel Overview 4 MFC 4350, MFC 4650 and MFC 7750 Control Panel Keys 5 MFC 6650MC Control Panel Overview 6 MFC 6650MC Control Panel Keys 7 2MFC Setup and Connections Caution ...9 Packing List ...10 Choosing a Location 11 Assembly ...12 Installing the Drum Unit Assembly (with Toner Cartridge 12 Setting Up...
... Tones and Handshake 2 ECM (Error Correction Mode 3 MFC 4350, MFC 4650 and MFC 7750 Control Panel Overview 4 MFC 4350, MFC 4650 and MFC 7750 Control Panel Keys 5 MFC 6650MC Control Panel Overview 6 MFC 6650MC Control Panel Keys 7 2MFC Setup and Connections Caution ...9 Packing List ...10 Choosing a Location 11 Assembly ...12 Installing the Drum Unit Assembly (with Toner Cartridge 12 Setting Up...
Users Manual - English
Page 13
...xi 17Optional Accessories (For MFC 4350, MFC 4650 and MFC 6650MC Only) Memory Board ...179...206 Bi-Directional Parallel Ports (nibble and byte modes 206 MFC Connect Failure or Bi-Directional Communication Error 207 Brother HL-6/6V/10h/630series/660series/960/1260/WL-660 207...Drum Unit or in the United States only ...... 183 Federal Communications Commission(FCC) Declaration of Conformity (For USA Only)...185 Laser Safety (For 110-120V Models Only 185 FDA Regulations 186 Manufactured ...186 Attention ...186 Industry Canada Compliance Statement (For Canada Only 187 International...
...xi 17Optional Accessories (For MFC 4350, MFC 4650 and MFC 6650MC Only) Memory Board ...179...206 Bi-Directional Parallel Ports (nibble and byte modes 206 MFC Connect Failure or Bi-Directional Communication Error 207 Brother HL-6/6V/10h/630series/660series/960/1260/WL-660 207...Drum Unit or in the United States only ...... 183 Federal Communications Commission(FCC) Declaration of Conformity (For USA Only)...185 Laser Safety (For 110-120V Models Only 185 FDA Regulations 186 Manufactured ...186 Attention ...186 Industry Canada Compliance Statement (For Canada Only 187 International...
Users Manual - English
Page 14
xii TABLE OF CONTENTS 20Specifications Packing and Shipping the MFC 210 Regular Maintenance 213 Cleaning the Document Scanner 213 Cleaning the Printer 214 Cleaning the Drum Unit 215 Replacing the Toner Cartridge 216 Toner Empty Indicator 216 How to Replace the Toner Cartridge 217 Replacing the Drum Unit 221 For Customer Service 226 Product Description 227 Fax Specifications ...227 Printer Specifications 228 Electrical and Environment 229 Parallel Interface Specifications 230 Resident Fonts ...231 Symbol Sets/Character Sets 231 Glossary ...233 Index ...239
xii TABLE OF CONTENTS 20Specifications Packing and Shipping the MFC 210 Regular Maintenance 213 Cleaning the Document Scanner 213 Cleaning the Printer 214 Cleaning the Drum Unit 215 Replacing the Toner Cartridge 216 Toner Empty Indicator 216 How to Replace the Toner Cartridge 217 Replacing the Drum Unit 221 For Customer Service 226 Product Description 227 Fax Specifications ...227 Printer Specifications 228 Electrical and Environment 229 Parallel Interface Specifications 230 Resident Fonts ...231 Symbol Sets/Character Sets 231 Glossary ...233 Index ...239
Users Manual - English
Page 24
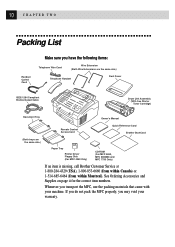
...Bi-directioned Cable Drum Unit Assembly (With free Starter Toner Cartridge) Document Tray Owner's Manual Remote Control Access Card Quick Reference Card Brother StartCard (Both trays are the same size.) Paper Tray Printer Driver Floppy Disk (For MFC 4350 Only) CD-ROM (For MFC 4650, MFC 6650MC and MFC 7750 Only) ...If an item is missing, call Brother Customer Service at 1-800-284-4329 (USA), 1-800-853-6660 (from within Canada) or 1-514-685-6464...
...Bi-directioned Cable Drum Unit Assembly (With free Starter Toner Cartridge) Document Tray Owner's Manual Remote Control Access Card Quick Reference Card Brother StartCard (Both trays are the same size.) Paper Tray Printer Driver Floppy Disk (For MFC 4350 Only) CD-ROM (For MFC 4650, MFC 6650MC and MFC 7750 Only) ...If an item is missing, call Brother Customer Service at 1-800-284-4329 (USA), 1-800-853-6660 (from within Canada) or 1-514-685-6464...
Users Manual - English
Page 26
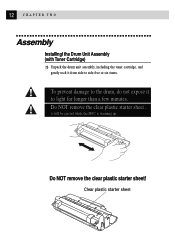
Do NOT remove the clear plastic starter sheet! Clear plastic starter sheet Do NOT remove the clear plastic starter sheet - it to light for longer than a few minutes. To prevent damage to side five or six times. 12 CHAPTER TWO Assembly Installingl the Drum Unit Assembly (with Toner Cartridge) 1 Unpack the drum unit assembly, including the toner cartridge, and gently rock it from side to the drum, do not expose it will be ejected while the MFC is warming up.
Do NOT remove the clear plastic starter sheet! Clear plastic starter sheet Do NOT remove the clear plastic starter sheet - it to light for longer than a few minutes. To prevent damage to side five or six times. 12 CHAPTER TWO Assembly Installingl the Drum Unit Assembly (with Toner Cartridge) 1 Unpack the drum unit assembly, including the toner cartridge, and gently rock it from side to the drum, do not expose it will be ejected while the MFC is warming up.

Users Manual - English
Page 27
13 M F C S E T U P A N D C O N N E C T I O N S 2 Open the top cover of the MFC. 3 Holding the drum unit by its handles, insert it in the MFC. 4 Close the top cover.
13 M F C S E T U P A N D C O N N E C T I O N S 2 Open the top cover of the MFC. 3 Holding the drum unit by its handles, insert it in the MFC. 4 Close the top cover.
Users Manual - English
Page 31
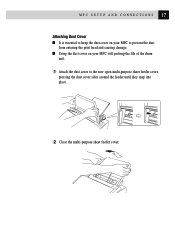
s Using the dust cover on your MFC will prolong the life of the drum unit. 1 Attach the dust cover to prevent the dust from entering the print head and causing damage. 17 M F C S E T U P A N D C O N N E C T I O N S Attaching Dust Cover s It is essential to keep the dust cover on your MFC to the now open multi-purpose sheet feeder cover, pressing the dust cover sides around the feeder until they snap into place. 2 Close the multi-purpose sheet feeder cover.
s Using the dust cover on your MFC will prolong the life of the drum unit. 1 Attach the dust cover to prevent the dust from entering the print head and causing damage. 17 M F C S E T U P A N D C O N N E C T I O N S Attaching Dust Cover s It is essential to keep the dust cover on your MFC to the now open multi-purpose sheet feeder cover, pressing the dust cover sides around the feeder until they snap into place. 2 Close the multi-purpose sheet feeder cover.

Users Manual - English
Page 208
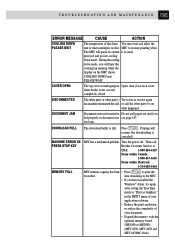
...COMM. ERROR CONNECTION FAIL A poor quality phone line Try the call the Brother Fax-Back System at USA: 1-800-521-2846 From within Canada: 1-800-681-9838 ERROR MESSAGES ERROR MESSAGE CAUSE ACTION CHANGE DRUM SOON The drum unit is near the end of paper or paper Refill the paper or remove...is not in the paper and load it again. If you reduction ratio automatically are using (see this happens, your MFC or telephone line. then replace the drum unit with your MFC often identifies the problem and displays an error message. You tried to AUTO if you see page 43). CHECK PAPER...
...COMM. ERROR CONNECTION FAIL A poor quality phone line Try the call the Brother Fax-Back System at USA: 1-800-521-2846 From within Canada: 1-800-681-9838 ERROR MESSAGES ERROR MESSAGE CAUSE ACTION CHANGE DRUM SOON The drum unit is near the end of paper or paper Refill the paper or remove...is not in the paper and load it again. If you reduction ratio automatically are using (see this happens, your MFC or telephone line. then replace the drum unit with your MFC often identifies the problem and displays an error message. You tried to AUTO if you see page 43). CHECK PAPER...
Users Manual - English
Page 209
...or call the other party's Try to fax or receive again fax machine terminated the call Brother Customer Service at USA: 1-800-284-4329 From within Canada: 1-800-853-6660 From within Montreal: 1-514-685-6464 MFC memory capacity has been • Press FF/Cont to see page 197. Press FF/..., MFC 4650 and MFC 6650MC Only) too long. MFC to "Print as Graphics" in the PRINT menu of your application software. • Reduce the print resolution or reduce the complexity of the drum You must wait and allow the unit or toner cartridge is full. print job and go into cooling down mode...
...or call the other party's Try to fax or receive again fax machine terminated the call Brother Customer Service at USA: 1-800-284-4329 From within Canada: 1-800-853-6660 From within Montreal: 1-514-685-6464 MFC memory capacity has been • Press FF/Cont to see page 197. Press FF/..., MFC 4650 and MFC 6650MC Only) too long. MFC to "Print as Graphics" in the PRINT menu of your application software. • Reduce the print resolution or reduce the complexity of the drum You must wait and allow the unit or toner cartridge is full. print job and go into cooling down mode...

Users Manual - English
Page 212
Multi-purpose Sheet Feeder Paper is Jammed in the Fuser Unit. 1 Open the top cover. 2 Remove the drum unit. 3 Gently pull out the jammed paper. 4 Reinstall the drum unit. 5 Close the top cover. 198 C H A P T E R N I N E T E E N Paper is Jammed near the Drum Unit or in the Multi-purpose Sheet Feeder 1 Open the multi-purpose sheet feeder to pull the jammed paper upward and out of the feeder. 2 Close the multi-purpose sheet feeder. 3 Open the top cover and check that a torn piece of paper does not remain inside the MFC.
Multi-purpose Sheet Feeder Paper is Jammed in the Fuser Unit. 1 Open the top cover. 2 Remove the drum unit. 3 Gently pull out the jammed paper. 4 Reinstall the drum unit. 5 Close the top cover. 198 C H A P T E R N I N E T E E N Paper is Jammed near the Drum Unit or in the Multi-purpose Sheet Feeder 1 Open the multi-purpose sheet feeder to pull the jammed paper upward and out of the feeder. 2 Close the multi-purpose sheet feeder. 3 Open the top cover and check that a torn piece of paper does not remain inside the MFC.
Users Manual - English
Page 215
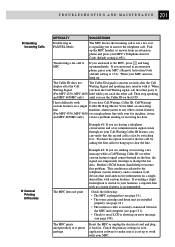
...after the Call Waiting Signal and speaking may and MFC 6650MC only) create a problem sending or receiving fax ...cable is securely connected between the MFC and computer (see page 14.) • The toner cartridge and drum unit are having a telephone ... Calls General Printing Difficulties DIFFICULTY SUGGESTIONS Double ring in your business, a separate line with If you answered at an extension phone, press your MFC. Brother's ECM feature should help overcome this problem. If avoiding a slight interruption is crucial to your application software to clear the line. 201 ...
...after the Call Waiting Signal and speaking may and MFC 6650MC only) create a problem sending or receiving fax ...cable is securely connected between the MFC and computer (see page 14.) • The toner cartridge and drum unit are having a telephone ... Calls General Printing Difficulties DIFFICULTY SUGGESTIONS Double ring in your business, a separate line with If you answered at an extension phone, press your MFC. Brother's ECM feature should help overcome this problem. If avoiding a slight interruption is crucial to your application software to clear the line. 201 ...
Users Manual - English
Page 218
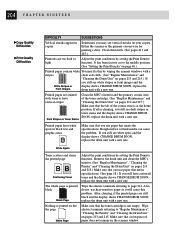
...If after cleaning, you still see white spots and the display shows CHANGE DRUM SOON, replace the drum unit with toner or have vertical stripes Dark Stripes or Toner Stains Clean the MFC's interior and the primary corona wire of the toner cartridge. (See "Regular... of the corona wire is not empty. Rough surface or thick media can cause the problem. Remove the drum unit and clean the MFC's interior. (See "Regular Maintenance", "Cleaning the Printer" and "Cleaning the Drum Unit" on the scanner window. Either the scanner or the primary corona wire for printing s dirty. 204 C H A P T...
...If after cleaning, you still see white spots and the display shows CHANGE DRUM SOON, replace the drum unit with toner or have vertical stripes Dark Stripes or Toner Stains Clean the MFC's interior and the primary corona wire of the toner cartridge. (See "Regular... of the corona wire is not empty. Rough surface or thick media can cause the problem. Remove the drum unit and clean the MFC's interior. (See "Regular Maintenance", "Cleaning the Printer" and "Cleaning the Drum Unit" on the scanner window. Either the scanner or the primary corona wire for printing s dirty. 204 C H A P T...
Users Manual - English
Page 219
...Blurred Page page by themselves. Rough surfaces or thick media can cause a ghost image. In this case, replace the drum unit with the toner cartridge installed. may occur if the MFC has not been used for a long time. Try copying at either edge temperatures, etc. If the markings do not... disappear, it may disappear by wiping the scanner windows with a clean soft cloth. (See "Regular Maintenance", "Cleaning the Printer" and "Cleaning the Drum Unit" on pages...
...Blurred Page page by themselves. Rough surfaces or thick media can cause a ghost image. In this case, replace the drum unit with the toner cartridge installed. may occur if the MFC has not been used for a long time. Try copying at either edge temperatures, etc. If the markings do not... disappear, it may disappear by wiping the scanner windows with a clean soft cloth. (See "Regular Maintenance", "Cleaning the Printer" and "Cleaning the Drum Unit" on pages...
Users Manual - English
Page 224
...your Display Driver software. Contact your Windows® Setup Display selection from the AC outlet. 2 Open the top cover. 3 Hold the drum unit assembly by your MFC. Contact your reseller or Microsoft Support if you need help modifying your PC; Also, follow the steps below to the standard VGA or... SVGA selection. Top Cover Drum Unit however, you transport the MFC, use the MFC with no further problems. Graphics or Text Is Missing When the Document Is Printed This could be damaged, which will ...
...your Display Driver software. Contact your Windows® Setup Display selection from the AC outlet. 2 Open the top cover. 3 Hold the drum unit assembly by your MFC. Contact your reseller or Microsoft Support if you need help modifying your PC; Also, follow the steps below to the standard VGA or... SVGA selection. Top Cover Drum Unit however, you transport the MFC, use the MFC with no further problems. Graphics or Text Is Missing When the Document Is Printed This could be damaged, which will ...
Users Manual - English
Page 225
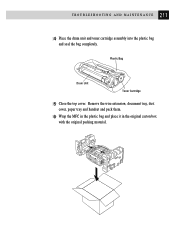
Remove the wire extension, document tray, dust cover, paper tray and handset and pack them. 6 Wrap the MFC in the plastic bag and place it in the original carton box with the original packing material. 211 T R O U B L E S H O O T I N G A N D M A I N T E N A N C E 4 Place the drum unit and toner cartridge assembly into the plastic bag and seal the bag completely. Plastic Bag Drum Unit Toner Cartridge 5 Close the top cover.
Remove the wire extension, document tray, dust cover, paper tray and handset and pack them. 6 Wrap the MFC in the plastic bag and place it in the original carton box with the original packing material. 211 T R O U B L E S H O O T I N G A N D M A I N T E N A N C E 4 Place the drum unit and toner cartridge assembly into the plastic bag and seal the bag completely. Plastic Bag Drum Unit Toner Cartridge 5 Close the top cover.
Users Manual - English
Page 226
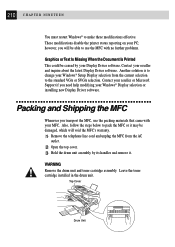
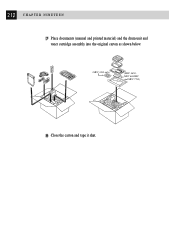
212 C H A P T E R N I N E T E E N 7 Place documents (manual and printed material) and the drum unit and toner cartridge assembly into the original carton as shown below: (MFC 4350 only) (MFC 4650, MFC 6650MC and MFC 7750) 8 Close the carton and tape it shut.
212 C H A P T E R N I N E T E E N 7 Place documents (manual and printed material) and the drum unit and toner cartridge assembly into the original carton as shown below: (MFC 4350 only) (MFC 4650, MFC 6650MC and MFC 7750) 8 Close the carton and tape it shut.
Users Manual - English
Page 227
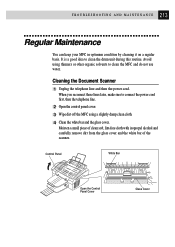
... lines later, make sure to clean the drum unit during this routine. It is a good idea to connect the power cord first, then the telephone line. 2 Open the control panel cover. 3 Wipe dirt off the MFC using thinners or other organic solvents to clean the MFC and do not use water. Cleaning the... and the white bar of the scanner. Control Panel White Bar Open the Control Panel Cover Glass Cover 213 T R O U B L E S H O O T I N G A N D M A I N T E N A N C E Regular Maintenance You can keep your MFC in optimum condition by cleaning it on a regular basis.
... lines later, make sure to clean the drum unit during this routine. It is a good idea to connect the power cord first, then the telephone line. 2 Open the control panel cover. 3 Wipe dirt off the MFC using thinners or other organic solvents to clean the MFC and do not use water. Cleaning the... and the white bar of the scanner. Control Panel White Bar Open the Control Panel Cover Glass Cover 213 T R O U B L E S H O O T I N G A N D M A I N T E N A N C E Regular Maintenance You can keep your MFC in optimum condition by cleaning it on a regular basis.
Users Manual - English
Page 228
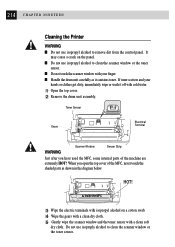
.... HOT! s Do not touch the scanner window with your hands or clothes get dirty, immediately wipe or wash it contains toner. s Handle the drum unit carefully as shown in the diagram below. s Do not use isopropyl alcohol to remove dirt from the control panel. If toner scatters and your... Wipe the gears with a clean dry cloth. 5 Gently wipe the scanner window and the toner sensor with cold water. 1 Open the top cover. 2 Remove the drum unit assembly. When you have used the MFC, some internal parts of the MFC, never touch the shaded parts as it off with a clean soft dry cloth.
.... HOT! s Do not touch the scanner window with your hands or clothes get dirty, immediately wipe or wash it contains toner. s Handle the drum unit carefully as shown in the diagram below. s Do not use isopropyl alcohol to remove dirt from the control panel. If toner scatters and your... Wipe the gears with a clean dry cloth. 5 Gently wipe the scanner window and the toner sensor with cold water. 1 Open the top cover. 2 Remove the drum unit assembly. When you have used the MFC, some internal parts of the MFC, never touch the shaded parts as it off with a clean soft dry cloth.
Users Manual - English
Page 229
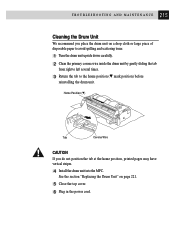
... drop cloth or large piece of disposable paper to avoid spilling and scattering toner. 1 Turn the drum unit upside down carefully. 2 Clean the primary corona wire inside the drum unit by gently sliding the tab from right to left several times. 3 Return the tab to the... home position (w mark position) before reinstalling the drum unit. 215 T R O U B L E S H O O T I N G A N D M A I N T E N A N C E Cleaning the Drum Unit We recommend you do not position the tab at the home position, printed pages may have vertical stripes. 4 Install the drum unit into the MFC.
... drop cloth or large piece of disposable paper to avoid spilling and scattering toner. 1 Turn the drum unit upside down carefully. 2 Clean the primary corona wire inside the drum unit by gently sliding the tab from right to left several times. 3 Return the tab to the... home position (w mark position) before reinstalling the drum unit. 215 T R O U B L E S H O O T I N G A N D M A I N T E N A N C E Cleaning the Drum Unit We recommend you do not position the tab at the home position, printed pages may have vertical stripes. 4 Install the drum unit into the MFC.


