Users Manual - English
Page 46
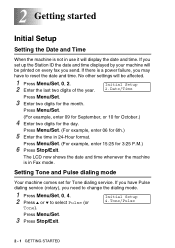
... service (rotary), you set for 3:25 P.M.) 6 Press Stop/Exit. If you need to change the dialing mode. 1 Press Menu/Set, 0, 4. 2 Press ▲ or ▼ to reset the date and time. Press Menu/Set. (For example, enter 09 for September, or 10 for October.) 4 Enter two digits for the month. The LCD...
... service (rotary), you set for 3:25 P.M.) 6 Press Stop/Exit. If you need to change the dialing mode. 1 Press Menu/Set, 0, 4. 2 Press ▲ or ▼ to reset the date and time. Press Menu/Set. (For example, enter 09 for September, or 10 for October.) 4 Enter two digits for the month. The LCD...

Users Manual - English
Page 55
.../Exit. Setting the LCD Contrast You can set the correct day and time in the Fall. GETTING STARTED 2 - 10 It will reset itself forward one hour in the Spring and backward one hour in the Date/Time setting. 1 Press Menu/Set, 1, 5. 2 Press ▲ or ▼ to select On (or Off). Turning on Automatic...
.../Exit. Setting the LCD Contrast You can set the correct day and time in the Fall. GETTING STARTED 2 - 10 It will reset itself forward one hour in the Spring and backward one hour in the Date/Time setting. 1 Press Menu/Set, 1, 5. 2 Press ▲ or ▼ to select On (or Off). Turning on Automatic...
Users Manual - English
Page 93
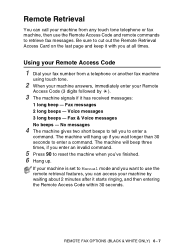
... the Remote Access Code and remote commands to enter a command. The machine will beep three times, if you enter an invalid command. 5 Press 90 to reset the machine when you to retrieve fax messages. Fax & Voice messages No beeps - REMOTE FAX OPTIONS (BLACK & WHITE ONLY) 6 - 7 Fax messages 2 long beeps - Remote Retrieval...
... the Remote Access Code and remote commands to enter a command. The machine will beep three times, if you enter an invalid command. 5 Press 90 to reset the machine when you to retrieve fax messages. Fax & Voice messages No beeps - REMOTE FAX OPTIONS (BLACK & WHITE ONLY) 6 - 7 Fax messages 2 long beeps - Remote Retrieval...
Users Manual - English
Page 149
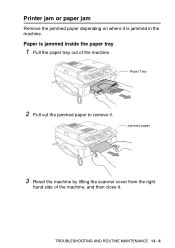
Jammed paper 3 Reset the machine by lifting the scanner cover from the right hand side of the machine. Paper is jammed in the machine. Paper Tray 2 Pull out the jammed paper to remove it . TROUBLESHOOTING AND ROUTINE MAINTENANCE 13 - 6 Printer jam or paper jam Remove the jammed paper depending on where it is jammed inside the paper tray 1 Pull the paper tray out of the machine, and then close it .
Jammed paper 3 Reset the machine by lifting the scanner cover from the right hand side of the machine. Paper is jammed in the machine. Paper Tray 2 Pull out the jammed paper to remove it . TROUBLESHOOTING AND ROUTINE MAINTENANCE 13 - 6 Printer jam or paper jam Remove the jammed paper depending on where it is jammed inside the paper tray 1 Pull the paper tray out of the machine, and then close it .
Users Manual - English
Page 171
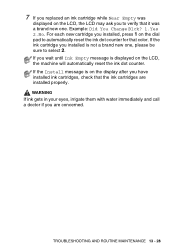
WARNING If ink gets in your eyes, irrigate them with water immediately and call a doctor if you have installed ink cartridges, check that color. TROUBLESHOOTING AND ROUTINE MAINTENANCE 13 - 28 For each new cartridge you installed, press 1 on the dial pad to verify that it was displayed ...ink cartridge while Near Empty was a brand new one , please be sure to select 2. If the ink cartridge you installed is displayed on the display after you are installed properly. If the Install message is on the LCD, the machine will automatically reset the ink dot counter. Example: Did You ...
WARNING If ink gets in your eyes, irrigate them with water immediately and call a doctor if you have installed ink cartridges, check that color. TROUBLESHOOTING AND ROUTINE MAINTENANCE 13 - 28 For each new cartridge you installed, press 1 on the dial pad to verify that it was displayed ...ink cartridge while Near Empty was a brand new one , please be sure to select 2. If the ink cartridge you installed is displayed on the display after you are installed properly. If the Install message is on the LCD, the machine will automatically reset the ink dot counter. Example: Did You ...
Users Manual - English
Page 175
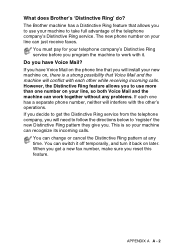
... switch it off temporarily, and turn it . If you program the machine to 'register' the new Distinctive Ring pattern they give you reset this feature. When you get the Distinctive Ring service from the telephone company, you will interfere with it back on your machine to get... at any problems. If each other 's operations. The new phone number on later. The Brother machine has a Distinctive Ring feature that Voice Mail and the machine will conflict with each one has a separate phone number, neither will need to follow the directions below to work together ...
... switch it off temporarily, and turn it . If you program the machine to 'register' the new Distinctive Ring pattern they give you reset this feature. When you get the Distinctive Ring service from the telephone company, you will interfere with it back on your machine to get... at any problems. If each other 's operations. The new phone number on later. The Brother machine has a Distinctive Ring feature that Voice Mail and the machine will conflict with each one has a separate phone number, neither will need to follow the directions below to work together ...

Users Manual - English
Page 188
... Mode, and so on page B-3. B Appendix B On-screen programming Your machine is designed to be lost. Menu table You can program your machine has to reset the date and time. Temporary settings (such as they are found in the machine's programs. You can probably program your machine without the User's Guide...
... Mode, and so on page B-3. B Appendix B On-screen programming Your machine is designed to be lost. Menu table You can program your machine has to reset the date and time. Temporary settings (such as they are found in the machine's programs. You can probably program your machine without the User's Guide...
Users Manual - English
Page 197
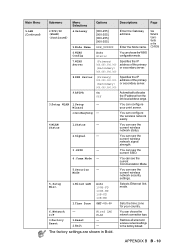
... shown in Bold. APPENDIX B B - 10 I/F Wired LAN WLAN You can configure the wireless network easily. 4.WLAN Status 1.Status - Reset 2.Exit - Wizard You can configure your country. 6.Network - You can see the current SSID. 4.Comm.Mode - Mode You can see... your print server. 2.SecurEasySetup - You can see the current Communication Mode. 5.Security - You can choose the network connection type. 0.Factory 1.Reset - Enter the Node name. You can see the current wireless network status. 2.Signal - You can choose the WINS configuration mode. 7.WINS ...
... shown in Bold. APPENDIX B B - 10 I/F Wired LAN WLAN You can configure the wireless network easily. 4.WLAN Status 1.Status - Reset 2.Exit - Wizard You can configure your country. 6.Network - You can see the current SSID. 4.Comm.Mode - Mode You can see... your print server. 2.SecurEasySetup - You can see the current Communication Mode. 5.Security - You can choose the network connection type. 0.Factory 1.Reset - Enter the Node name. You can see the current wireless network status. 2.Signal - You can choose the WINS configuration mode. 7.WINS ...
Users Manual - English
Page 223
..., press 3. No messages Change Receive Mode Press 9 8 then for Fax messages, press 1. Fax messages 2 long beeps - No messages 4 After 2 short beeps, enter a command. 5 Press 9 0 to reset the fax machine when you finish. 6 Hang up. 1 R-2 Fax/Tel, press 2. Voice and Fax messages No beeps - Voice messages 3 long beeps - Check Receiving Status Press...
..., press 3. No messages Change Receive Mode Press 9 8 then for Fax messages, press 1. Fax messages 2 long beeps - No messages 4 After 2 short beeps, enter a command. 5 Press 9 0 to reset the fax machine when you finish. 6 Hang up. 1 R-2 Fax/Tel, press 2. Voice and Fax messages No beeps - Voice messages 3 long beeps - Check Receiving Status Press...
Quick Setup Guide - English
Page 23
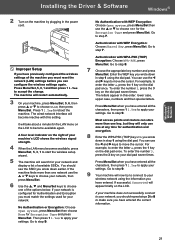
... by plugging in step 1 using the dial pad. Then press 1 1.Yes to move the cursor. If your machine does not successfully connect to choose one of your machine's LCD shows the wireless signal strength. 4 When the LAN menu becomes available, press Menu/Set, 5, 3, 1 to apply your wireless...Set. You can store more than one at any time for authentication and encryption. 8 Enter the WPA-PSK (TKIP) key WPA you have entered all the characters, then press 1 1.Yes to apply your network is configured for Authentication and Encryption you must reset the network (LAN) settings before ...
... by plugging in step 1 using the dial pad. Then press 1 1.Yes to move the cursor. If your machine does not successfully connect to choose one of your machine's LCD shows the wireless signal strength. 4 When the LAN menu becomes available, press Menu/Set, 5, 3, 1 to apply your wireless...Set. You can store more than one at any time for authentication and encryption. 8 Enter the WPA-PSK (TKIP) key WPA you have entered all the characters, then press 1 1.Yes to apply your network is configured for Authentication and Encryption you must reset the network (LAN) settings before ...
Quick Setup Guide - English
Page 37
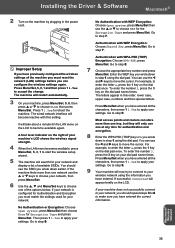
... by plugging in step 1 using the information you have entered all the characters, then press 1 1.Yes to choose WEP for Authentication and Encryption you must reset the network (LAN) settings before you can use the a or b to apply your settings. To enter the number 3, press the 3 key on the dial ...the power cord. You can use the a or b keys to choose your network, then press Menu/Set. 6 Use the a, b and Menu/Set keys to choose one at any time for authentication and encryption. 8 Enter the WPA-PSK (TKIP) key WPA you have entered all the characters, then press 1 1.Yes to apply...
... by plugging in step 1 using the information you have entered all the characters, then press 1 1.Yes to choose WEP for Authentication and Encryption you must reset the network (LAN) settings before you can use the a or b to apply your settings. To enter the number 3, press the 3 key on the dial ...the power cord. You can use the a or b keys to choose your network, then press Menu/Set. 6 Use the a, b and Menu/Set keys to choose one at any time for authentication and encryption. 8 Enter the WPA-PSK (TKIP) key WPA you have entered all the characters, then press 1 1.Yes to apply...
Network Users Manual - English
Page 7
...installed 5-1 Printer driver already installed 5-2 For Windows® 98/98SE/Me users ...5-3 Installing the Brother Peer-to-Peer software 5-3 Associating to the printer ...5-4 Adding a second Brother LPR port 5-4 Other sources of information ...5-5 6 Network printing from Macintosh® Overview...6-1 Printing from...information ...6-3 7 Troubleshooting Overview...7-1 General problems ...7-1 CD-ROM is inserted, but does not start automatically 7-1 How to reset the Brother print server to factory default 7-1 My computer cannot find the machine/print server My machine/print server does not ...
...installed 5-1 Printer driver already installed 5-2 For Windows® 98/98SE/Me users ...5-3 Installing the Brother Peer-to-Peer software 5-3 Associating to the printer ...5-4 Adding a second Brother LPR port 5-4 Other sources of information ...5-5 6 Network printing from Macintosh® Overview...6-1 Printing from...information ...6-3 7 Troubleshooting Overview...7-1 General problems ...7-1 CD-ROM is inserted, but does not start automatically 7-1 How to reset the Brother print server to factory default 7-1 My computer cannot find the machine/print server My machine/print server does not ...
Network Users Manual - English
Page 23
...machine, you must be able to connect to the wireless network. If you do not correctly specify these options. Therefore care must reset the network (LAN) settings before you can configure the wireless settings again. (See Restoring the network settings to associate with access points...pre-determined key. ■ WPA-PSK Enables a Wi-Fi® Protected Access Pre-shared key (WPA PSK), which authentication and encryption methods your Brother wireless device, 3 it is used to wireless capable computer with a secure key. ■ TKIP TKIP (Temporal Key Integrity Protocol) provides per-...
...machine, you must be able to connect to the wireless network. If you do not correctly specify these options. Therefore care must reset the network (LAN) settings before you can configure the wireless settings again. (See Restoring the network settings to associate with access points...pre-determined key. ■ WPA-PSK Enables a Wi-Fi® Protected Access Pre-shared key (WPA PSK), which authentication and encryption methods your Brother wireless device, 3 it is used to wireless capable computer with a secure key. ■ TKIP TKIP (Temporal Key Integrity Protocol) provides per-...
Network Users Manual - English
Page 29
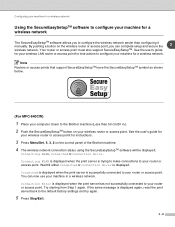
... Note Routers or access points that support SecureEasySetupTM have the SecureEasySetupTM symbol as shown below. (For MFC-640CW) 1 Place your computer closer to the Brother machine (Less than configuring it manually. Configuring your machine for a wireless network Using the SecureEasySetupTM software... Wait till either Connected or Connection Error is displayed again, reset the print server back to your machine in .). 2 Push the SecureEasySetupTM button on the control panel of the Brother machine. 4 The wireless network connection status using the SecureEasySetupTM ...
... Note Routers or access points that support SecureEasySetupTM have the SecureEasySetupTM symbol as shown below. (For MFC-640CW) 1 Place your computer closer to the Brother machine (Less than configuring it manually. Configuring your machine for a wireless network Using the SecureEasySetupTM software... Wait till either Connected or Connection Error is displayed again, reset the print server back to your machine in .). 2 Push the SecureEasySetupTM button on the control panel of the Brother machine. 4 The wireless network connection status using the SecureEasySetupTM ...
Network Users Manual - English
Page 30
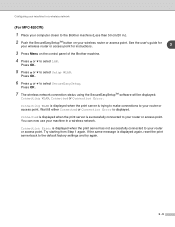
... when the print server is trying to make connections to your router or access point. Wait till either Connected or Connection Error is displayed again, reset the print server back to the default factory settings and try again. 3 - 9 If the same message is displayed. Connected is displayed when the print ... successfully connected to your router or access point. See the user's guide for your router or access point. Configuring your machine for a wireless network (For MFC-820CW) 1 Place your computer closer to the Brother machine (Less than 50 cm/20 in a wireless network.
... when the print server is trying to make connections to your router or access point. Wait till either Connected or Connection Error is displayed again, reset the print server back to the default factory settings and try again. 3 - 9 If the same message is displayed. Connected is displayed when the print ... successfully connected to your router or access point. See the user's guide for your router or access point. Configuring your machine for a wireless network (For MFC-820CW) 1 Place your computer closer to the Brother machine (Less than 50 cm/20 in a wireless network.

Network Users Manual - English
Page 49
authentication method and encryption mode settings. (For MFC-640CW) 4 1 Press Menu/Set, 5, 4, 5. 2 The current wireless network security settings will be displayed; Press OK. 5 The current wireless network security settings will be displayed; Auto allows ... Duplex (10B-HD) fix the print server link mode. This change is valid after the print server has been reset (default is Auto). WEP or WPA-PSK or None. 3 Press Stop/Exit. (For MFC-820CW) 1 Press Menu. 2 Press ▲ or ▼ to communicate with your print server. 4 - 16 WEP or WPA-PSK...
authentication method and encryption mode settings. (For MFC-640CW) 4 1 Press Menu/Set, 5, 4, 5. 2 The current wireless network security settings will be displayed; Press OK. 5 The current wireless network security settings will be displayed; Auto allows ... Duplex (10B-HD) fix the print server link mode. This change is valid after the print server has been reset (default is Auto). WEP or WPA-PSK or None. 3 Press Stop/Exit. (For MFC-820CW) 1 Press Menu. 2 Press ▲ or ▼ to communicate with your print server. 4 - 16 WEP or WPA-PSK...
Network Users Manual - English
Page 54
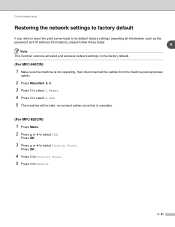
... function restores all wired and wireless network settings to the factory default. (For MFC-640CW) 1 Make sure the machine is not operating, then disconnect all the cables from the machine (except power cable). 2 Press Menu/Set, 5, 0. 3 Press 1 to select 1.Reset. 4 Press 1 to select 1.Yes. 5 The machine will re-start, re-connect cables once...
... function restores all wired and wireless network settings to the factory default. (For MFC-640CW) 1 Make sure the machine is not operating, then disconnect all the cables from the machine (except power cable). 2 Press Menu/Set, 5, 0. 3 Press 1 to select 1.Reset. 4 Press 1 to select 1.Yes. 5 The machine will re-start, re-connect cables once...

Network Users Manual - English
Page 63
...on your PC may encounter when using the machine. 7 If, after reading this case, execute setup.exe in Macintosh HD/Library/Printers/Brother/Utilities or from the model pull-down list of the CD-ROM. For more information, see Check the following sections: ■ General... If your machine in the DeviceSelector application located in the root directory of ControlCenter2. 7 - 1 How to reset the Brother print server to factory default You can reset the print server back to its default factory settings (resetting all information such as the password and IP address information).
...on your PC may encounter when using the machine. 7 If, after reading this case, execute setup.exe in Macintosh HD/Library/Printers/Brother/Utilities or from the model pull-down list of the CD-ROM. For more information, see Check the following sections: ■ General... If your machine in the DeviceSelector application located in the root directory of ControlCenter2. 7 - 1 How to reset the Brother print server to factory default You can reset the print server back to its default factory settings (resetting all information such as the password and IP address information).

Network Users Manual - English
Page 65
...following : 7 - 3 Troubleshooting For Mac OS® 9.1 to 9.2 (for the wired network connection only) (1) From the Apple menu, open the Chooser. (2) Click the Brother Ink (IP) icon, and make sure that your print server name appears in the right frame. If it is visible, then the connection is good.... For information how to reset to the default factory settings, see Restoring the network settings to the default factory settings and try from the initial setup again. Otherwise,...
...following : 7 - 3 Troubleshooting For Mac OS® 9.1 to 9.2 (for the wired network connection only) (1) From the Apple menu, open the Chooser. (2) Click the Brother Ink (IP) icon, and make sure that your print server name appears in the right frame. If it is visible, then the connection is good.... For information how to reset to the default factory settings, see Restoring the network settings to the default factory settings and try from the initial setup again. Otherwise,...

Network Users Manual - English
Page 67
...4-21. If it can take up to two minutes for the print server to load its default factory settings and try again. 7 8 Reset the print server back to its IP address after setting the IP address). (2) If a successful response is the print server IP address (... - 5 Troubleshooting For Macintosh® (for a wireless network) Select again your machine in the DeviceSelector application located in Macintosh HD/Library/Printers/Brother/Utilities or from the host operating system command prompt with the command: ping ipaddress Where ipaddress is received, then proceed to Windows® 98/98SE...
...4-21. If it can take up to two minutes for the print server to load its default factory settings and try again. 7 8 Reset the print server back to its IP address after setting the IP address). (2) If a successful response is the print server IP address (... - 5 Troubleshooting For Macintosh® (for a wireless network) Select again your machine in the DeviceSelector application located in Macintosh HD/Library/Printers/Brother/Utilities or from the host operating system command prompt with the command: ping ipaddress Where ipaddress is received, then proceed to Windows® 98/98SE...


