Users Manual - English
Page 23
... 13-1 Error messages 13-1 Document jams 13-5 Document is jammed in the top of the ADF unit ... 13-5 Document is jammed inside the ADF unit 13-5 Printer jam or paper jam 13-6 Paper is jammed inside the paper tray 13-6 Paper is jammed inside the machine 13-7 If you...-30 A Appendix A A-1 Setting up telephone services A-1 Distinctive Ring A-1 What does your telephone company's 'Distinctive Ring' do A-1 What does Brother's 'Distinctive Ring' do A-2 Do you have Voice Mail A-2 Before you choose the ring pattern to register .......A-3 Registering the Distinctive Ring pattern...
... 13-1 Error messages 13-1 Document jams 13-5 Document is jammed in the top of the ADF unit ... 13-5 Document is jammed inside the ADF unit 13-5 Printer jam or paper jam 13-6 Paper is jammed inside the paper tray 13-6 Paper is jammed inside the machine 13-7 If you...-30 A Appendix A A-1 Setting up telephone services A-1 Distinctive Ring A-1 What does your telephone company's 'Distinctive Ring' do A-1 What does Brother's 'Distinctive Ring' do A-2 Do you have Voice Mail A-2 Before you choose the ring pattern to register .......A-3 Registering the Distinctive Ring pattern...
Users Manual - English
Page 34
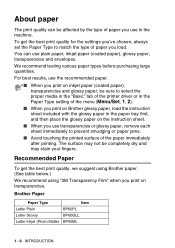
...Paper Type to match the type of paper you print on inkjet paper (coated paper), transparencies and glossy paper, be completely dry and may not be sure to prevent smudging or paper jams. ■ Avoid touching the printed surface of the paper immediately after printing. About paper... Paper Type setting of the menu (Menu/Set, 1, 2). ■ When you print on Brother glossy paper, load the instruction sheet included with the glossy paper in the machine. For best results, use plain paper, inkjet paper (coated paper), glossy paper, transparencies and envelopes. Brother Paper Paper Type...
...Paper Type to match the type of paper you print on inkjet paper (coated paper), transparencies and glossy paper, be completely dry and may not be sure to prevent smudging or paper jams. ■ Avoid touching the printed surface of the paper immediately after printing. About paper... Paper Type setting of the menu (Menu/Set, 1, 2). ■ When you print on Brother glossy paper, load the instruction sheet included with the glossy paper in the machine. For best results, use plain paper, inkjet paper (coated paper), glossy paper, transparencies and envelopes. Brother Paper Paper Type...
Users Manual - English
Page 40
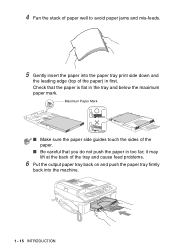
it may lift at the back of the tray and cause feed problems. 6 Put the output paper tray back on and push the paper tray firmly back into the paper tray print side down and the leading edge (top of the paper) in first. Maximum Paper Mark ■ Make sure the paper side guides touch the sides of the paper. ■ Be careful that the paper is flat in too far; 4 Fan the stack of paper well to avoid paper jams and mis-feeds. 5 Gently insert the paper into the machine. 1 - 15 INTRODUCTION Check that you do not push the paper in the tray and below the maximum paper mark.
it may lift at the back of the tray and cause feed problems. 6 Put the output paper tray back on and push the paper tray firmly back into the paper tray print side down and the leading edge (top of the paper) in first. Maximum Paper Mark ■ Make sure the paper side guides touch the sides of the paper. ■ Be careful that the paper is flat in too far; 4 Fan the stack of paper well to avoid paper jams and mis-feeds. 5 Gently insert the paper into the machine. 1 - 15 INTRODUCTION Check that you do not push the paper in the tray and below the maximum paper mark.
Users Manual - English
Page 49
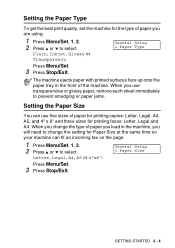
... same time so your machine can use transparencies or glossy paper, remove each sheet immediately to prevent smudging or paper jams. Setting the Paper Size You can fit an incoming fax on the page. 1 Press Menu/Set, 1, 3. 2 Press ▲ or ▼ to select Plain, Inkjet, Glossy or Transparency. When you use five sizes of the...
... same time so your machine can use transparencies or glossy paper, remove each sheet immediately to prevent smudging or paper jams. Setting the Paper Size You can fit an incoming fax on the page. 1 Press Menu/Set, 1, 3. 2 Press ▲ or ▼ to select Plain, Inkjet, Glossy or Transparency. When you use five sizes of the...
Users Manual - English
Page 146
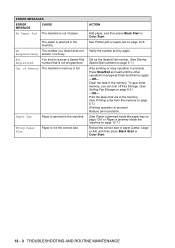
...the correct size of paper (Letter, Legal or A4), and then press Black Start or Color Start. 13 - 3 TROUBLESHOOTING AND ROUTINE MAINTENANCE The paper is jammed in the machine. ACTION Add paper, and then press Black Start or Color Start. See Printer jam or paper jam on page 5-1.) (Fax...4-7.) (Printing operation in the memory. Paper Jam Paper is jammed in the machine. Wrong Paper Size Paper is not the correct size. Clear the data in process) Reduce print resolution. (See Paper is jammed inside the paper tray on page 13-6 or Paper is jammed inside the machine on page 6-3.) -...
...the correct size of paper (Letter, Legal or A4), and then press Black Start or Color Start. 13 - 3 TROUBLESHOOTING AND ROUTINE MAINTENANCE The paper is jammed in the machine. ACTION Add paper, and then press Black Start or Color Start. See Printer jam or paper jam on page 5-1.) (Fax...4-7.) (Printing operation in the memory. Paper Jam Paper is jammed in the machine. Wrong Paper Size Paper is not the correct size. Clear the data in process) Reduce print resolution. (See Paper is jammed inside the paper tray on page 13-6 or Paper is jammed inside the machine on page 6-3.) -...
Users Manual - English
Page 148
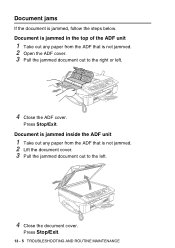
Document is jammed inside the ADF unit 1 Take out any paper from the ADF that is not jammed. 2 Open the ADF cover. 3 Pull the jammed document out to the left . 4 Close the ADF cover. Press Stop/Exit. 13 - 5 TROUBLESHOOTING AND ROUTINE MAINTENANCE Press Stop/Exit. Document jams If the document is not jammed. 2 Lift the document cover. 3 Pull the jammed document out to the right or left . 4 Close the document cover. Document is jammed in the top of the ADF unit 1 Take out any paper from the ADF that is jammed, follow the steps below.
Document is jammed inside the ADF unit 1 Take out any paper from the ADF that is not jammed. 2 Open the ADF cover. 3 Pull the jammed document out to the left . 4 Close the ADF cover. Press Stop/Exit. 13 - 5 TROUBLESHOOTING AND ROUTINE MAINTENANCE Press Stop/Exit. Document jams If the document is not jammed. 2 Lift the document cover. 3 Pull the jammed document out to the right or left . 4 Close the document cover. Document is jammed in the top of the ADF unit 1 Take out any paper from the ADF that is jammed, follow the steps below.
Users Manual - English
Page 149
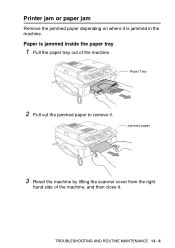
Paper Tray 2 Pull out the jammed paper to remove it . TROUBLESHOOTING AND ROUTINE MAINTENANCE 13 - 6 Paper is jammed in the machine. Printer jam or paper jam Remove the jammed paper depending on where it is jammed inside the paper tray 1 Pull the paper tray out of the machine, and then close it . Jammed paper 3 Reset the machine by lifting the scanner cover from the right hand side of the machine.
Paper Tray 2 Pull out the jammed paper to remove it . TROUBLESHOOTING AND ROUTINE MAINTENANCE 13 - 6 Paper is jammed in the machine. Printer jam or paper jam Remove the jammed paper depending on where it is jammed inside the paper tray 1 Pull the paper tray out of the machine, and then close it . Jammed paper 3 Reset the machine by lifting the scanner cover from the right hand side of the machine.
Users Manual - English
Page 150
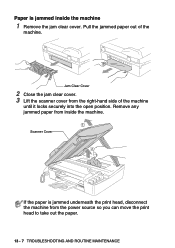
Remove any jammed paper from the right-hand side of the machine. Scanner Cover If the paper is jammed inside the machine. Jam Clear Cover 2 Close the jam clear cover. 3 Lift the scanner cover from inside the machine 1 Remove the jam clear cover. Paper is jammed underneath the print head, disconnect the machine from the power source so you can move the print head to take out the paper. 13 - 7 TROUBLESHOOTING AND ROUTINE MAINTENANCE Pull the jammed paper out of the machine until it locks securely into the open position.
Remove any jammed paper from the right-hand side of the machine. Scanner Cover If the paper is jammed inside the machine. Jam Clear Cover 2 Close the jam clear cover. 3 Lift the scanner cover from inside the machine 1 Remove the jam clear cover. Paper is jammed underneath the print head, disconnect the machine from the power source so you can move the print head to take out the paper. 13 - 7 TROUBLESHOOTING AND ROUTINE MAINTENANCE Pull the jammed paper out of the machine until it locks securely into the open position.
Users Manual - English
Page 168
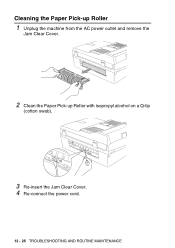
Cleaning the Paper Pick-up Roller 1 Unplug the machine from the AC power outlet and remove the Jam Clear Cover. 2 Clean the Paper Pick-up Roller with isopropyl alcohol on a Q-tip (cotton swab). 3 Re-insert the Jam Clear Cover. 4 Re-connect the power cord. 13 - 25 TROUBLESHOOTING AND ROUTINE MAINTENANCE
Cleaning the Paper Pick-up Roller 1 Unplug the machine from the AC power outlet and remove the Jam Clear Cover. 2 Clean the Paper Pick-up Roller with isopropyl alcohol on a Q-tip (cotton swab). 3 Re-insert the Jam Clear Cover. 4 Re-connect the power cord. 13 - 25 TROUBLESHOOTING AND ROUTINE MAINTENANCE
Users Manual - English
Page 218
sending 3-1 at end of conversation .. 3-6 automatic 3-5 Broadcasting 3-12 canceling from memory 3-11 color fax 3-3 compatibility 13-14 contrast 3-7 Dial tone detection .... 13-14 enter Fax mode 3-1 from memory (Dual Access) ....... 3-2, 3-9 from scanner glass ....... 3-4...replacing 13-26 Ink Dot Counter 13-26 J Jacks convert to RJ11 jack triplex adapter A-12 EXT external telephone .........A-9 TAD (answering machine A-9 Jams document 13-5 paper 13-5 L LCD (liquid crystal display B-1, B-2 contrast 2-10 Help List 8-3 M Apple® Macintosh® See Software User's Guide on the ...
sending 3-1 at end of conversation .. 3-6 automatic 3-5 Broadcasting 3-12 canceling from memory 3-11 color fax 3-3 compatibility 13-14 contrast 3-7 Dial tone detection .... 13-14 enter Fax mode 3-1 from memory (Dual Access) ....... 3-2, 3-9 from scanner glass ....... 3-4...replacing 13-26 Ink Dot Counter 13-26 J Jacks convert to RJ11 jack triplex adapter A-12 EXT external telephone .........A-9 TAD (answering machine A-9 Jams document 13-5 paper 13-5 L LCD (liquid crystal display B-1, B-2 contrast 2-10 Help List 8-3 M Apple® Macintosh® See Software User's Guide on the ...
Users Manual - English
Page 219
...11 Default Settings 10-9 DPOF printing 10-8 from memory 4-7 improving quality ...........13-15 paper jams 13-6 report 8-3 INDEX I - 4 O Out of Area (Caller ID) ........A-5 Outgoing Message (Msg Ctr OGM 7-2 P Paging 6-2 programming your pager number 6-1 Paper 1-9, S-2 document size 3-3 Size 2-4 size of document 1-6 Type 2-4 PaperPort®... difficulties 13-11 multi-line (PBX A-14 roll over lines A-12 two-line phone system ... Memory Stick 10-1 paper & size 10-9 paper and size 10-13 Printing images 10-6 Printing Index 10-5 quality 10-13 scan to card 10-12 Secure Digital...
...11 Default Settings 10-9 DPOF printing 10-8 from memory 4-7 improving quality ...........13-15 paper jams 13-6 report 8-3 INDEX I - 4 O Out of Area (Caller ID) ........A-5 Outgoing Message (Msg Ctr OGM 7-2 P Paging 6-2 programming your pager number 6-1 Paper 1-9, S-2 document size 3-3 Size 2-4 size of document 1-6 Type 2-4 PaperPort®... difficulties 13-11 multi-line (PBX A-14 roll over lines A-12 two-line phone system ... Memory Stick 10-1 paper & size 10-9 paper and size 10-13 Printing images 10-6 Printing Index 10-5 quality 10-13 scan to card 10-12 Secure Digital...
Users Manual - English
Page 221
... settings ..... 9-3 Text, entering B-12 special characters ..........B-13 Tone signals on Pulse line .... 5-6 Troubleshooting 13-1 checking ink volume ..... 13-19 document jam 13-5 error messages on LCD 13-1 if you are having difficulty copying 13-12 incoming calls 13-12 Network 13-13 phone line 13-14...or receiving faxes 13-10 Printing Receiving Faxes 13-10 receiving faxes .......... 13-11 scanning 13-12 sending faxes 13-11 software 13-12 paper jam 13-6 print quality 13-15 True2Life® PhotoCapture Center 10-10 Two-line phone system .....A-12 U Unable to Clean 13-4 Unable to...
... settings ..... 9-3 Text, entering B-12 special characters ..........B-13 Tone signals on Pulse line .... 5-6 Troubleshooting 13-1 checking ink volume ..... 13-19 document jam 13-5 error messages on LCD 13-1 if you are having difficulty copying 13-12 incoming calls 13-12 Network 13-13 phone line 13-14...or receiving faxes 13-10 Printing Receiving Faxes 13-10 receiving faxes .......... 13-11 scanning 13-12 sending faxes 13-11 software 13-12 paper jam 13-6 print quality 13-15 True2Life® PhotoCapture Center 10-10 Two-line phone system .....A-12 U Unable to Clean 13-4 Unable to...
Quick Setup Guide - English
Page 7
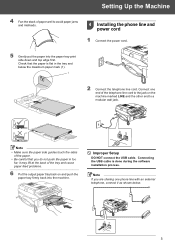
... do not push the paper in the tray and below . 5 Connect one phone line with an external telephone, connect it may lift at the back of the tray and cause paper feed problems. 6 Put the output paper tray back on the machine marked LINE and the other end to avoid paper jams and misfeeds. 4 Installing the...
... do not push the paper in the tray and below . 5 Connect one phone line with an external telephone, connect it may lift at the back of the tray and cause paper feed problems. 6 Put the output paper tray back on the machine marked LINE and the other end to avoid paper jams and misfeeds. 4 Installing the...
Software Users Manual - English
Page 10
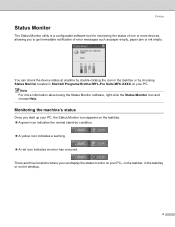
...paper empty, paper jam or ink empty. You can display the status monitor on the desktop. 4 Note For more devices, allowing you start up your PC, the Status Monitor icon appears on the tasktray. „ A green icon indicates the normal stand-by choosing Status Monitor located in Start/All Programs/Brother/MFL-Pro Suite MFC...-XXXX on your PC-in the taskbar, in the tasktray or by condition. „ A yellow icon indicates a warning. „ A red icon indicates an error has occurred. Monitoring the machine's status 1 Once you to get immediate notification of one...
...paper empty, paper jam or ink empty. You can display the status monitor on the desktop. 4 Note For more devices, allowing you start up your PC, the Status Monitor icon appears on the tasktray. „ A green icon indicates the normal stand-by choosing Status Monitor located in Start/All Programs/Brother/MFL-Pro Suite MFC...-XXXX on your PC-in the taskbar, in the tasktray or by condition. „ A yellow icon indicates a warning. „ A red icon indicates an error has occurred. Monitoring the machine's status 1 Once you to get immediate notification of one...
Software Users Manual - English
Page 106
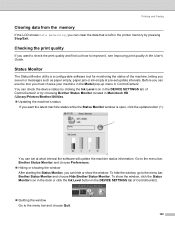
...8 If the LCD shows Data Remaining, you must choose your machine in the Model pop-up menu in ControlCenter2. Go to the menu bar, Brother Status Monitor and choose Preferences. „ Hiding or showing the window After starting the Status Monitor, you want the latest machine status while the ... Level button in the User's Guide. To show the window. To hide the window, go to improve it, see error messages such as paper empty, paper jam or ink empty at pre-set at what interval the software will update the machine status information. You can set update intervals. Status Monitor 8...
...8 If the LCD shows Data Remaining, you must choose your machine in the Model pop-up menu in ControlCenter2. Go to the menu bar, Brother Status Monitor and choose Preferences. „ Hiding or showing the window After starting the Status Monitor, you want the latest machine status while the ... Level button in the User's Guide. To show the window. To hide the window, go to improve it, see error messages such as paper empty, paper jam or ink empty at pre-set at what interval the software will update the machine status information. You can set update intervals. Status Monitor 8...


