
Quick Setup Guide - English
Page 1
... directly from the driver or go to http://solutions.brother.com Keep this "Quick Setup Guide" for quick and easy reference at all times. Setting Up the Machine Windows® Windows® Network Mac OS® X Installing the Driver & Software MFC-210C Quick Setup Guide MFC-420CN MFC-620CN Before you can use the machine, you must...
... directly from the driver or go to http://solutions.brother.com Keep this "Quick Setup Guide" for quick and easy reference at all times. Setting Up the Machine Windows® Windows® Network Mac OS® X Installing the Driver & Software MFC-210C Quick Setup Guide MFC-420CN MFC-620CN Before you can use the machine, you must...
Quick Setup Guide - English
Page 5
... CD-ROM "MFL-Pro Suite 12 For USB Interface Cable Users ■ For Windows® 98/98SE/Me/2000 Professional/XP 14 For Network Interface Cable Users (MFC-420CN, MFC-620CN only) ■ For Windows® 98/98SE/Me/2000 Professional/XP 17 For USB Interface Cable Users 20 ... For Mac OS® 8.6 to 9.2 28 ■ For Network Users (MFC-420CN, MFC-620CN only) Network User's Guide Chapter Map 30 Restoring the Network Settings to Factory Default 30 Installing the BRAdmin Professional Configuration Utility (Windows® only 31 Setting your IP Address, Subnet Mask and Gateway using BRAdmin...
... CD-ROM "MFL-Pro Suite 12 For USB Interface Cable Users ■ For Windows® 98/98SE/Me/2000 Professional/XP 14 For Network Interface Cable Users (MFC-420CN, MFC-620CN only) ■ For Windows® 98/98SE/Me/2000 Professional/XP 17 For USB Interface Cable Users 20 ... For Mac OS® 8.6 to 9.2 28 ■ For Network Users (MFC-420CN, MFC-620CN only) Network User's Guide Chapter Map 30 Restoring the Network Settings to Factory Default 30 Installing the BRAdmin Professional Configuration Utility (Windows® only 31 Setting your IP Address, Subnet Mask and Gateway using BRAdmin...

Quick Setup Guide - English
Page 7
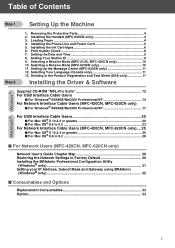
... be connected to a grounded/ earthed plug. ■ Since the MFC is grounded through the power outlet, you can protect yourself when you are sharing one phone line with an external telephone answering machine, connect it as shown below . 2 Connect the telephone line cord. DO NOT ...as shown below . Please set the Receive Mode to "External TAD" if you connect the MFC to a modular wall jack. If you are sharing one end of the User's Guide. Setting Up the Machine Windows® Windows® Network 4 Installing the Phone Line and Power Cord 1 Connect the power cord.
... be connected to a grounded/ earthed plug. ■ Since the MFC is grounded through the power outlet, you can protect yourself when you are sharing one phone line with an external telephone answering machine, connect it as shown below . 2 Connect the telephone line cord. DO NOT ...as shown below . Please set the Receive Mode to "External TAD" if you connect the MFC to a modular wall jack. If you are sharing one end of the User's Guide. Setting Up the Machine Windows® Windows® Network 4 Installing the Phone Line and Power Cord 1 Connect the power cord.
Quick Setup Guide - English
Page 9
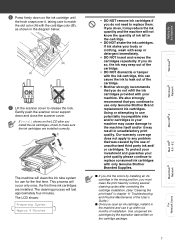
...Mac OS® 8.6 - 9.2 Mac OS® X Windows® Network Windows® Setting Up the Machine If you continue to make sure the ink cartridges are installed. If ink stains your body or clothing, wash with the cartridge color (B), as shown in unsatisfactory print quality. We also strongly recommend... 4 Minutes • DO NOT remove ink cartridges if you do not refill the ink cartridges provided with only Genuine Brother Branded Supplies. ■ If you mix the colors by installing an ink cartridge in the wrong position, you open an ink cartridge, install it in the cartridge. &#...
...Mac OS® 8.6 - 9.2 Mac OS® X Windows® Network Windows® Setting Up the Machine If you continue to make sure the ink cartridges are installed. If ink stains your body or clothing, wash with the cartridge color (B), as shown in unsatisfactory print quality. We also strongly recommend... 4 Minutes • DO NOT remove ink cartridges if you do not refill the ink cartridges provided with only Genuine Brother Branded Supplies. ■ If you mix the colors by installing an ink cartridge in the wrong position, you open an ink cartridge, install it in the cartridge. &#...
Quick Setup Guide - English
Page 11
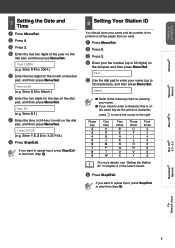
...:03 (e.g. Enter 0 4 for 2004.) 5 Enter the two digits for 3:25 P.M.) 8 Press Stop/Exit. Setting Up the Machine Windows® Windows® Network 7 Setting the Date and Time 1 Press Menu/Set. 2 Press 0. 3 Press 2. 4 Enter the last two digits... of the User's Guide. 6 Press Stop/Exit. Press One Two Three Four key time times times times 2 A B C 2 3 D E F 3 4 G H I 4 5 J K L 5 6 M N O 6 7 P Q R S 8 T U V 8 9 W X Y Z For ...
...:03 (e.g. Enter 0 4 for 2004.) 5 Enter the two digits for 3:25 P.M.) 8 Press Stop/Exit. Setting Up the Machine Windows® Windows® Network 7 Setting the Date and Time 1 Press Menu/Set. 2 Press 0. 3 Press 2. 4 Enter the last two digits... of the User's Guide. 6 Press Stop/Exit. Press One Two Three Four key time times times times 2 A B C 2 3 D E F 3 4 G H I 4 5 J K L 5 6 M N O 6 7 P Q R S 8 T U V 8 9 W X Y Z For ...
Quick Setup Guide - English
Page 13
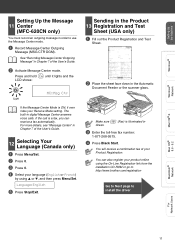
... rides your language (English or French) by using the On-Line Registration link from the installation CD-ROM or go to http://www.brother.com/registration Go to Next page to use the Message Center mode. 1 Record Message Center Outgoing Message (MSG CTR OGM). Make sure...OS® 8.6 - 9.2 Macintosh® Network For Network Users 11 You can receive a fax automatically. Setting Up the Machine Windows® Windows® Network Setting Up the Message 11 Center (MFC-620CN only) You must record an outgoing message in 3 Enter the toll-free fax number: 1-877-268-9575. 4 Press Black ...
... rides your language (English or French) by using the On-Line Registration link from the installation CD-ROM or go to http://www.brother.com/registration Go to Next page to use the Message Center mode. 1 Record Message Center Outgoing Message (MSG CTR OGM). Make sure...OS® 8.6 - 9.2 Macintosh® Network For Network Users 11 You can receive a fax automatically. Setting Up the Machine Windows® Windows® Network Setting Up the Message 11 Center (MFC-620CN only) You must record an outgoing message in 3 Enter the toll-free fax number: 1-877-268-9575. 4 Press Black ...
Quick Setup Guide - English
Page 15
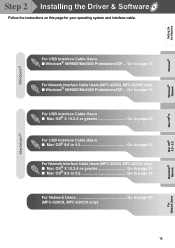
... Go to page 28 For Network Users Go to page 14 For Network Interface Cable Users (MFC-420CN, MFC-620CN only) ■ Windows® 98/98SE/Me/2000 Professional/XP ... Go to page 30 (MFC-420CN, MFC-620CN only) 13 Mac OS® 8.6 - 9.2 Macintosh® Network For Network Users Setting Up... the Machine Windows® Windows® Network Mac OS® X Step 2 Installing the Driver & Software Follow the instructions ...
... Go to page 28 For Network Users Go to page 14 For Network Interface Cable Users (MFC-420CN, MFC-620CN only) ■ Windows® 98/98SE/Me/2000 Professional/XP ... Go to page 30 (MFC-420CN, MFC-620CN only) 13 Mac OS® 8.6 - 9.2 Macintosh® Network For Network Users Setting Up... the Machine Windows® Windows® Network Mac OS® X Step 2 Installing the Driver & Software Follow the instructions ...
Quick Setup Guide - English
Page 16
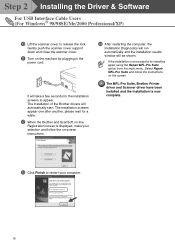
...PC restarts, the installation of the machine. ■ Brother recommends you have to install a Windows® 2000 update first. If this window does not appear, use Windows® Explorer to run the setup.exe program from Step 4 to install the Windows® updates. If the installation does not continue ...see the following screen, click OK to install the MFL-Pro Suite. 14 When instructed, click OK to start installation of the Brother CD-ROM. Then the installation will appear. Click Install MFL-Pro Suite. ■ If the installation does not continue automatically, please...
...PC restarts, the installation of the machine. ■ Brother recommends you have to install a Windows® 2000 update first. If this window does not appear, use Windows® Explorer to run the setup.exe program from Step 4 to install the Windows® updates. If the installation does not continue ...see the following screen, click OK to install the MFL-Pro Suite. 14 When instructed, click OK to start installation of the Brother CD-ROM. Then the installation will appear. Click Install MFL-Pro Suite. ■ If the installation does not continue automatically, please...
Quick Setup Guide - English
Page 17
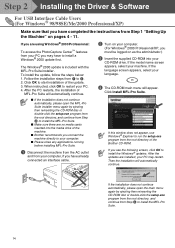
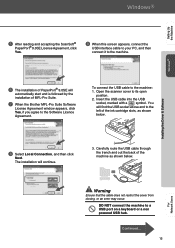
Windows® Installing the Driver & Software 6 The installation of PaperPort® 9.0SE will automatically start and is followed by the installation of the machine as shown ... Agreement. You will continue. 3. Carefully route the USB cable through the trench and out the back of MFL-Pro Suite. 7 When the Brother MFL-Pro Suite Software License Agreement window appears, click Yes, if you agree to the left of the ink cartridge slots, as shown below . 8 Select Local Connection, and then...
Windows® Installing the Driver & Software 6 The installation of PaperPort® 9.0SE will automatically start and is followed by the installation of the machine as shown ... Agreement. You will continue. 3. Carefully route the USB cable through the trench and out the back of MFL-Pro Suite. 7 When the Brother MFL-Pro Suite Software License Agreement window appears, click Yes, if you agree to the left of the ink cartridge slots, as shown below . 8 Select Local Connection, and then...
Quick Setup Guide - English
Page 18
...one after another, please wait for the installation screens to restart your selection and follow the instructions on the screen. D After restarting the computer, the Installation Diagnostics will run automatically and the installation results window will automatically start. If the installation is now complete. The installation of the Brother... drivers will be shown. C Click Finish to appear. B When the Brother and ScanSoft on-line ...
...one after another, please wait for the installation screens to restart your selection and follow the instructions on the screen. D After restarting the computer, the Installation Diagnostics will run automatically and the installation results window will automatically start. If the installation is now complete. The installation of the Brother... drivers will be shown. C Click Finish to appear. B When the Brother and ScanSoft on-line ...

Quick Setup Guide - English
Page 19
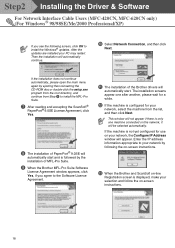
Click Install MFL-Pro Suite. If this window does not appear, use Windows® Explorer to the machine: 1. To connect the network interface cable to run the setup.exe program from the root directory of the Brother CD-ROM. Insert the network cable into your language. 3. If the ...machine, and then connect it . If the model name screen appears, select your hub. Setting Up the Machine Windows® For Network Interface Cable Users (MFC-420CN, MFC-620CN only) (Windows® 98/98SE/Me/2000 Professional/XP) Make sure that you have completed the instructions from closing, or an...
Click Install MFL-Pro Suite. If this window does not appear, use Windows® Explorer to the machine: 1. To connect the network interface cable to run the setup.exe program from the root directory of the Brother CD-ROM. Insert the network cable into your language. 3. If the ...machine, and then connect it . If the model name screen appears, select your hub. Setting Up the Machine Windows® For Network Interface Cable Users (MFC-420CN, MFC-620CN only) (Windows® 98/98SE/Me/2000 Professional/XP) Make sure that you have completed the instructions from closing, or an...
Quick Setup Guide - English
Page 20
..., MFC-620CN only) (For Windows® 98/98SE/Me/2000 Professional/XP) If you agree to install the MFL-Pro Suite. 7 After reading and accepting the ScanSoft® PaperPort® 9.0SE License Agreement, click Yes. 8 The installation of PaperPort® 9.0SE will automatically continue. 0 Select Network Connection, and then click Next. C When the Brother...
..., MFC-620CN only) (For Windows® 98/98SE/Me/2000 Professional/XP) If you agree to install the MFL-Pro Suite. 7 After reading and accepting the ScanSoft® PaperPort® 9.0SE License Agreement, click Yes. 8 The installation of PaperPort® 9.0SE will automatically continue. 0 Select Network Connection, and then click Next. C When the Brother...
Quick Setup Guide - English
Page 21
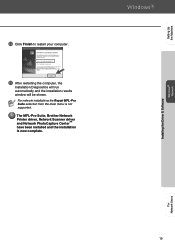
The MFL-Pro Suite, Brother Network Printer driver, Network Scanner driver and Network PhotoCapture Center™ have been installed and the installation is not supported. E After restarting the computer, the Installation Diagnostics will run automatically and the installation results window will be shown. For network installations the Repair MFL-Pro Suite selection from the main menu is now complete. 19 For Network Users Setting Up the Machine Installing the Driver & Software Windows® Network D Click Finish to restart your computer.
The MFL-Pro Suite, Brother Network Printer driver, Network Scanner driver and Network PhotoCapture Center™ have been installed and the installation is not supported. E After restarting the computer, the Installation Diagnostics will run automatically and the installation results window will be shown. For network installations the Repair MFL-Pro Suite selection from the main menu is now complete. 19 For Network Users Setting Up the Machine Installing the Driver & Software Windows® Network D Click Finish to restart your computer.
Quick Setup Guide - English
Page 22
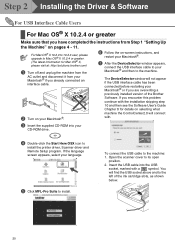
... Turn on your Macintosh®. 10 and then see the Software User's Guide Chapter 8 for Mac OS® X, please visit at: http://solutions.brother.com) 1 Turn off and unplug the machine from the AC outlet and disconnect it from Step 1 "Setting Up the Machine" on selecting what machine... Macintosh® if you already connected an interface cable. 6 Follow the on-screen instructions, and restart your Macintosh®. 7 After the DeviceSelector window appears, connect the USB interface cable to your CD-ROM drive. 4 Double-click the Start Here OSX icon to install the printer driver, Scanner...
... Turn on your Macintosh®. 10 and then see the Software User's Guide Chapter 8 for Mac OS® X, please visit at: http://solutions.brother.com) 1 Turn off and unplug the machine from the AC outlet and disconnect it from Step 1 "Setting Up the Machine" on selecting what machine... Macintosh® if you already connected an interface cable. 6 Follow the on-screen instructions, and restart your Macintosh®. 7 After the DeviceSelector window appears, connect the USB interface cable to your CD-ROM drive. 4 Double-click the Start Here OSX icon to install the printer driver, Scanner...
Quick Setup Guide - English
Page 27
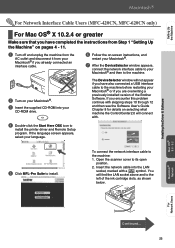
...6 Follow the on-screen instructions, and restart your Macintosh®. 7 After the DeviceSelector window appears, connect the network interface cable to your Macintosh® and then to the left of the Brother Software. If the language screen appears, select your language. 5 Click MFL-Pro Suite...will connect with a symbol. Setting Up the Machine Installing the Driver & Software Mac OS® 8.6 - 9.2 For Network Interface Cable Users (MFC-420CN, MFC-620CN only) For Mac OS® X 10.2.4 or greater Make sure that you have also connected a USB interface cable to install. If you ...
...6 Follow the on-screen instructions, and restart your Macintosh®. 7 After the DeviceSelector window appears, connect the network interface cable to your Macintosh® and then to the left of the Brother Software. If the language screen appears, select your language. 5 Click MFL-Pro Suite...will connect with a symbol. Setting Up the Machine Installing the Driver & Software Mac OS® 8.6 - 9.2 For Network Interface Cable Users (MFC-420CN, MFC-620CN only) For Mac OS® X 10.2.4 or greater Make sure that you have also connected a USB interface cable to install. If you ...
Quick Setup Guide - English
Page 32
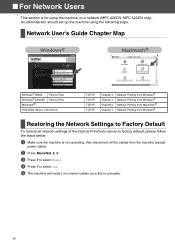
... TCP/IP TCP/IP Chapter 4 Chapter 4 Chapter 5 Chapter 4 Network Printing from Windows® Network Printing from Windows® Network Printing from Macintosh® Network Printing from Windows® Restoring the Network Settings to Factory Default To restore all network settings of the internal Print/Scan server to factory default, please follow the steps below... using the following steps. ■ For Network Users This section is complete. 30 An administrator should set up the machine using the machine on a network (MFC-420CN, MFC-620CN only).
... TCP/IP TCP/IP Chapter 4 Chapter 4 Chapter 5 Chapter 4 Network Printing from Windows® Network Printing from Windows® Network Printing from Macintosh® Network Printing from Windows® Restoring the Network Settings to Factory Default To restore all network settings of the internal Print/Scan server to factory default, please follow the steps below... using the following steps. ■ For Network Users This section is complete. 30 An administrator should set up the machine using the machine on a network (MFC-420CN, MFC-620CN only).

Quick Setup Guide - English
Page 33
...BRAdmin Professional go to manage your CD-ROM drive. The default password for the print server is designed to http://solutions.brother.com 1 Insert the supplied CD-ROM into your Brother network connected devices such as network-ready Multifunction devices and/or network-ready printers in a Local Area Network (LAN)... can use BRAdmin Professional to manage devices from other manufacturers whose products support SNMP (Simple Network Management Protocol). Setting Up the Machine Windows® Windows® Network Mac OS® X Installing the BRAdmin Professional Configuration Utility...
...BRAdmin Professional go to manage your CD-ROM drive. The default password for the print server is designed to http://solutions.brother.com 1 Insert the supplied CD-ROM into your Brother network connected devices such as network-ready Multifunction devices and/or network-ready printers in a Local Area Network (LAN)... can use BRAdmin Professional to manage devices from other manufacturers whose products support SNMP (Simple Network Management Protocol). Setting Up the Machine Windows® Windows® Network Mac OS® X Installing the BRAdmin Professional Configuration Utility...
Quick Setup Guide - English
Page 34
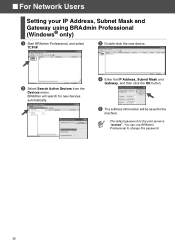
BRAdmin will search for the print server is "access". The default password for new devices automatically. 4 Enter the IP Address, Subnet Mask and Gateway, and then click the OK button. 5 The address information will be saved to change this password. 32 You can use BRAdmin Professional to the machine. ■ For Network Users Setting your IP Address, Subnet Mask and Gateway using BRAdmin Professional (Windows® only) 1 Start BRAdmin Professional, and select TCP/IP. 3 Double-click the new device. 2 Select Search Active Devices from the Devices menu.
BRAdmin will search for the print server is "access". The default password for new devices automatically. 4 Enter the IP Address, Subnet Mask and Gateway, and then click the OK button. 5 The address information will be saved to change this password. 32 You can use BRAdmin Professional to the machine. ■ For Network Users Setting your IP Address, Subnet Mask and Gateway using BRAdmin Professional (Windows® only) 1 Start BRAdmin Professional, and select TCP/IP. 3 Double-click the new device. 2 Select Search Active Devices from the Devices menu.
Quick Setup Guide - English
Page 36
.... Brother is a registered trademark of Brother International Corporation. © Copyright 2004 Brother Industries, Ltd. PaperPort and OmniPage OCR are registered trademarks of Microsoft in a Professional Environment. ©2004 Brother Industries, Ltd. Brother reserves the right to change without notice in the specifications and materials contained herein and shall not be responsible for use in the U.S. Windows and...
.... Brother is a registered trademark of Brother International Corporation. © Copyright 2004 Brother Industries, Ltd. PaperPort and OmniPage OCR are registered trademarks of Microsoft in a Professional Environment. ©2004 Brother Industries, Ltd. Brother reserves the right to change without notice in the specifications and materials contained herein and shall not be responsible for use in the U.S. Windows and...
Software Users Manual - English
Page 2
...printer (For Windows 1-1 Using the Brother printer driver 1-1 Features 1-1 Choosing the right type of paper 1-2 Printing a document 1-2 Simultaneous printing and faxing 1-3 Clearing data from the memory 1-3 Checking the Print Quality 1-3 Printer operation key 1-3 Job Cancel (MFC-5440CN only 1-3 Status Monitor (Windows® only ... Border Line 1-13 Orientation 1-13 Copies 1-14 Collate 1-14 Reverse Order 1-14 Paper Tray (MFC-5840CN only 1-14 Advanced tab 1-15 Color 1-16 Color/Grayscale 1-16 Image Type 1-16 Custom Image Type 1-17 Halftone Pattern 1-18 Scaling 1-19 Watermark...
...printer (For Windows 1-1 Using the Brother printer driver 1-1 Features 1-1 Choosing the right type of paper 1-2 Printing a document 1-2 Simultaneous printing and faxing 1-3 Clearing data from the memory 1-3 Checking the Print Quality 1-3 Printer operation key 1-3 Job Cancel (MFC-5440CN only 1-3 Status Monitor (Windows® only ... Border Line 1-13 Orientation 1-13 Copies 1-14 Collate 1-14 Reverse Order 1-14 Paper Tray (MFC-5840CN only 1-14 Advanced tab 1-15 Color 1-16 Color/Grayscale 1-16 Image Type 1-16 Custom Image Type 1-17 Halftone Pattern 1-18 Scaling 1-19 Watermark...

