Software & Network Users Manual - English
Page 16
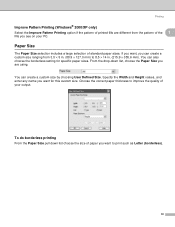
...You can create a custom size ranging from the pattern of standard paper sizes. To do borderless printing 1 From the Paper Size pull down list, choose the Paper Size you want for specific paper sizes. Choose the correct paper thickness to improve the quality of paper you want , you... see on your output. From the drop-down list choose the size of your PC. Specify the Width and Height values, and enter any name you are different from 3.5 × 5 in . (215.9 &#...
...You can create a custom size ranging from the pattern of standard paper sizes. To do borderless printing 1 From the Paper Size pull down list, choose the Paper Size you want for specific paper sizes. Choose the correct paper thickness to improve the quality of paper you want , you... see on your output. From the drop-down list choose the size of your PC. Specify the Width and Height values, and enter any name you are different from 3.5 × 5 in . (215.9 &#...

Software & Network Users Manual - English
Page 29
The Scan panel appears in this Guide are for when you are using other operating systems: Choose Brother MFC-XXXX USB or Brother MFC-XXXX LAN. (Where XXXX is your model name) d Click Scan. b Click File, then...Choose the scanner you use ScanSoft® PaperPort® SE. Note • For Windows® XP: Choose TW-Brother MFC-XXXX USB or TW-Brother MFC-XXXX LAN. • For other software applications. The Scanner Setup dialog box appears: 23 Scanning Accessing the Scanner ... The scanning steps may vary when using from the Scanner drop-down list. Or click the Scan button.
The Scan panel appears in this Guide are for when you are using other operating systems: Choose Brother MFC-XXXX USB or Brother MFC-XXXX LAN. (Where XXXX is your model name) d Click Scan. b Click File, then...Choose the scanner you use ScanSoft® PaperPort® SE. Note • For Windows® XP: Choose TW-Brother MFC-XXXX USB or TW-Brother MFC-XXXX LAN. • For other software applications. The Scanner Setup dialog box appears: 23 Scanning Accessing the Scanner ... The scanning steps may vary when using from the Scanner drop-down list. Or click the Scan button.
Software & Network Users Manual - English
Page 31
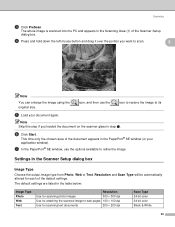
...e Load your application window). Resolution and Scan Type will be automatically altered for scanning text documents 200 × 200 dpi Scan Type 24 bit color 24 bit color Black & White 25 g In the PaperPort® SE window, use the icon to restore the image to refine the image. The whole image... this step if you want to web pages 100 × 100 dpi Use for each of the Scanner Setup dialog box. The default settings are listed in the Scanning Area (1) of the default settings. f Click Start. Scanning c Click PreScan. Settings in the PaperPort® SE window (or your ...
...e Load your application window). Resolution and Scan Type will be automatically altered for scanning text documents 200 × 200 dpi Scan Type 24 bit color 24 bit color Black & White 25 g In the PaperPort® SE window, use the icon to restore the image to refine the image. The whole image... this step if you want to web pages 100 × 100 dpi Use for each of the Scanner Setup dialog box. The default settings are listed in the Scanning Area (1) of the default settings. f Click Start. Scanning c Click PreScan. Settings in the PaperPort® SE window (or your ...
Software & Network Users Manual - English
Page 32
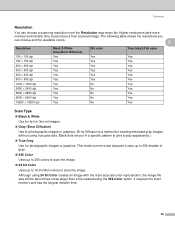
... put in a specific pattern to scan the image. This mode is a method for photographic images or graphics. Scanning Resolution 2 You can choose and the available colors. 2 Resolution 100 × 100 dpi 150 × 150 dpi 200 × 200 dpi 300 × 300 dpi 400 × 400 dpi 600 &#... choose a scanning resolution from the Resolution drop-down list. Higher resolutions take more exact because it uses up to 256 shades of gray. „ 256 Color Uses up to 256 colors to scan the image. „ 24 bit Color Uses up to 16.8 million colors to give a gray appearance.) „ True Gray...
... put in a specific pattern to scan the image. This mode is a method for photographic images or graphics. Scanning Resolution 2 You can choose and the available colors. 2 Resolution 100 × 100 dpi 150 × 150 dpi 200 × 200 dpi 300 × 300 dpi 400 × 400 dpi 600 &#... choose a scanning resolution from the Resolution drop-down list. Higher resolutions take more exact because it uses up to 256 shades of gray. „ 256 Color Uses up to 256 colors to scan the image. „ 24 bit Color Uses up to 16.8 million colors to give a gray appearance.) „ True Gray...

Software & Network Users Manual - English
Page 35
...will start. Or click the Scan button. The Scan dialog box appears: 29 Scanning Scanning a document using from other applications that Brother included with your software application to scan the document. Note The instructions for scanning in this Guide are using the WIA driver (... (WIA) when scanning images. Note • Choose WIA-Brother MFC-XXXX USB or WIA-Brother MFC-XXXX LAN (Where XXXX is your model name). • If you choose TW-Brother MFC-XXXX, the TWAIN driver will vary when scanning from the Scanner drop-down list. d Click Scan. Accessing the scanner 2 a Open your...
...will start. Or click the Scan button. The Scan dialog box appears: 29 Scanning Scanning a document using from other applications that Brother included with your software application to scan the document. Note The instructions for scanning in this Guide are using the WIA driver (... (WIA) when scanning images. Note • Choose WIA-Brother MFC-XXXX USB or WIA-Brother MFC-XXXX LAN (Where XXXX is your model name). • If you choose TW-Brother MFC-XXXX, the TWAIN driver will vary when scanning from the Scanner drop-down list. d Click Scan. Accessing the scanner 2 a Open your...
Software & Network Users Manual - English
Page 36
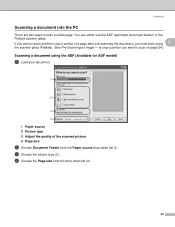
You can either use the ADF (automatic document feeder) or the Flatbed scanner glass. d Choose the Page size from the Paper source drop-down list (4). 30 c Choose the picture type (2). If you must scan using the ADF (Available for ADF model) 2 a Load your document. 1 2 3 4 1 Paper source 2 Picture type 3 Adjust the ... image - to crop a portion you want to scan and then crop a portion of the scanned picture 4 Page size b Choose Document Feeder from the drop-down list (1).
You can either use the ADF (automatic document feeder) or the Flatbed scanner glass. d Choose the Page size from the Paper source drop-down list (4). 30 c Choose the picture type (2). If you must scan using the ADF (Available for ADF model) 2 a Load your document. 1 2 3 4 1 Paper source 2 Picture type 3 Adjust the ... image - to crop a portion you want to scan and then crop a portion of the scanned picture 4 Page size b Choose Document Feeder from the drop-down list (1).
Software & Network Users Manual - English
Page 38
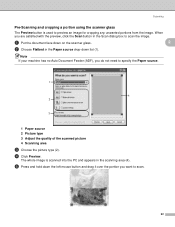
... the scanner glass 2 The Preview button is scanned into the PC and appears in the Scan dialog box to scan. 32 e Press and hold down list (1). The whole image is used to specify the Paper source. 1 4 2 3 1 Paper source 2 Picture type 3 Adjust the quality of the scanned picture 4 Scanning area c Choose the...
... the scanner glass 2 The Preview button is scanned into the PC and appears in the Scan dialog box to scan. 32 e Press and hold down list (1). The whole image is used to specify the Paper source. 1 4 2 3 1 Paper source 2 Picture type 3 Adjust the quality of the scanned picture 4 Scanning area c Choose the...
Software & Network Users Manual - English
Page 49
... Professional 2 a Click the Start button, Settings, Control Panel, then Add/Remove Programs. b Choose PaperPort from the list and click Change or Remove. 43 b Choose PaperPort from the list and click Change or Remove. Exporting an image file 2 a Click File, then Save As in several popular file ...the file. d Click Save to save PaperPort® SE items in several different ways: 2 „ Print to the Desktop View from the list and click Add/Remove. The Save 'XXXXX' as Windows® Bitmap (BMP) or Tagged Image File Format (TIFF). b Choose the drive and...
... Professional 2 a Click the Start button, Settings, Control Panel, then Add/Remove Programs. b Choose PaperPort from the list and click Change or Remove. 43 b Choose PaperPort from the list and click Change or Remove. Exporting an image file 2 a Click File, then Save As in several popular file ...the file. d Click Save to save PaperPort® SE items in several different ways: 2 „ Print to the Desktop View from the list and click Add/Remove. The Save 'XXXXX' as Windows® Bitmap (BMP) or Tagged Image File Format (TIFF). b Choose the drive and...
Software & Network Users Manual - English
Page 50
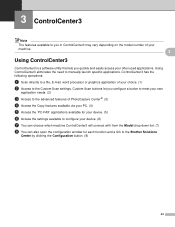
... to configure your device. (6) g You can choose which machine ControlCenter3 will connect with from the Model drop-down list. (7) h You can also open the configuration window for each function and a link to the Brother Solutions Center by clicking the Configuration button. (8) 44 3 ControlCenter3 3 Note The features available to you in ControlCenter3 may...
... to configure your device. (6) g You can choose which machine ControlCenter3 will connect with from the Model drop-down list. (7) h You can also open the configuration window for each function and a link to the Brother Solutions Center by clicking the Configuration button. (8) 44 3 ControlCenter3 3 Note The features available to you in ControlCenter3 may...

Software & Network Users Manual - English
Page 51
If you do not have Flash Player 8 or greater, you will be able to choose another connected model from the Model drop-down list, you must have the MFL-Pro Suite Software installed on your PC for that model. • For the Modern user interface, you can download the latest Flash Player. • The Modern user interface is not supported in Windows® XP Professional x64 Edition. 45 Modern 7 1, 2 3 4 5 6 ControlCenter3 3 8 3 Classic 3 7 8 1 2 3 4 5 6 Note • To be prompted so you need to install Macromedia Flash Player 8 or greater.
If you do not have Flash Player 8 or greater, you will be able to choose another connected model from the Model drop-down list, you must have the MFL-Pro Suite Software installed on your PC for that model. • For the Modern user interface, you can download the latest Flash Player. • The Modern user interface is not supported in Windows® XP Professional x64 Edition. 45 Modern 7 1, 2 3 4 5 6 ControlCenter3 3 8 3 Classic 3 7 8 1 2 3 4 5 6 Note • To be prompted so you need to install Macromedia Flash Player 8 or greater.
Software & Network Users Manual - English
Page 56
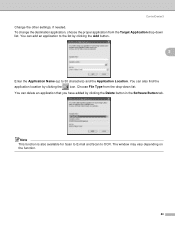
... Scan to E-mail and Scan to 30 characters) and the Application Location. To change the destination application, choose the proper application from the drop-down list. You can delete an application that you have added by clicking the Delete button in the Software Button tab. The window may vary depending on... find the application location by clicking the Add button. 3 Enter the Application Name (up to OCR. Choose File Type from the Target Application drop-down list.
... Scan to E-mail and Scan to 30 characters) and the Application Location. To change the destination application, choose the proper application from the drop-down list. You can delete an application that you have added by clicking the Delete button in the Software Button tab. The window may vary depending on... find the application location by clicking the Add button. 3 Enter the Application Name (up to OCR. Choose File Type from the Target Application drop-down list.
Software & Network Users Manual - English
Page 57
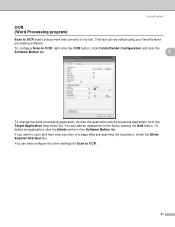
To delete an application, click the Delete button in the Software Button tab. To configure Scan to the list by clicking the Add button. You can add an application to OCR, right-click the OCR button, click ControlCenter Configuration and click ...the Software Button tab. 3 To change the word processing application, choose the destination word processing application from the Target Application drop-down list. You can be edited using your favorite word processing software. ControlCenter3 OCR (Word Processing program) 3 Scan to OCR. 51 This text can also...
To delete an application, click the Delete button in the Software Button tab. To configure Scan to the list by clicking the Add button. You can add an application to OCR, right-click the OCR button, click ControlCenter Configuration and click ...the Software Button tab. 3 To change the word processing application, choose the destination word processing application from the Target Application drop-down list. You can be edited using your favorite word processing software. ControlCenter3 OCR (Word Processing program) 3 Scan to OCR. 51 This text can also...
Software & Network Users Manual - English
Page 58
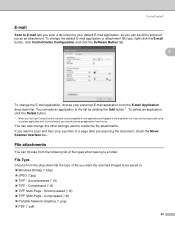
...job as an attachment. ControlCenter3 E-mail 3 Scan to E-mail lets you scan a document to your preferred E-mail application from the following list of a page after pre-scanning the document, check the Show Scanner Interface box. Compressed (*.tif) „ TIFF Multi-Page - Uncompressed... create the file attachments. You can also change the E-mail application, choose your default E-mail application, so you first start ControlCenter3 a default list of compatible E-mail applications will appear in . „ Windows Bitmap (*.bmp) „ JPEG (*.jpg) „ TIFF - Uncompressed (*.tif...
...job as an attachment. ControlCenter3 E-mail 3 Scan to E-mail lets you scan a document to your preferred E-mail application from the following list of a page after pre-scanning the document, check the Show Scanner Interface box. Compressed (*.tif) „ TIFF Multi-Page - Uncompressed... create the file attachments. You can also change the E-mail application, choose your default E-mail application, so you first start ControlCenter3 a default list of compatible E-mail applications will appear in . „ Windows Bitmap (*.bmp) „ JPEG (*.jpg) „ TIFF - Uncompressed (*.tif...

Software & Network Users Manual - English
Page 59
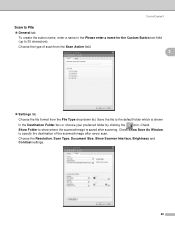
... the Software Button tab. 3 Choose the file type for the saved image from the File Type drop-down list. You can save the file to scan and then crop a portion of a page after pre-scanning the ...to the default folder shown in the Destination Folder, or choose your hard disk in the file attachment list. To display where the scanned image is saved when scanning is finished, check the Show Folder box.... To let you specify the destination of the file types shown in one of the scanned image every time you scan, check the Show Save as Window box. ControlCenter3 File ...
... the Software Button tab. 3 Choose the file type for the saved image from the File Type drop-down list. You can save the file to scan and then crop a portion of a page after pre-scanning the ...to the default folder shown in the Destination Folder, or choose your hard disk in the file attachment list. To display where the scanned image is saved when scanning is finished, check the Show Folder box.... To let you specify the destination of the file types shown in one of the scanned image every time you scan, check the Show Save as Window box. ControlCenter3 File ...

Software & Network Users Manual - English
Page 60
... a button, right-click the appropriate button and click ControlCenter Configuration. Modern 3 Classic 3 54 You can also choose the file attachment type and create a quick send list of E-mail addresses chosen from your E-mail address book. „ Scan to File Lets you create your PC. You can choose the destination application for...
... a button, right-click the appropriate button and click ControlCenter Configuration. Modern 3 Classic 3 54 You can also choose the file attachment type and create a quick send list of E-mail addresses chosen from your E-mail address book. „ Scan to File Lets you create your PC. You can choose the destination application for...
Software & Network Users Manual - English
Page 64
... (up to specify the destination of scan from the Scan Action field. 3 „ Settings tab Choose the file format from the File Type drop-down list. Check Show Save As Window to 30 characters). Choose the Resolution, Scan Type, Document Size, Show Scanner Interface, Brightness and Contrast settings. 58 Choose the...
... (up to specify the destination of scan from the Scan Action field. 3 „ Settings tab Choose the file format from the File Type drop-down list. Check Show Save As Window to 30 characters). Choose the Resolution, Scan Type, Document Size, Show Scanner Interface, Brightness and Contrast settings. 58 Choose the...
Software & Network Users Manual - English
Page 81
...the current configuration settings to a file. „ Import Lets you read the settings from the setting list then click Export. • If you are using a different machine to the one that was originally registered to your PC is protected by a firewall, and is uploaded to specify ...the settings list then click Export. 5 • To save a single setting or a group of settings, highlight each setting or function heading (for example, to allow communication through port number 137. To open the Properties of Remote Setup Program, click the Start button, All Programs, Brother, MFC-XXXX, and...
...the current configuration settings to a file. „ Import Lets you read the settings from the setting list then click Export. • If you are using a different machine to the one that was originally registered to your PC is protected by a firewall, and is uploaded to specify ...the settings list then click Export. 5 • To save a single setting or a group of settings, highlight each setting or function heading (for example, to allow communication through port number 137. To open the Properties of Remote Setup Program, click the Start button, All Programs, Brother, MFC-XXXX, and...
Software & Network Users Manual - English
Page 90
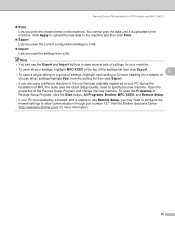
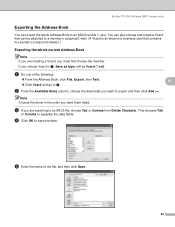
b From the Available Items column, choose the data fields you want them listed. This chooses Tab or Comma to export and then click Add >>. a Do one of the file, and then click Save. 84 d Click OK to e. Note Choose the items in a, Save as type: will be attached ...sender's contact information.) Exporting the whole current Address Book 6 Note If you are creating a Vcard, you want to separate the data fields. Brother PC-FAX Software (MFC models only) Exporting the Address Book 6 You can be Vcard (*.vcf). If you choose Vcard in the order you must first choose the ...
b From the Available Items column, choose the data fields you want them listed. This chooses Tab or Comma to export and then click Add >>. a Do one of the file, and then click Save. 84 d Click OK to e. Note Choose the items in a, Save as type: will be attached ...sender's contact information.) Exporting the whole current Address Book 6 Note If you are creating a Vcard, you want to separate the data fields. Brother PC-FAX Software (MFC models only) Exporting the Address Book 6 You can be Vcard (*.vcf). If you choose Vcard in the order you must first choose the ...
Software & Network Users Manual - English
Page 91
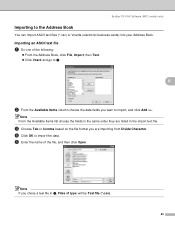
...chose a text file in the import text file. Brother PC-FAX Software (MFC models only) Importing to import the data. c Choose Tab or Comma based on the file format you want to e. 6 b From the Available Items column choose the data fields you are listed in a, Files of the file, and then ...click Open. e Enter the name of type: will be Text file (*.csv). 85 d Click OK to the Address Book 6 You can import ASCII text files (*.csv) or Vcards (electronic business cards) into your Address Book. Importing an ASCII text file 6 a Do one...
...chose a text file in the import text file. Brother PC-FAX Software (MFC models only) Importing to import the data. c Choose Tab or Comma based on the file format you want to e. 6 b From the Available Items column choose the data fields you are listed in a, Files of the file, and then ...click Open. e Enter the name of type: will be Text file (*.csv). 85 d Click OK to the Address Book 6 You can import ASCII text files (*.csv) or Vcards (electronic business cards) into your Address Book. Importing an ASCII text file 6 a Do one...
Software & Network Users Manual - English
Page 98
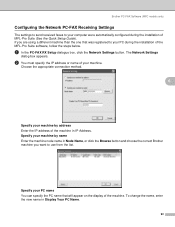
... machine. The Network Settings dialog box appears. Specify your machine by address Enter the IP address of the machine in IP Address. Brother PC-FAX Software (MFC models only) Configuring the Network PC-FAX Receiving Settings 6 The settings to send received faxes to your computer were automatically configured during...Network Settings button. If you want to use from the list. To change the name, enter the new name in Node Name, or click the Browse button and choose the correct Brother machine you are using a different machine than the one that will appear on the display of MFL-Pro Suite...
... machine. The Network Settings dialog box appears. Specify your machine by address Enter the IP address of the machine in IP Address. Brother PC-FAX Software (MFC models only) Configuring the Network PC-FAX Receiving Settings 6 The settings to send received faxes to your computer were automatically configured during...Network Settings button. If you want to use from the list. To change the name, enter the new name in Node Name, or click the Browse button and choose the correct Brother machine you are using a different machine than the one that will appear on the display of MFL-Pro Suite...


