Software Users Manual - English
Page 12
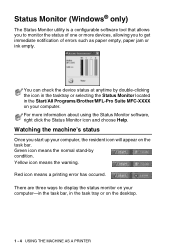
...display the status monitor on your computer-in the task bar, in the Start/All Programs/Brother/MFL-Pro Suite MFC-XXXX on your computer. There are three ways to get immediate notification of one or more information about using the Status Monitor software, right click the Status Monitor icon ...Monitor (Windows® only) The Status Monitor utility is a configurable software tool that allows you to monitor the status of errors such as paper empty, paper jam or ink empty. You can check the device status at anytime by condition. For more devices, allowing you start up your computer, the ...
...display the status monitor on your computer-in the task bar, in the Start/All Programs/Brother/MFL-Pro Suite MFC-XXXX on your computer. There are three ways to get immediate notification of one or more information about using the Status Monitor software, right click the Status Monitor icon ...Monitor (Windows® only) The Status Monitor utility is a configurable software tool that allows you to monitor the status of errors such as paper empty, paper jam or ink empty. You can check the device status at anytime by condition. For more devices, allowing you start up your computer, the ...
Users Manual - English
Page 17
...-4 International ENERGY STAR® Compliance Statement .... 10-5 Important safety instructions 10-6 Trademarks 10-8 11 Troubleshooting and routine maintenance 11-1 Troubleshooting 11-1 Error messages 11-1 Document jams 11-5 Document is jammed in the top of the ADF unit. .... 11-5 Document is jammed inside the ADF unit 11-5 Printer jam or paper jam 11-6 Paper is jammed inside the paper tray 11-6 Paper...
...-4 International ENERGY STAR® Compliance Statement .... 10-5 Important safety instructions 10-6 Trademarks 10-8 11 Troubleshooting and routine maintenance 11-1 Troubleshooting 11-1 Error messages 11-1 Document jams 11-5 Document is jammed in the top of the ADF unit. .... 11-5 Document is jammed inside the ADF unit 11-5 Printer jam or paper jam 11-6 Paper is jammed inside the paper tray 11-6 Paper...
Users Manual - English
Page 29
... instruction sheet. ■ When you use transparencies or glossy paper, remove each sheet immediately to match the type of paper you 've chosen, always set the Paper Type to prevent smudging or paper jams. ■ Avoid touching the printed surface of paper you print on Brother glossy paper, load the instruction sheet included with the glossy paper in the MFC.
... instruction sheet. ■ When you use transparencies or glossy paper, remove each sheet immediately to match the type of paper you 've chosen, always set the Paper Type to prevent smudging or paper jams. ■ Avoid touching the printed surface of paper you print on Brother glossy paper, load the instruction sheet included with the glossy paper in the MFC.

Users Manual - English
Page 35
Check that you do not push the paper in too far; 4 Fan the stack of paper well to avoid paper jams and mis-feeds. 5 Gently insert the paper into the MFC. 1 - 16 INTRODUCTION Maximum Paper Mark ■ Make sure the paper side guides touch the sides of the paper) in the tray and below the maximum paper mark. it may lift at the back of the tray and cause feed problems. 6 Put the output paper tray back on and push the paper tray firmly back into the paper tray print side face down and the leading edge (top of the paper. ■ Be careful that the paper is flat in first.
Check that you do not push the paper in too far; 4 Fan the stack of paper well to avoid paper jams and mis-feeds. 5 Gently insert the paper into the MFC. 1 - 16 INTRODUCTION Maximum Paper Mark ■ Make sure the paper side guides touch the sides of the paper) in the tray and below the maximum paper mark. it may lift at the back of the tray and cause feed problems. 6 Put the output paper tray back on and push the paper tray firmly back into the paper tray print side face down and the leading edge (top of the paper. ■ Be careful that the paper is flat in first.

Users Manual - English
Page 37
Tray Cover Universal Guide Release Button 3 Fan the stack of paper well to avoid paper jams and mis-feeds. 4 Gently insert the paper into the paper tray print side face down and the leading edge (top of the paper) in the tray and below the maximum paper mark. When you use Legal size paper, open the tray cover, and then press and hold the universal guide release button as you slide out the front of the paper. 1 - 18 INTRODUCTION Maximum Paper Mark Make sure the paper side guides and paper length guide touch the sides of the paper tray. Check that the paper is flat in first.
Tray Cover Universal Guide Release Button 3 Fan the stack of paper well to avoid paper jams and mis-feeds. 4 Gently insert the paper into the paper tray print side face down and the leading edge (top of the paper) in the tray and below the maximum paper mark. When you use Legal size paper, open the tray cover, and then press and hold the universal guide release button as you slide out the front of the paper. 1 - 18 INTRODUCTION Maximum Paper Mark Make sure the paper side guides and paper length guide touch the sides of the paper tray. Check that the paper is flat in first.
Users Manual - English
Page 46
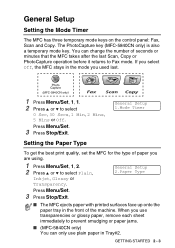
... ▲ or ▼ to prevent smudging or paper jams. ■ (MFC-5840CN only) You can change the number of seconds or minutes that the MFC takes after the last Scan, Copy or PhotoCapture operation before it returns to select Plain, Inkjet, Glossy or Transparency. The PhotoCapture key (MFC-5840CN only) is also a temporary mode key. You...
... ▲ or ▼ to prevent smudging or paper jams. ■ (MFC-5840CN only) You can change the number of seconds or minutes that the MFC takes after the last Scan, Copy or PhotoCapture operation before it returns to select Plain, Inkjet, Glossy or Transparency. The PhotoCapture key (MFC-5840CN only) is also a temporary mode key. You...
Users Manual - English
Page 130
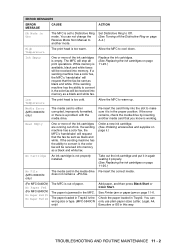
... a .JPG file. (For MFC-5440CN) No Paper Fed (For MFC-5840CN) No Paper Fed #1 No Paper Fed #2 The MFC is not properly installed. The paper loaded in Tray#2 is jammed in this way. If a sending machine has a color fax, the MFC's 'handshake' will stop all print operations. The paper is the wrong size or type. (MFC-5840CN only) Add paper, and then press Black...
... a .JPG file. (For MFC-5440CN) No Paper Fed (For MFC-5840CN) No Paper Fed #1 No Paper Fed #2 The MFC is not properly installed. The paper loaded in Tray#2 is jammed in this way. If a sending machine has a color fax, the MFC's 'handshake' will stop all print operations. The paper is the wrong size or type. (MFC-5840CN only) Add paper, and then press Black...
Users Manual - English
Page 131
... Start or Color Start. 11 - 3 TROUBLESHOOTING AND ROUTINE MAINTENANCE ACTION Verify the number and try again. -OR- See Document jams on page 11-5. (Fax sending or copy operation in process) Press Stop/Exit and wait until the other operations in the MFC. The document is jammed in the memory. Paper Jam Wrong Paper Size Paper is jammed in progress...
... Start or Color Start. 11 - 3 TROUBLESHOOTING AND ROUTINE MAINTENANCE ACTION Verify the number and try again. -OR- See Document jams on page 11-5. (Fax sending or copy operation in process) Press Stop/Exit and wait until the other operations in the MFC. The document is jammed in the memory. Paper Jam Wrong Paper Size Paper is jammed in progress...
Users Manual - English
Page 133
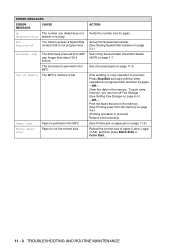
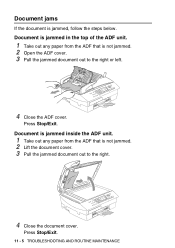
Press Stop/Exit. Press Stop/Exit. 11 - 5 TROUBLESHOOTING AND ROUTINE MAINTENANCE Document is jammed in the top of the ADF unit. 1 Take out any paper from the ADF that is jammed, follow the steps below. Document jams If the document is not jammed. 2 Lift the document cover. 3 Pull the jammed document out to the right or left. 4 Close the ADF cover. Document is jammed inside the ADF unit. 1 Take out any paper from the ADF that is not jammed. 2 Open the ADF cover. 3 Pull the jammed document out to the right. 4 Close the document cover.
Press Stop/Exit. Press Stop/Exit. 11 - 5 TROUBLESHOOTING AND ROUTINE MAINTENANCE Document is jammed in the top of the ADF unit. 1 Take out any paper from the ADF that is jammed, follow the steps below. Document jams If the document is not jammed. 2 Lift the document cover. 3 Pull the jammed document out to the right or left. 4 Close the ADF cover. Document is jammed inside the ADF unit. 1 Take out any paper from the ADF that is not jammed. 2 Open the ADF cover. 3 Pull the jammed document out to the right. 4 Close the document cover.
Users Manual - English
Page 134
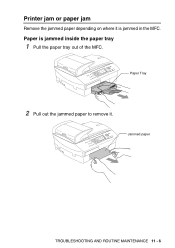
Jammed paper TROUBLESHOOTING AND ROUTINE MAINTENANCE 11 - 6 Paper is jammed in the MFC. Printer jam or paper jam Remove the jammed paper depending on where it . Paper Tray 2 Pull out the jammed paper to remove it is jammed inside the paper tray 1 Pull the paper tray out of the MFC.
Jammed paper TROUBLESHOOTING AND ROUTINE MAINTENANCE 11 - 6 Paper is jammed in the MFC. Printer jam or paper jam Remove the jammed paper depending on where it . Paper Tray 2 Pull out the jammed paper to remove it is jammed inside the paper tray 1 Pull the paper tray out of the MFC.
Users Manual - English
Page 135
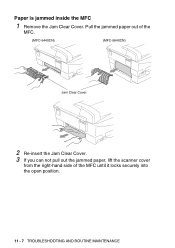
Pull the jammed paper out of the MFC. (MFC-5440CN) (MFC-5840CN) Jam Clear Cover 2 Re-insert the Jam Clear Cover. 3 If you can not pull out the jammed paper, lift the scanner cover from the right-hand side of the MFC until it locks securely into the open position. 11 - 7 TROUBLESHOOTING AND ROUTINE MAINTENANCE Paper is jammed inside the MFC 1 Remove the Jam Clear Cover.
Pull the jammed paper out of the MFC. (MFC-5440CN) (MFC-5840CN) Jam Clear Cover 2 Re-insert the Jam Clear Cover. 3 If you can not pull out the jammed paper, lift the scanner cover from the right-hand side of the MFC until it locks securely into the open position. 11 - 7 TROUBLESHOOTING AND ROUTINE MAINTENANCE Paper is jammed inside the MFC 1 Remove the Jam Clear Cover.

Users Manual - English
Page 136
Scanner Cover If the paper is jammed underneath the print head, disconnect the MFC from the power source so you can move the print head and take out the paper. 5 Lift the scanner cover to release the lock. TROUBLESHOOTING AND ROUTINE MAINTENANCE 11 - 8 Gently push the scanner cover support down and close the scanner cover. 4 Remove the jammed paper.
Scanner Cover If the paper is jammed underneath the print head, disconnect the MFC from the power source so you can move the print head and take out the paper. 5 Lift the scanner cover to release the lock. TROUBLESHOOTING AND ROUTINE MAINTENANCE 11 - 8 Gently push the scanner cover support down and close the scanner cover. 4 Remove the jammed paper.
Users Manual - English
Page 204
... User's Guide on the CD-ROM Maintenance, routine .......11-23 Manual dialing 3-1 receive 4-1 transmission 3-5 Memory Storage B-1 Menu Selection Table ......... A-10 TAD (answering machine A-10 Jams document 11-5 paper 11-5 L LCD (liquid crystal display B-1, B-2 contrast 2-7 Help List 7-3 M Macintosh® See Software User's Guide on the CD-ROM from scanner glass ........3-4 manual 3-5 overseas 3-13...
... User's Guide on the CD-ROM Maintenance, routine .......11-23 Manual dialing 3-1 receive 4-1 transmission 3-5 Memory Storage B-1 Menu Selection Table ......... A-10 TAD (answering machine A-10 Jams document 11-5 paper 11-5 L LCD (liquid crystal display B-1, B-2 contrast 2-7 Help List 7-3 M Macintosh® See Software User's Guide on the CD-ROM from scanner glass ........3-4 manual 3-5 overseas 3-13...
Users Manual - English
Page 205
...'s Guide on the CD-ROM PC Fax Receive 6-3 PC Faxing See Software User's Guide on the CD-ROM improving quality .......... 11-15 paper jams 11-6 report 7-3 resolution S-8 specifications S-8 Programming your MFC B-1, B-2 Q Quality key (copying 8-3 Quick-Dial Access codes and credit card numbers setting up 5-5 Broadcasting 3-12 using Groups 3-12 I - 4 INDEX A-... Networking printing See Software User's Guide on the CD-ROM scanning See Software User's Guide on the CD-ROM O Options key (copying) Brightness 8-10 Paper Size 8-9 Paper Type 8-6, 8-9 Out of Area (Caller ID) ........
...'s Guide on the CD-ROM PC Fax Receive 6-3 PC Faxing See Software User's Guide on the CD-ROM improving quality .......... 11-15 paper jams 11-6 report 7-3 resolution S-8 specifications S-8 Programming your MFC B-1, B-2 Q Quality key (copying 8-3 Quick-Dial Access codes and credit card numbers setting up 5-5 Broadcasting 3-12 using Groups 3-12 I - 4 INDEX A-... Networking printing See Software User's Guide on the CD-ROM scanning See Software User's Guide on the CD-ROM O Options key (copying) Brightness 8-10 Paper Size 8-9 Paper Type 8-6, 8-9 Out of Area (Caller ID) ........
Users Manual - English
Page 207
Troubleshooting 11-1 checking ink volume .... 11-19 document jam 11-5 error messages on LCD ... 11-1 if you are having difficulty copying 11-12 incoming calls 11-12 Network 11-13 phone line 11-14 ...-9 printing or receiving faxes 11-10 Printing Received Faxes 11-10 receiving faxes .......... 11-11 scanning 11-12 sending faxes 11-11 software 11-12 paper jam 11-6 print quality 11-15 True2Life® PhotoCapture Center™ ... 9-10 Two-line phone system .... A-13 V Volume, setting 2-5 beeper 2-5 ring 2-5 speaker 2-6 W Warranties iii Canada vi...
Troubleshooting 11-1 checking ink volume .... 11-19 document jam 11-5 error messages on LCD ... 11-1 if you are having difficulty copying 11-12 incoming calls 11-12 Network 11-13 phone line 11-14 ...-9 printing or receiving faxes 11-10 Printing Received Faxes 11-10 receiving faxes .......... 11-11 scanning 11-12 sending faxes 11-11 software 11-12 paper jam 11-6 print quality 11-15 True2Life® PhotoCapture Center™ ... 9-10 Two-line phone system .... A-13 V Volume, setting 2-5 beeper 2-5 ring 2-5 speaker 2-6 W Warranties iii Canada vi...


