Software Users Manual - English
Page 2
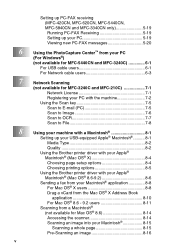
... a printer (For Windows 1-1 Using the Brother printer driver 1-1 Features 1-1 Choosing the right type of paper 1-2 Printing a document 1-2 Simultaneous printing and faxing 1-3 Clearing data from the memory 1-3 Checking the Print Quality 1-3 Printer operation key 1-3 Job Cancel (MFC-5440CN only 1-3 Status Monitor (Windows®...13 Border Line 1-13 Orientation 1-13 Copies 1-14 Collate 1-14 Reverse Order 1-14 Paper Tray (MFC-5840CN only 1-14 Advanced tab 1-15 Color 1-16 Color/Grayscale 1-16 Image Type 1-16 Custom Image Type 1-17 Halftone Pattern 1-18 Scaling 1-19 Watermark ...
... a printer (For Windows 1-1 Using the Brother printer driver 1-1 Features 1-1 Choosing the right type of paper 1-2 Printing a document 1-2 Simultaneous printing and faxing 1-3 Clearing data from the memory 1-3 Checking the Print Quality 1-3 Printer operation key 1-3 Job Cancel (MFC-5440CN only 1-3 Status Monitor (Windows®...13 Border Line 1-13 Orientation 1-13 Copies 1-14 Collate 1-14 Reverse Order 1-14 Paper Tray (MFC-5840CN only 1-14 Advanced tab 1-15 Color 1-16 Color/Grayscale 1-16 Image Type 1-16 Custom Image Type 1-17 Halftone Pattern 1-18 Scaling 1-19 Watermark ...
Software Users Manual - English
Page 4
3 iii Scan to Card (not available for MFC-3240C, MFC-210C and MFC-5440CN 2-23 Changing the default quality 2-25 Changing the default black & white file format ..... 2-25 Changing the default color file format 2-25 Using ScanSoft® PaperPort® 9.0SE... 3-1 ControlCenter2.0 3-1 How to turn off the AutoLoad feature in ControlCenter2.0 3-2 SCAN 3-3 CUSTOM SCAN 3-3 PHOTOCAPTURE (not available for MFC-5440CN and MFC-3240C)... 3-4 COPY 3-4 PC-FAX 3-5 DEVICE SETTING 3-5 SCAN 3-6 Image (example: Microsoft Paint 3-6 OCR (Word Processing program 3-8 E-mail 3-9 File attachments 3-10 ...
3 iii Scan to Card (not available for MFC-3240C, MFC-210C and MFC-5440CN 2-23 Changing the default quality 2-25 Changing the default black & white file format ..... 2-25 Changing the default color file format 2-25 Using ScanSoft® PaperPort® 9.0SE... 3-1 ControlCenter2.0 3-1 How to turn off the AutoLoad feature in ControlCenter2.0 3-2 SCAN 3-3 CUSTOM SCAN 3-3 PHOTOCAPTURE (not available for MFC-5440CN and MFC-3240C)... 3-4 COPY 3-4 PC-FAX 3-5 DEVICE SETTING 3-5 SCAN 3-6 Image (example: Microsoft Paint 3-6 OCR (Word Processing program 3-8 E-mail 3-9 File attachments 3-10 ...
Software Users Manual - English
Page 5
... 3-24 Setup 3-24 DEVICE SETTING 3-25 Remote Setup (not available for MFC-210C 3-25 Quick-Dial (not available for MFC-210C 3-26 Ink Level 3-26 4 Using MFC Remote Setup (For Windows 4-1 MFC Remote Setup (not available for MFC-210C 4-1 5 Using Brother PC-FAX software (For Windows 5-1 PC-FAX sending 5-1 Setting up user information 5-2 Sending setup 5-3 Outside line access...
... 3-24 Setup 3-24 DEVICE SETTING 3-25 Remote Setup (not available for MFC-210C 3-25 Quick-Dial (not available for MFC-210C 3-26 Ink Level 3-26 4 Using MFC Remote Setup (For Windows 4-1 MFC Remote Setup (not available for MFC-210C 4-1 5 Using Brother PC-FAX software (For Windows 5-1 PC-FAX sending 5-1 Setting up user information 5-2 Sending setup 5-3 Outside line access...
Software Users Manual - English
Page 6
... up PC-FAX receiving (MFC-420CN, MFC-620CN, MFC-5440CN, MFC-5840CN and MFC-3340CN only 5-19 Running PC-FAX Receiving 5-19 Setting up your PC 5-19 Viewing new PC-FAX messages 5-20 Using the PhotoCapture Center™ from your PC (For Windows®) (not available for MFC-5440CN and MFC-3240C 6-1 For ...174; (Mac OS® X 8-4 Choosing page setup options 8-4 Choosing printing options 8-5 Using the Brother printer driver with your Apple® Macintosh® (Mac OS® 8.6-9.2 8-6 Sending a fax from your Macintosh® application 8-8 For Mac OS® X users 8-8 Drag a vCard from ...
... up PC-FAX receiving (MFC-420CN, MFC-620CN, MFC-5440CN, MFC-5840CN and MFC-3340CN only 5-19 Running PC-FAX Receiving 5-19 Setting up your PC 5-19 Viewing new PC-FAX messages 5-20 Using the PhotoCapture Center™ from your PC (For Windows®) (not available for MFC-5440CN and MFC-3240C 6-1 For ...174; (Mac OS® X 8-4 Choosing page setup options 8-4 Choosing printing options 8-5 Using the Brother printer driver with your Apple® Macintosh® (Mac OS® 8.6-9.2 8-6 Sending a fax from your Macintosh® application 8-8 For Mac OS® X users 8-8 Drag a vCard from ...
Software Users Manual - English
Page 11
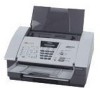
... find out how to improve it pauses the PC printing operation, and then continues printing when copying or fax receiving has finished. Printer operation key Job Cancel (MFC-5440CN only) You can print from your computer while sending or receiving a fax in the User's Guide. USING THE MACHINE AS A PRINTER 1 - 3 Simultaneous printing and...
... find out how to improve it pauses the PC printing operation, and then continues printing when copying or fax receiving has finished. Printer operation key Job Cancel (MFC-5440CN only) You can print from your computer while sending or receiving a fax in the User's Guide. USING THE MACHINE AS A PRINTER 1 - 3 Simultaneous printing and...
Software Users Manual - English
Page 58
...are installed automatically. When you install MFL-Pro Suite, ScanSoft® PaperPort® 9.0SE for Brother is a document management application. Using ScanSoft® PaperPort® 9.0SE and OmniPage® OCR ScanSoft® PaperPort® 9....0SE for Brother and ScanSoft® OmniPage® OCR are using Windows® XP or Windows® 2000 Professional, you must...; OmniPage® OCR, is only an introduction to view scanned documents. See Documentation for printing, faxing or filing.
...are installed automatically. When you install MFL-Pro Suite, ScanSoft® PaperPort® 9.0SE for Brother is a document management application. Using ScanSoft® PaperPort® 9.0SE and OmniPage® OCR ScanSoft® PaperPort® 9....0SE for Brother and ScanSoft® OmniPage® OCR are using Windows® XP or Windows® 2000 Professional, you must...; OmniPage® OCR, is only an introduction to view scanned documents. See Documentation for printing, faxing or filing.
Software Users Manual - English
Page 60
... applications with links to PaperPort® 9.0SE. If PaperPort® 9.0SE does not automatically recognize one of the Send To Bar is to select an item and then fax it. To use a link, drag an item onto one of the applications on the Desktop. ■ You can be a PaperPort® 9.0SE item or...
... applications with links to PaperPort® 9.0SE. If PaperPort® 9.0SE does not automatically recognize one of the Send To Bar is to select an item and then fax it. To use a link, drag an item onto one of the applications on the Desktop. ■ You can be a PaperPort® 9.0SE item or...
Software Users Manual - English
Page 63
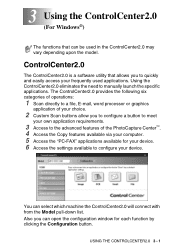
... your own application requirements. 3 Access to the advanced features of the PhotoCapture Center™. 4 Access the Copy features available via your computer. 5 Access the "PC-FAX" applications available for each function by clicking the Configuration button. 3 Using the ControlCenter2.0 (For Windows®) The functions that allows you to quickly and easily...
... your own application requirements. 3 Access to the advanced features of the PhotoCapture Center™. 4 Access the Copy features available via your computer. 5 Access the "PC-FAX" applications available for each function by clicking the Configuration button. 3 Using the ControlCenter2.0 (For Windows®) The functions that allows you to quickly and easily...
Software Users Manual - English
Page 67
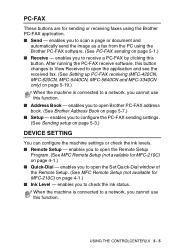
... are for sending or receiving faxes using the Brother PC-FAX software. (See PC-FAX sending on page 5-1.) ■ Receive - enables you to receive a PC-FAX by clicking this button. enables you to open the application and see the received fax. (See Setting up PC-FAX receiving (MFC-420CN, MFC-620CN, MFC-5440CN, MFC-5840CN and MFC-3340CN only) on page 5-19...
... are for sending or receiving faxes using the Brother PC-FAX software. (See PC-FAX sending on page 5-1.) ■ Receive - enables you to receive a PC-FAX by clicking this button. enables you to open the application and see the received fax. (See Setting up PC-FAX receiving (MFC-420CN, MFC-620CN, MFC-5440CN, MFC-5840CN and MFC-3340CN only) on page 5-19...
Software Users Manual - English
Page 84
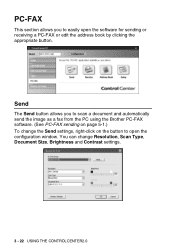
PC-FAX This section allows you to scan a document and automatically send the image as a fax from the PC using the Brother PC-FAX software. (See PC-FAX sending on the button to easily open the configuration window. Send The Send button allows you to open the software for sending or receiving a PC-FAX or edit the address book by clicking the appropriate button. You can change the Send settings, right-click on page 5-1.) To change Resolution, Scan Type, Document Size, Brightness and Contrast settings. 3 - 22 USING THE CONTROLCENTER2.0
PC-FAX This section allows you to scan a document and automatically send the image as a fax from the PC using the Brother PC-FAX software. (See PC-FAX sending on the button to easily open the configuration window. Send The Send button allows you to open the software for sending or receiving a PC-FAX or edit the address book by clicking the appropriate button. You can change the Send settings, right-click on page 5-1.) To change Resolution, Scan Type, Document Size, Brightness and Contrast settings. 3 - 22 USING THE CONTROLCENTER2.0
Software Users Manual - English
Page 85
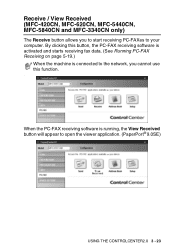
By clicking this button, the PC-FAX receiving software is activated and starts receiving fax data. (See Running PC-FAX Receiving on page 5-19.) When the machine is running, the View Received button will appear to your computer. Receive / View Received (MFC-420CN, MFC-620CN, MFC-5440CN, MFC-5840CN and MFC-3340CN only) The Receive button allows you cannot use this function. .) When the PC-FAX receiving software is connected to the network, you to start receiving PC-FAXes to open the viewer application. (PaperPort® 9.0SE) USING THE CONTROLCENTER2.0 3 - 23
By clicking this button, the PC-FAX receiving software is activated and starts receiving fax data. (See Running PC-FAX Receiving on page 5-19.) When the machine is running, the View Received button will appear to your computer. Receive / View Received (MFC-420CN, MFC-620CN, MFC-5440CN, MFC-5840CN and MFC-3340CN only) The Receive button allows you cannot use this function. .) When the PC-FAX receiving software is connected to the network, you to start receiving PC-FAXes to open the viewer application. (PaperPort® 9.0SE) USING THE CONTROLCENTER2.0 3 - 23
Software Users Manual - English
Page 86
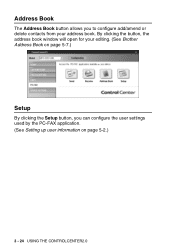
Address Book The Address Book button allows you can configure the user settings used by the PC-FAX application. (See Setting up user information on page 5-7.) Setup By clicking the Setup button, you to configure add/amend or delete contacts from your editing. (See Brother Address Book on page 5-2.) 3 - 24 USING THE CONTROLCENTER2.0 By clicking the button, the address book window will open for your address book.
Address Book The Address Book button allows you can configure the user settings used by the PC-FAX application. (See Setting up user information on page 5-7.) Setup By clicking the Setup button, you to configure add/amend or delete contacts from your editing. (See Brother Address Book on page 5-2.) 3 - 24 USING THE CONTROLCENTER2.0 By clicking the button, the address book window will open for your address book.
Software Users Manual - English
Page 91
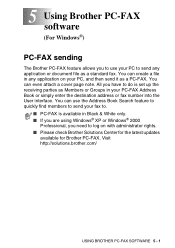
... administrator rights. ■ Please check Brother Solutions Center for the latest updates available for Brother PC-FAX. Visit http://solutions.brother.com/ USING BROTHER PC-FAX SOFTWARE 5 - 1 You can even attach a cover page note. You can create a file in your PC-FAX Address Book or simply enter the destination... address or fax number into the User interface. 5 Using Brother PC-FAX software (For Windows®) PC-FAX sending The Brother PC-FAX feature allows you need to log on your PC, and ...
... administrator rights. ■ Please check Brother Solutions Center for the latest updates available for Brother PC-FAX. Visit http://solutions.brother.com/ USING BROTHER PC-FAX SOFTWARE 5 - 1 You can even attach a cover page note. You can create a file in your PC-FAX Address Book or simply enter the destination... address or fax number into the User interface. 5 Using Brother PC-FAX software (For Windows®) PC-FAX sending The Brother PC-FAX feature allows you need to log on your PC, and ...

Software Users Manual - English
Page 92
Setting up user information You can access the User Information from the FAX Sending dialog box by clicking . (See Sending a file as a PC-FAX using the Facsimile style user interface on page 5-16.) 1 From the Start menu, select Programs, Brother, MFL-Pro Suite MFC-XXXX (Where XXXX is your model name), and then select PC-FAX Setup. The Brother PC-FAX Setup dialog box will appear: 2 You must enter this information to create the Fax Header and Cover Page. 3 Click OK to save the User Information. 5 - 2 USING BROTHER PC-FAX SOFTWARE
Setting up user information You can access the User Information from the FAX Sending dialog box by clicking . (See Sending a file as a PC-FAX using the Facsimile style user interface on page 5-16.) 1 From the Start menu, select Programs, Brother, MFL-Pro Suite MFC-XXXX (Where XXXX is your model name), and then select PC-FAX Setup. The Brother PC-FAX Setup dialog box will appear: 2 You must enter this information to create the Fax Header and Cover Page. 3 Click OK to save the User Information. 5 - 2 USING BROTHER PC-FAX SOFTWARE
Software Users Manual - English
Page 93
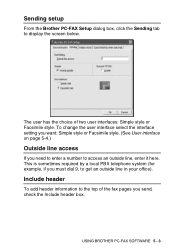
The user has the choice of the fax pages you send, check the Include header box. To change the user interface select the interface setting you want: Simple style or Facsimile style. (See ... by a local PBX telephone system (for example, if you need to enter a number to get an outside line, enter it here. Sending setup From the Brother PC-FAX Setup dialog box, click the Sending tab to the top of two user interfaces: Simple style or Facsimile style. USING...
The user has the choice of the fax pages you send, check the Include header box. To change the user interface select the interface setting you want: Simple style or Facsimile style. (See ... by a local PBX telephone system (for example, if you need to enter a number to get an outside line, enter it here. Sending setup From the Brother PC-FAX Setup dialog box, click the Sending tab to the top of two user interfaces: Simple style or Facsimile style. USING...
Software Users Manual - English
Page 94
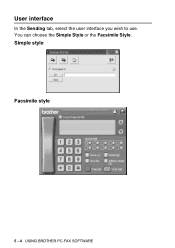
You can choose the Simple Style or the Facsimile Style. Simple style Facsimile style 5 - 4 USING BROTHER PC-FAX SOFTWARE User interface In the Sending tab, select the user interface you wish to use.
You can choose the Simple Style or the Facsimile Style. Simple style Facsimile style 5 - 4 USING BROTHER PC-FAX SOFTWARE User interface In the Sending tab, select the user interface you wish to use.
Software Users Manual - English
Page 95
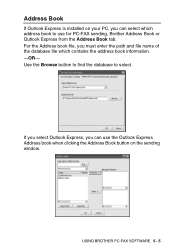
Use the Browse button to find the database to use the Outlook Express Address book when clicking the Address Book button on your PC, you can use for PC-FAX sending, Brother Address Book or Outlook Express from the Address Book tab. If you select Outlook Express, you can select which contains the address book information. -OR- USING BROTHER PC-FAX SOFTWARE 5 - 5 Address Book If Outlook Express is installed on the sending window. For the Address book file, you must enter the path and file name of the database file which address book to select.
Use the Browse button to find the database to use the Outlook Express Address book when clicking the Address Book button on your PC, you can use for PC-FAX sending, Brother Address Book or Outlook Express from the Address Book tab. If you select Outlook Express, you can select which contains the address book information. -OR- USING BROTHER PC-FAX SOFTWARE 5 - 5 Address Book If Outlook Express is installed on the sending window. For the Address book file, you must enter the path and file name of the database file which address book to select.
Software Users Manual - English
Page 96
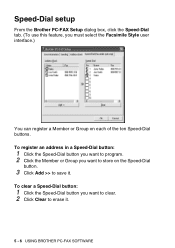
To clear a Speed-Dial button: 1 Click the Speed-Dial button you must select the Facsimile Style user interface.) You can register a Member or Group on the Speed-Dial button. 3 Click Add >> to erase it . Speed-Dial setup From the Brother PC-FAX Setup dialog box, click the Speed-Dial tab. (To use this feature, you want to store on each of the ten Speed-Dial buttons. To register an address in a Speed-Dial button: 1 Click the Speed-Dial button you want to program. 2 Click the Member or Group you want to clear. 2 Click Clear to save it . 5 - 6 USING BROTHER PC-FAX SOFTWARE
To clear a Speed-Dial button: 1 Click the Speed-Dial button you must select the Facsimile Style user interface.) You can register a Member or Group on the Speed-Dial button. 3 Click Add >> to erase it . Speed-Dial setup From the Brother PC-FAX Setup dialog box, click the Speed-Dial tab. (To use this feature, you want to store on each of the ten Speed-Dial buttons. To register an address in a Speed-Dial button: 1 Click the Speed-Dial button you want to program. 2 Click the Member or Group you want to clear. 2 Click Clear to save it . 5 - 6 USING BROTHER PC-FAX SOFTWARE
Software Users Manual - English
Page 97
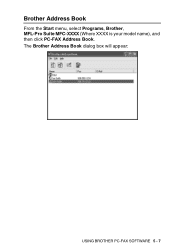
The Brother Address Book dialog box will appear: USING BROTHER PC-FAX SOFTWARE 5 - 7 Brother Address Book From the Start menu, select Programs, Brother, MFL-Pro Suite MFC-XXXX (Where XXXX is your model name), and then click PC-FAX Address Book.
The Brother Address Book dialog box will appear: USING BROTHER PC-FAX SOFTWARE 5 - 7 Brother Address Book From the Start menu, select Programs, Brother, MFL-Pro Suite MFC-XXXX (Where XXXX is your model name), and then click PC-FAX Address Book.
Software Users Manual - English
Page 98
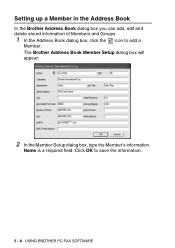
Name is a required field. Click OK to add a Member. Setting up a Member in the Address Book In the Brother Address Book dialog box you can add, edit and delete stored information of Members and Groups. 1 In the Address Book dialog box, click the icon to save the information. 5 - 8 USING BROTHER PC-FAX SOFTWARE The Brother Address Book Member Setup dialog box will appear: 2 In the Member Setup dialog box, type the Member's information.
Name is a required field. Click OK to add a Member. Setting up a Member in the Address Book In the Brother Address Book dialog box you can add, edit and delete stored information of Members and Groups. 1 In the Address Book dialog box, click the icon to save the information. 5 - 8 USING BROTHER PC-FAX SOFTWARE The Brother Address Book Member Setup dialog box will appear: 2 In the Member Setup dialog box, type the Member's information.


