
Network Users Manual - English
Page 10
...on a 10/100 MB wired or IEEE 802.11b/802.11g wireless Ethernet network using the internal network print server. To use the Brother machine through a network, you need to configure the print server, and set up the ... r r r r r r r r r r r 1 Not available for MFC-253CW, MFC-255CW and MFC-257CW. 2 Not available for DCP-365CN, DCP-395CN and MFC-295CN. 3 BRAdmin Professional 3 and Web BRAdmin are available as a download from http://solutions.brother.com. 4 Not available for DCP models. 5 Not available for DCP models, MFC-253CW, MFC-255CW, MFC-257CW and MFC-295CN. 6 Black and White only.
...on a 10/100 MB wired or IEEE 802.11b/802.11g wireless Ethernet network using the internal network print server. To use the Brother machine through a network, you need to configure the print server, and set up the ... r r r r r r r r r r r 1 Not available for MFC-253CW, MFC-255CW and MFC-257CW. 2 Not available for DCP-365CN, DCP-395CN and MFC-295CN. 3 BRAdmin Professional 3 and Web BRAdmin are available as a download from http://solutions.brother.com. 4 Not available for DCP models. 5 Not available for DCP models, MFC-253CW, MFC-255CW, MFC-257CW and MFC-295CN. 6 Black and White only.
Network Users Manual - English
Page 124
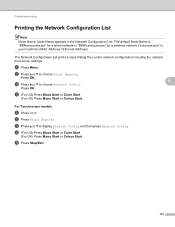
... List prints a report listing the current network configuration including the network print server settings. a Press Menu. Press OK. d (For US) Press Black Start or Color Start. (For UK) Press Mono Start or Colour Start. Press OK. 6 c Press a or b to display Network Config and then press ...Network Config. c Press a or b to choose Network Config. b Press a or b to choose Print Reports. d (For US) Press Black Start or Color Start. (For UK) Press Mono Start or Colour Start. b Press Print Reports. e Press Stop/Exit. 115 For Touchscreen models 6 a Press MENU....
... List prints a report listing the current network configuration including the network print server settings. a Press Menu. Press OK. d (For US) Press Black Start or Color Start. (For UK) Press Mono Start or Colour Start. Press OK. 6 c Press a or b to display Network Config and then press ...Network Config. c Press a or b to choose Network Config. b Press a or b to choose Print Reports. d (For US) Press Black Start or Color Start. (For UK) Press Mono Start or Colour Start. b Press Print Reports. e Press Stop/Exit. 115 For Touchscreen models 6 a Press MENU....

Software Users Manual - English
Page 20
Color Settings Click the Color Settings button to be printed in black and white using grayscale. Printing Color/Grayscale This selection allows a color document to see options for enhanced print settings. 1 1 1 13
Color Settings Click the Color Settings button to be printed in black and white using grayscale. Printing Color/Grayscale This selection allows a color document to see options for enhanced print settings. 1 1 1 13
Software Users Manual - English
Page 44
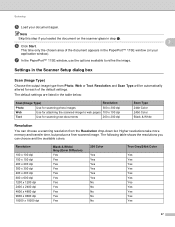
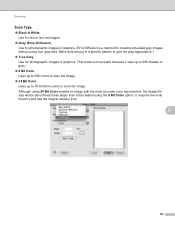
... options available to web pages 100 x 100 dpi Text Use for scanning text documents 200 x 200 dpi Scan Type 24bit Color 24bit Color Black & White Resolution 2 You can choose and the available colors. The following table shows the resolutions you loaded the document on the scanner glass in the PaperPort™ 11SE window (or... x 400 dpi 600 x 600 dpi 1200 x 1200 dpi 2400 x 2400 dpi 4800 x 4800 dpi 9600 x 9600 dpi 19200 x 19200 dpi Black & White/ Gray (Error Diffusion) Yes Yes Yes Yes Yes Yes Yes Yes Yes Yes Yes 256 Color Yes Yes Yes Yes Yes Yes No No No No No True Gray/24bit...
... options available to web pages 100 x 100 dpi Text Use for scanning text documents 200 x 200 dpi Scan Type 24bit Color 24bit Color Black & White Resolution 2 You can choose and the available colors. The following table shows the resolutions you loaded the document on the scanner glass in the PaperPort™ 11SE window (or... x 400 dpi 600 x 600 dpi 1200 x 1200 dpi 2400 x 2400 dpi 4800 x 4800 dpi 9600 x 9600 dpi 19200 x 19200 dpi Black & White/ Gray (Error Diffusion) Yes Yes Yes Yes Yes Yes Yes Yes Yes Yes Yes 256 Color Yes Yes Yes Yes Yes Yes No No No No No True Gray/24bit...

Software Users Manual - English
Page 45
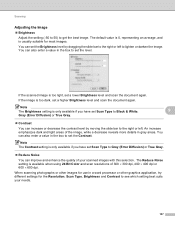
...image file size will be about three times larger than a file created using the 256 Color option. Reduce Noise 2 You can set the Brightness level by dragging the slide bar to the right or left to Black & White, Gray (Error Diffusion) or True Gray. 38 You can improve and ... graphics. Note The Brightness setting is too light, set Scan Type to lighten or darken the image. Although using 24bit Color creates an image with this selection. Scanning Scan Type 2 „ Black & White Use for text or line art images. „ Gray (Error Diffusion) 2 Use for photographic images or graphics...
...image file size will be about three times larger than a file created using the 256 Color option. Reduce Noise 2 You can set the Brightness level by dragging the slide bar to the right or left to Black & White, Gray (Error Diffusion) or True Gray. 38 You can improve and ... graphics. Note The Brightness setting is too light, set Scan Type to lighten or darken the image. Although using 24bit Color creates an image with this selection. Scanning Scan Type 2 „ Black & White Use for text or line art images. „ Gray (Error Diffusion) 2 Use for photographic images or graphics...

Software Users Manual - English
Page 87
...Black and White faxing only. 80 ControlCenter3 PC-FAX (MFC models only) 3 The PC-FAX option lets you scan a page or document and automatically send the image as a fax from the PC using the Brother PC-FAX software. (See PC-FAX sending on page 88.) „ Receive (Not available for MFC-255CW and MFC-295CN...) By clicking this button, the PC-FAX receive software is activated and your PC starts receiving fax data from the control panel menu of the Brother machine. (See PC-FAX receiving (Not available for sending...
...Black and White faxing only. 80 ControlCenter3 PC-FAX (MFC models only) 3 The PC-FAX option lets you scan a page or document and automatically send the image as a fax from the PC using the Brother PC-FAX software. (See PC-FAX sending on page 88.) „ Receive (Not available for MFC-255CW and MFC-295CN...) By clicking this button, the PC-FAX receive software is activated and your PC starts receiving fax data from the control panel menu of the Brother machine. (See PC-FAX receiving (Not available for sending...

Software Users Manual - English
Page 95
You can only send Black & White fax documents. The Brother PC-FAX Setup dialog box appears: b Enter this information to send a document file from the FAX Sending dialog box by clicking the (See Sending a file as a PC-FAX. 5 Brother PC-FAX Software (MFC models only) 5 PC-FAX sending 5 The Brother PC-FAX feature lets you...a PC-FAX using Windows® XP or Windows® 2000 Professional, you have to save the User Information. a Click the Start button, All Programs, Brother, MFC-XXXX (where XXXX is set up the receiving parties as members or groups in any application on the...
You can only send Black & White fax documents. The Brother PC-FAX Setup dialog box appears: b Enter this information to send a document file from the FAX Sending dialog box by clicking the (See Sending a file as a PC-FAX. 5 Brother PC-FAX Software (MFC models only) 5 PC-FAX sending 5 The Brother PC-FAX feature lets you...a PC-FAX using Windows® XP or Windows® 2000 Professional, you have to save the User Information. a Click the Start button, All Programs, Brother, MFC-XXXX (where XXXX is set up the receiving parties as members or groups in any application on the...

Software Users Manual - English
Page 129
Color Settings Click the Color Settings button to be printed in black and white using grayscale. Color/Grayscale This selection allows a color document to see options for enhanced print settings. 8 8 8 122 Printing and Faxing Advanced settings 8 You can choose the Color/Grayscale, Mirror Printing, Reverse Printing and Bi-Directional Printing settings.
Color Settings Click the Color Settings button to be printed in black and white using grayscale. Color/Grayscale This selection allows a color document to see options for enhanced print settings. 8 8 8 122 Printing and Faxing Advanced settings 8 You can choose the Color/Grayscale, Mirror Printing, Reverse Printing and Bi-Directional Printing settings.
Software Users Manual - English
Page 141
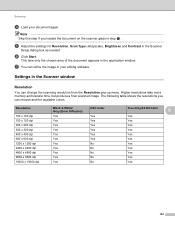
... document on the scanner glass in step a. f Click Start. g You can refine the image in the Scanner window 9 Resolution 9 You can choose and the available colors. Resolution 100 x 100 dpi 150 x 150 dpi 200 x 200 dpi 300 x 300 dpi 400 x 400 dpi 600 x 600 dpi 1200 x 1200 dpi 2400 x 2400 dpi... 4800 x 4800 dpi 9600 x 9600 dpi 19200 x 19200 dpi Black & White/ Gray (Error Diffusion) Yes Yes Yes Yes Yes Yes Yes Yes Yes Yes Yes 8 Bit Color Yes Yes Yes Yes Yes Yes No No No No No True Gray/24 Bit...
... document on the scanner glass in step a. f Click Start. g You can refine the image in the Scanner window 9 Resolution 9 You can choose and the available colors. Resolution 100 x 100 dpi 150 x 150 dpi 200 x 200 dpi 300 x 300 dpi 400 x 400 dpi 600 x 600 dpi 1200 x 1200 dpi 2400 x 2400 dpi... 4800 x 4800 dpi 9600 x 9600 dpi 19200 x 19200 dpi Black & White/ Gray (Error Diffusion) Yes Yes Yes Yes Yes Yes Yes Yes Yes Yes Yes 8 Bit Color Yes Yes Yes Yes Yes Yes No No No No No True Gray/24 Bit...
Software Users Manual - English
Page 142
This mode is a method for creating simulated gray images without using the 8 Bit Color option. Black dots are put in a specific pattern to scan the image. It requires the most accurate color reproduction, the image file size will be about three times larger than a file created using true gray ...dots. Although using 24 Bit Color creates an image with the most memory and has the longest transfer time. 9 135 Scanning Scan Type 9 „ Black & White Use for text or line art images. „ Gray (Error Diffusion) Use...
This mode is a method for creating simulated gray images without using the 8 Bit Color option. Black dots are put in a specific pattern to scan the image. It requires the most accurate color reproduction, the image file size will be about three times larger than a file created using true gray ...dots. Although using 24 Bit Color creates an image with the most memory and has the longest transfer time. 9 135 Scanning Scan Type 9 „ Black & White Use for text or line art images. „ Gray (Error Diffusion) Use...
Software Users Manual - English
Page 144
... see which setting best suits your scanned images with this selection. Note The Contrast setting is only available if you have set Scan Type to Black & White, 9 Gray (Error Diffusion) or True Gray. „ Contrast You can also enter a value in a word processor or other images for use in ... decrease the contrast level by dragging the slide bar to lighten or darken the image. If the scanned image is available when using 24 Bit Color and scan resolutions of your needs. 137 The Reduce Noise setting is too light, set a higher Brightness level and scan the document again. ...
... see which setting best suits your scanned images with this selection. Note The Contrast setting is only available if you have set Scan Type to Black & White, 9 Gray (Error Diffusion) or True Gray. „ Contrast You can also enter a value in a word processor or other images for use in ... decrease the contrast level by dragging the slide bar to lighten or darken the image. If the scanned image is available when using 24 Bit Color and scan resolutions of your needs. 137 The Reduce Noise setting is too light, set a higher Brightness level and scan the document again. ...
Software Users Manual - English
Page 173
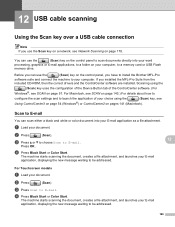
...or USB Flash memory drive. The machine starts scanning the document, creates a file attachment, and launches your computer. d Press Black Start or Color Start. d Press Black Start or Color Start. 12 USB cable scanning 12 Using the Scan key over a USB cable connection 12 Note If you use the Scan ...key on a network, see SCAN on page 57. For Touchscreen models 12 a Load your document. If you have to install the Brother...
...or USB Flash memory drive. The machine starts scanning the document, creates a file attachment, and launches your computer. d Press Black Start or Color Start. d Press Black Start or Color Start. 12 USB cable scanning 12 Using the Scan key over a USB cable connection 12 Note If you use the Scan ...key on a network, see SCAN on page 57. For Touchscreen models 12 a Load your document. If you have to install the Brother...
Software Users Manual - English
Page 174
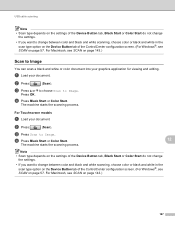
... do not change the settings. • If you want to change between color and black and white scanning, choose color or black and white in the scan type option on page 143.) 167 d Press Black Start or Color Start. 12 The machine starts the scanning process. Note • Scan type depends on.... (For Windows®, see SCAN on page 57. For Macintosh, see SCAN on page 143.) Scan to change between color and black and white scanning, choose color or black and white in the scan type option on the Device Button tab of the ControlCenter configuration screen. (For Windows®, see...
... do not change the settings. • If you want to change between color and black and white scanning, choose color or black and white in the scan type option on page 143.) 167 d Press Black Start or Color Start. 12 The machine starts the scanning process. Note • Scan type depends on.... (For Windows®, see SCAN on page 57. For Macintosh, see SCAN on page 143.) Scan to change between color and black and white scanning, choose color or black and white in the scan type option on the Device Button tab of the ControlCenter configuration screen. (For Windows®, see...

Software Users Manual - English
Page 175
.... b Press (Scan). c Press a or b to choose Scan to OCR. d Press Black Start or Color Start. Note • Scan type depends on the settings of the Device Button tab, Black Start or Color Start do not change between color and black and white scanning, choose color or black and white in the scan type option on the Device Button...
.... b Press (Scan). c Press a or b to choose Scan to OCR. d Press Black Start or Color Start. Note • Scan type depends on the settings of the Device Button tab, Black Start or Color Start do not change between color and black and white scanning, choose color or black and white in the scan type option on the Device Button...
Software Users Manual - English
Page 176
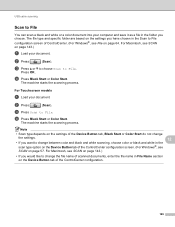
... ControlCenter. (For Windows®, see SCAN on the settings of the Device Button tab, Black Start or Color Start do not change between color and black and white scanning, choose color or black and white in the Scan to File configuration screen of the ControlCenter configuration screen. (For Windows...®, see File on page 143.) a Load your document. For Touchscreen models 12 a Load your document. d Press Black Start or Color Start. The machine starts the scanning process. Press OK. c Press Scan to File. Note • Scan type depends on page 57....
... ControlCenter. (For Windows®, see SCAN on the settings of the Device Button tab, Black Start or Color Start do not change between color and black and white scanning, choose color or black and white in the Scan to File configuration screen of the ControlCenter configuration screen. (For Windows...®, see File on page 143.) a Load your document. For Touchscreen models 12 a Load your document. d Press Black Start or Color Start. The machine starts the scanning process. Press OK. c Press Scan to File. Note • Scan type depends on page 57....
Software Users Manual - English
Page 177
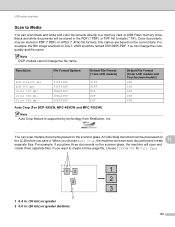
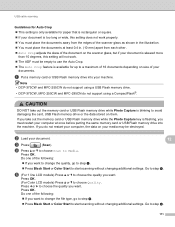
...Format (1 line LCD models) B/W 200x100 dpi B/W 200 dpi Color 150 dpi Color 300 dpi Color 600 dpi TIFF / PDF TIFF / PDF JPEG / PDF JPEG / PDF JPEG / PDF TIFF TIFF PDF PDF PDF Auto Crop (For DCP-395CN, MFC-495CW and MFC-795CW) Note Auto Crop feature is supported by technology from ... scanner glass. An individual document can scan multiple documents placed on the current date. USB cable scanning Scan to Media 12 You can scan black and white and color documents directly to create a three page file, choose TIFF or PDF for File Type. 1 13 1 2 2 3 2 1 0.4 in. (10 mm) or greater 2 0.8 ...
...Format (1 line LCD models) B/W 200x100 dpi B/W 200 dpi Color 150 dpi Color 300 dpi Color 600 dpi TIFF / PDF TIFF / PDF JPEG / PDF JPEG / PDF JPEG / PDF TIFF TIFF PDF PDF PDF Auto Crop (For DCP-395CN, MFC-495CW and MFC-795CW) Note Auto Crop feature is supported by technology from ... scanner glass. An individual document can scan multiple documents placed on the current date. USB cable scanning Scan to Media 12 You can scan black and white and color documents directly to create a three page file, choose TIFF or PDF for File Type. 1 13 1 2 2 3 2 1 0.4 in. (10 mm) or greater 2 0.8 ...
Software Users Manual - English
Page 178
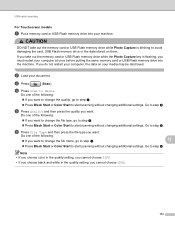
...do not support using a USB Flash memory drive. • DCP-375CW, MFC-255CW and MFC-295CN do not restart your computer, the data on your media may be empty... key is flashing, you want to change the quality, go to step f. „ Press Black Start or Color Start to avoid damaging the card, USB Flash memory drive or the data stored on size of your... documents. Press OK. (For Color LCD models) Press a or b to step h. 171 b Load your document. 12 c Press (Scan). Press OK. Press OK. Do one of the following : „ If you must be destroyed. e...
...do not support using a USB Flash memory drive. • DCP-375CW, MFC-255CW and MFC-295CN do not restart your computer, the data on your media may be empty... key is flashing, you want to change the quality, go to step f. „ Press Black Start or Color Start to avoid damaging the card, USB Flash memory drive or the data stored on size of your... documents. Press OK. (For Color LCD models) Press a or b to step h. 171 b Load your document. 12 c Press (Scan). Press OK. Press OK. Do one of the following : „ If you must be destroyed. e...
Software Users Manual - English
Page 179
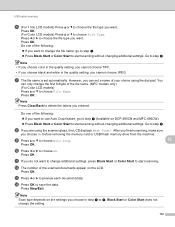
...Press a or b to choose On. j Press d or c to choose Auto Crop. 12 Press OK. Do one of the following : „ If you can only change additional settings, press Black Start or Color Start to start scanning without changing additional settings. g The file name is set a name of the scanned documents... If you choose black and white in step e to f, Black Start or Color Start does not change the file name, go to choose the file type you are using the dial pad. However, you want to change the first 6 digits of the file name. (MFC models only) (For Color LCD models) Press...
...Press a or b to choose On. j Press d or c to choose Auto Crop. 12 Press OK. Do one of the following : „ If you can only change additional settings, press Black Start or Color Start to start scanning without changing additional settings. g The file name is set a name of the scanned documents... If you choose black and white in step e to f, Black Start or Color Start does not change the file name, go to choose the file type you are using the dial pad. However, you want to change the first 6 digits of the file name. (MFC models only) (For Color LCD models) Press...
Software Users Manual - English
Page 180
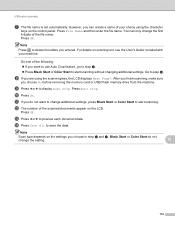
...scanning without changing additional settings. Go to Media. Note • If you choose color in the quality setting, you cannot choose TIFF. • If you choose black and white in the quality setting, you want . Do one of the following : „ If you must restart your computer at once ...press the quality you do not restart your computer, the data on them. Do one of the following : „ If you want to change the quality, go to step f. „ Press Black Start or Color Start to start scanning without changing additional settings. If you take out the memory card...
...scanning without changing additional settings. Go to Media. Note • If you choose color in the quality setting, you cannot choose TIFF. • If you choose black and white in the quality setting, you want . Do one of the following : „ If you must restart your computer at once ...press the quality you do not restart your computer, the data on them. Do one of the following : „ If you want to change the quality, go to step f. „ Press Black Start or Color Start to start scanning without changing additional settings. If you take out the memory card...
Software Users Manual - English
Page 181
...set automatically. Do one of your machine. i Press d or c to start scanning without changing additional settings. Press Auto Crop. k If you do not change the setting. 12 174 Note Scan type depends on the settings you can only change additional settings, press Black Start or Color Start to display... you finish scanning, make sure you entered. However, you choose in step e and f, Black Start or Color Start do not want to use Auto Crop feature, go to step i. „ Press Black Start or Color Start to start scanning. h If you want to change the first 6 digits of the ...
...set automatically. Do one of your machine. i Press d or c to start scanning without changing additional settings. Press Auto Crop. k If you do not change the setting. 12 174 Note Scan type depends on the settings you can only change additional settings, press Black Start or Color Start to display... you finish scanning, make sure you entered. However, you choose in step e and f, Black Start or Color Start do not want to use Auto Crop feature, go to step i. „ Press Black Start or Color Start to start scanning. h If you want to change the first 6 digits of the ...


