Software Users Manual - English
Page 3
... Duplex Printing (MFC-6890CDW only 12 Advanced tab...14 Color/Grayscale ...15 Color Settings ...15 Use Watermark...16 Watermark Settings ...17 Other Print Options...19 Support ...28 Using FaceFilter Studio for photo printing by REALLUSION 30 Starting FaceFilter Studio with your Brother machine turned On... List...36 Uninstalling FaceFilter Studio ...36 2 Scanning 37 Scanning a document using the TWAIN driver 37 Scanning a document into the PC ...37 Pre-Scanning to crop a portion you want to scan 39 Settings in the Scanner Setup dialog box 40 Scanning a document using the WIA driver (For ...
... Duplex Printing (MFC-6890CDW only 12 Advanced tab...14 Color/Grayscale ...15 Color Settings ...15 Use Watermark...16 Watermark Settings ...17 Other Print Options...19 Support ...28 Using FaceFilter Studio for photo printing by REALLUSION 30 Starting FaceFilter Studio with your Brother machine turned On... List...36 Uninstalling FaceFilter Studio ...36 2 Scanning 37 Scanning a document using the TWAIN driver 37 Scanning a document into the PC ...37 Pre-Scanning to crop a portion you want to scan 39 Settings in the Scanner Setup dialog box 40 Scanning a document using the WIA driver (For ...
Software Users Manual - English
Page 4
... ...77 CUSTOM SCAN ...78 File Type...79 Customizing a user-defined button...80 PHOTOCAPTURE...84 Open PCC Folder (PCC: PhotoCapture Center 84 Copy From PCC ...85 Copy To Application ...85 FaceFilter Studio ...86 COPY ...88 PC-FAX (MFC models only) ...90 Send ...91 Receive/View Received (Not available for MFC-250C and MFC-290C 91 Address...
... ...77 CUSTOM SCAN ...78 File Type...79 Customizing a user-defined button...80 PHOTOCAPTURE...84 Open PCC Folder (PCC: PhotoCapture Center 84 Copy From PCC ...85 Copy To Application ...85 FaceFilter Studio ...86 COPY ...88 PC-FAX (MFC models only) ...90 Send ...91 Receive/View Received (Not available for MFC-250C and MFC-290C 91 Address...

Software Users Manual - English
Page 5
... FTP Manual Method...122 How to set a new default for Scan to FTP 123 Entering Text ...125 For MFC-5890CN and MFC-6490CW 125 For MFC-6890CDW...126 5 Remote Setup (Not available for DCP models, MFC-250C and MFC-290C) 127 Remote Setup...127 6 Brother PC-FAX Software (MFC models only) 129 PC-FAX sending ...129 Setting up user...
... FTP Manual Method...122 How to set a new default for Scan to FTP 123 Entering Text ...125 For MFC-5890CN and MFC-6490CW 125 For MFC-6890CDW...126 5 Remote Setup (Not available for DCP models, MFC-250C and MFC-290C) 127 Remote Setup...127 6 Brother PC-FAX Software (MFC models only) 129 PC-FAX sending ...129 Setting up user...
Software Users Manual - English
Page 6
PC-FAX receiving (Not available for MFC-250C and MFC-290C 143 Enabling the PC-FAX Receiving ...paper...156 Simultaneous printing, scanning and faxing 156 Clearing data from the memory ...156 Status Monitor ...157 Using the Brother Ink driver ...158 Choosing page setup options ...158 Automatic Duplex Printing (MFC-6890CDW only 160 Choosing...printing options ...162 Basic settings...163 Media Type...163 Quality ...164 Color Mode ...164 Advanced settings ...165 Color/Grayscale ...166 Other Print Options...168 Support ...169 Sending a fax (MFC models only) ...170 Drag a vCard from the Mac OS®...
PC-FAX receiving (Not available for MFC-250C and MFC-290C 143 Enabling the PC-FAX Receiving ...paper...156 Simultaneous printing, scanning and faxing 156 Clearing data from the memory ...156 Status Monitor ...157 Using the Brother Ink driver ...158 Choosing page setup options ...158 Automatic Duplex Printing (MFC-6890CDW only 160 Choosing...printing options ...162 Basic settings...163 Media Type...163 Quality ...164 Color Mode ...164 Advanced settings ...165 Color/Grayscale ...166 Other Print Options...168 Support ...169 Sending a fax (MFC models only) ...170 Drag a vCard from the Mac OS®...
Software Users Manual - English
Page 7
... ...204 User-defined button ...205 Scan to Image ...205 Scan to OCR ...206 Scan to E-mail ...207 Scan to Media 190 Using Presto! PageManager...193 Features ...193 System requirements for DCP models, MFC-250C and MFC-290C 212 Ink Level ...213 vi 10 Scanning 176 Scanning from a Macintosh® ...176 Accessing the scanner ...176 Scanning an image into your Macintosh...
... ...204 User-defined button ...205 Scan to Image ...205 Scan to OCR ...206 Scan to E-mail ...207 Scan to Media 190 Using Presto! PageManager...193 Features ...193 System requirements for DCP models, MFC-250C and MFC-290C 212 Ink Level ...213 vi 10 Scanning 176 Scanning from a Macintosh® ...176 Accessing the scanner ...176 Scanning an image into your Macintosh...

Software Users Manual - English
Page 8
... FTP Manual Method...237 How to set a new default for Scan to FTP 238 Entering Text ...240 For MFC-5890CN and MFC-6490CW 240 For MFC-6890CDW...241 13 Remote Setup & PhotoCapture Center® 242 Remote Setup (Not available for DCP models, MFC-250C and MFC-290C 242 PhotoCapture Center®...244 For USB cable users ...244...
... FTP Manual Method...237 How to set a new default for Scan to FTP 238 Entering Text ...240 For MFC-5890CN and MFC-6490CW 240 For MFC-6890CDW...241 13 Remote Setup & PhotoCapture Center® 242 Remote Setup (Not available for DCP models, MFC-250C and MFC-290C 242 PhotoCapture Center®...244 For USB cable users ...244...

Software Users Manual - English
Page 9
Section I Windows® Printing Scanning ControlCenter3 Network Scanning (For models with built-in network support) Remote Setup (Not available for DCP models, MFC-250C and MFC-290C) Brother PC-FAX Software (MFC models only) PhotoCapture Center® Firewall settings (For Network users) I 2 37 69 96 127 129 148 151
Section I Windows® Printing Scanning ControlCenter3 Network Scanning (For models with built-in network support) Remote Setup (Not available for DCP models, MFC-250C and MFC-290C) Brother PC-FAX Software (MFC models only) PhotoCapture Center® Firewall settings (For Network users) I 2 37 69 96 127 129 148 151
Software Users Manual - English
Page 10
.... • If your machine communicate with the machine. Ethernet The Ethernet interface lets your PC. Using the Brother printer driver 1 A printer driver translates the data from Windows® XP. Install those drivers by a firewall... Firewall. This feature is protected by following the Quick Setup Guide. Low Running Cost Whenever a particular ink color requires replacement, you may vary depending on a network. You can be understood by the printer/multi-function ...on your PC may need to network print, network scan or PC Fax, you only have already been made.
.... • If your machine communicate with the machine. Ethernet The Ethernet interface lets your PC. Using the Brother printer driver 1 A printer driver translates the data from Windows® XP. Install those drivers by a firewall... Firewall. This feature is protected by following the Quick Setup Guide. Low Running Cost Whenever a particular ink color requires replacement, you may vary depending on a network. You can be understood by the printer/multi-function ...on your PC may need to network print, network scan or PC Fax, you only have already been made.

Software Users Manual - English
Page 11
... from the memory 1 If the LCD shows Data Remaining, you can print from your computer while sending or receiving a fax in memory, or while scanning a document into the computer. However, when the machine is copying or receiving a fax on the control panel. 3 Fax sending will not be stopped... during PC printing. Printing Choosing the right type of paper. Simultaneous printing, scanning and faxing 1 Your machine can clear the data that is important to read About paper in the printer memory by pressing the Stop/Exit key...
... from the memory 1 If the LCD shows Data Remaining, you can print from your computer while sending or receiving a fax in memory, or while scanning a document into the computer. However, when the machine is copying or receiving a fax on the control panel. 3 Fax sending will not be stopped... during PC printing. Printing Choosing the right type of paper. Simultaneous printing, scanning and faxing 1 Your machine can clear the data that is important to read About paper in the printer memory by pressing the Stop/Exit key...

Software Users Manual - English
Page 45
For more . TWAIN drivers meet the standard universal protocol for scanning in which you can not only scan images directly into hundreds of the screen. Scanning a document using the TWAIN driver 2 The Brother MFL-Pro Suite software includes a TWAIN compliant scanner driver. Scanning a document into the PC 2 There are using Windows® Firewall and you installed...
For more . TWAIN drivers meet the standard universal protocol for scanning in which you can not only scan images directly into hundreds of the screen. Scanning a document using the TWAIN driver 2 The Brother MFL-Pro Suite software includes a TWAIN compliant scanner driver. Scanning a document into the PC 2 There are using Windows® Firewall and you installed...

Software Users Manual - English
Page 46
Scanning e Choose TW-Brother MFC-XXXX or TW-Brother MFC-XXXX LAN from the Available Scanners list. (Where XXXX is required when you can adjust the scanning area further by clicking the left mouse button and dragging it. This is your model name) f Check the Display scanner dialog box on the Scan or Get Photo panel. g Click Scan... box: „ Scan (Image Type) (1) „ Resolution (2) „ Scan Type (3) „ Brightness (4) „ Contrast (5) „ Document Size (6) i Click Start. When scanning is finished, click Cancel to return to crop an image when scanning. 38 Note After ...
Scanning e Choose TW-Brother MFC-XXXX or TW-Brother MFC-XXXX LAN from the Available Scanners list. (Where XXXX is required when you can adjust the scanning area further by clicking the left mouse button and dragging it. This is your model name) f Check the Display scanner dialog box on the Scan or Get Photo panel. g Click Scan... box: „ Scan (Image Type) (1) „ Resolution (2) „ Scan Type (3) „ Brightness (4) „ Contrast (5) „ Document Size (6) i Click Start. When scanning is finished, click Cancel to return to crop an image when scanning. 38 Note After ...
Software Users Manual - English
Page 47
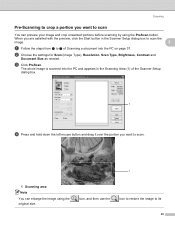
... as needed. c Click PreScan. icon, and then use the icon to restore the image to scan. 1 1 Scanning area Note You can preview your image and crop unwanted portions before scanning by using the original size. The whole image is scanned into the PC and appears in the Scanner Setup dialog box to...dialog box. 1 d Press and hold down the left mouse button and drag it over the portion you want to scan 2 You can enlarge the image using the PreScan button. Scanning Pre-Scanning to crop a portion you want to its 39 When you are satisfied with the preview, click the Start button in...
... as needed. c Click PreScan. icon, and then use the icon to restore the image to scan. 1 1 Scanning area Note You can preview your image and crop unwanted portions before scanning by using the original size. The whole image is scanned into the PC and appears in the Scanner Setup dialog box to...dialog box. 1 d Press and hold down the left mouse button and drag it over the portion you want to scan 2 You can enlarge the image using the PreScan button. Scanning Pre-Scanning to crop a portion you want to its 39 When you are satisfied with the preview, click the Start button in...
Software Users Manual - English
Page 48
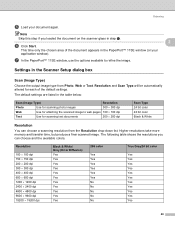
... for attaching the scanned image to refine the image. Settings in the table below: Scan (Image Type) Resolution Photo Use for scanning photo images 300 × 300 dpi Web Use for scanning text documents 200 × 200 dpi Scan Type 24 bit color 24 bit color Black & White Resolution... 2 You can choose and the available colors. Resolution 100 ×...
... for attaching the scanned image to refine the image. Settings in the table below: Scan (Image Type) Resolution Photo Use for scanning photo images 300 × 300 dpi Web Use for scanning text documents 200 × 200 dpi Scan Type 24 bit color 24 bit color Black & White Resolution... 2 You can choose and the available colors. Resolution 100 ×...
Software Users Manual - English
Page 49
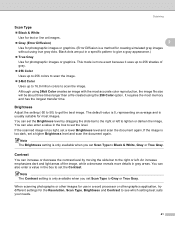
...images or graphics. (Error Diffusion is a method for creating simulated gray images without using the 256 Color option. This mode is only available when you set a higher Brightness level and scan the document again. You can increase or decrease the contrast level by dragging the slide bar to the..., while a decrease reveals more exact because it uses up to 256 shades of gray. „ 256 Color Uses up to 256 colors to scan the image. „ 24bit Color Uses up to 16.8 million colors to Black & White, Gray or True Gray. Note The Contrast setting is more details in gray areas....
...images or graphics. (Error Diffusion is a method for creating simulated gray images without using the 256 Color option. This mode is only available when you set a higher Brightness level and scan the document again. You can increase or decrease the contrast level by dragging the slide bar to the..., while a decrease reveals more exact because it uses up to 256 shades of gray. „ 256 Color Uses up to 256 colors to scan the image. „ 24bit Color Uses up to 16.8 million colors to Black & White, Gray or True Gray. Note The Contrast setting is more details in gray areas....
Software Users Manual - English
Page 50
Scanning Document Size 2 Choose one of the following sizes: „ A3 11.7 × 16.5 in (297 × 420 mm) (Available on 11 x 17 scanning models only) 2 „ Ledger 11 × 17 in (279.4 × 431.8 mm) (Available on 11 x 17 scanning models only) „ JIS B4 10.1 × 14.3...Letter 8 1/2 × 11 in (215.9 × 279.4 mm) „ Legal 8 1/2 × 14 in (215.9 × 355.6 mm) (Available on ADF models and 11 x 17 scanning models) „ A5 5.8 × 8.3 in (148 × 210 mm) „ Executive 7 1/4 × 10 1/2 in (184.1 × 266.7 mm) „ Business Card 3.5 ×...
Scanning Document Size 2 Choose one of the following sizes: „ A3 11.7 × 16.5 in (297 × 420 mm) (Available on 11 x 17 scanning models only) 2 „ Ledger 11 × 17 in (279.4 × 431.8 mm) (Available on 11 x 17 scanning models only) „ JIS B4 10.1 × 14.3...Letter 8 1/2 × 11 in (215.9 × 279.4 mm) „ Legal 8 1/2 × 14 in (215.9 × 355.6 mm) (Available on ADF models and 11 x 17 scanning models) „ A5 5.8 × 8.3 in (148 × 210 mm) „ Executive 7 1/4 × 10 1/2 in (184.1 × 266.7 mm) „ Business Card 3.5 ×...

Software Users Manual - English
Page 51
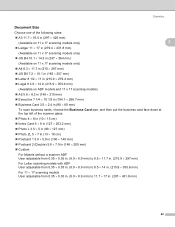
The size will vary depending on the screen. • Width: shows the width of scanning area. • Height: shows the height of scanning area. • Data Size: shows the approximate data size in Bitmap format. You can see the actual paper size you choose Custom as the unit for Width and Height. If you chose on the type of file, resolution and number of colors used. 43 Note You can choose "mm" or "inch" as the size, the Custom Document Size dialog box appears. Scanning 2 Enter the Name, Width and Height of the document.
The size will vary depending on the screen. • Width: shows the width of scanning area. • Height: shows the height of scanning area. • Data Size: shows the approximate data size in Bitmap format. You can see the actual paper size you choose Custom as the unit for Width and Height. If you chose on the type of file, resolution and number of colors used. 43 Note You can choose "mm" or "inch" as the size, the Custom Document Size dialog box appears. Scanning 2 Enter the Name, Width and Height of the document.
Software Users Manual - English
Page 52
... Windows® XP/Windows Vista® you choose TW-Brother MFC-XXXX, the TWAIN driver will vary when scanning from the Available Scanners list. (Where XXXX is your document. If you want to scan a whole page. The process will start. e Choose WIA-Brother MFC-XXXX or WIA-Brother MFC-XXXX LAN from other applications that was installed during...
... Windows® XP/Windows Vista® you choose TW-Brother MFC-XXXX, the TWAIN driver will vary when scanning from the Available Scanners list. (Where XXXX is your document. If you want to scan a whole page. The process will start. e Choose WIA-Brother MFC-XXXX or WIA-Brother MFC-XXXX LAN from other applications that was installed during...
Software Users Manual - English
Page 53
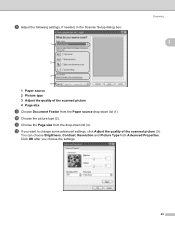
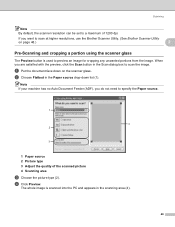
k Choose the Page size from Advanced Properties. Click OK after you want to change some advanced settings, click Adjust the quality of the scanned picture 4 Page size i Choose Document Feeder from the Paper source drop-down list (4). l If you choose the settings. 45 You can choose Brightness, Contrast, Resolution and Picture Type from the drop-down list (1). h Adjust the following settings, if needed, in the Scanner Setup dialog box: 1 Scanning 2 2 3 4 1 Paper source 2 Picture type 3 Adjust the quality of the scanned picture (3). j Choose the picture type (2).
k Choose the Page size from Advanced Properties. Click OK after you want to change some advanced settings, click Adjust the quality of the scanned picture 4 Page size i Choose Document Feeder from the Paper source drop-down list (4). l If you choose the settings. 45 You can choose Brightness, Contrast, Resolution and Picture Type from the drop-down list (1). h Adjust the following settings, if needed, in the Scanner Setup dialog box: 1 Scanning 2 2 3 4 1 Paper source 2 Picture type 3 Adjust the quality of the scanned picture (3). j Choose the picture type (2).
Software Users Manual - English
Page 54
... used to specify the Paper source. 1 4 2 3 1 Paper source 2 Picture type 3 Adjust the quality of 1200 dpi. Scanning Note By default, the scanner resolution can be set to scan at higher resolutions, use the Brother Scanner Utility. (See Brother Scanner Utility on the scanner glass. Note If your machine has no Auto Document Feeder (ADF...
... used to specify the Paper source. 1 4 2 3 1 Paper source 2 Picture type 3 Adjust the quality of 1200 dpi. Scanning Note By default, the scanner resolution can be set to scan at higher resolutions, use the Brother Scanner Utility. (See Brother Scanner Utility on the scanner glass. Note If your machine has no Auto Document Feeder (ADF...

Software Users Manual - English
Page 55
Click OK after you need to scan. g Click the Scan button in the PaperPort™ 11SE window (or your application window). 47 The machine starts scanning the document. This time only the chosen area of the scanned picture (3). Scanning 2 f If you choose settings. You can choose Brightness, Contrast, Resolution and Picture Type from Advanced Properties. e Press and hold down the left mouse button and drag it over the portion you want to access advanced settings, click Adjust the quality of the document appears in the Scan dialog box.
Click OK after you need to scan. g Click the Scan button in the PaperPort™ 11SE window (or your application window). 47 The machine starts scanning the document. This time only the chosen area of the scanned picture (3). Scanning 2 f If you choose settings. You can choose Brightness, Contrast, Resolution and Picture Type from Advanced Properties. e Press and hold down the left mouse button and drag it over the portion you want to access advanced settings, click Adjust the quality of the document appears in the Scan dialog box.


