

Users Manual - English and Spanish
Page 4
... 5 Flat bed attachment 5 USING YOUR SEWING MACHINE 6 Connecting plugs 6 Main power and sewing light switch 7 Foot controller 7 Checking the needle 7 Replacing the needle 7 Changing the presser foot 8 THE CONTROLS 9 Pattern selection dial 9 Patterns and stitch names 9 Reverse sewing lever 10 THREADING THE MACHINE ...233;s 32 OPTIONAL ACCESSORIES 33 Using the walking foot 33 Using the quilting guide 34 Using the quilting foot 34 Using the 1/4-inch quilting foot 35 Using the narrow hemmer foot 35 Using the blind stitch foot 37 6. SEWING BUTTONHOLES AND BUTTONS 27 Making a...
... 5 Flat bed attachment 5 USING YOUR SEWING MACHINE 6 Connecting plugs 6 Main power and sewing light switch 7 Foot controller 7 Checking the needle 7 Replacing the needle 7 Changing the presser foot 8 THE CONTROLS 9 Pattern selection dial 9 Patterns and stitch names 9 Reverse sewing lever 10 THREADING THE MACHINE ...233;s 32 OPTIONAL ACCESSORIES 33 Using the walking foot 33 Using the quilting guide 34 Using the quilting foot 34 Using the 1/4-inch quilting foot 35 Using the narrow hemmer foot 35 Using the blind stitch foot 37 6. SEWING BUTTONHOLES AND BUTTONS 27 Making a...

Users Manual - English and Spanish
Page 6
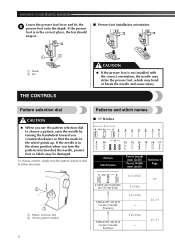
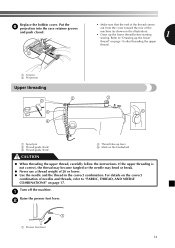
... lever to stitch in the reverse direction. 0 Pattern selection dial (Page 9) Rotate the dial in either direction to raise and lower the presser foot. E Presser foot lever (Page 14) Used to choose the stitch you want. B Buttonhole fine-adjustment screw (Page 28) C Main power and sewing light...Page 15) 6 Thread cutter (Page 19) Pass the threads through the thread cutter to cut them. 7 Flat bed attachment with accessory compartment (Page 5) 8 Presser foot (Page 8) 9 Reverse sewing lever (Page 10) Push this to control the sewing speed, and to 1 open it. 1 2 1 Flat bed attachment 2 ...
... lever to stitch in the reverse direction. 0 Pattern selection dial (Page 9) Rotate the dial in either direction to raise and lower the presser foot. E Presser foot lever (Page 14) Used to choose the stitch you want. B Buttonhole fine-adjustment screw (Page 28) C Main power and sewing light...Page 15) 6 Thread cutter (Page 19) Pass the threads through the thread cutter to cut them. 7 Flat bed attachment with accessory compartment (Page 5) 8 Presser foot (Page 8) 9 Reverse sewing lever (Page 10) Push this to control the sewing speed, and to 1 open it. 1 2 1 Flat bed attachment 2 ...

Users Manual - English and Spanish
Page 8
...cloth and dust to build up . Other needles may occur if the foot controller is placed on the machine rating plate. Check the needle from the top and the sides. Lower the presser foot lever. 3 1 1 Presser foot lever 7 Checking the needle The sewing needle must always be used on... the foot controller. only) ● Foot Controller: Model KD-1902 This foot controller can be straight and sharp for home use sewing machine ...
...cloth and dust to build up . Other needles may occur if the foot controller is placed on the machine rating plate. Check the needle from the top and the sides. Lower the presser foot lever. 3 1 1 Presser foot lever 7 Checking the needle The sewing needle must always be used on... the foot controller. only) ● Foot Controller: Model KD-1902 This foot controller can be straight and sharp for home use sewing machine ...

Users Manual - English and Spanish
Page 9
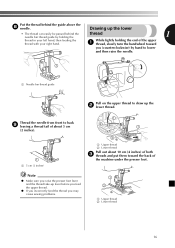
... stopper 3 Needle Install the twin needle in the same way. 1 2 3 1 Black button 2 Presser foot holder 3 Presser foot Put a different presser foot on the needle 4 plate so that the bar on the presser foot is in the needle plate. screwdriver, otherwise the needle may break or the machine may cause accident or... the shank. 8 With the flat side of the sewing machine may cause injury. ● Only use the wrong presser foot, the needle may strike the presser foot and bend or break, and may be damaged. ● Always turn the needle clamp screw counterclockwise to be injured....
... stopper 3 Needle Install the twin needle in the same way. 1 2 3 1 Black button 2 Presser foot holder 3 Presser foot Put a different presser foot on the needle 4 plate so that the bar on the presser foot is in the needle plate. screwdriver, otherwise the needle may break or the machine may cause accident or... the shank. 8 With the flat side of the sewing machine may cause injury. ● Only use the wrong presser foot, the needle may strike the presser foot and bend or break, and may be damaged. ● Always turn the needle clamp screw counterclockwise to be injured....
Users Manual - English and Spanish
Page 10
... needle and cause injury. KNOWING YOUR SEWING MACHINE Lower the presser foot lever and fix the 5 presser foot onto the shank. If the presser foot is in the correct place, the bar should snap in. ■ Presser foot installation orientation 1 2 1 Shank 2 Bar THE CONTROLS CAUTION ● If the presser foot is in either direction. 2 1 1 Pattern selection dial 2 Chosen pattern number...
... needle and cause injury. KNOWING YOUR SEWING MACHINE Lower the presser foot lever and fix the 5 presser foot onto the shank. If the presser foot is in the correct place, the bar should snap in. ■ Presser foot installation orientation 1 2 1 Shank 2 Bar THE CONTROLS CAUTION ● If the presser foot is in either direction. 2 1 1 Pattern selection dial 2 Chosen pattern number...

Users Manual - English and Spanish
Page 14
... wrong direction, it may cause incorrect thread tension. 1 1 1 Tension-adjusting spring 1 Bobbin cover 13 If you accidentally step on the foot controller and the machine starts to sew, you turn off the machine while threading. Prepare the bobbin wound properly 1 before threading the lower ...be injured. CAUTION ● Make sure you . Remove the bobbin cover by sliding it and 3 lift toward you (counterclockwise) and raise the presser foot lever. If the thread unrolls in the right direction. Raise the needle by the arrow. 1 2 1 Wound evenly 2 Wound poorly Lower threading...
... wrong direction, it may cause incorrect thread tension. 1 1 1 Tension-adjusting spring 1 Bobbin cover 13 If you accidentally step on the foot controller and the machine starts to sew, you turn off the machine while threading. Prepare the bobbin wound properly 1 before threading the lower ...be injured. CAUTION ● Make sure you . Remove the bobbin cover by sliding it and 3 lift toward you (counterclockwise) and raise the presser foot lever. If the thread unrolls in the right direction. Raise the needle by the arrow. 1 2 1 Wound evenly 2 Wound poorly Lower threading...
Users Manual - English and Spanish
Page 15
... lower. ● Use the needle and the thread in the illustration). • Draw up lever 5 Mark on page 17. Turn off the machine. 1 Raise the presser foot lever. 2 1 1 Presser foot lever 14 Refer to "FABRIC, THREAD, AND NEEDLE COMBINATIONS" on the handwheel CAUTION ● When threading the upper thread, carefully follow the instructions.
... lower. ● Use the needle and the thread in the illustration). • Draw up lever 5 Mark on page 17. Turn off the machine. 1 Raise the presser foot lever. 2 1 1 Presser foot lever 14 Refer to "FABRIC, THREAD, AND NEEDLE COMBINATIONS" on the handwheel CAUTION ● When threading the upper thread, carefully follow the instructions.
Users Manual - English and Spanish
Page 17
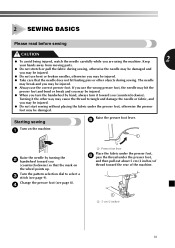
Note ● Make sure you raise the presser foot lever and the thread take-up the 2 lower thread. Drawing up the lower • The thread can easily be passed behind the guide above the 8 ... (2 inches) 1 2 1 2 1 Upper thread 2 Lower thread Pull out about 10 cm (4 inches) of both 3 threads and put them toward the back of the machine under the presser foot.
Note ● Make sure you raise the presser foot lever and the thread take-up the 2 lower thread. Drawing up the lower • The thread can easily be passed behind the guide above the 8 ... (2 inches) 1 2 1 2 1 Upper thread 2 Lower thread Pull out about 10 cm (4 inches) of both 3 threads and put them toward the back of the machine under the presser foot.
Users Manual - English and Spanish
Page 19
... dial to tangle and damage the needle or fabric, and you may be injured. ● Do not start sewing without placing the fabric under the presser foot, and then pull out about 5 cm (2 inches) of the machine. 1 1 5 cm (2 inches) 18 2 SEWING BASICS Please read before sewing CAUTION ● ...To avoid being injured, watch the needle carefully while you may be injured. ● Always use the correct presser foot. Turning it toward the rear of thread toward you (counterclockwise) so that the needle does not hit basting pins or other way may cause...
... dial to tangle and damage the needle or fabric, and you may be injured. ● Do not start sewing without placing the fabric under the presser foot, and then pull out about 5 cm (2 inches) of the machine. 1 1 5 cm (2 inches) 18 2 SEWING BASICS Please read before sewing CAUTION ● ...To avoid being injured, watch the needle carefully while you may be injured. ● Always use the correct presser foot. Turning it toward the rear of thread toward you (counterclockwise) so that the needle does not hit basting pins or other way may cause...
Users Manual - English and Spanish
Page 20
...check the thread tension and stitch length and width. b Pull the fabric to the left hand, turn the fabric, lower the presser foot lever, and then continue sewing. 1 1 Presser foot lever Slowly press down on page 10 for back tacking and reinforcing seams by turning the a handwheel toward you (counterclockwise) with... your right hand to lower the needle to change the sewing direction, and then raise the presser foot lever. CAUTION ● If fabric more than 6 mm (15/64 inch) thick is sewn or if the fabric is pushed with too much...
...check the thread tension and stitch length and width. b Pull the fabric to the left hand, turn the fabric, lower the presser foot lever, and then continue sewing. 1 1 Presser foot lever Slowly press down on page 10 for back tacking and reinforcing seams by turning the a handwheel toward you (counterclockwise) with... your right hand to lower the needle to change the sewing direction, and then raise the presser foot lever. CAUTION ● If fabric more than 6 mm (15/64 inch) thick is sewn or if the fabric is pushed with too much...
Users Manual - English and Spanish
Page 21
..., and then sew without stretching the fabric. The needle could break and damage the machine. ● Make sure that the needle does not strike the presser foot. ● Do not sew with free-arm sewing, install the flat bed attachment back in the same way as cuffs and pant legs, or hardto...
..., and then sew without stretching the fabric. The needle could break and damage the machine. ● Make sure that the needle does not strike the presser foot. ● Do not sew with free-arm sewing, install the flat bed attachment back in the same way as cuffs and pant legs, or hardto...
Users Manual - English and Spanish
Page 22
... needle bar thread guide 2 Right needle thread passes in the same way that you (counterclockwise) and check that the needle does not touch the presser foot. Do not use the twin needle with the Straight Stitch (Center Needle Position) and the Zigzag Stitch (1.5 mm (1/16 inch) width). If ...the needle hits the presser foot, the needle may be used with any other stitches. 1 Left needle thread passes through the eye of the bobbin winder shaft. SEWING BASICS ■...
... needle bar thread guide 2 Right needle thread passes in the same way that you (counterclockwise) and check that the needle does not touch the presser foot. Do not use the twin needle with the Straight Stitch (Center Needle Position) and the Zigzag Stitch (1.5 mm (1/16 inch) width). If ...the needle hits the presser foot, the needle may be used with any other stitches. 1 Left needle thread passes through the eye of the bobbin winder shaft. SEWING BASICS ■...
Users Manual - English and Spanish
Page 23
... ● If the upper thread was incorrectly threaded, the upper thread may be sure to raise the needle from the fabric, and then raise the presser foot lever and turn the fabric. Otherwise the needle may break or the machine may need to adjust it when you start to sew. ■ Correct...
... ● If the upper thread was incorrectly threaded, the upper thread may be sure to raise the needle from the fabric, and then raise the presser foot lever and turn the fabric. Otherwise the needle may break or the machine may need to adjust it when you start to sew. ■ Correct...
Users Manual - English and Spanish
Page 26
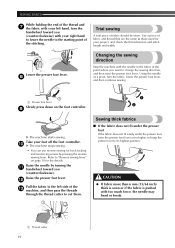
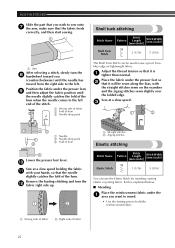
... speed. 3 1 2 1 23 1 2 1 Needle 2 Needle drop point 3 Fold of hem 1 Straight stitches 2 Zigzag stitches Elastic stitching 3 Lower the presser foot lever. 0 Sew at a slow speed holding the fabric a with the straight stitches sewn on lightweight fabric. BUILT-IN STITCHES Slide the part that you wish... be sewn along the bias, with your hands, so that it is explained below. ■ Mending Place the reinforcement fabric under the presser foot, 9 and then adjust the fabric position until the needle has moved from the right side to hold the reinforcement fabric. 1 Wrong side...
... speed. 3 1 2 1 23 1 2 1 Needle 2 Needle drop point 3 Fold of hem 1 Straight stitches 2 Zigzag stitches Elastic stitching 3 Lower the presser foot lever. 0 Sew at a slow speed holding the fabric a with the straight stitches sewn on lightweight fabric. BUILT-IN STITCHES Slide the part that you wish... be sewn along the bias, with your hands, so that it is explained below. ■ Mending Place the reinforcement fabric under the presser foot, 9 and then adjust the fabric position until the needle has moved from the right side to hold the reinforcement fabric. 1 Wrong side...
Users Manual - English and Spanish
Page 27
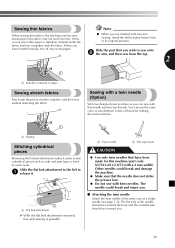
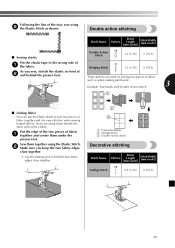
... pieces of the tear, sew using nylon thread, the stitch will not be visible. Put the edge of the two pieces of 2 and behind the presser foot. Double action stitching Stitch Name Pattern Stitch Length [mm (inch)] Stitch Width [mm (inch)] ■ Sewing elastic Double Action 16 Stitch 1.2 (1/16) 5 (3/16) Pin the... center them together using the Elastic Stitch. 2 Make sure you are used for joining two pieces of fabric, such as shown. Sew them under the presser foot.
... pieces of the tear, sew using nylon thread, the stitch will not be visible. Put the edge of the two pieces of 2 and behind the presser foot. Double action stitching Stitch Name Pattern Stitch Length [mm (inch)] Stitch Width [mm (inch)] ■ Sewing elastic Double Action 16 Stitch 1.2 (1/16) 5 (3/16) Pin the... center them together using the Elastic Stitch. 2 Make sure you are used for joining two pieces of fabric, such as shown. Sew them under the presser foot.
Users Manual - English and Spanish
Page 28
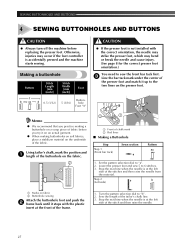
...9679; We recommend that you try it on an actual garment. ● When making a buttonhole on a scrap piece of fabric before replacing the presser foot. Using tailor's chalk, mark the position and 1 length of the buttonhole on the underside of the stitches and then raise the needle from the... material. Lower the presser foot and sew 5 to "b". 2. Sew the length of chalk mark 2 Red lines ■ Making a Buttonhole Step Step 1 (Front bar tack) Sewn section ...
...9679; We recommend that you try it on an actual garment. ● When making a buttonhole on a scrap piece of fabric before replacing the presser foot. Using tailor's chalk, mark the position and 1 length of the buttonhole on the underside of the stitches and then raise the needle from the... material. Lower the presser foot and sew 5 to "b". 2. Sew the length of chalk mark 2 Red lines ■ Making a Buttonhole Step Step 1 (Front bar tack) Sewn section ...
Users Manual - English and Spanish
Page 31
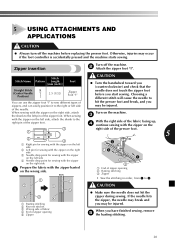
... side of the fabric facing up, 4 continue sewing with the zipper on the 3 right side of the presser foot. 1 5 2 I " to sew different types of zippers, and can use the zipper foot "I 4 1 Right pin for sewing with the zipper on the left side 2 Left pin for sewing with...the basting stitching. 30 5 USING ATTACHMENTS AND APPLICATIONS CAUTION ● Always turn off the machine. 2 Attach the zipper foot "I " needle does not touch the zipper foot before replacing the presser foot. When sewing Turn on the machine. 3 with the zipper on the right side, attach the shank to the left ...
... side of the fabric facing up, 4 continue sewing with the zipper on the 3 right side of the presser foot. 1 5 2 I " to sew different types of zippers, and can use the zipper foot "I 4 1 Right pin for sewing with the zipper on the left side 2 Left pin for sewing with...the basting stitching. 30 5 USING ATTACHMENTS AND APPLICATIONS CAUTION ● Always turn off the machine. 2 Attach the zipper foot "I " needle does not touch the zipper foot before replacing the presser foot. When sewing Turn on the machine. 3 with the zipper on the right side, attach the shank to the left ...
Users Manual - English and Spanish
Page 32
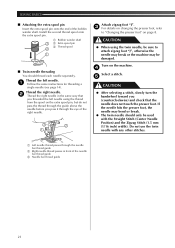
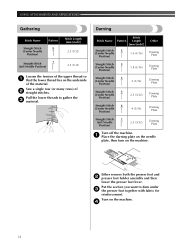
Turn on the underside of the material. Pull the lower threads to darn under 3 the presser foot together with fabric for reinforcement. Sew a single row (or many rows) of 2 straight stitches. Put the section you want to gather the 3 material. USING ATTACHMENTS ... Position) 2.5 (3/32) Darning Plate Turn off the machine. 1 Place the darning plate on the needle plate, then turn on the machine. Either remove both the presser foot and 2 presser foot holder assembly and then lower the...
Turn on the underside of the material. Pull the lower threads to darn under 3 the presser foot together with fabric for reinforcement. Sew a single row (or many rows) of 2 straight stitches. Put the section you want to gather the 3 material. USING ATTACHMENTS ... Position) 2.5 (3/32) Darning Plate Turn off the machine. 1 Place the darning plate on the needle plate, then turn on the machine. Either remove both the presser foot and 2 presser foot holder assembly and then lower the...
Users Manual - English and Spanish
Page 34
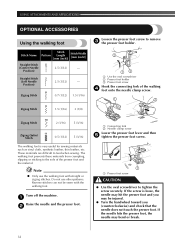
These materials are difficult to tighten the screw securely. Do not use the walking foot with the walking foot. Turn off the machine. 1 Raise the needle and the presser foot. 2 1 Connecting fork 2 Needle clamp screw Lower the presser foot lever and then 5 tighten the presser foot screw. 1 1 Presser foot screw CAUTION ● Use the oval screwdriver to feed when sewing. If...
These materials are difficult to tighten the screw securely. Do not use the walking foot with the walking foot. Turn off the machine. 1 Raise the needle and the presser foot. 2 1 Connecting fork 2 Needle clamp screw Lower the presser foot lever and then 5 tighten the presser foot screw. 1 1 Presser foot screw CAUTION ● Use the oval screwdriver to feed when sewing. If...
Users Manual - English and Spanish
Page 35
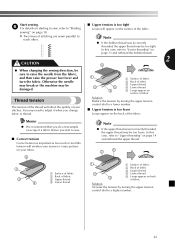
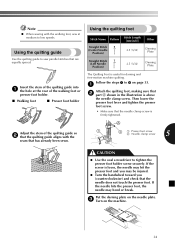
...is loose, the needle may hit the presser foot and you (counterclockwise) and check that the needle does not touch the presser foot. A Adjust the stem of the walking foot or presser foot holder. ■ Walking foot ■ Presser foot holder The Quilting Foot is above the needle clamp screw. ...Note ● When sewing with the walking foot, sew at the rear of the ...
...is loose, the needle may hit the presser foot and you (counterclockwise) and check that the needle does not touch the presser foot. A Adjust the stem of the walking foot or presser foot holder. ■ Walking foot ■ Presser foot holder The Quilting Foot is above the needle clamp screw. ...Note ● When sewing with the walking foot, sew at the rear of the ...


