Users Manual - English
Page 2
... are being administered. 8. Do not use the proper needle plate. This sewing machine is being used by the manufacturer as threading the needle, changing the needle, threading the bobbin, or changing the presser foot. 15. Return the sewing machine to break. 14. To reduce the risk of the air openings blocked.... use by pulling on the cord. Always use a bent needle. 13. Do not pull or push the fabric while stitching. "IMPORTANT SAFETY INSTRUCTIONS" When using the sewing machine, basic safety precautions should always be supervised to ensure that they do not play with this...
... are being administered. 8. Do not use the proper needle plate. This sewing machine is being used by the manufacturer as threading the needle, changing the needle, threading the bobbin, or changing the presser foot. 15. Return the sewing machine to break. 14. To reduce the risk of the air openings blocked.... use by pulling on the cord. Always use a bent needle. 13. Do not pull or push the fabric while stitching. "IMPORTANT SAFETY INSTRUCTIONS" When using the sewing machine, basic safety precautions should always be supervised to ensure that they do not play with this...
Users Manual - English
Page 39
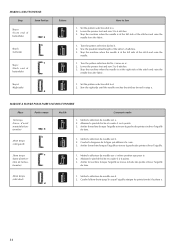
Lower the presser foot and sew 5 to a. 2. Sew the predetermined length of buttonhole) Step d (Right side) d Pattern ac c a b ac c a d How to Sew 1. Stop the machine when the needle is at the right side of the stitch and raise the needle from the fabric. 1. Arrêter la machine lorsque l'aiguille se trouve à gauche des points et relever l'aiguille...
Lower the presser foot and sew 5 to a. 2. Sew the predetermined length of buttonhole) Step d (Right side) d Pattern ac c a b ac c a d How to Sew 1. Stop the machine when the needle is at the right side of the stitch and raise the needle from the fabric. 1. Arrêter la machine lorsque l'aiguille se trouve à gauche des points et relever l'aiguille...
Users Manual - English
Page 55
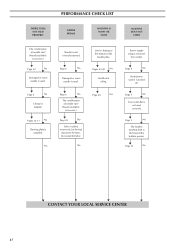
...Page 12 No M M M M CONTACT YOUR LOCAL SERVICE CENTER 47 M Pages 12-17 No M Darning plate is slid toward the bobbin presser. No Needle is incorrect. No Lint is clinging to the bottom of needle size/ thread size/fabric is used . PERFORMANCE CHECK LIST FABRIC ...MACHINE DOES NOT START The combination of needle size/ thread size/fabric is not correctly inserted. M Page 4 No M Main power switch is pulled excessively. M Page 6 No M Damaged or worn needle is not used correctly. M Page 22 No M Fabric is turned off. Do not pull the fabric. M Page 5 No M Foot...
...Page 12 No M M M M CONTACT YOUR LOCAL SERVICE CENTER 47 M Pages 12-17 No M Darning plate is slid toward the bobbin presser. No Needle is incorrect. No Lint is clinging to the bottom of needle size/ thread size/fabric is used . PERFORMANCE CHECK LIST FABRIC ...MACHINE DOES NOT START The combination of needle size/ thread size/fabric is not correctly inserted. M Page 4 No M Main power switch is pulled excessively. M Page 6 No M Damaged or worn needle is not used correctly. M Page 22 No M Fabric is turned off. Do not pull the fabric. M Page 5 No M Foot...
Quick Setup Guide - English
Page 1
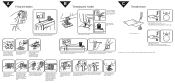
... lever. Hold the bobbin case as shown, insert the bobbin with the top opening around the bobbin winder thread guide. 2 3 4 4 Raise the presser foot lifter. 5 * Raise the thread takeup lever to its highest position and remove the bobbin case by turning the balance hand wheel. Pass the thread through... the thread guide and down the left . 6 7 8 ∗If these actions do not correct the problem, please rethread the machine using step A and B. The latch should hold the bobbin case in place. Pull the thread tail into the bobbin case groove, under the spring ...
... lever. Hold the bobbin case as shown, insert the bobbin with the top opening around the bobbin winder thread guide. 2 3 4 4 Raise the presser foot lifter. 5 * Raise the thread takeup lever to its highest position and remove the bobbin case by turning the balance hand wheel. Pass the thread through... the thread guide and down the left . 6 7 8 ∗If these actions do not correct the problem, please rethread the machine using step A and B. The latch should hold the bobbin case in place. Pull the thread tail into the bobbin case groove, under the spring ...


