

Users Manual - English
Page 1
Computerized Embroidery and Sewing Machine Operation Manual Product Code 885-V31/V33 GETTING READY SEWING BASICS UTILITY STITCHES EMBROIDERY APPENDIX
Computerized Embroidery and Sewing Machine Operation Manual Product Code 885-V31/V33 GETTING READY SEWING BASICS UTILITY STITCHES EMBROIDERY APPENDIX

Users Manual - English
Page 3
... part may injure your back or knees. 4 Always keep your machine if the power is cut. 3 Never operate this embroidery and sewing machine. In addition, after using, when cleaning, when making any adjustments mentioned in the instruction manual • To unplug the machine, switch the machine to the symbol "O" position to the nearest authorized dealer or...
... part may injure your back or knees. 4 Always keep your machine if the power is cut. 3 Never operate this embroidery and sewing machine. In addition, after using, when cleaning, when making any adjustments mentioned in the instruction manual • To unplug the machine, switch the machine to the symbol "O" position to the nearest authorized dealer or...
Users Manual - English
Page 9
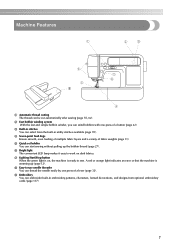
...). f Bright light The convenient LED lamp makes it easy to sew. i Embroidery You can select from the built-in embroidery patterns, characters, framed decorations, and designs from optional embroidery cards (page 117). 7 c Built-in stitches You can embroider built-in utility stitches available (page 70). Machine Features 9 a Automatic thread cutting The thread can wind bobbins...
...). f Bright light The convenient LED lamp makes it easy to sew. i Embroidery You can select from the built-in embroidery patterns, characters, framed decorations, and designs from optional embroidery cards (page 117). 7 c Built-in stitches You can embroider built-in utility stitches available (page 70). Machine Features 9 a Automatic thread cutting The thread can wind bobbins...

Users Manual - English
Page 12
...e LCD (liquid crystal display) (touch panel) (page 18) Setting for the embroidery unit. c Spool pin (page 23, 32) Place a spool of the sewing machine and their functions are described below. Names of Machine Parts and Their Functions The names of the various parts of thread on this thread ...guide cover when winding the bobbin thread and threading the machine. Before using the sewing machine, carefully read these buttons to raise and lower the presser foot . g Embroidery unit connector slot (page 123) Plug in the connector for the selected stitch or ...
...e LCD (liquid crystal display) (touch panel) (page 18) Setting for the embroidery unit. c Spool pin (page 23, 32) Place a spool of the sewing machine and their functions are described below. Names of Machine Parts and Their Functions The names of the various parts of thread on this thread ...guide cover when winding the bobbin thread and threading the machine. Before using the sewing machine, carefully read these buttons to raise and lower the presser foot . g Embroidery unit connector slot (page 123) Plug in the connector for the selected stitch or ...

Users Manual - English
Page 13
... guide disk (page 34) Pass the thread through the needle bar thread guide. a Handle Carry the sewing machine by its handle when transporting the machine. Do not cover the air vent while the sewing machine is marked with guides for the selected stitching. Needle and presser foot section Right-side/rear view a .... c Needle bar thread guide (page 34) Pass the upper thread through the thread guide disk when using the needle threader to sew one stitch. c Embroidery card slot (page 138) Insert the embroidery card. f Foot controller jack (page 52) Insert the plug on and off.
... guide disk (page 34) Pass the thread through the needle bar thread guide. a Handle Carry the sewing machine by its handle when transporting the machine. Do not cover the air vent while the sewing machine is marked with guides for the selected stitching. Needle and presser foot section Right-side/rear view a .... c Needle bar thread guide (page 34) Pass the upper thread through the thread guide disk when using the needle threader to sew one stitch. c Embroidery card slot (page 138) Insert the embroidery card. f Foot controller jack (page 52) Insert the plug on and off.

Users Manual - English
Page 15
... this key to sew embroidery. d Next page key Displays the next page when there are items that are not displayed on using the sewing machine. a LCD (liquid crystal display) (touch panel) Setting for the selected stitch or pattern and error messages appear in the LCD. Touch the keys... displayed on the LCD. For details, refer to perform operations. b Back key Press to return to get help on the LCD. into the sewing machine memory. i Sewing machine help key Press to the previous screen. e Memory key Press to set the needle stop position, the buzzer sound, and more. c Previous ...
... this key to sew embroidery. d Next page key Displays the next page when there are items that are not displayed on using the sewing machine. a LCD (liquid crystal display) (touch panel) Setting for the selected stitch or pattern and error messages appear in the LCD. Touch the keys... displayed on the LCD. For details, refer to perform operations. b Back key Press to return to get help on the LCD. into the sewing machine memory. i Sewing machine help key Press to the previous screen. e Memory key Press to set the needle stop position, the buzzer sound, and more. c Previous ...

Users Manual - English
Page 20
... utility stitch selection screen is attached. The details are displayed on the LCD (liquid crystal display) on the front of the sewing machine. z Refer to "Operation panel" (page 13). Change the screen on the LCD using the keys on the LCD. 18...displayed on the right side of stitches contained i Horizontal mirror image j Automatic thread cutting k Automatic reverse/reinforcement l Single/twin needle sewing and needle stop position Memo z A different screen is displayed when the embroidery unit is displayed. 1 l k 2 0 9 3 8 4 7 5 6 a Selected stitch b Presser foot to be ...
... utility stitch selection screen is attached. The details are displayed on the LCD (liquid crystal display) on the front of the sewing machine. z Refer to "Operation panel" (page 13). Change the screen on the LCD using the keys on the LCD. 18...displayed on the right side of stitches contained i Horizontal mirror image j Automatic thread cutting k Automatic reverse/reinforcement l Single/twin needle sewing and needle stop position Memo z A different screen is displayed when the embroidery unit is displayed. 1 l k 2 0 9 3 8 4 7 5 6 a Selected stitch b Presser foot to be ...
Users Manual - English
Page 21
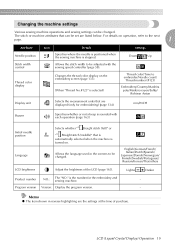
... thread color display on . Allows the language used in reverse highlighting are displayed (only for the embroidery and sewing machine. - English/German/French/ Italian/Dutch/Spanish/ Japanese/Danish/Norwegian/ Finnish/Swedish/Portuguese/ Russian/Korean/Thai...Specifies whether or not a beep is sounded with the sewing speed controller (page 58). Changing the machine settings Various sewing machine operations and sewing settings can be changed . LCD (Liquid Crystal Display) Operation 19 is selected) Embroidery/Country/Madeira poly/Madeira rayon/Sulky/ Robison Anton Display...
... thread color display on . Allows the language used in reverse highlighting are displayed (only for the embroidery and sewing machine. - English/German/French/ Italian/Dutch/Spanish/ Japanese/Danish/Norwegian/ Finnish/Swedish/Portuguese/ Russian/Korean/Thai...Specifies whether or not a beep is sounded with the sewing speed controller (page 58). Changing the machine settings Various sewing machine operations and sewing settings can be changed . LCD (Liquid Crystal Display) Operation 19 is selected) Embroidery/Country/Madeira poly/Madeira rayon/Sulky/ Robison Anton Display...

Users Manual - English
Page 23
... initial stitch screen appears again. bobbin winding / setting bobbin thread / needle replacement / embroidery unit attachment / Example: Upper threading embroidery frame attachment / embroidery foot attachment / presser foot replacement on the LCD display for the selected topic appears. a X The LCD comes on the sewing machine. c a b cd After you return to the corresponding page in this Operation Manual...
... initial stitch screen appears again. bobbin winding / setting bobbin thread / needle replacement / embroidery unit attachment / Example: Upper threading embroidery frame attachment / embroidery foot attachment / presser foot replacement on the LCD display for the selected topic appears. a X The LCD comes on the sewing machine. c a b cd After you return to the corresponding page in this Operation Manual...
Users Manual - English
Page 25
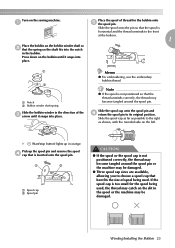
... cap onto the spool pin and f return the spool pin to the right as shown, with the rounded side on the sewing machine. Pick up in the spool or the machine may catch on the bobbin until it snaps into place. Turn on the left. X (Start/stop button) lights up the... may be damaged. ● Winding/Installing the Bobbin 23 Note z If the spool is inserted onto the spool pin. Memo z For embroidering, use the embroidery bobbin thread. Slide the spool cap as far as possible to its original position. a b a Notch b Bobbin winder shaft spring Slide the bobbin winder in...
... cap onto the spool pin and f return the spool pin to the right as shown, with the rounded side on the sewing machine. Pick up in the spool or the machine may catch on the bobbin until it snaps into place. Turn on the left. X (Start/stop button) lights up the... may be damaged. ● Winding/Installing the Bobbin 23 Note z If the spool is inserted onto the spool pin. Memo z For embroidering, use the embroidery bobbin thread. Slide the spool cap as far as possible to its original position. a b a Notch b Bobbin winder shaft spring Slide the bobbin winder in...
Users Manual - English
Page 42
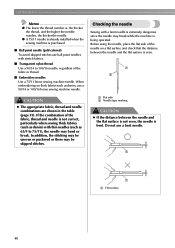
...or thread. ■ Embroidery needles Use a 75/11 home sewing machine needle. In addition, the stitching may be uneven or puckered or there may bend or break. Do not use ball point needles with a bent needle is extremely dangerous since the needle may break while the machine is , the thicker...; Transparent nylon thread Use a 90/14 to 75/11), the needle may be skipped stitches. z A 75/11 needle is already installed when the sewing machine is purchased. ■ Ball point needle (gold colored) To avoid skipped stitches use a bent needle. GETTING READY Memo z The lower the thread number...
...or thread. ■ Embroidery needles Use a 75/11 home sewing machine needle. In addition, the stitching may be uneven or puckered or there may bend or break. Do not use ball point needles with a bent needle is extremely dangerous since the needle may break while the machine is , the thicker...; Transparent nylon thread Use a 90/14 to 75/11), the needle may be skipped stitches. z A 75/11 needle is already installed when the sewing machine is purchased. ■ Ball point needle (gold colored) To avoid skipped stitches use a bent needle. GETTING READY Memo z The lower the thread number...
Users Manual - English
Page 45
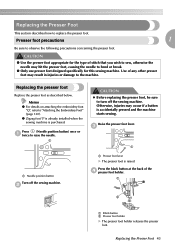
... below. Memo z For details on attaching the embroidery foot "Q", refer to replace the presser foot. a CAUTION z Before replacing the presser foot, be sure to turn off the sewing machine. c a a Needle position button Turn off the sewing machine. Replacing the Presser Foot 43 Presser foot precautions... use presser feet designed specifically for this sewing machine. Use of the d presser foot holder. Otherwise, injuries may occur if a button is raised. b a Presser foot lever X The presser foot is accidentally pressed and the machine starts sewing. Press the black button at the back...
... below. Memo z For details on attaching the embroidery foot "Q", refer to replace the presser foot. a CAUTION z Before replacing the presser foot, be sure to turn off the sewing machine. c a a Needle position button Turn off the sewing machine. Replacing the Presser Foot 43 Presser foot precautions... use presser feet designed specifically for this sewing machine. Use of the d presser foot holder. Otherwise, injuries may occur if a button is raised. b a Presser foot lever X The presser foot is accidentally pressed and the machine starts sewing. Press the black button at the back...
Users Manual - English
Page 47
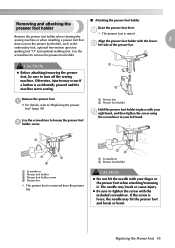
..., be sure to loosen the presser foot b holder screw. If the screw is loose, the needle may occur if a button is accidentally pressed and the machine starts sewing. embroidery foot, optional free-motion open toe quilting foot "O" and optional walking foot. a Presser bar b Presser foot holder Hold the presser foot holder in your...
..., be sure to loosen the presser foot b holder screw. If the screw is loose, the needle may occur if a button is accidentally pressed and the machine starts sewing. embroidery foot, optional free-motion open toe quilting foot "O" and optional walking foot. a Presser bar b Presser foot holder Hold the presser foot holder in your...
Users Manual - English
Page 120
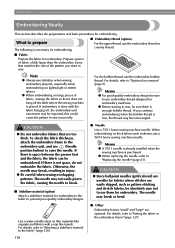
...; Since ball point needles (gold colored) are needles for embroidery machines. If embroidery is necessary for embroidering. ■ Embroidery thread (option) For the upper thread, use a 90/14 home sewing machine needle. If you want to prevent poor quality embroidery designs. The needle may break or bend. ■ Other Embroidery frames "small" and "large" are easily skipped, such...
...; Since ball point needles (gold colored) are needles for embroidery machines. If embroidery is necessary for embroidering. ■ Embroidery thread (option) For the upper thread, use a 90/14 home sewing machine needle. If you want to prevent poor quality embroidery designs. The needle may break or bend. ■ Other Embroidery frames "small" and "large" are easily skipped, such...
Users Manual - English
Page 122
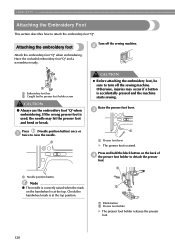
...X The presser foot is at the top position. Turn off the sewing machine. b a b a Embroidery foot bar b Caught by the presser foot holder screw CAUTION ● Always use the embroidery foot "Q" when embroidering. a CAUTION z Before attaching the embroidery foot, be sure to detach the presser foot. Raise the presser... the presser foot holder to turn off the sewing machine. Press and hold the black button on the handwheel is raised. Have the included embroidery foot "Q" and a screwdriver ready. EMBROIDERY Attaching the Embroidery Foot This section describes how to raise the ...
...X The presser foot is at the top position. Turn off the sewing machine. b a b a Embroidery foot bar b Caught by the presser foot holder screw CAUTION ● Always use the embroidery foot "Q" when embroidering. a CAUTION z Before attaching the embroidery foot, be sure to detach the presser foot. Raise the presser... the presser foot holder to turn off the sewing machine. Press and hold the black button on the handwheel is raised. Have the included embroidery foot "Q" and a screwdriver ready. EMBROIDERY Attaching the Embroidery Foot This section describes how to raise the ...
Users Manual - English
Page 126
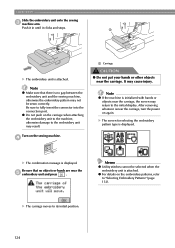
... push on again. Note z If the machine is no objects or hands are near the carriage, the screen may not be selected when the embroidery unit is attached. EMBROIDERY Slide the embroidery unit onto the sewing c machine arm. Be sure that there is initialized ...with hands or objects near the e embroidery unit and press . z For details on the sewing machine. Turn on the embroidery patterns, refer to the embroidery unit may...
... push on again. Note z If the machine is no objects or hands are near the carriage, the screen may not be selected when the embroidery unit is attached. EMBROIDERY Slide the embroidery unit onto the sewing c machine arm. Be sure that there is initialized ...with hands or objects near the e embroidery unit and press . z For details on the sewing machine. Turn on the embroidery patterns, refer to the embroidery unit may...

Accessory Catalog
Page 3
..., 1717, LS2000 series, VX1400/1500 series Innov-is the perfect multifunction machine. Brother Sewing Machine Lineup 03 Please select your machine from the extensive Brother Embroidery Library. * Brother embroidery accessories are compatible with these machines. Create 12" x 7" or 10-1/4" x 6-1/4" embroidery, edit and size designs, and make your machine in sewing and embroidery utilizing the latest innovations including USB media and touch screen technology. It...
..., 1717, LS2000 series, VX1400/1500 series Innov-is the perfect multifunction machine. Brother Sewing Machine Lineup 03 Please select your machine from the extensive Brother Embroidery Library. * Brother embroidery accessories are compatible with these machines. Create 12" x 7" or 10-1/4" x 6-1/4" embroidery, edit and size designs, and make your machine in sewing and embroidery utilizing the latest innovations including USB media and touch screen technology. It...

Accessory Catalog
Page 17
... border frame simplifies the process of items. - Expand the functionality of your Innov-is 4000D sewing and embroidery machine. * Requires additional purchases. Accepts USB mouse* to embroider 150 decorative sewing stitches within the frame. - The 4000D Premium Upgrade Package is compatible only with the Brother Innov-is 4000D by adding special features to the actual...
... border frame simplifies the process of items. - Expand the functionality of your Innov-is 4000D sewing and embroidery machine. * Requires additional purchases. Accepts USB mouse* to embroider 150 decorative sewing stitches within the frame. - The 4000D Premium Upgrade Package is compatible only with the Brother Innov-is 4000D by adding special features to the actual...

Accessory Catalog
Page 33
... 2-1/2 inches) SA411 www.brother.com Brother Embroidery Accessories 63 Free-Standing Ten Spool Thread Stand Ten Spool Thread Stand Embroidery Machine Hoops Brother Embroidery Accessories 64 For all embroidery and sewing/embroidery machines. Spend less time changing threads, and more on to your machine. For all models: SA503...(approx. 1 x 2-1/2 inches) SA442 For Innov-is 900D series, SE-350, HE-240, LB6770, Innov-is 4000D/2500D/1500D SA560 QuattroTM 6000D Embroidery Machine Hoops Select hoops appropriate for thread delivery or bobbin storage. Ten Spool Thread Stand This 10-Spool ...
... 2-1/2 inches) SA411 www.brother.com Brother Embroidery Accessories 63 Free-Standing Ten Spool Thread Stand Ten Spool Thread Stand Embroidery Machine Hoops Brother Embroidery Accessories 64 For all embroidery and sewing/embroidery machines. Spend less time changing threads, and more on to your machine. For all models: SA503...(approx. 1 x 2-1/2 inches) SA442 For Innov-is 900D series, SE-350, HE-240, LB6770, Innov-is 4000D/2500D/1500D SA560 QuattroTM 6000D Embroidery Machine Hoops Select hoops appropriate for thread delivery or bobbin storage. Ten Spool Thread Stand This 10-Spool ...

Accessory Catalog
Page 34
... Thread Pack) Attention all embroiderers, Quilters and Heirloom stitchers! Individual colors are also available (sold in a fun assortment of colors specifically designed for Brother Embroidery machines, but compatible with other sewing and embroidery machine brands. Available in a 5-pack sleeve). 300 meters (328 yards) of a special and sophisticated look with straight, zig zag or decorative stitches. Made...
... Thread Pack) Attention all embroiderers, Quilters and Heirloom stitchers! Individual colors are also available (sold in a fun assortment of colors specifically designed for Brother Embroidery machines, but compatible with other sewing and embroidery machine brands. Available in a 5-pack sleeve). 300 meters (328 yards) of a special and sophisticated look with straight, zig zag or decorative stitches. Made...


