
Users Manual - English
Page 4
...the needle to break. • Do not push or pull the fabric when sewing, and follow the troubleshooting table in the manual. If the problem persists, please consult your local authorized Brother dealer. Use accessories recommended by or near children. • The plastic bag that this sewing machine was... this machine only for its intended use as described in the back of . For additional product information and updates, visit our web site at www.brother.com 2 Do not use the machine near a space heater, iron, halogen lamp, or other parts to assure correct installation. 8 For repair or ...
...the needle to break. • Do not push or pull the fabric when sewing, and follow the troubleshooting table in the manual. If the problem persists, please consult your local authorized Brother dealer. Use accessories recommended by or near children. • The plastic bag that this sewing machine was... this machine only for its intended use as described in the back of . For additional product information and updates, visit our web site at www.brother.com 2 Do not use the machine near a space heater, iron, halogen lamp, or other parts to assure correct installation. 8 For repair or ...

Users Manual - English
Page 8
... through a design...148 Stopping while embroidering ...148 Saving patterns...150 APPENDIX 151 Care and Maintenance ...152 Cleaning the machine surface ...152 Cleaning the race ...152 Troubleshooting ...154 Error messages ...159 Adjusting the LCD ...163 Operation beep...163 Index ...165 6
... through a design...148 Stopping while embroidering ...148 Saving patterns...150 APPENDIX 151 Care and Maintenance ...152 Cleaning the machine surface ...152 Cleaning the race ...152 Troubleshooting ...154 Error messages ...159 Adjusting the LCD ...163 Operation beep...163 Index ...165 6

Users Manual - English
Page 153
5 APPENDIX The various maintenance and troubleshooting procedures are described in this chapter. Care and Maintenance 152 Troubleshooting ...154 Index ...165
5 APPENDIX The various maintenance and troubleshooting procedures are described in this chapter. Care and Maintenance 152 Troubleshooting ...154 Index ...165
Users Manual - English
Page 156
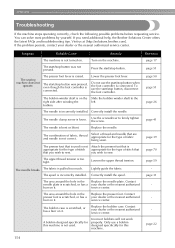
...of fabric being sewn. A bobbin designed specifically for this machine. APPENDIX Troubleshooting If the machine stops operating correctly, check the following possible problems before requesting service. Visit us at [http://solutions.brother.com]. The presser foot lever is bent or blunt. The needle is...specifically for this machine is not used is not Attach the presser foot that you need additional help, the Brother Solutions Center offers the latest FAQs and troubleshooting tips. The start /stop button was not pressed. Lower the presser foot lever. Do not use the start...
...of fabric being sewn. A bobbin designed specifically for this machine. APPENDIX Troubleshooting If the machine stops operating correctly, check the following possible problems before requesting service. Visit us at [http://solutions.brother.com]. The presser foot lever is bent or blunt. The needle is...specifically for this machine is not used is not Attach the presser foot that you need additional help, the Brother Solutions Center offers the latest FAQs and troubleshooting tips. The start /stop button was not pressed. Lower the presser foot lever. Do not use the start...

Users Manual - English
Page 157
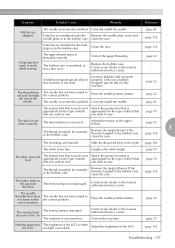
... upper thread was not wound onto the bobbin correctly. page 32 The upper thread was pulled off around the hole in the thread. page 152 Troubleshooting 155 page 41 The area around the bobbin five or six times clockwise. Replace the bobbin case. Remove any knots or tangles. - Only use a bobbin...
... upper thread was not wound onto the bobbin correctly. page 32 The upper thread was pulled off around the hole in the thread. page 152 Troubleshooting 155 page 41 The area around the bobbin five or six times clockwise. Replace the bobbin case. Remove any knots or tangles. - Only use a bobbin...
Users Manual - English
Page 159
... is tangled, for the type of stitch that you wish to the right. does not come on the machine. The machine is damaged. page 163 Troubleshooting 157 Symptom Probable Cause Remedy Reference Stitches are lowered. Press the needle position button. clean the race. page 59 The fabric does not feed. page...
... is tangled, for the type of stitch that you wish to the right. does not come on the machine. The machine is damaged. page 163 Troubleshooting 157 Symptom Probable Cause Remedy Reference Stitches are lowered. Press the needle position button. clean the race. page 59 The fabric does not feed. page...

Users Manual - English
Page 161
... was pushed at a LCD screen other than the sewing LCD screen. If you press or do the operation correctly while the error message is displayed. Troubleshooting 159 You have selected a pattern for which the stitch width control cannot be wrong or the needle may break and cause injury. 6 The machine is...
... was pushed at a LCD screen other than the sewing LCD screen. If you press or do the operation correctly while the error message is displayed. Troubleshooting 159 You have selected a pattern for which the stitch width control cannot be wrong or the needle may break and cause injury. 6 The machine is...

Users Manual - English
Page 163
Troubleshooting 161 The reverse/reinforcement stitch button, needle position button or 18 thread cutter button was pressed while the bobbin winder shaft is moved to the ...
Troubleshooting 161 The reverse/reinforcement stitch button, needle position button or 18 thread cutter button was pressed while the bobbin winder shaft is moved to the ...

Users Manual - English
Page 165
... beep. Turn on . Operation beep Each time a key is tangled The sewing machine beeps for the cause of the b operation panel keys except (Setting key). Troubleshooting 163 Press c or . Press b panel. (Setting key) in the LCD when the sewing machine is turned on d again. Adjusting the LCD If nothing appears in...
... beep. Turn on . Operation beep Each time a key is tangled The sewing machine beeps for the cause of the b operation panel keys except (Setting key). Troubleshooting 163 Press c or . Press b panel. (Setting key) in the LCD when the sewing machine is turned on d again. Adjusting the LCD If nothing appears in...

Users Manual - English
Page 169
... 31 threading bobbin 22 5 threading needle 31 threading needle manually 36 tips 65 touch panel 13 trial sewing 65 triple stretch stitch 78, 95, 103 troubleshooting 154 turning machine on/off 16 twin needle 9 twin needle sewing 36 U upper thread 31 upper thread spool 31 upper thread tension 59, 145 Upper...
... 31 threading bobbin 22 5 threading needle 31 threading needle manually 36 tips 65 touch panel 13 trial sewing 65 triple stretch stitch 78, 95, 103 troubleshooting 154 turning machine on/off 16 twin needle 9 twin needle sewing 36 U upper thread 31 upper thread spool 31 upper thread tension 59, 145 Upper...


