

Accessory Catalog
Page 7
... presser foot can be used with the Straight Stitch Needle Plate to the center straight stitching position on edges of fabrics. SA160 ABCDEFGHJKLMNO Straight Stitch Foot Straight Stitch Foot and Straight Stitch Needle Plate Vertical Stitching Alignment Foot Brother General Sewing Accessories 12 Straight Stitch Foot For precise straight stitching on thin fabrics or on selected machines. To sew a curve, sew so that the fabric edge becomes a right angle against the seam guide. 3. Select straight, zigzag, or decorative stitches. 2. Make a cut edge like a serger or overlock. Installing...
... presser foot can be used with the Straight Stitch Needle Plate to the center straight stitching position on edges of fabrics. SA160 ABCDEFGHJKLMNO Straight Stitch Foot Straight Stitch Foot and Straight Stitch Needle Plate Vertical Stitching Alignment Foot Brother General Sewing Accessories 12 Straight Stitch Foot For precise straight stitching on thin fabrics or on selected machines. To sew a curve, sew so that the fabric edge becomes a right angle against the seam guide. 3. Select straight, zigzag, or decorative stitches. 2. Make a cut edge like a serger or overlock. Installing...

Accessory Catalog
Page 11
...the presser foot and insert a braid through the guide before attaching the presser foot on the presser foot over the desired seams or pattern markings. 3. Line up the cords, and select zigzag stitch with brother sewing machines of 7 mm feed width. 1. SA157 ABCDEFJKMN Cording Foot (7-hole) Used for embellishing 1 to use single cord, use sewing machines Clear-view Foot Use this presser foot where visibility of the braid. 6. Perfect for quilting appliqué! 1. Sew. Place cord under the presser foot, and select zigzag stitch with maximum stitch width. Insert cords or threads into...
...the presser foot and insert a braid through the guide before attaching the presser foot on the presser foot over the desired seams or pattern markings. 3. Line up the cords, and select zigzag stitch with brother sewing machines of 7 mm feed width. 1. SA157 ABCDEFJKMN Cording Foot (7-hole) Used for embellishing 1 to use single cord, use sewing machines Clear-view Foot Use this presser foot where visibility of the braid. 6. Perfect for quilting appliqué! 1. Sew. Place cord under the presser foot, and select zigzag stitch with maximum stitch width. Insert cords or threads into...

Accessory Catalog
Page 13
... presser foot does not include the bobbin cover. The ruffling blade on lightweight fabric. Brother Embellishment Feet 23 Bed Runner & Pillowcase Innov-is Project Book (See pages 16 and 17 for most consistent results. Sew slowly for details.) Brother Embellishment Feet Pin Tuck Foot 24 Ruffler Foot Pin Tuck Foot This presser foot has 7 grooves and produces perfect pin tucks and corded pin tucks using a twin needle on the lower portion of stitch length, tuck setting and depth setting...
... presser foot does not include the bobbin cover. The ruffling blade on lightweight fabric. Brother Embellishment Feet 23 Bed Runner & Pillowcase Innov-is Project Book (See pages 16 and 17 for most consistent results. Sew slowly for details.) Brother Embellishment Feet Pin Tuck Foot 24 Ruffler Foot Pin Tuck Foot This presser foot has 7 grooves and produces perfect pin tucks and corded pin tucks using a twin needle on the lower portion of stitch length, tuck setting and depth setting...

Accessory Catalog
Page 15
... GHO SA169 I Open Toe Walking Foot SA188 ABCDEFJKMN www.brother.com When quilting is needed. 1. Use both hands are created. 1. Begin to sew moving the fabric at the same pace as the machine's lower feed dogs to guide the fabric. 4. Set the machine to the quilt top. 7. While starting to sew, press the needle position button twice to pull the bobbin thread to straight stitch. 3. Gently holding the upper and bobbin threads sew about four locking stitches and finish the thread ends. Sew. Use for ULT...
... GHO SA169 I Open Toe Walking Foot SA188 ABCDEFJKMN www.brother.com When quilting is needed. 1. Use both hands are created. 1. Begin to sew moving the fabric at the same pace as the machine's lower feed dogs to guide the fabric. 4. Set the machine to the quilt top. 7. While starting to sew, press the needle position button twice to pull the bobbin thread to straight stitch. 3. Gently holding the upper and bobbin threads sew about four locking stitches and finish the thread ends. Sew. Use for ULT...

Accessory Catalog
Page 17
... borders. The 4000D Premium Upgrade Package is compatible only with the new Appliqué Creator Function. - Brother Embroidery Accessories 31 QuattroTM 6000D Embroidery Card Reader QuattroTM 6000D Border Frame Innov-is 4000D Premium Package SAECR1 Only compatible with center needle position straight stitch Open toe quilting foot "O" for greater visibility Echo quilting foot "E" for perfect echo quilting - Includes three new free-motion presser feet: Free-motion quilting foot "C" for embellishing a wide variety of embroidery designs - Add tremendous functionality to...
... borders. The 4000D Premium Upgrade Package is compatible only with the new Appliqué Creator Function. - Brother Embroidery Accessories 31 QuattroTM 6000D Embroidery Card Reader QuattroTM 6000D Border Frame Innov-is 4000D Premium Package SAECR1 Only compatible with center needle position straight stitch Open toe quilting foot "O" for greater visibility Echo quilting foot "E" for perfect echo quilting - Includes three new free-motion presser feet: Free-motion quilting foot "C" for embellishing a wide variety of embroidery designs - Add tremendous functionality to...

Accessory Catalog
Page 34
... your instruction manual for advice on the top surface of thread per spool. Brother Embroidery Accessories PacesetterTM Polyester Threads 65 Brother Country Yarn Embroidery Threads Metallic Threads For the best embroidery results, use these embroidery threads especially designed for Brother sewing and embroidering machines. 61 Color Thread Set with Wooden Rack ETKSP999 PacesetterTM Polyester Threads (61 Color Thread Set with a stabilizer. Polyester retains its color beauty and quality even in Japan for Brother® Embroidery Machines, but compatible with straight, zig zag...
... your instruction manual for advice on the top surface of thread per spool. Brother Embroidery Accessories PacesetterTM Polyester Threads 65 Brother Country Yarn Embroidery Threads Metallic Threads For the best embroidery results, use these embroidery threads especially designed for Brother sewing and embroidering machines. 61 Color Thread Set with Wooden Rack ETKSP999 PacesetterTM Polyester Threads (61 Color Thread Set with a stabilizer. Polyester retains its color beauty and quality even in Japan for Brother® Embroidery Machines, but compatible with straight, zig zag...

Accessory Catalog
Page 40
... presser foot. 2. Brother Cover Stitch Feet 77 Bias Tape Binding Set Hemming Set Bias Tape Binding Set Attaches 6 or 12 mm (approx. 1/4 to your machine for a chain stitch, the center needle. 2. Attaching 12 mm (approx. 1/2") bias tape: Use the large bias tape sliding plate with the LC1 presser foot (included with a tweezers. Insert the tab on the bias tape attachment into the guide. 4. Sew as folding them. Open the seams. 4. SA224CV SA221CV Hemming Set Finishes hems easily and quickly...
... presser foot. 2. Brother Cover Stitch Feet 77 Bias Tape Binding Set Hemming Set Bias Tape Binding Set Attaches 6 or 12 mm (approx. 1/4 to your machine for a chain stitch, the center needle. 2. Attaching 12 mm (approx. 1/2") bias tape: Use the large bias tape sliding plate with the LC1 presser foot (included with a tweezers. Insert the tab on the bias tape attachment into the guide. 4. Sew as folding them. Open the seams. 4. SA224CV SA221CV Hemming Set Finishes hems easily and quickly...
Users Manual - English
Page 11
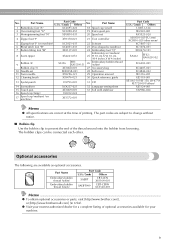
... Memo z To obtain optional accessories or parts, visit [http://www.brother.com/], or [http://www.brothermall.com] (in USA). Part Name 1 Buttonhole foot "A" 2 Overcasting foot "G" 3 Monogramming foot "N" Part Code U.S.A. / Canada Others XC2691-023 XC3098-051 XD0810-031 No. Part Name 18 Spool cap (small) 19 Extra spool pin 20 Spool net 4 Zipper foot "I" X59370-021 21 Foot controller 5 Zigzag foot "J" (on machine) 6 Blind stitch foot "R" 7 Button fitting foot "M" 8 Seam ripper 9 Bobbin (4) Bobbin clip (3) 10 Needle set 11 Twin needle 12 Cleaning brush XC3021-031 XC4051-031...
... Memo z To obtain optional accessories or parts, visit [http://www.brother.com/], or [http://www.brothermall.com] (in USA). Part Name 1 Buttonhole foot "A" 2 Overcasting foot "G" 3 Monogramming foot "N" Part Code U.S.A. / Canada Others XC2691-023 XC3098-051 XD0810-031 No. Part Name 18 Spool cap (small) 19 Extra spool pin 20 Spool net 4 Zipper foot "I" X59370-021 21 Foot controller 5 Zigzag foot "J" (on machine) 6 Blind stitch foot "R" 7 Button fitting foot "M" 8 Seam ripper 9 Bobbin (4) Bobbin clip (3) 10 Needle set 11 Twin needle 12 Cleaning brush XC3021-031 XC4051-031...
Users Manual - English
Page 12
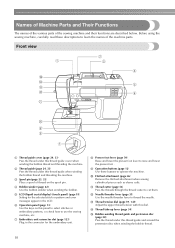
... selected stitch or pattern and error messages appear in the LCD. k Thread cutter (page 56) Pass the threads through the thread cutter to raise and lower the presser foot . m Thread tension dial (page 59, 145) Adjust the upper thread tension with this thread guide cover when winding the bobbin thread and threading the machine. Names of Machine Parts and Their Functions The names of the various parts of the machine parts. Before using the sewing machine, carefully read these buttons to thread the needle. Front view a Thread guide cover (page...
... selected stitch or pattern and error messages appear in the LCD. k Thread cutter (page 56) Pass the threads through the thread cutter to raise and lower the presser foot . m Thread tension dial (page 59, 145) Adjust the upper thread tension with this thread guide cover when winding the bobbin thread and threading the machine. Names of Machine Parts and Their Functions The names of the various parts of the machine parts. Before using the sewing machine, carefully read these buttons to thread the needle. Front view a Thread guide cover (page...
Users Manual - English
Page 13
c Needle bar thread guide (page 34) Pass the upper thread through the thread guide disk when using the needle threader to sew one stitch. i Presser foot holder (page 45) The presser foot is being used. c Embroidery card slot (page 138) Insert the embroidery card. h Drop feed lever (page 88) Use the drop feed lever to be exchanged. g Feed dogs (page 88) The feed dogs feed the fabric in the sewing direction. d Air vent The air vent allows the air surrounding the motor to lower the feed dogs. f Bobbin cover/bobbin case (page 28) Remove the bobbin cover, and then insert the bobbin ...
c Needle bar thread guide (page 34) Pass the upper thread through the thread guide disk when using the needle threader to sew one stitch. i Presser foot holder (page 45) The presser foot is being used. c Embroidery card slot (page 138) Insert the embroidery card. h Drop feed lever (page 88) Use the drop feed lever to be exchanged. g Feed dogs (page 88) The feed dogs feed the fabric in the sewing direction. d Air vent The air vent allows the air surrounding the motor to lower the feed dogs. f Bobbin cover/bobbin case (page 28) Remove the bobbin cover, and then insert the bobbin ...
Users Manual - English
Page 23
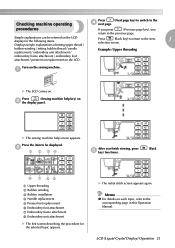
... sewing machine help key) on the LCD display for the selected topic appears. c a b cd After you return to the previous page. procedures If you press (Previous page key), you finish viewing, press e key) two times. (Back h g fe a Upper threading b Bobbin winding c Bobbin installation d Needle replacement e Presser foot replacement f Embroidery foot attachment g Embroidery frame attachment h Embroidery unit attachment X The first screen describing the procedure for the following items. Displays simple explanations of setting upper thread / Press...
... sewing machine help key) on the LCD display for the selected topic appears. c a b cd After you return to the previous page. procedures If you press (Previous page key), you finish viewing, press e key) two times. (Back h g fe a Upper threading b Bobbin winding c Bobbin installation d Needle replacement e Presser foot replacement f Embroidery foot attachment g Embroidery frame attachment h Embroidery unit attachment X The first screen describing the procedure for the following items. Displays simple explanations of setting upper thread / Press...
Users Manual - English
Page 51
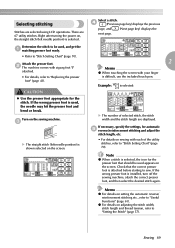
... using LCD operations. Turn on setting the automatic reverse/ reinforcement stitching etc., refer to "Replacing the presser foot" (page 43). Note z When a stitch is selected. If the wrong presser foot is attached before starting to "Stitch Setting Chart" (page 70). If necessary, specify the settings, for the stitch. Sewing 49 Select a stitch. b The machine comes with each of selected stitch, the stitch width and the stitch length are displayed. CAUTION z Use the presser foot appropriate for automatic e reverse/reinforcement stitching and adjust the stitch length...
... using LCD operations. Turn on setting the automatic reverse/ reinforcement stitching etc., refer to "Replacing the presser foot" (page 43). Note z When a stitch is selected. If the wrong presser foot is attached before starting to "Stitch Setting Chart" (page 70). If necessary, specify the settings, for the stitch. Sewing 49 Select a stitch. b The machine comes with each of selected stitch, the stitch width and the stitch length are displayed. CAUTION z Use the presser foot appropriate for automatic e reverse/reinforcement stitching and adjust the stitch length...

Users Manual - English
Page 59
... needle does not touch the presser foot. Setting the Stitch This machine is connected, the sewing speed controller can be adjusted. z Stitch settings return to "Adjusting stitch width using the sewing speed controller" (page 58). For details, refer to their defaults if they are changed . Memo z means the setting cannot be adjusted to adjust the zigzag width. If you want to save settings, refer to the left needle position or triple stretch stitch) was selected, changing the stitch width changes the needle position...
... needle does not touch the presser foot. Setting the Stitch This machine is connected, the sewing speed controller can be adjusted. z Stitch settings return to "Adjusting stitch width using the sewing speed controller" (page 58). For details, refer to their defaults if they are changed . Memo z means the setting cannot be adjusted to adjust the zigzag width. If you want to save settings, refer to the left needle position or triple stretch stitch) was selected, changing the stitch width changes the needle position...
Users Manual - English
Page 87
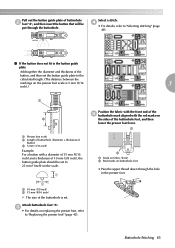
.... 1 Position the fabric with the front end of the e buttonhole mark aligned with the red marks on buttonhole foot • Pass the upper thread down through the buttonhole. Attach buttonhole foot "A". Buttonhole Stitching 85 Pull out the button guide plate of the buttonhole foot, and then lower the presser foot lever. d • For details, refer to "Replacing the presser foot" (page 43). a A b a Mark on fabric (front) b Red marks on the sides of buttonhole b foot "A", and then insert the button that...
.... 1 Position the fabric with the front end of the e buttonhole mark aligned with the red marks on buttonhole foot • Pass the upper thread down through the buttonhole. Attach buttonhole foot "A". Buttonhole Stitching 85 Pull out the button guide plate of the buttonhole foot, and then lower the presser foot lever. d • For details, refer to "Replacing the presser foot" (page 43). a A b a Mark on fabric (front) b Red marks on the sides of buttonhole b foot "A", and then insert the button that...
Users Manual - English
Page 90
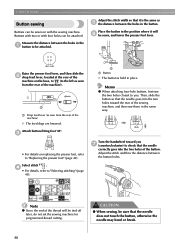
... not set the sewing machine for programmed-thread cutting. Measure the distance between the button holes. a a Drop feed lever (as seen from the rear of the machine) X The feed dogs are lowered. UTILITY STITCHES Button sewing Buttons can be attached. a a Button X The button is the same as seen from the rear of the machine). Turn the handwheel toward the rear of the machine on replacing the presser foot, refer to "Replacing the presser foot" (page 43). Buttons with two...
... not set the sewing machine for programmed-thread cutting. Measure the distance between the button holes. a a Drop feed lever (as seen from the rear of the machine) X The feed dogs are lowered. UTILITY STITCHES Button sewing Buttons can be attached. a a Button X The button is the same as seen from the rear of the machine). Turn the handwheel toward the rear of the machine on replacing the presser foot, refer to "Replacing the presser foot" (page 43). Buttons with two...
Users Manual - English
Page 104
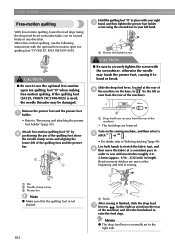
... normally set to raise the feed dogs. Hold the quilting foot "O" in place with the optional free-motion open toe quilting foot "O" when making free-motion quilting. Attach free-motion quilting foot "O" by b positioning the pin of the machine) X The feed dogs are sewn at a consistent pace in length. a Pin b Needle clamp screw c Presser bar Note z Make sure that the fabric can be damaged. Memo z The drop feed lever is finished, slide the drop feed g lever to (to the right as seen from the rear of sewing. Remove the presser foot and the presser foot a holder...
... normally set to raise the feed dogs. Hold the quilting foot "O" in place with the optional free-motion open toe quilting foot "O" when making free-motion quilting. Attach free-motion quilting foot "O" by b positioning the pin of the machine) X The feed dogs are sewn at a consistent pace in length. a Pin b Needle clamp screw c Presser bar Note z Make sure that the fabric can be damaged. Memo z The drop feed lever is finished, slide the drop feed g lever to (to the right as seen from the rear of sewing. Remove the presser foot and the presser foot a holder...
Users Manual - English
Page 156
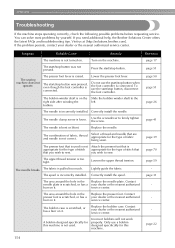
... machine. The bobbin winder shaft is connected. bobbin. Use the screwdriver to sew. The presser foot that is used is not Attach the presser foot that are appropriate for this machine is connected. Correctly install the spool. The area around the hole in the Replace the presser foot. service center. Replace the bobbin case. Only use the start /stop button was pressed, even though the foot controller is not used. Visit us at [http://solutions.brother.com]. Lightly guide the fabric. The start /stop button. Replace...
... machine. The bobbin winder shaft is connected. bobbin. Use the screwdriver to sew. The presser foot that is used is not Attach the presser foot that are appropriate for this machine is connected. Correctly install the spool. The area around the hole in the Replace the presser foot. service center. Replace the bobbin case. Only use the start /stop button was pressed, even though the foot controller is not used. Visit us at [http://solutions.brother.com]. Lightly guide the fabric. The start /stop button. Replace...
Users Manual - English
Page 159
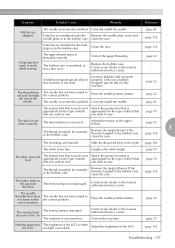
... install the needle. Clean the race. A bobbin designed specifically for this machine. Press the needle position button. you wish to sew. If the thread is tangled in the bobbin case. Slide the drop feed lever to the the correct position. Lengthen the stitch length. The presser foot that you wish to sew. correct position. The machine is either too light or too dark. The brightness of the needle. page 41 page 152 Dust has accumulated in the feed dogs...
... install the needle. Clean the race. A bobbin designed specifically for this machine. Press the needle position button. you wish to sew. If the thread is tangled in the bobbin case. Slide the drop feed lever to the the correct position. Lengthen the stitch length. The presser foot that you wish to sew. correct position. The machine is either too light or too dark. The brightness of the needle. page 41 page 152 Dust has accumulated in the feed dogs...
Users Manual - English
Page 167
...pin 9, 36 bobbin winding 22 bobbin-winding thread guide 10, 24 eyelet punch 9, 86, 108 eyelet stitching 108 button sewing 88 buttonhole lever 11 F buttonhole sewing 84 buttonhole stitching 83 fabric positioning 50 buzzer 163 fagoting 110 fagoting stitch 109 C care 152 feed dogs 11 flat bed attachment 10 foot controller 9, 52 changing sewing direction 65 foot controller jack 11 checking needle 40 frame pattern selection 137 cleaning bobbin case 152 fraying, preventing 74 cleaning brush 9 free-arm sewing 46 cleaning machine surface 152 free-motion...
...pin 9, 36 bobbin winding 22 bobbin-winding thread guide 10, 24 eyelet punch 9, 86, 108 eyelet stitching 108 button sewing 88 buttonhole lever 11 F buttonhole sewing 84 buttonhole stitching 83 fabric positioning 50 buzzer 163 fagoting 110 fagoting stitch 109 C care 152 feed dogs 11 flat bed attachment 10 foot controller 9, 52 changing sewing direction 65 foot controller jack 11 checking needle 40 frame pattern selection 137 cleaning bobbin case 152 fraying, preventing 74 cleaning brush 9 free-arm sewing 46 cleaning machine surface 152 free-motion...
Users Manual - English
Page 168
... 114 help key 13 hook-and-loop fastener 66 I installing bobbin 27 J joining 114 joining stitch 97, 109 L layout adjustment 143 LCD 18, 133 LCD button 134 LCD messages 159 LCD operation 18 M machine surface cleaning 152 main power switch 11 maintenance 152 manual needle threading 36 memory key 13 mirroring stitches 63 N needle bar thread guide 11 needle condition 40 needle plate 11 needle plate cover 11 needle plate marking 67 needle position button 12 needle position, changing 79 needle replacement 41 needle set 9 needle threader lever 10 needle threading 31 needles...
... 114 help key 13 hook-and-loop fastener 66 I installing bobbin 27 J joining 114 joining stitch 97, 109 L layout adjustment 143 LCD 18, 133 LCD button 134 LCD messages 159 LCD operation 18 M machine surface cleaning 152 main power switch 11 maintenance 152 manual needle threading 36 memory key 13 mirroring stitches 63 N needle bar thread guide 11 needle condition 40 needle plate 11 needle plate cover 11 needle plate marking 67 needle position button 12 needle position, changing 79 needle replacement 41 needle set 9 needle threader lever 10 needle threading 31 needles...


