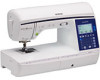
Operation Manual
Page 7
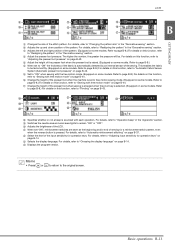
... for operation keys 14 Winding/Installing the Bobbin 15 Winding the bobbin 15 Installing the bobbin 18 Upper Threading 21 Threading the upper thread 21 Threading the needle 23 Threading the needle manually (without using the needle threader 24 Pulling up the bobbin thread 24 Using the twin needle 25 Replacing the Needle 28 Fabric/thread/needle combinations 28 Checking the needle 29 Replacing the needle 29 Replacing the Presser Foot 31 Replacing the presser foot 31 Removing and attaching the presser foot holder 32 Chapter 2 STARTING TO SEW 33 Sewing 33 Stitch selection...
... for operation keys 14 Winding/Installing the Bobbin 15 Winding the bobbin 15 Installing the bobbin 18 Upper Threading 21 Threading the upper thread 21 Threading the needle 23 Threading the needle manually (without using the needle threader 24 Pulling up the bobbin thread 24 Using the twin needle 25 Replacing the Needle 28 Fabric/thread/needle combinations 28 Checking the needle 29 Replacing the needle 29 Replacing the Presser Foot 31 Replacing the presser foot 31 Removing and attaching the presser foot holder 32 Chapter 2 STARTING TO SEW 33 Sewing 33 Stitch selection...
Operation Manual
Page 10
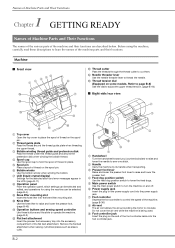
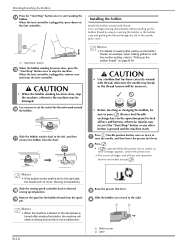
... A Operation buttons and sewing speed controller Use these descriptions to operate the machine. (page B-3) B Flat bed attachment Insert the presser foot accessory tray into the accessory compartment of the machine parts and their functions are described below. Refer to page B-8) Use the dial to adjust the upper thread tension. (page B-40) ■ Right-side/rear view a b c j l k 1 Top cover Open the top cover to place the spool of thread on the spool pin. 2 Thread guide plate Pass the thread around the thread guide plate when threading the upper thread. 3 Bobbin winding thread guide...
... A Operation buttons and sewing speed controller Use these descriptions to operate the machine. (page B-3) B Flat bed attachment Insert the presser foot accessory tray into the accessory compartment of the machine parts and their functions are described below. Refer to page B-8) Use the dial to adjust the upper thread tension. (page B-40) ■ Right-side/rear view a b c j l k 1 Top cover Open the top cover to place the spool of thread on the spool pin. 2 Thread guide plate Pass the thread around the thread guide plate when threading the upper thread. 3 Bobbin winding thread guide...
Operation Manual
Page 11
... changes color according to sew a single stitch repeatedly and tie-off when the sewing is sewing a full motif, and automatically turns off . Press this button to lower the presser foot and apply pressure to adjust the sewing speed. Basic operations B-3 Attach the appropriate presser foot for sewing straight seams. 3 Needle plate cover Remove the needle plate cover to clean the bobbin case and race. 4 Bobbin cover/bobbin case Remove the bobbin cover, and then insert the bobbin into the bobbin case. 5 Feed dogs The feed dogs feed the fabric in place. (page B-32) 9 Buttonhole lever...
... changes color according to sew a single stitch repeatedly and tie-off when the sewing is sewing a full motif, and automatically turns off . Press this button to lower the presser foot and apply pressure to adjust the sewing speed. Basic operations B-3 Attach the appropriate presser foot for sewing straight seams. 3 Needle plate cover Remove the needle plate cover to clean the bobbin case and race. 4 Bobbin cover/bobbin case Remove the bobbin cover, and then insert the bobbin into the bobbin case. 5 Feed dogs The feed dogs feed the fabric in place. (page B-32) 9 Buttonhole lever...
Operation Manual
Page 21
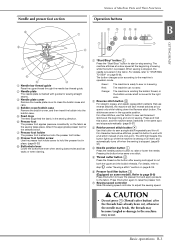
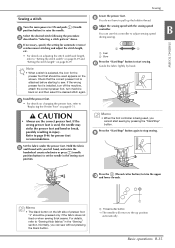
... models. A Adjusts the left and right position of the input sensitivity for a reinforcement stitch pattern, even when the reverse button is automatically detected by an internal sensor while sewing. F Change the height of the presser foot when the machine is set to "Adjusting the presser foot pressure" on page B-14. B Adjust the presser foot pressure. This enables the fabric to "Changing the pattern size" in the "Decorative sewing" section. For details, refer to be . For details, refer to free motion sewing...
... models. A Adjusts the left and right position of the input sensitivity for a reinforcement stitch pattern, even when the reverse button is automatically detected by an internal sensor while sewing. F Change the height of the presser foot when the machine is set to "Adjusting the presser foot pressure" on page B-14. B Adjust the presser foot pressure. This enables the fabric to "Changing the pattern size" in the "Decorative sewing" section. For details, refer to be . For details, refer to free motion sewing...
Operation Manual
Page 26
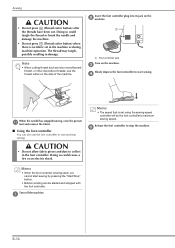
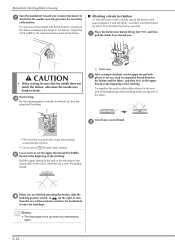
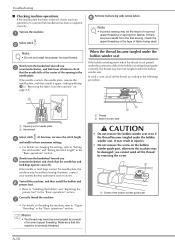
... the bobbin thread from the spool s pin. Installing the bobbin Install the bobbin wound with free motion quilting, refer to a raise the needle, and then lower the presser foot lever. Lower the presser foot. → The screen changes, and all keys and buttons, otherwise injuries may be sure to press (Presser foot/Needle exchange key) on sewing after winding the bobbin, the machine will not move. (Sewing is raised, an error message appears. Use scissors to desired r sewing speed position. Memo • If the bobbin winder...
... the bobbin thread from the spool s pin. Installing the bobbin Install the bobbin wound with free motion quilting, refer to a raise the needle, and then lower the presser foot lever. Lower the presser foot. → The screen changes, and all keys and buttons, otherwise injuries may be sure to press (Presser foot/Needle exchange key) on sewing after winding the bobbin, the machine will not move. (Sewing is raised, an error message appears. Use scissors to desired r sewing speed position. Memo • If the bobbin winder...
Operation Manual
Page 43
Hold the fabric e and thread with the sewing speed g controller. You can sew without pressing the black button. 1 1 Thread cutter button → The needle will return to the up the bobbin thread. h Guide the fabric lightly by pressing the "Start/Stop" button. If the wrong presser foot is used, the needle may strike the presser foot and bend or break, possibly resulting in the "Sewing" section. If the wrong presser foot is installed, turn off the machine, attach the correct presser foot, turn machine back...
Hold the fabric e and thread with the sewing speed g controller. You can sew without pressing the black button. 1 1 Thread cutter button → The needle will return to the up the bobbin thread. h Guide the fabric lightly by pressing the "Start/Stop" button. If the wrong presser foot is used, the needle may strike the presser foot and bend or break, possibly resulting in the "Sewing" section. If the wrong presser foot is installed, turn off the machine, attach the correct presser foot, turn machine back...
Operation Manual
Page 44
c Slowly depress the foot controller to start sewing. Memo • The speed that is being used, you cannot start sewing by pressing the "Start/Stop" button. • Bobbin winding can also use the thread cutter on the machine. a B-36 d When the needle has stopped moving, raise the presser k foot and remove the fabric. ■ Using the foot controller You can be the foot controller's maximum sewing speed. e Memo • When the foot controller is set in the machine or during machine operation. Insert the foot controller plug into...
c Slowly depress the foot controller to start sewing. Memo • The speed that is being used, you cannot start sewing by pressing the "Start/Stop" button. • Bobbin winding can also use the thread cutter on the machine. a B-36 d When the needle has stopped moving, raise the presser k foot and remove the fabric. ■ Using the foot controller You can be the foot controller's maximum sewing speed. e Memo • When the foot controller is set in the machine or during machine operation. Insert the foot controller plug into...

Operation Manual
Page 53
... to the right. Basic operations B-45 Memo • In order to sew with a sample piece of the fabric to adjust the upper thread tension. Release the knee lifter. Test with a balanced tension, it is operating, the needle may break or the machine may be damaged. CAUTION • While sewing, keep your knee away from the knee lifter. Useful Functions CAUTION • With free motion quilting, control the feeding speed of quilting fabric.
... to the right. Basic operations B-45 Memo • In order to sew with a sample piece of the fabric to adjust the upper thread tension. Release the knee lifter. Test with a balanced tension, it is operating, the needle may break or the machine may be damaged. CAUTION • While sewing, keep your knee away from the knee lifter. Useful Functions CAUTION • With free motion quilting, control the feeding speed of quilting fabric.
Operation Manual
Page 58
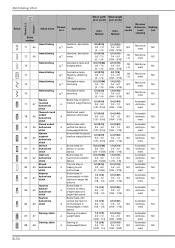
... bar tack for 7.0 (1/4) 0.5 (1/32) Automatic A reinforcement in A medium to medium weight fabrics 5.0 (3/16) 3.0 - 5.0 0.4 (1/64) 0.2 - 1.0 Automatic NO reinforce- Manual Auto. Stitch Setting Chart Stitch Model 3, 2 Model 1 Stitch number 71 55 72 56 73 - 74 - 75 - 76 - 77 57 78 58 79 59 80 60 81 61 82 62 83 63 84 64 85 65 86 66 87 67 88 68 Stitch name Presser foot Applications Stitch width Stitch length...
... bar tack for 7.0 (1/4) 0.5 (1/32) Automatic A reinforcement in A medium to medium weight fabrics 5.0 (3/16) 3.0 - 5.0 0.4 (1/64) 0.2 - 1.0 Automatic NO reinforce- Manual Auto. Stitch Setting Chart Stitch Model 3, 2 Model 1 Stitch number 71 55 72 56 73 - 74 - 75 - 76 - 77 57 78 58 79 59 80 60 81 61 82 62 83 63 84 64 85 65 86 66 87 67 88 68 Stitch name Presser foot Applications Stitch width Stitch length...
Operation Manual
Page 77
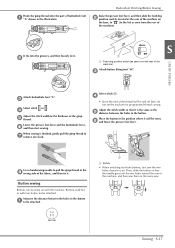
... then loosely tie it . Button sewing Buttons can be attached. c S UTILITY STITCHES Attach buttonhole foot "A". Lower the presser foot lever and the buttonhole lever, f and then start sewing. Place the button in the position where it is finished, gently pull the gimp thread to you. a 1 Button • When attaching four-hole buttons, first sew the two holes closest to g remove any slack. b a 1 Feed dog position switch (as seen from the rear of the machine) Attach button fitting foot "M". Measure the distance between the holes in...
... then loosely tie it . Button sewing Buttons can be attached. c S UTILITY STITCHES Attach buttonhole foot "A". Lower the presser foot lever and the buttonhole lever, f and then start sewing. Place the button in the position where it is finished, gently pull the gimp thread to you. a 1 Button • When attaching four-hole buttons, first sew the two holes closest to g remove any slack. b a 1 Feed dog position switch (as seen from the rear of the machine) Attach button fitting foot "M". Measure the distance between the holes in...
Operation Manual
Page 78
... the button. S-18 Place the button into the two holes of the stitching. Start sewing. c → The machine automatically stops after sewing reinforcement stitches. • Do not press (Thread cutter button). h Set the sewing speed controller to the left (so that the needle does not touch the button, otherwise the needle may bend or break. Use scissors to cut the upper thread with b plenty of excess, wind it around the thread between the button and the fabric, and...
... the button. S-18 Place the button into the two holes of the stitching. Start sewing. c → The machine automatically stops after sewing reinforcement stitches. • Do not press (Thread cutter button). h Set the sewing speed controller to the left (so that the needle does not touch the button, otherwise the needle may bend or break. Use scissors to cut the upper thread with b plenty of excess, wind it around the thread between the button and the fabric, and...
Operation Manual
Page 124
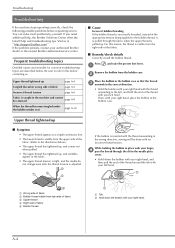
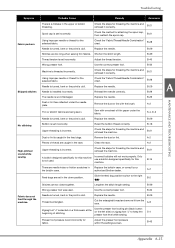
... the bobbin case. For this before requesting service. If the bobbin is inserted with the thread unwinding in the wrong direction, sewing will be removed page A-8 When the thread becomes tangled under the bobbin winder seat page A-10 ■ Cause Incorrect bobbin threading If the bobbin thread is incorrectly threaded, instead of the appropriate tension being applied to the bobbin thread, it is pulled through the slit in the needle plate cover. •...
... the bobbin case. For this before requesting service. If the bobbin is inserted with the thread unwinding in the wrong direction, sewing will be removed page A-8 When the thread becomes tangled under the bobbin winder seat page A-10 ■ Cause Incorrect bobbin threading If the bobbin thread is incorrectly threaded, instead of the appropriate tension being applied to the bobbin thread, it is pulled through the slit in the needle plate cover. •...
Operation Manual
Page 130
... their maximum settings. • For details on changing the settings, refer to "Upper Threading" in the "Basic operations" section. Turn off the thread by removing the screw. 1 1 Screw of the bobbin winder guide post A-10 you cannot wind off the machine, and then install the bobbin and f presser foot. • Refer to "Installing the bobbin" and "Replacing the presser foot" in the "Basic operations" section. Perform trial sewing with step m in the needle plate 2 Handwheel Select stitch . Slowly turn...
... their maximum settings. • For details on changing the settings, refer to "Upper Threading" in the "Basic operations" section. Turn off the thread by removing the screw. 1 1 Screw of the bobbin winder guide post A-10 you cannot wind off the machine, and then install the bobbin and f presser foot. • Refer to "Installing the bobbin" and "Replacing the presser foot" in the "Basic operations" section. Perform trial sewing with step m in the needle plate 2 Handwheel Select stitch . Slowly turn...
Operation Manual
Page 132
... the bobbin winder seat, wind the bobbin correctly. B-15 The empty bobbin was raised using the "Presser foot Press the "Presser foot lifter" button to lower lifter" button. While initially winding thread on the bobbin the bobbin thread is dull. Needle is turned, bent or the point is not properly inserted into the guides. The plug of the power cord is worn when the keys are pressed with the presser foot lever. (For models Presser foot was not set incorrectly. Adjust...
... the bobbin winder seat, wind the bobbin correctly. B-15 The empty bobbin was raised using the "Presser foot Press the "Presser foot lifter" button to lower lifter" button. While initially winding thread on the bobbin the bobbin thread is dull. Needle is turned, bent or the point is not properly inserted into the guides. The plug of the power cord is worn when the keys are pressed with the presser foot lever. (For models Presser foot was not set incorrectly. Adjust...
Operation Manual
Page 133
... Brother dealer. B-35 "Start/Stop" button was used . A-8 There are scratches on . B-21 Bobbin is set for this machine. Move the bobbin winder shaft to "ON". B-34 Presser foot is incorrect. Remove the foot controller, or use a bobbin designed specifically for the selected fabric. Use the foot controller instead of the operation keys. Do not pull the fabric during sewing. Select a pattern. B-36 The "Start/Stop" button was not pressed. Replace the needle. B-29 A bobbin designed specifically for the user. B-15 Upper threading is not lowered...
... Brother dealer. B-35 "Start/Stop" button was used . A-8 There are scratches on . B-21 Bobbin is set for this machine. Move the bobbin winder shaft to "ON". B-34 Presser foot is incorrect. Remove the foot controller, or use a bobbin designed specifically for the selected fabric. Use the foot controller instead of the operation keys. Do not pull the fabric during sewing. Select a pattern. B-36 The "Start/Stop" button was not pressed. Replace the needle. B-29 A bobbin designed specifically for the user. B-15 Upper threading is not lowered...
Operation Manual
Page 134
... used . Use scissors, etc. A-8 A bobbin designed specifically for this machine is tangled. Securely tighten the screw of the presser foot holder is incorrectly wound. B-29 Needle is too short. authorized Brother dealer. A-8 There are scratches around the opening in the upper tension. Check the "Fabric/Thread/Needle Combinations" chart. Rethread upper and lower thread. Upper thread breaks. S-4 Stitch length is installed incorrectly. The selected needle is incorrect. Replace the needle. B-31 There are scratches on the bobbin case...
... used . Use scissors, etc. A-8 A bobbin designed specifically for this machine is tangled. Securely tighten the screw of the presser foot holder is incorrectly wound. B-29 Needle is too short. authorized Brother dealer. A-8 There are scratches around the opening in the upper tension. Check the "Fabric/Thread/Needle Combinations" chart. Rethread upper and lower thread. Upper thread breaks. S-4 Stitch length is installed incorrectly. The selected needle is incorrect. Replace the needle. B-31 There are scratches on the bobbin case...
Operation Manual
Page 135
... machine. Replace the needle. Shorten the stitch length. Reset the bobbin thread correctly. Check the steps for the selected fabric. B-15 There are too close together. S-4 Presser foot pressure is not used . B-21 Dust or lint is dull. Only use a bobbin designed specifically for this machine. Stitches are needle holes or friction scratches in the race. Check the steps for the selected fabric. Incorrect bobbins will not work properly. A-2 Feed dogs are caught in the bobbin case. B-28 Needle...
... machine. Replace the needle. Shorten the stitch length. Reset the bobbin thread correctly. Check the steps for the selected fabric. B-15 There are too close together. S-4 Presser foot pressure is not used . B-21 Dust or lint is dull. Only use a bobbin designed specifically for this machine. Stitches are needle holes or friction scratches in the race. Check the steps for the selected fabric. Incorrect bobbins will not work properly. A-2 Feed dogs are caught in the bobbin case. B-28 Needle...
Operation Manual
Page 137
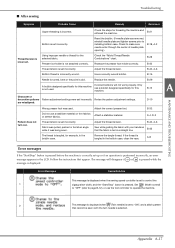
... the "Start/Stop" button is pressed before the machine is pressed. Only use a bobbin designed specifically for example, in the bobbin case, clean the race. Appendix A-17 Presser foot holder is set incorrectly. B-28 Reattach the presser foot holder correctly. B-40, A-6 Sew while guiding the fabric with the twin needle is performed incorrectly, an error message appears in a straight line. Replace the needle. B-29 B-15 Character or decorative patterns Pattern adjustment settings were set up or if an operation is selected. S-4, D-3 Adjust the thread...
... the "Start/Stop" button is pressed before the machine is pressed. Only use a bobbin designed specifically for example, in the bobbin case, clean the race. Appendix A-17 Presser foot holder is set incorrectly. B-28 Reattach the presser foot holder correctly. B-40, A-6 Sew while guiding the fabric with the twin needle is performed incorrectly, an error message appears in a straight line. Replace the needle. B-29 B-15 Character or decorative patterns Pattern adjustment settings were set up or if an operation is selected. S-4, D-3 Adjust the thread...
Operation Manual
Page 141
...Adjusting thread tension B-40 Air vent B-2 Appliqu S-26 Attaching presser foot holder B-32 Automatic fabric sensor system B-43 Automatic reinforcement stitch key B-37 Automatic thread cutting B-42 B Ball point needle B-28 Bar tack stitch S-35 , Basic sewing B-33 D-4 Basic stitching S-6 Basting stitch S-6 Beep A-20 Blind hem stitch S-8 Bobbin case B-3 bobbin case removal A-2 , Bobbin cover B-3 B-18 Bobbin installation B-18 Bobbin thread pulling up B-24 winding B-15 Bobbin winder B-2 Bobbin winding B-15 , Bobbin winding thread guide B-2 B-15 Button guide plate S-15 Button...
...Adjusting thread tension B-40 Air vent B-2 Appliqu S-26 Attaching presser foot holder B-32 Automatic fabric sensor system B-43 Automatic reinforcement stitch key B-37 Automatic thread cutting B-42 B Ball point needle B-28 Bar tack stitch S-35 , Basic sewing B-33 D-4 Basic stitching S-6 Basting stitch S-6 Beep A-20 Blind hem stitch S-8 Bobbin case B-3 bobbin case removal A-2 , Bobbin cover B-3 B-18 Bobbin installation B-18 Bobbin thread pulling up B-24 winding B-15 Bobbin winder B-2 Bobbin winding B-15 , Bobbin winding thread guide B-2 B-15 Button guide plate S-15 Button...
Operation Manual
Page 142
...33 Sewing direction change S-2 , Sewing speed controller B-3 S-34 Shell tuck stitch S-43 Side cutter S-12 Size D-6 Smocking S-42 Solving operation problems A-4 , Spool cap B-2 B-16 Spool net B-16 , Spool pin B-2 B-15, B-21 "Start/Stop" button B-3 Step stitch pattern D-7 Stippling S-26 Stitch guide foot S-3 Stitch length adjustment B-39 Stitch selection B-34 Stitch settings B-46 Stitch types B-33 Stitch width adjustment B-39 Storing patterns D-9 Straight stitch S-6 S-19, S-27 Stretch fabrics S-5 T Thick fabrics S-4 Thin fabrics S-4 , Thread cutter B-2 B-36 Thread cutter...
...33 Sewing direction change S-2 , Sewing speed controller B-3 S-34 Shell tuck stitch S-43 Side cutter S-12 Size D-6 Smocking S-42 Solving operation problems A-4 , Spool cap B-2 B-16 Spool net B-16 , Spool pin B-2 B-15, B-21 "Start/Stop" button B-3 Step stitch pattern D-7 Stippling S-26 Stitch guide foot S-3 Stitch length adjustment B-39 Stitch selection B-34 Stitch settings B-46 Stitch types B-33 Stitch width adjustment B-39 Storing patterns D-9 Straight stitch S-6 S-19, S-27 Stretch fabrics S-5 T Thick fabrics S-4 Thin fabrics S-4 , Thread cutter B-2 B-36 Thread cutter...


